How to Pin or Unpin Copilot in Windows 11


You can anchor the Copilot side panel to your desktop in Windows 11 or keep it hidden until you need it. Microsoft introduced Copilot in Windows 11 build 23493. This AI assistant (an interactive software tool that responds to natural language) accepts plain-language requests for system tasks and daily workflows.
Pin or unpin Copilot from the taskbar by right-clicking the Copilot icon and selecting “Pin to taskbar ” or “Unpin from taskbar”. This action controls whether the Copilot panel is permanently visible or hidden until activated.
On computers that have Copilot added, there is a new Copilot button will appear on the Taskbar. It opens as a flyout panel on the right side of the screen when you click the button or press Win+C.
You can ask Copilot questions or have it take actions. Examples are “Change to dark mode,” “Turn on do not disturb,” and “Take a screenshot.”
The recent Windows 11 build 25992 (Canary) added a toggle that lets you pin or unpin the Copilot side panel on the desktop for quicker access.
Pinning the panel keeps it visible on screen at all times, next to your other windows. Unpinning it returns to the standard behavior, where the panel appears only after you click the taskbar button or press the shortcut.
That gives you a choice. Pin it if you use Copilot all day, and leave it unpinned if you want the screen space back.
A note on versions: the pin toggle was introduced in a preview build, Windows 11 build 25992 in the Canary channel. Microsoft has since changed how Copilot works on Windows 11, and the layout and behavior of the panel can differ between builds. If you don't see the pin icon described below, your build most likely doesn't include the toggle.
Pin or unpin the Copilot Side Pane to the Desktop
Pinning Copilot keeps it open alongside your other windows instead of sliding away when you click elsewhere. Unpinning returns it to the normal sliding view. The steps are the same in both directions.
Here is how to do it.
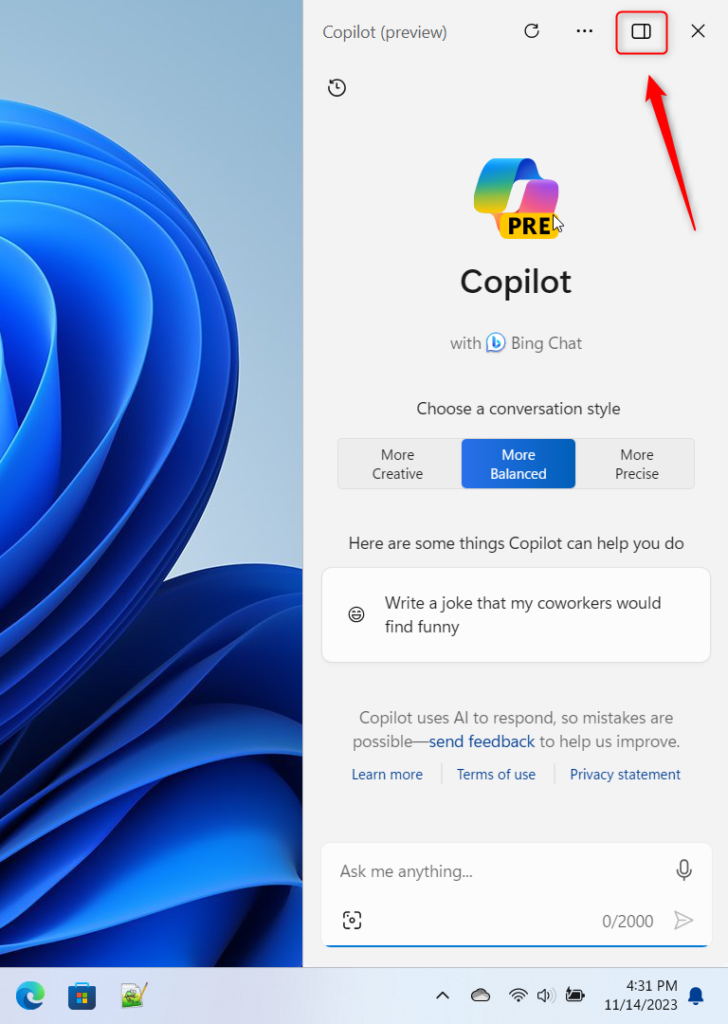
- Open the Windows Copilot on the taskbar, or press Win+C. The Copilot side panel slides in from the right edge of the screen.
- Look near the top right corner of the panel for the pin icon, and click it. The panel now stays docked on the desktop, and your other windows resize to fit beside it.
- To unpin, click the same icon again. The panel goes back to the sliding view and closes when you click away from it.
No restart or sign-out is needed. The change takes effect straight away, and you can reverse it at any time with the same icon.
If you don't see the pin icon, check these things:
- You may be on a build that doesn't have the toggle. At the time of writing it was a Canary-channel feature, and preview features can change or be removed.
- Copilot may not be available on your PC at all. It depends on your Windows build, your region, and your account.
- If the Copilot button is missing from the taskbar, the shortcut Win+C is the quickest way to try opening it.
That should do it.
Pinning the Copilot panel gives you permanent, one-click access to Microsoft's AI assistant without hunting for shortcuts. In short:
- Pinning or unpinning the Copilot side panel on the desktop in Windows 11 makes Copilot easier to reach when you want it, or out of the way when you don't.
- You can talk to the assistant in natural language to change system settings and work across several applications.
- Windows 11 build 25992 (Canary) added the toggle that controls whether the Copilot side panel stays visible on the desktop.
- The toggle gives you flexibility. You can keep Copilot docked while you work or tuck it away to free up screen space.
Have a question about this guide?
Answered by AI from this guide. Good questions may be added to this page — please don't include personal details.
Did this guide fix your problem?

About the Author
Richard
Tech Writer, IT Professional
Richard is a writer at Geek Rewind who turns complex IT tasks into clear, step-by-step guides. He draws on years of hands-on experience in system administration and enterprise IT operations, focusing on Windows, Linux and WordPress: the problems people actually run into, and the fixes that work. His server and WordPress guides come from systems he runs himself. Richard builds and maintains the platform behind Geek Rewind, from its Ubuntu servers and Nginx configuration to its custom WordPress plugins. Many new tutorials start with readers' questions, and he's always glad to answer them in the comments.
[…] Copilot is available on your device, you can pin or unpin the side pane, open Copilot when Windows starts, Turn Copilot on or off, enable or disable Copilot using […]
I dont have this button
[…] Copilot is available on your device, you can pin or unpin the side pane, open Copilot when Windows starts, Turn Copilot on or off, enable or disable Copilot using […]
[…] Copilot installed, you can enable or disable it, open Copilot when Windows starts, Pin or Unpin the Copilot side panel, Resize the Copilot side panel, delete chat history in Copilot, create a desktop shortcut, […]
[…] Copilot is available on your device, you can pin or unpin the side pane, open Copilot when Windows starts, Turn Copilot on or off, enable or disable Copilot […]
[…] on Windows, you can enable or disable it, open Copilot when Windows starts, Pin or Unpin the Copilot side panel, Resize the Copilot side panel, delete chat history in Copilot, create a desktop […]
[…] on Windows, you can enable or disable it, open Copilot when Windows starts, Pin or Unpin the Copilot side panel, Resize the Copilot side panel, delete chat history in Copilot, create a desktop […]
[…] Pin or unpin the Copilot side panel […]
[…] Pin or unpin the Copilot panel […]
[…] Copilot is installed on Windows, you can enable or disable it, open Copilot when Windows starts, Pin or Unpin the Copilot side panel, Resize the Copilot side panel, delete chat history in Copilot, create a desktop shortcut, and […]
[…] is available for many tasks, such as you can pin or unpin the side pane, open Copilot when Windows starts, Turn Copilot on or off, enable or disable Copilot using content […]