How to Disable Windows 11 Copilot


Windows 11 Copilot is an artificial intelligence chatbot built into version 23H2 and later. It sits on your taskbar , answers questions and can change some settings for you. Turning off Copilot removes its icon from your screen and stops the tool from launching when you press the Win+C shortcut.
The Windows Settings app and the Group Policy Editor can both turn this feature off. The Group Policy Editor is only included in Pro, Enterprise and Education editions. Windows 11 Home users need the Registry Editor method covered below, which works on every edition. Either way, you end up with a cleaner taskbar and more screen space.
Open Registry Editor (Win+R, type regedit), navigate to Computer\🗝️HKEY_CURRENT_USER\
Why Disable Copilot?
Disabling Windows 11 Copilot stops the built-in AI assistant from running in the background. That reduces screen clutter and keeps the assistant from sending your activity to Microsoft cloud services. Many people turn the tool off to protect their privacy and to stop it from tracking their daily computer usage habits.
If you only want a tidier taskbar, hiding the icon may be enough. The steps below go further and switch the feature off at the policy level.
Privacy concerns drive many people to remove these built-in helpers. Completing the adjustment takes a series of deliberate manual changes. Each one is small, but they are made in the registry, so go slowly and double-check every path and value name before you save.
How to Disable and Remove Copilot in Windows
Disabling the feature means working in a few specific areas of the operating system. You will need each of the following:
Step 1Open the Registry Editor
You need the Registry Editor (an advanced database for system settings) to disable Windows 11 Copilot. Changing these core operating system settings requires administrator permissions.
- Press the Windows key + R on your keyboard to open the Run box.
- Type regedit into the box and press Enter.
- Click Yes if a User Account Control prompt appears. You should now see the Registry Editor window, with a folder tree on the left and values on the right.
In Registry Editor, choose File Export, set the export range to All, name the file and save it somewhere safe. If something goes wrong, you can double-click that file to restore the saved settings.
⚠️ Admin Privileges Required
Sign in with an administrator account. If you are using a standard account, Windows asks for an administrator password and the edits may be refused without it.
Navigate to these registry keys. The quickest way is to click the address bar at the top of Registry Editor, paste a path and press Enter. You can also expand the folders in the left pane one by one. Work through the keys one at a time:
Computer\HKEY_CURRENT_USER\Software\Policies\Microsoft\Windows\WindowsCopilot
Computer\HKEY_LOCAL_MACHINE\SOFTWARE\Policies\Microsoft\Windows\WindowsCopilot
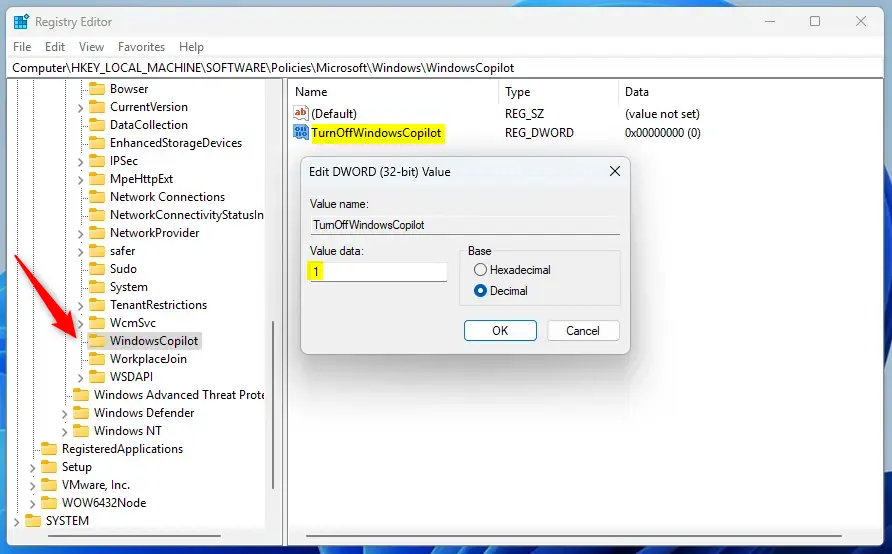
Step 2Edit the TurnOffWindowsCopilot Value
Setting the TurnOffWindowsCopilot value to 1 turns off the Windows 11 Copilot feature and removes its button from your taskbar. If you cannot find this setting in your registry key, you must create a new DWORD (32-bit) entry with that exact name and set the data value to 1.
- Select the key in the left pane. Its values appear on the right.
- Look for TurnOffWindowsCopilot in the Name column.
- Double-click it. The Edit DWORD (32-bit) Value window opens.
- Type 1 in the Value data box and click OK. The entry should now show 0x00000001 (1) in the Data column.
Missing entries are normal. Windows does not create this value by default, so you have to add it yourself.
- Right-click a blank area in the right pane.
- Choose New DWORD (32-bit) Value.
- Name the new entry exactly TurnOffWindowsCopilot and press Enter. Spelling and capitalization matter.
- Double-click the new entry, type 1 in Value data and click OK. This disables Copilot.
If the key itself does not exist, right-click its parent folder in the left pane, choose New Key and give it the missing folder name.
Step 3Disable Search Box Suggestions
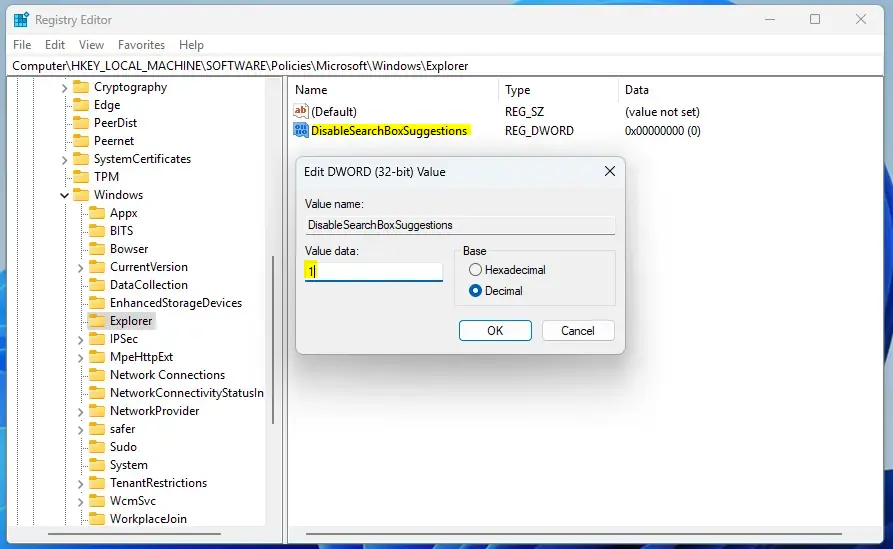
Disabling search box suggestions in Windows 11 stops online ads and web results from showing up when you search your computer. You turn off these web recommendations by going to the Explorer registry key and changing the DisableSearchBoxSuggestions value to 1. Local results from your apps and files keep working as before.
Go to this key first:
Computer\HKEY_CURRENT_USER\Software\Policies\Microsoft\Windows\Explorer
Then repeat the change at this key:
Computer\HKEY_LOCAL_MACHINE\SOFTWARE\Policies\Microsoft\Windows\Explorer
- Select the Explorer key in the left pane.
- Double-click the
DisableSearchBoxSuggestions(REG_DWORD) entry on the right side to open its properties. - Enter the value
1in the Value data box to disable and remove Copilot from Windows. - Click OK. The entry should show the new value in the Data column.
If the entry is not there, create it yourself:
- Right-click a blank area in the right pane.
- Choose New DWORD (32-bit) Value.
- Name it
DisableSearchBoxSuggestionsand press Enter. - Double-click the new entry, set Value data to 1 and click OK. This disables Copilot.
Step 4Disable the Edge Sidebar
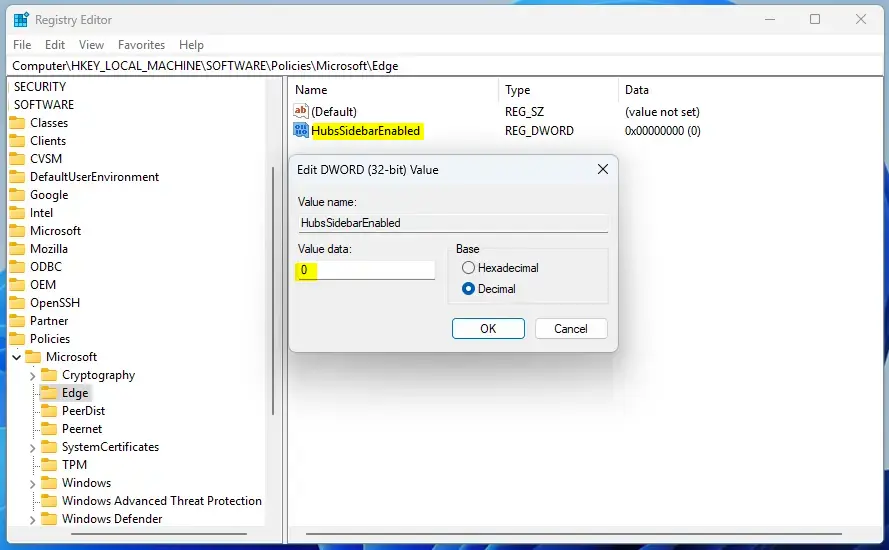
Disabling the Edge sidebar removes the persistent AI panel from the side of your web browser window. You hide this panel by opening the Edge registry key and changing the HubsSidebarEnabled setting, so the sidebar no longer stays on your screen. This only affects Microsoft Edge. Other browsers are not touched.
HKEY_LOCAL_MACHINE\SOFTWARE\Policies\Microsoft\Edge- Select the Edge key in the left pane.
- Double-click the
HubsSidebarEnabled(REG_DWORD) entry on the right side to open its properties. - Enter the value
0in the Value data box to disable and remove Copilot from Windows. For this setting, 0 means the sidebar is off. - Click OK.
Absent entries need to be created by hand:
- Right-click a blank area in the right pane.
- Choose New DWORD (32-bit) Value.
- Name it
HubsSidebarEnabledand press Enter. - Double-click the new entry, set Value data to 0 and click OK. This disables Copilot.
Close and reopen Edge afterward. The sidebar should be gone.
Step 5Save Changes and Restart
Save your open work first, then select Start Power Restart A full restart works better than signing out and back in, because some of these policies are only read at startup. After you sign in, the Copilot icon should be gone from the taskbar and Windows key + C should do nothing.
If the icon is still there, go back and check that each value name is spelled exactly right and that you created it in the correct key. On recent Windows 11 builds, Copilot may be installed as a separate app. If so, the registry policy may not hide it, and you can remove it under Settings Apps Installed apps
How to Turn Copilot Back On
Restoring the AI assistant means deleting the custom entries you created during setup. Open Registry Editor again, go to each location you edited, then right-click the entry, choose Delete and click Yes to confirm. Remove these:
TurnOffWindowsCopilotDisableSearchBoxSuggestionsHubsSidebarEnabled
Reboot the computer after deleting these entries. This restores default behavior and allows Windows Copilot to run again. If you made a registry backup earlier, you can also double-click that .reg file to bring back your original settings.
Summary
Limiting Windows 11 Copilot gives you more control over how your computer behaves and cuts down on background telemetry data collection. These registry adjustments keep your local device activity more private and stop the assistant from syncing your personal files to the cloud.
User Privacy: Restricting AI assistance protects personal files from cloud synchronization routines.
Feedback and Support: Copilot remains in preview for Windows Insiders. Microsoft evaluates diagnostic telemetry and user commentary to refine upcoming builds. Because the feature keeps changing, a registry setting that works today may behave differently after a major update, so it is worth rechecking after one.
Further Assistance: If you hit a technical snag or have questions, leave a comment below for troubleshooting help. Mention your Windows edition and build number so we can narrow down the cause.
Have a question about this guide?
Answered by AI from this guide. Good questions may be added to this page — please don't include personal details.
Did this guide fix your problem?

About the Author
Richard
Tech Writer, IT Professional
Richard is a writer at Geek Rewind who turns complex IT tasks into clear, step-by-step guides. He draws on years of hands-on experience in system administration and enterprise IT operations, focusing on Windows, Linux and WordPress: the problems people actually run into, and the fixes that work. His server and WordPress guides come from systems he runs himself. Richard builds and maintains the platform behind Geek Rewind, from its Ubuntu servers and Nginx configuration to its custom WordPress plugins. Many new tutorials start with readers' questions, and he's always glad to answer them in the comments.
No comments yet — be the first to share your thoughts!