How to Manage Copilot Side by Side in Windows 11


Turn Copilot Side by Side (dock/undock) on or off in Windows 11 to run the AI assistant alongside your other open windows.
Microsoft has removed or replaced this feature in Windows, so the instructions below can no longer be followed. They are kept here as a record of how it used to work.
The Copilot setting in this tutorial is no longer available.
Click the three dots menu in the Copilot window and select “Side by Side.” When checked, Copilot docks to your screen; when unchecked, it returns to its floating pop-up mode. This setting is remembered across sessions.
Microsoft introduced Copilot in Windows 11 build 23493 to help you change system settings and work across multiple apps using natural language.
For computers that have Copilot added, a new Copilot button will appear on the Taskbar. Pressing the button or using the keyboard shortcut (Win+C) will appear as a flyout interface.
When Copilot is available on your device, you can pin or unpin the side pane, open Copilot when Windows starts, Turn Copilot on or off, enable or disable Copilot using content from Edge, refresh Copilot prompts, resize the Copilot side pane, delete recent activity, enable or disable Copilot plugins, and more.
A recent update to Copilot allows users to use the tool alongside other windows. When toggled, the tool docks on the desktop, similar to a standalone application.
Dock or undock the Copilot side pane
As mentioned, you can toggle the Copilot side-by-side feature to launch the side panel as a standalone app.
Here's how to do it.
First, open Copilot with the shortcut Windows key + C.
Then, click the three dots button on Copilot, and click the Side by Side button to (check = dock) or (uncheck = undock) Copilot on the side of your desktop.
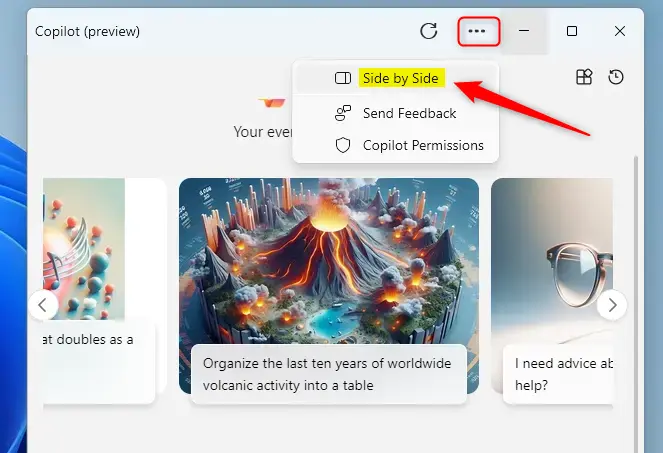
Docking the side pane lets you keep Copilot visible while working in other apps.
- This article explored how to toggle Copilot's Side by Side (Dock/Undock) feature.
- Docking or undocking the Copilot side pane allows for a more versatile user experience, especially when running multiple applications.
- For further questions or suggestions, please utilize the comments section below.
Was this guide helpful?

About the Author
Richard
Tech Writer, IT Professional
Richard is a writer at Geek Rewind who turns complex IT tasks into clear, step-by-step guides. He draws on years of hands-on experience in system administration and enterprise IT operations, focusing on Windows, Linux and WordPress: the problems people actually run into, and the fixes that work. His server and WordPress guides come from systems he runs himself. Richard builds and maintains the platform behind Geek Rewind, from its Ubuntu servers and Nginx configuration to its custom WordPress plugins. Many new tutorials start with readers' questions, and he's always glad to answer them in the comments.


No comments yet — be the first to share your thoughts!