How to Create a Desktop Shortcut for Copilot in Windows 11


A desktop shortcut for Copilot in Windows 11 lets you open Microsoft’s built-in AI assistant with a double-click. Copilot is an artificial intelligence tool that answers questions, summarizes text, and changes computer settings using plain English.
Microsoft introduced Copilot in Windows 11 build 23493. Placing this icon directly on your desktop gives you instant access to the assistant whenever you need it, without hunting through menus. The whole job takes about a minute, and you can remove the shortcut at any time.
Right-click your desktop, select New, then Shortcut. Paste “microsoft-edge://?ux=copilot&tcp=1&source=taskbar” into the item location box. Name it “Copilot” and click Finish.
Create a desktop shortcut for Copilot
You make the shortcut with a special web address that opens the AI assistant directly from your desktop. You don’t need to open your web browser first. You create the shortcut, name it, and then optionally change its icon. This works on both Windows 11 Home and Pro, and you don’t need to restart anything.
If you have never made a shortcut by hand, this guide covers the basics. You can also read more about creating a desktop shortcut here.
Start by opening the shortcut wizard:
- Go to your desktop and right-click an empty area.
- Choose New, then Shortcut. On Windows 11 you may need to click Show more options first to see the classic menu.
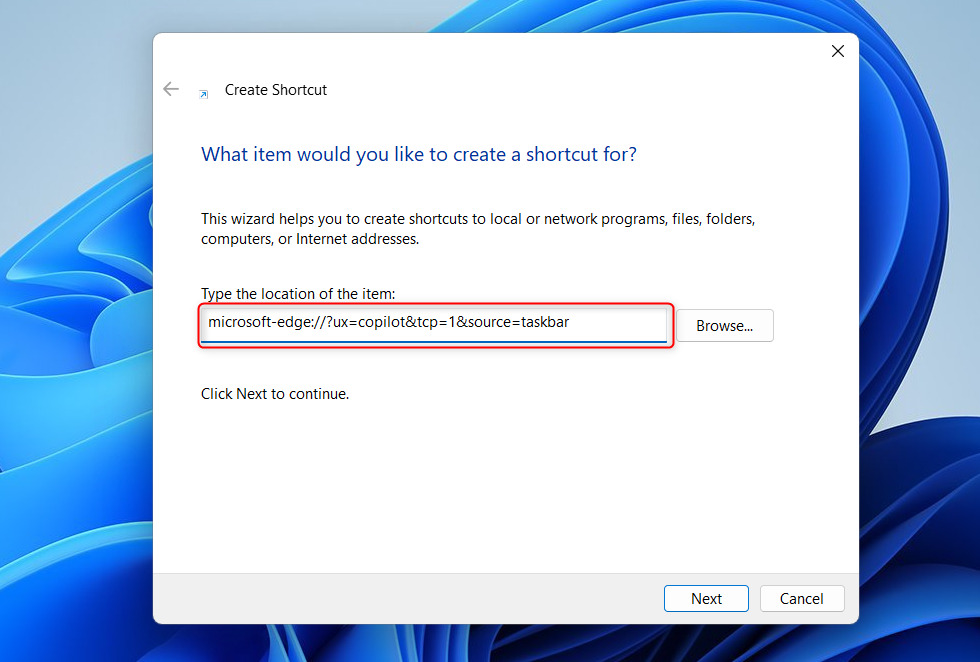
- Wait for the Create Shortcut window to appear. It asks you to type the location of the item.

Now add the web address. Copy the line below and paste it into the location box. Copy the whole line with nothing missing at the start or end, because a partial address creates a broken shortcut.
microsoft-edge://?ux=copilot&tcp=1&source=taskbar
After you paste it, the location box should show the full address, as in the image below.
- Click Next to continue.
- Type a name for the shortcut in the name box, such as Copilot. This is the label you will see under the icon, so pick something you will recognize.
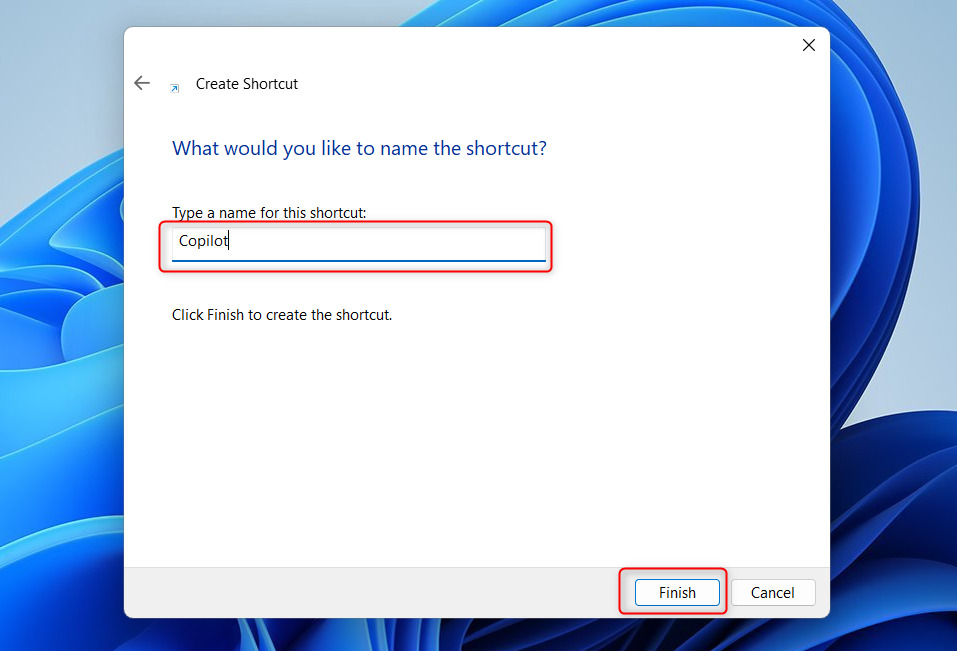
- Click the Finish button. A new icon with the name you created appears on the desktop.
- Double-click the icon to test it. Copilot should open. If nothing happens or you get an error, delete the shortcut and repeat the steps, checking that the pasted address is complete.
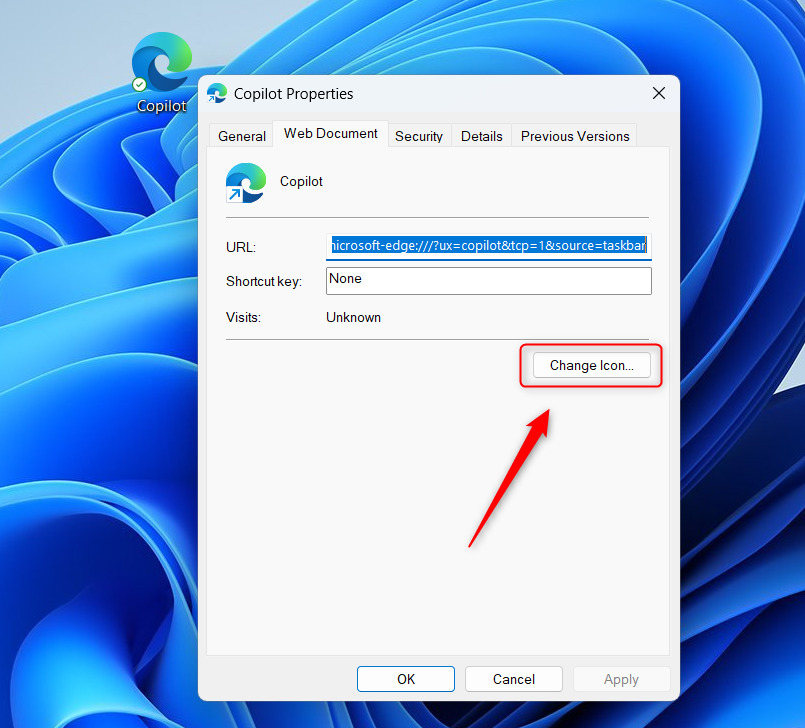
The icon will probably look generic at first. Because this shortcut points to a web address, Windows treats it as an internet shortcut. That is why you see a Web Document tab in its properties. To change the icon:
- Right-click the new icon and select Properties. On Windows 11 you may need to click Show more options first, or you can select the icon and press Alt+Enter.
- In the Properties window, open the Web Document tab.
- Select the Change Icon… button. A window opens with a list of icons.
Windows only accepts icons in the ICO file format. Download the icon from the link below. Convert the downloaded image into an ICO file using an online image converter before you continue. If you can find an ICO file directly, you can skip the conversion step.

- Using File Explorer, find and select the downloaded icon to use.
- Click OK in the icon window, then Apply and OK in the Properties window. The desktop shortcut should now show the new icon.

That completes the setup process. If the icon doesn't update right away, click an empty part of the desktop and press F5 to refresh it.
Adding the original Copilot icon to the shortcut gives the desktop a cleaner, more finished look. To undo any of this, right-click the shortcut and choose Delete. That only removes the shortcut and does not affect Copilot itself.
- Creating a desktop shortcut for Copilot in Windows 11 allows quick and easy access to the feature directly from the desktop.
- Following the steps, users can launch Copilot without navigating menus or searching for the feature.
- Using the original Copilot icon makes the shortcut easy to spot among other desktop icons.
Have a question about this guide?
Answered by AI from this guide. Good questions may be added to this page — please don't include personal details.
Did this guide fix your problem?

About the Author
Richard
Tech Writer, IT Professional
Richard is a writer at Geek Rewind who turns complex IT tasks into clear, step-by-step guides. He draws on years of hands-on experience in system administration and enterprise IT operations, focusing on Windows, Linux and WordPress: the problems people actually run into, and the fixes that work. His server and WordPress guides come from systems he runs himself. Richard builds and maintains the platform behind Geek Rewind, from its Ubuntu servers and Nginx configuration to its custom WordPress plugins. Many new tutorials start with readers' questions, and he's always glad to answer them in the comments.
[…] Copilot side panel, Resize the Copilot side panel, delete chat history in Copilot, create a desktop shortcut, modify Copilot key, enable or disable Copilot model training, and […]
[…] Copilot side panel, Resize the Copilot side panel, delete chat history in Copilot, create a desktop shortcut, hide the sidebar, use your phone with Copilot, and […]