How to Install Nginx on Ubuntu Linux


Installing Nginx on Ubuntu turns your machine into a fast web server that handles high traffic well. This works on Ubuntu 20.04 LTS and later. Nginx is free server software that hosts websites and web apps directly from your system.
You install Nginx with the apt package manager from the terminal. A few commands download the software, start the service and let you check that the server runs correctly. You need an account with sudo rights, and the server needs internet access to reach the Ubuntu repositories.
To install Nginx on Ubuntu, run sudo apt update, then sudo apt install nginx in the terminal. Apt downloads and installs the server, and Nginx starts automatically. Confirm it runs with sudo systemctl status nginx, looking for active (running).
How to use Nginx HTTP server on Ubuntu Linux
The install takes two commands:
- Open your terminal and run sudo apt update. This refreshes the list of available software, so apt installs the current Nginx package and not an outdated one.
- Run sudo apt install nginx. Apt downloads Nginx and its dependencies and installs them. Type Y if it asks you to confirm.
On Ubuntu, Nginx starts on its own as soon as the installation finishes, so you don’t need a separate start command.
Nginx is in the standard Ubuntu repositories, so you can install it with the apt package management tool. You don’t need to add any third-party source. The version in the repository is the one Ubuntu has tested for your release. It may be a little older than the newest Nginx release.
To install Nginx, run the commands below in a terminal. Run them in order. Apt asks for your sudo password the first time, and you won’t see the characters as you type it.
sudo apt update
sudo apt install nginx
The commands above install the Nginx HTTP server. When apt returns you to the prompt without an error, the installation is done and the service is already running.
To find out whether Nginx is installed and running, use the status check command below. It asks systemd, the Ubuntu service manager, to report on the Nginx service.
sudo systemctl status nginx
When Nginx is running, the command prints lines similar to the ones below. Look for active (running) near the top, usually in green. If the output fills the screen and the prompt doesn’t come back, press q to leave it.
nginx.service - A high performance web server and a reverse proxy server
     Loaded: loaded (/lib/systemd/system/nginx.service; enabled; vendor preset: enabled)
     Active: active (running) since Wed 2021-09-15 12:27:58 CDT; 9s ago
       Docs: man:nginx(8)
   Main PID: 2711 (nginx)
      Tasks: 2 (limit: 4651)
     Memory: 3.0M
     CGroup: /system.slice/nginx.service
             ├─2711 nginx: master process /usr/sbin/nginx -g daemon on; master_process on;
             └─2712 nginx: worker process

Sep 15 12:27:58 ubuntu2004 systemd[1]: Starting A high performance web server and a reverse pro>
Sep 15 12:27:58 ubuntu2004 systemd[1]: Started A high performance web server and a reverse prox>
How to allow Nginx through the Ubuntu firewall
If the Ubuntu firewall is on, you must allow web traffic through UFW (Uncomplicated Firewall, the built-in tool for managing network traffic rules) before visitors can reach your server. Run sudo ufw allow ‘Nginx Full’ in your terminal to open the web ports, so other computers can reach your Nginx site.
If yours is off, nothing blocks the traffic and the rule has no effect until you turn UFW on. If you manage the server over SSH and plan to enable UFW, allow SSH first. Otherwise you can lock yourself out.
If you use UFW to manage the Ubuntu firewall, run the commands below to allow traffic to Nginx.
sudo ufw allow 'Nginx Full'
That allows full traffic to Nginx. The Nginx Full profile opens both port 80 (plain HTTP) and port 443 (HTTPS), so you won’t need to change the firewall again when you add an SSL certificate later.
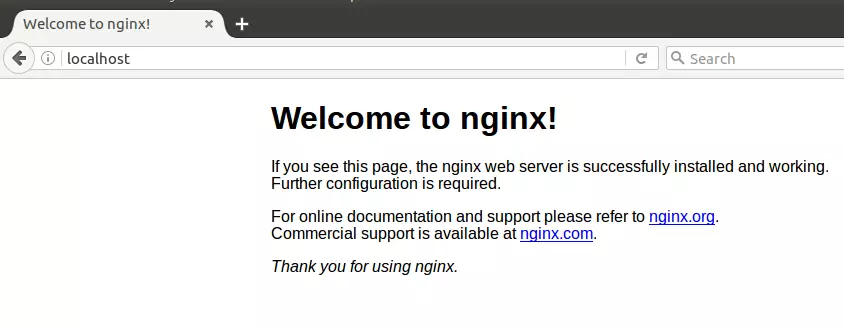
With the firewall open, test the server from a browser. Enter the server’s hostname or IP address in the address bar. You can do this on the server itself or from another computer on the same network.
http://localhost
You should see the Nginx default welcome page, headed Welcome to nginx!. If the page doesn’t load, check these in order:
- The status check shows Nginx as active (running).
- The firewall rule above is in place.
- You typed the right address. On a cloud server, also check that the provider’s own firewall or security group allows ports 80 and 443.
How to configure Nginx on Ubuntu Linux
You will find all Nginx configuration files in the /etc/nginx folder on your Ubuntu system. This main directory holds every settings file you need to change how your web server behaves, where it looks for website files and how it handles incoming visitors. Editing these files needs sudo rights.
On Ubuntu Linux, Nginx uses the directory structure and configuration files described below.
All Nginx configuration files are in the /etc/nginx directory. This is the Nginx home directory, and the other locations in this section sit inside it.
Nginx’s main configuration file is /etc/nginx/nginx.conf. It holds the global settings. You rarely need to touch it, because per-site settings belong in their own files. Leave it alone unless you really need a global change.
Nginx virtual host files, which define each individual website, live in the /etc/nginx/sites-available directory. A file there does nothing on its own. To turn a site on, you link its file into the /etc/nginx/sites-enabled directory, and Nginx loads only the configurations found in that directory.
Use the command below to activate a website by linking it into the /etc/nginx/sites-enabled directory. Replace example.com.conf with the name of your own virtual host file.
sudo ln -s /etc/nginx/sites-available/example.com.conf /etc/nginx/sites-enabled/
Because it is a link, you keep editing the original file in sites-available. Nginx reads configuration only when it starts or reloads, so the new site goes live only after you reload or restart the service.
To deactivate a virtual host, use the command below. Replace example.com.conf with the name of your website’s virtual host file. This removes only the link in sites-enabled. The original file stays in sites-available, so you can activate the site again later. As before, reload Nginx for the change to take effect.
sudo rm /etc/nginx/sites-enabled/example.com.conf
Nginx uses snippets, small reusable pieces of configuration, to add extra functions. They are stored in the /etc/nginx/snippets/ directory. Keeping repeated settings in one snippet means you edit them once instead of in every site file.
A snippet is loaded by Nginx only when a server block includes it. Putting a file in the snippets directory does not activate it.
To use a snippet, add the `include` directive inside the server block of your site. For instance, `include /etc/nginx/snippets/my_snippet.conf;` inserts the content of `my_snippet.conf` into that server block. Make sure the path is correct and the line ends with a semicolon, because Nginx will not start or reload cleanly with a typo in an included file.
server {
        listen 80 default_server;
        listen [::]:80 default_server;

        root /var/www/html;

 include snippets/mycustomsnippets.conf;

........
Nginx also writes log files, access.log and error.log, to the /var/log/nginx/ directory. The access log records each request the server receives. The error log records problems, such as a bad configuration or a missing file. When something doesn't work, check the error log first.
Ubuntu may hold more Nginx configuration files than the ones covered here. A separate, detailed tutorial can cover those other configurations.
Conclusion:
This guide showed how to install Nginx on Ubuntu Linux, check that it is running, open the firewall and find its main configuration files and logs. You can report errors or suggest additions to the installation steps using the comment form.
Have a question about this guide?
Answered by AI from this guide. Good questions may be added to this page — please don't include personal details.
Did this guide fix your problem?

About the Author
Richard
Tech Writer, IT Professional
Richard is a writer at Geek Rewind who turns complex IT tasks into clear, step-by-step guides. He draws on years of hands-on experience in system administration and enterprise IT operations, focusing on Windows, Linux and WordPress: the problems people actually run into, and the fixes that work. His server and WordPress guides come from systems he runs himself. Richard builds and maintains the platform behind Geek Rewind, from its Ubuntu servers and Nginx configuration to its custom WordPress plugins. Many new tutorials start with readers' questions, and he's always glad to answer them in the comments.
[…] How to install Nginx on Ubuntu […]
[…] How to install Nginx on Ubuntu […]
[…] How to install Nginx on Ubuntu […]
[…] How to install Nginx on Ubuntu […]
[…] How to install Nginx on Ubuntu […]
[…] How to install Nginx on Ubuntu […]
[…] How to install Nginx on Ubuntu […]
[…] How to install Nginx on Ubuntu […]
[…] How to install Nginx on Ubuntu […]
[…] How to install Nginx on Ubuntu […]
[…] How to install Nginx on Ubuntu […]
[…] How to install Nginx on Ubuntu […]
[…] How to install Nginx on Ubuntu […]
[…] How to install Nginx on Ubuntu […]
[…] How to install Nginx on Ubuntu […]
[…] How to install Nginx on Ubuntu […]
[…] How to install Nginx on Ubuntu […]
[…] How to install Nginx on Ubuntu […]
[…] How to install Nginx on Ubuntu […]
[…] How to install Nginx on Ubuntu […]
[…] How to install Nginx on Ubuntu […]
[…] How to install Nginx on Ubuntu […]
[…] How to install Nginx on Ubuntu […]
[…] How to install Nginx on Ubuntu […]
[…] How to install Nginx on Ubuntu […]
[…] How to install Nginx on Ubuntu […]
[…] How to install Nginx on Ubuntu […]
[…] How to install Nginx on Ubuntu […]
[…] How to install Nginx on Ubuntu […]
[…] How to install Nginx on Ubuntu […]
[…] How to install Nginx on Ubuntu […]
[…] How to install Nginx on Ubuntu […]
[…] How to install Nginx on Ubuntu […]
[…] How to install Nginx on Ubuntu […]
[…] How to install Nginx on Ubuntu […]
[…] How to install Nginx on Ubuntu […]
[…] How to install Nginx on Ubuntu […]
[…] How to install Nginx on Ubuntu […]
[…] How to install Nginx on Ubuntu […]
[…] How to install Nginx on Ubuntu […]
[…] How to install Nginx on Ubuntu […]
[…] How to install Nginx on Ubuntu […]
[…] How to install Nginx on Ubuntu […]
[…] How to install Nginx on Ubuntu […]
[…] How to install Nginx on Ubuntu […]
[…] How to install Nginx on Ubuntu […]
[…] How to install Nginx on Ubuntu […]
[…] How to install Nginx on Ubuntu […]
[…] use and run CGI script on Nginx, you must first install and configure FastCGI. With Nginx installed, run the command below to install […]
[…] you already have a web server like Nginx or Apache installed and running a website, you can use this method to generate a free […]
[…] How to install Nginx on Ubuntu […]
[…] How to install Nginx on Ubuntu […]
[…] How to install Nginx […]
[…] How to install Nginx on Ubuntu Linux […]
[…] How to install Nginx on Ubuntu […]