How to Install LEMP on Ubuntu Linux


LEMP on Ubuntu Linux is a web hosting bundle that combines the Linux operating system, the Nginx web server, the MariaDB database, and the PHP scripting language to run dynamic websites like WordPress. The name comes from the first letters of Linux, Nginx (pronounced “engine-x”), MySQL or MariaDB, and PHP. Ubuntu 22.04 LTS provides the stable, secure base for this software stack.
Getting these four layers installed and working together on your server lets you launch fast, reliable websites. This guide walks you through setting up every component on your machine, one step at a time. Before you start, make sure you have an Ubuntu 22.04 machine, a user account that can run commands with sudo, and a working internet connection. A restart is not normally needed for any step here, except where Ubuntu asks for one after system updates.
To install LEMP on Ubuntu 22.04, update your package lists with sudo apt update, then install the Nginx web server with sudo apt install nginx. Next add MariaDB for the database and PHP for scripting, then confirm the stack works by loading http://localhost in a browser, which should show the Nginx welcome page.
How to install Ubuntu Linux
Remember the username and password you choose here. You will use that account with sudo for every command in this guide.
Before you start building a web server, complete the installation, sign in and open a terminal. Then run the command sudo apt update to grab the latest software lists and security updates. Ubuntu asks for your password the first time you use sudo. The terminal shows nothing while you type it, which is normal.
A Linux machine serves as the initial requirement for LEMP configuration. This can be a physical computer, a virtual machine or a cloud server, as long as it runs Ubuntu. Users can install Ubuntu Linux by following the detailed steps provided in a separate guide.
Once Ubuntu is installed, update it so you start from current packages. This avoids version conflicts later in the stack.
- Open a terminal on your Ubuntu machine.
- Run the commands in the block below. Enter your password if Ubuntu asks for it.
- Wait for the process to finish. You should see the terminal prompt come back. On a fresh install, the upgrade can take several minutes.
- If Ubuntu says a restart is required, for example after a kernel update, reboot the machine before you continue.
sudo apt update
sudo apt dist-upgrade
sudo apt autoremove
There are lots of other settings and configurations that apply to Ubuntu, such as firewall rules, SSH hardening and automatic updates. However, this post is only concerned with installing LEMP.
How to install Nginx on Ubuntu Linux
You install Nginx (a fast web server that handles visitor requests) on Ubuntu by running the command sudo apt install nginx in your terminal after updating your package lists. This downloads and sets up the web server automatically, allowing you to host web pages and begin building your LEMP stack.
Ubuntu normally starts Nginx as soon as the installation finishes, so you can test it right away. The commands are in the block below.
sudo apt update
sudo apt install nginx
After installing Nginx, the commands below can be used to stop, start and enable the Nginx service to always start up when the server starts.
The enable command is the one that makes Nginx come back after a reboot. You only need to run it once. Stopping Nginx takes your websites offline until you start it again, so don’t do that on a live server without a reason.
sudo systemctl stop nginx
sudo systemctl start nginx
sudo systemctl enable nginx
To see if Nginx is installed, check it from a web browser.
- Open a web browser on any computer that can reach the server.
- Type the server hostname or IP address into the address bar, in the format shown below, and press Enter.
- If the page does not load, check whether a firewall is blocking port 80 (HTTP). Ubuntu’s firewall, if you turned it on, must allow web traffic. Cloud providers often have their own firewall settings as well.
http://localhost
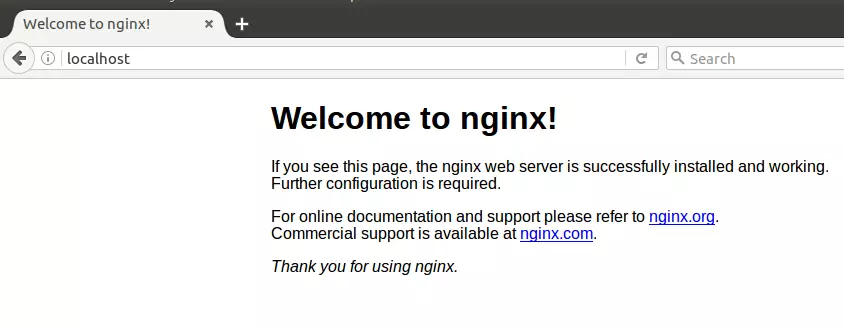
If you see the Nginx welcome page above, with the heading “Welcome to nginx!”, it means Nginx is installed and functioning. If you see a different page or an error, check that the Nginx service is running before you go on.
How to install MariaDB on Ubuntu Linux
You install MariaDB (a reliable database system that stores your website data) on Ubuntu by running the command sudo apt install mariadb-server in your terminal. This downloads the database software you need for your LEMP stack, replacing older MySQL packages with a fully open-source database server.
For this post, we will install MariaDB instead of MySQL. MariaDB is a drop-in replacement for MySQL. Most applications, WordPress included, work with either one, and the tools and settings you see below are very similar.
To install MariaDB, run the commands below. Type Y if apt asks you to confirm the download.
sudo apt update
sudo apt install mariadb-server
After installing , you can run the commands below to view the MariaDB service status. The service normally starts by itself after installation.
sudo systemctl status mariadb
After running the command above, it should output lines similar to the ones below. Look for active (running) in the Active line. If the output stays on screen and the prompt does not come back, press Q to leave the status view.
mariadb.service - MariaDB 10.6.12 database server
     Loaded: loaded (/lib/systemd/system/mariadb.service; enabled; vendor preset: enabled)
     Active: active (running) since Wed 2021-09-15 16:40:20 CDT; 22s ago
       Docs: man:mysqld(8)
             https://mariadb.com/kb/en/library/systemd/
   Main PID: 3007 (mysqld)
     Status: "Taking your SQL requests now..."
      Tasks: 31 (limit: 4651)
     Memory: 65.6M
     CGroup: /system.slice/mariadb.service
             └─3007 /usr/sbin/mysqld

Sep 15 16:40:20 ubuntu2204 /etc/mysql/debian-start[3045]: mysql
Sep 15 16:40:20 ubuntu2204 /etc/mysql/debian-start[3045]: performance_schema
MariaDB and MySQL have a script allowing you to perform security operations. A fresh install comes with a few weak defaults, and this script closes them.
Run the commands below to invoke the script and perform some recommended tasks to secure the database. The script asks a series of yes or no questions. The exact wording differs slightly between versions, but the usual choices are:
- Set or change the root password. This is optional on Ubuntu, because root logs in through the socket, as explained below.
- Remove anonymous users. Answer yes.
- Disallow remote root login. Answer yes, unless you have a specific reason to allow it.
- Remove the test database. Answer yes.
- Reload the privilege tables so the changes apply now. Answer yes.
sudo mysql_secure_installation
MariaDB and MySQL servers have the root user set to use the auth_socket authentication method by default. On Ubuntu, this means the database trusts the operating system to confirm who you are.
The auth_socket plugin authenticates users that connect from the local host through the Unix socket file. You can’t authenticate as a root by providing a password. This is safer than a stored root password, because only someone with administrator rights on the server can reach the database as root.
Simply run the command below to log on to MariaDB and MySQL servers as root. You don't need a password since it's using the auth_socket method. Run it with sudo, because the operating system checks that you are an administrator.
To log on to MariaDB, run the commands below.
sudo mysql
The server console should come up. The prompt changes to a MariaDB prompt, which shows that you are now typing database commands and not shell commands. To leave the console and return to the normal terminal, press Ctrl+D.
Welcome to the MariaDB monitor.  Commands end with ; or \g.
Your MariaDB connection id is 32
Server version: 10.6.12-MariaDB-0ubuntu0.22.04.1 Ubuntu 22.04

Copyright (c) 2000, 2018, Oracle, MariaDB Corporation Ab and others.

Type 'help;' or '\h' for help. Type '\c' to clear the current input statement.

MariaDB [(none)]>
How to install PHP on Ubuntu Linux
You install PHP on Ubuntu by installing PHP-FPM (a processor that helps Nginx run dynamic code) along with the common server extensions using your terminal. Because Nginx does not handle PHP files on its own, adding PHP-FPM connects the web server to the programming language so your dynamic websites work properly.
Nginx doesn't have built-in support for processing PHP files and is not tightly integrated as Apache. To add PHP support for Nginx, you must install and use PHP-FPM (FastCGI process manager) to handle the PHP files. Nginx passes each request for a PHP file to PHP-FPM, PHP-FPM runs the code, and Nginx sends the result back to the visitor.
If you're using the Nginx web server, the commands below are used to install PHP. On Ubuntu 22.04, the default repository provides PHP 8.1. Other Ubuntu releases ship other versions, so note the version number that gets installed, because you need it in the steps below.
sudo apt update
sudo apt install php-fpm
Because PHP isn't tightly integrated with Nginx, if you make changes to PHP, you must restart or reload PHP and Nginx separately for the changes to apply. This applies, for example, when you edit PHP settings or install a new PHP extension. The PHP-FPM service name includes the version number, so use the one that matches your install. A reload applies most changes without dropping active connections, and a restart is the fallback if a reload doesn't pick up the change.
sudo systemctl restart php8.1-fpm
sudo systemctl restart nginx
Also, you must add these lines to the Nginx server block to allow Nginx to read PHP files. Remember to use the version of PHP installed and reference it in the highlighted line below. If the version in that line doesn't match what is installed, Nginx can't reach PHP-FPM and visitors see a 502 Bad Gateway error. After you edit the server block, reload Nginx so the change applies. If something goes wrong, remove the lines you added and reload Nginx to go back to the previous behavior.
server {

    location ~ \.php$ {
        include snippets/fastcgi-php.conf;
        fastcgi_pass unix:/run/php/php8.1-fpm.sock;
    }
}
To install the latest PHP versions unavailable in the Ubuntu repository, run the commands below to install a third-party PPA repository that includes multiple versions of PHP. A PPA is not maintained by Ubuntu itself, so only add it if you need a version Ubuntu doesn't offer. If the default version works for your site, you can skip this part.
At the time of this writing, the latest version of PHP is 8.0. Newer versions have been released since then, so check which versions the repository offers before you pick one. Also check which PHP versions your application supports.
sudo apt install software-properties-common
sudo add-apt-repository ppa:ondrej/php
After adding the repository above, you can then install another PHP version. Several PHP versions can sit on the same server, each with its own PHP-FPM service. Nginx uses the one that its server block points to, so update that line if you switch versions.
sudo apt install php8.0 php8.0-common php8.0-cli php8.0-gd php8.0-curl php8.0-mysql
That should do it! You now have Nginx, MariaDB and PHP on Ubuntu. Before you install a site such as WordPress, confirm that the Nginx welcome page loads, the MariaDB service is running, and your PHP-FPM service is active.
For more on LEMP, read individual posts on the LEMP components
Conclusion:
This guide explains installing the LEMP stack on Ubuntu Linux: updating Ubuntu, installing Nginx, setting up and securing MariaDB, and adding PHP-FPM so Nginx can run PHP. Users can report errors or add information using the comment form below the guide.
Have a question about this guide?
Answered by AI from this guide. Good questions may be added to this page — please don't include personal details.
Did this guide fix your problem?

About the Author
Richard
Tech Writer, IT Professional
Richard is a writer at Geek Rewind who turns complex IT tasks into clear, step-by-step guides. He draws on years of hands-on experience in system administration and enterprise IT operations, focusing on Windows, Linux and WordPress: the problems people actually run into, and the fixes that work. His server and WordPress guides come from systems he runs himself. Richard builds and maintains the platform behind Geek Rewind, from its Ubuntu servers and Nginx configuration to its custom WordPress plugins. Many new tutorials start with readers' questions, and he's always glad to answer them in the comments.
[…] How to install LEMP on Ubuntu Linux […]
[…] ready to connect to our Google Cloud server and install any CMS based on LAMP or LEMP by tying software and packages installed in our previous […]