How to Create Your Website on Google Cloud Server


Running a website on Google Cloud means renting a virtual private server (a computer hosted in Google’s data centers) to handle your web traffic instead of using traditional shared web hosting. Google Cloud gives you a dedicated server running the Ubuntu Linux operating system. Ubuntu pairs with web software like Apache, the PHP programming language, and a MySQL database to keep your pages online 24/7.
A content management system (CMS, a platform for building and managing digital content like WordPress) sits on top of this setup so you can publish pages without writing raw code. This guide walks you through launching your own server instance on Google Cloud and connecting the software required to host a live site. You will need a Google Cloud account with billing enabled and a running Ubuntu virtual machine, which the earlier posts in this series cover. The steps are the same whether your own PC runs Windows 11 Home or Pro, because all the work happens in the browser and on the server.
Open the Google Cloud Console, go to Menu Compute Engine VM instances, and click SSH next to a running Ubuntu instance to open a browser-based terminal. From there, install Apache, PHP and MySQL, then copy your site files into the web root directory. The whole setup happens in the browser, so you need no extra software on Windows 11.
How to connect to Google Cloud servers
Connecting to Google Cloud servers to manage your website files and settings happens right inside your web browser using the built-in Google Cloud Console. This tool lets you open a command line window without installing extra software like PuTTY. You just open your Google Cloud dashboard, find your virtual machine instance in Compute Engine, and click the SSH button next to it.
A stopped instance has no SSH option that works, so start it first from the VM instances page. Also check that your browser is on the supported list below.
SSH from the browser supports the following web browsers:
- Web browsers
- The latest version of Google Chrome
- Firefox
- Microsoft Edge
- Microsoft Internet Explorer 11 and later
- Safari 8 and later. Note that Safari in private browser mode is not supported.
- Virtual machine configurations
- All Linux VM images are natively available in Google Cloud.
No additional software or browser extensions are needed. Internet Explorer is listed because Google’s documentation still lists it, but Microsoft has retired it. On Windows 11, use Edge, Chrome or Firefox instead.
- Sign in to the Google Cloud Console in your browser.
- Open Menu Compute Engine VM instances
You should now see a table listing every virtual machine in the selected project. If the table is empty, check the project name in the top bar. You may be looking at the wrong project.
- In the list of virtual machine instances, find the row of the instance that you want to connect to.
- Click SSH in that row.
A new browser window opens and connects. The first connection can take a few seconds, because the console creates and sends the SSH keys for you. If nothing opens, your browser may have blocked the pop-up window, so allow pop-ups for the Cloud Console and try again.

Alternatively, open an SSH connection to an instance from the instance details page.
- On the VM instances page, click the name of the instance.
- On the instance details page, click SSH.
This gives the same terminal window as the button in the list. It is handy when you are already on the details page checking the external IP address or firewall settings.
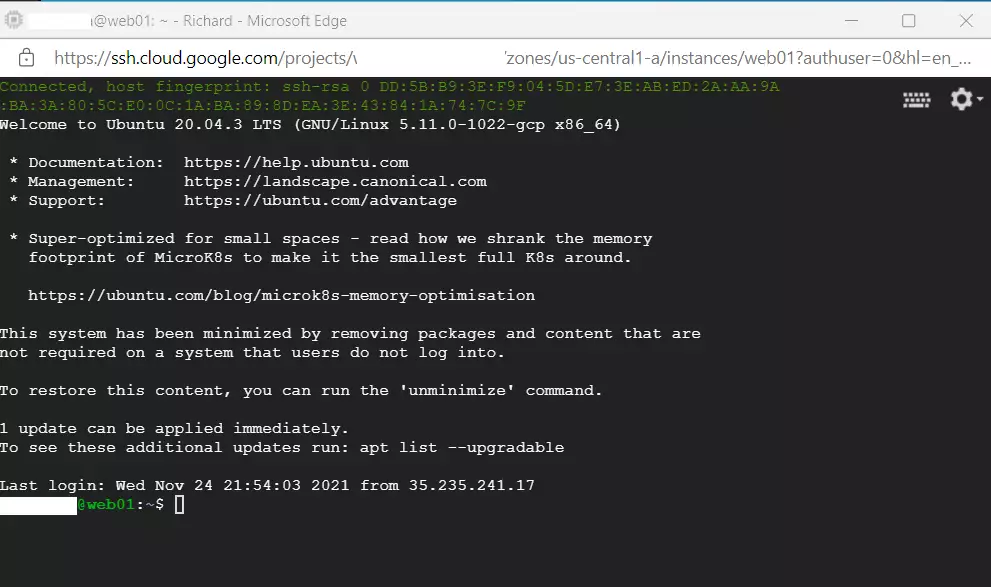
An SSH terminal window with the Ubuntu Linux instance created in the series's second post will open. You will see a prompt showing your user name and the instance name. That prompt means you are logged in and the server is waiting for a command.
To close the session, close the window or type exit. Closing the window does not stop the server, so your website keeps running and billing continues as normal.
How to create websites on Google Cloud Servers
To successfully create a website on Google Cloud, you need to install a web server like Apache or Nginx, set up a database, and upload your site files to the server directory. You manage these tasks through the browser connection you set up earlier by running Linux commands. Once the software packages finish installing, you can type your server public IP address into your browser to view your live site.
If the page does not load, the cause is usually the firewall. Google Cloud blocks web traffic to a new instance until you allow it. Open the instance settings and make sure HTTP traffic is allowed, and HTTPS too once you add a certificate. Also note that the external IP address is temporary by default and can change when the instance is stopped and started. Reserve a static external IP address before you point a domain name at the server.
After installing all required packages, administrators can access the site directly by visiting the server's hostname or IP address. Test from a different device or network than the one you use for SSH. That shows you what real visitors will see.
Detailed guides for building sites on Ubuntu Linux running Apache or Nginx appear below. Click any linked article to learn more about installing and managing a Content Management System (CMS) on Ubuntu Linux. Pick the guide that matches both the web server and the CMS you want to run.
How to install WordPress on Ubuntu Linux with Apache
How to install WordPress on Ubuntu Linux with Nginx
How to install Drupal on Ubuntu Linux with Apache
How to install Drupal on Ubuntu Linux with Nginx
How to install Joomla on Ubuntu with Apache
How to install Joomla on Ubuntu with Nginx
Each tutorial covers the configuration steps explored in previous posts. Readers will also discover how to secure sites using free Let's Encrypt SSL certificates. Those certificates need a registered domain name that already points to your server, so set up the domain first.
That wraps up the installation process.
Conclusion:
Running a live site on Ubuntu Linux takes careful execution. Keep these core points in mind:
- Domain Name: Ensure your domain name is properly registered and pointed to your Google Cloud server.
- Google Cloud Setup: Set up your Google Cloud server with Ubuntu Linux, installing necessary software and packages.
- Choose a CMS: Select a popular content management system (CMS) like WordPress, Drupal, or Joomla to help create your website.
- Connection via SSH: Use SSH from the Google Cloud Console to connect to your server easily without additional software.
- Website Management: After installation, manage your website directly through the browser using the server's IP address or hostname.
- Security: Don't forget to secure your website with free Let's Encrypt SSL certificates to enhance security.
These configuration tasks equip administrators to build and manage robust web properties. Work through the key steps above in order. Check each one before moving on, and test the site from outside your own network. Let's Encrypt certificates expire after 90 days, so confirm that automatic renewal is working. Then the finished site stays visible and accessible to visitors.
Was this guide helpful?

About the Author
Richard
Tech Writer, IT Professional
Richard is a writer at Geek Rewind who turns complex IT tasks into clear, step-by-step guides. He draws on years of hands-on experience in system administration and enterprise IT operations, focusing on Windows, Linux and WordPress: the problems people actually run into, and the fixes that work. His server and WordPress guides come from systems he runs himself. Richard builds and maintains the platform behind Geek Rewind, from its Ubuntu servers and Nginx configuration to its custom WordPress plugins. Many new tutorials start with readers' questions, and he's always glad to answer them in the comments.


No comments yet — be the first to share your thoughts!