How to Install OpenCart with Nginx on Ubuntu 24.04


Installing OpenCart with Nginx on Ubuntu 24.04 sets up a fast online store using free shopping cart software and a quick web server that handles visitors well. OpenCart is an online store platform that lets you sell products on the internet, while Nginx (a fast web server program) loads your pages quickly.
You need a server running Ubuntu 24.04 to follow these steps. Setting up this pairing keeps your shop loading fast so you can start selling products right away.
Install Nginx using `sudo apt install nginx`, then MariaDB with `sudo apt install mariadb-server`. Create an OpenCart database and user within MariaDB. Finally, install PHP and its required modules using `sudo apt install php-fpm php-intl php-mysql php-curl php-cli php-zip php-xml php-gd php-common php-mbstring php-xmlrpc php-json php-sqlite3 php-soap php-zip`.
Install Nginx HTTP server on Ubuntu
Nginx HTTP server installation on Ubuntu 24.04 requires updating your package list and running the default installation command in your terminal. You can set up Nginx for your OpenCart Nginx Ubuntu installation by opening the terminal and typing sudo apt update followed by sudo apt install nginx.
To do that, open the Ubuntu terminal and run the commands below to install the Nginx web server.
sudo apt update
sudo apt install nginx
Once Nginx is installed, the commands below can start, stop, and enable the Nginx web server to start automatically when your server boots up.
sudo systemctl stop nginx
sudo systemctl start nginx
sudo systemctl enable nginx
You can test the Nginx web server by opening your web browser and browsing to the server’s localhost or IP address.
http://localhost
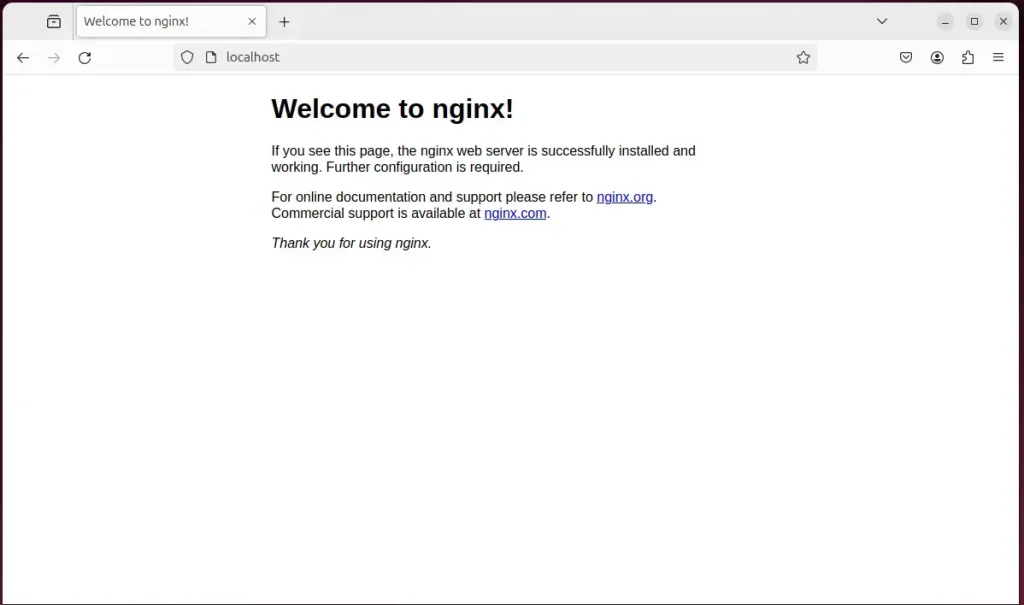
When you see the Welcome to nginx!, it means the Nginx HTTP server is successfully installed.
Additional help on installing Nginx on Ubuntu is in the link below.
Install the MariaDB database server on Ubuntu
MariaDB database server installation on Ubuntu provides the backend storage your online store needs to function. You can complete the MariaDB setup for your OpenCart Nginx Ubuntu installation by opening your terminal and running the standard package installation command to download and start the database service.
To install and use the MariaDB database server, use the instructions below.
Open the Ubuntu terminal and run the commands below to install the MariaDB database server.
sudo apt update
sudo apt install mariadb-server
Once the MariaDB database server is installed, use the commands below to stop, start, and enable the MariaDB server to start automatically when the server boots.
sudo systemctl stop mariadb
sudo systemctl start mariadb
sudo systemctl enable mariadb
Run the following commands to validate and test if the MariaDB database server is installed successfully.
sudo mariadb
Once you run the commands above, it will log you onto the MariaDB console and display a message similar to the one below.
Welcome to the MariaDB monitor.  Commands end with ; or g.
Your MariaDB connection id is 32
Server version: 10.11.2-MariaDB-1 Ubuntu 23.04

Copyright (c) 2000, 2018, Oracle, MariaDB Corporation Ab and others.

Type 'help;' or 'h' for help. Type 'c' to clear the current input statement.

MariaDB [(none)]>
The message tells you that the server is installed successfully.
Additional help on installing MariaDB.
- How to install MariaDB on Ubuntu Linux
- MariaDB without password prompt
Create an OpenCart database
An OpenCart database must be created in MariaDB along with a dedicated user account before you run the web installer. You can set up this database for your OpenCart Nginx Ubuntu installation by logging into the database command line and running SQL commands to create the database and grant full user permissions.
As part of the setup, we will create an opencartdb database and a corresponding user account called opencartdbuser.
Finally, we'll grant the opencartdbuser full access to the opencartdb database.
All the database steps above can be done using the commands below:
But first, log on to the MariaDB database server:
sudo mariadb
Then run the commands below to complete the steps:
CREATE DATABASE opencartdb CHARACTER SET utf8mb4 COLLATE utf8mb4_general_ci;
CREATE USER opencartdbuser@localhost IDENTIFIED BY 'type_your_password_here';
GRANT ALL ON opencartdb.* TO opencartdbuser@localhost WITH GRANT OPTION;
FLUSH PRIVILEGES;
exit
Install PHP on Ubuntu Linux
PHP and its required extensions must be installed on your Ubuntu system so the e-commerce software can process code and communicate with the database. You can handle this part of your OpenCart Nginx Ubuntu installation by running the apt command that pulls in PHP-FPM and all necessary modules.
Run the commands below to install PHP.
sudo apt install php-fpm php-intl php-mysql php-curl php-cli php-zip php-xml php-gd php-common php-mbstring php-xmlrpc php-json php-sqlite3 php-soap php-zip
Additional help on installing PHP
Download OpenCart files
OpenCart installation files are downloaded directly from the official project repository to your server's web root directory. You can fetch the package for your OpenCart Nginx Ubuntu installation using the wget command-line tool to grab the archive file and prepare it for extraction.
To always install the latest version, check the OpenCart's download page. If a new version is available, replace the version number in the link below.
First, navigate to the /tmp/ directory and download OpenCart files. After unzipping the file, move the content into the OpenCart folder in the Nginx root directory.
The final step is to change the permissions. This will allow the Nginx web server to safely interact with the files, ensuring a secure environment for your OpenCart installation.
cd /tmp
wget https://github.com/opencart/opencart/releases/download/4.0.2.3/opencart-4.0.2.3.zip
unzip opencart-4.0.2.3.zip
sudo mv opencart-*/upload/ /var/www/opencart
Next, create the config files and allow Nginx to use them.
sudo cp /var/www/opencart/config-dist.php /var/www/opencart/config.php
sudo cp /var/www/opencart/admin/config-dist.php /var/www/opencart/admin/config.php
sudo chown -R www-data:www-data /var/www/opencart
Once you have completed all the above steps, continue configuring the Nginx web server below to serve the OpenCart content.
Run the commands below to create a Nginx virtual host file for OpenCart.
sudo nano /etc/nginx/sites-available/opencart.conf
Then, copy and paste the content block below into the Nginx server block.
server {
    listen 80;
    listen [::]:80;
    root /var/www/opencart;
    index  index.php;
    server_name  opencart.example.com;

    access_log /var/log/nginx/example.com.access.log;
    error_log /var/log/nginx/example.com.error.log;

    location / {
        try_files $uri @opencart;
    }

    location /admin {
        index index.php;
    }

    location @opencart {
	 rewrite ^/(.+)$ /index.php?_route_=$1 last;
    }

    location ~ .php$ {
         include snippets/fastcgi-php.conf;
         fastcgi_pass unix:/var/run/php/php8.3-fpm.sock;
         fastcgi_param SCRIPT_FILENAME $document_root$fastcgi_script_name;
         include fastcgi_params;
    }
}
Save the file.
You enable the OpenCart virtual host configuration file, located at `/etc/nginx/sites-available/opencart`, by creating a symbolic link to the `/etc/nginx/sites-enabled/` directory. Then, you restart the Nginx web server to apply these changes, ensuring the OpenCart website is accessible.
sudo ln -s /etc/nginx/sites-available/opencart.conf /etc/nginx/sites-enabled/
sudo systemctl restart nginx.service
Setup Let's Encrypt SSL/TLS for OpenCart
Let's Encrypt SSL/TLS certificates secure your website traffic by enabling HTTPS connections through the Nginx web server. You can finish your OpenCart Nginx Ubuntu installation security setup by installing Certbot and generating a free certificate for your domain name.
Please read the post below for additional resources on installing and creating Let's Encrypt SSL certificates for Nginx.
How to set up Let's Encrypt SSL certificate for Nginx on Ubuntu Linux
Once you have restarted the Nginx web server, open your browser and browse to the server hostname or IP address defined in the Nginx server block.
http://opencart.example.com
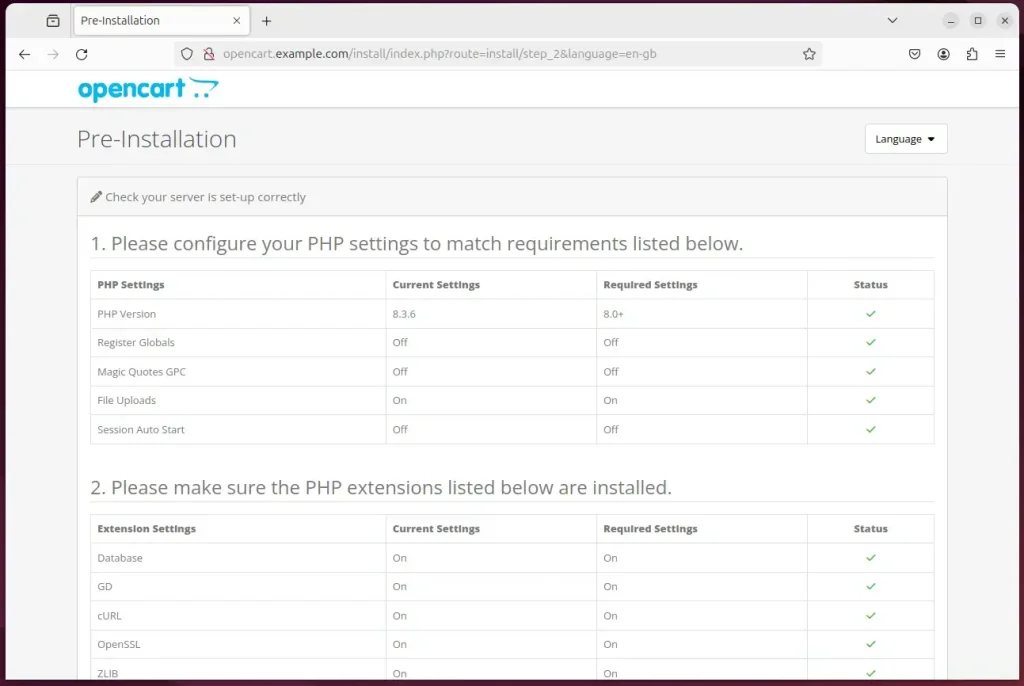
An OpenCart installation wizard page should appear. Ensure all requirements are met and continue.
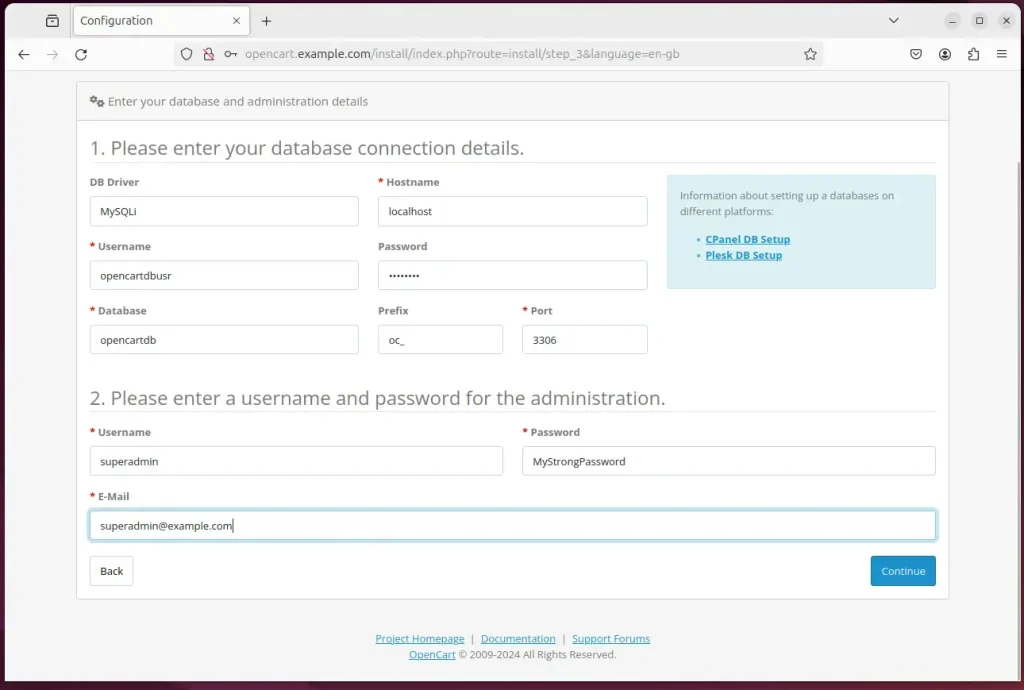
Next, enter the database name, create an account and password, and continue.
Your OpenCart site should be set up and ready to use.
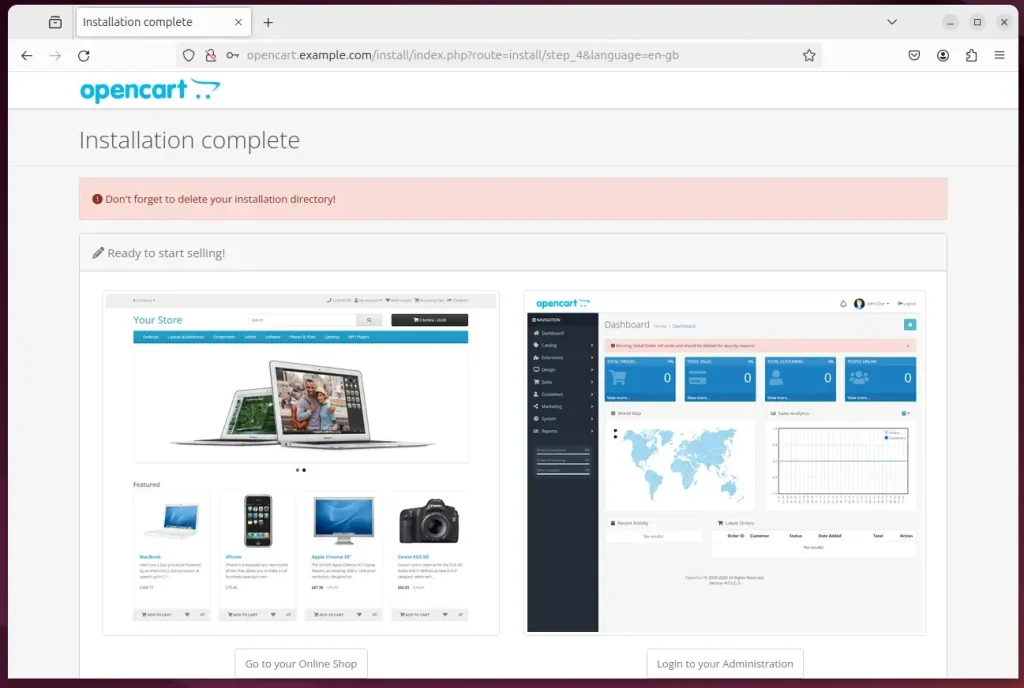
Don't forget to delete your installation directory!
sudo rm -rf /var/www/opencart/install/
That should do it!
Conclusion:
Installing OpenCart with Nginx on Ubuntu 24.04 provides a solid foundation for your e-commerce site. Here are key takeaways from the installation process:
- Choose the Right Components: Using Nginx for its performance and security features paired with Ubuntu's user-friendly environment enhances reliability.
- Database Setup: MariaDB is a robust database solution that enables efficient data management for your OpenCart application.
- PHP Compatibility: Ensure you have the necessary PHP extensions installed to support OpenCart's functionality.
- Easy Configuration: The virtual host setup simplifies Nginx's management for serving OpenCart efficiently.
- SSL Security: Implementing Let's Encrypt SSL certificates secures your site, reinforcing customer trust.
- Finalization: Deleting the installation directory post-setup is crucial for maintaining security.
After following these installation steps, you can establish a secure and functional OpenCart e-commerce platform on your Ubuntu 24.04 server, ready to sell products online.
Was this guide helpful?

About the Author
Richard
Tech Writer, IT Professional
Richard is a writer at Geek Rewind who turns complex IT tasks into clear, step-by-step guides. He draws on years of hands-on experience in system administration and enterprise IT operations, focusing on Windows, Linux and WordPress: the problems people actually run into, and the fixes that work. His server and WordPress guides come from systems he runs himself. Richard builds and maintains the platform behind Geek Rewind, from its Ubuntu servers and Nginx configuration to its custom WordPress plugins. Many new tutorials start with readers' questions, and he's always glad to answer them in the comments.



No comments yet — be the first to share your thoughts!