How to Install Froxlor with Nginx on Ubuntu 24.04

Install PHP on Ubuntu Linux
Installing PHP and the required modules on Ubuntu 24.04 is necessary because Froxlor runs entirely on PHP scripts. Run the command sudo apt install php-fpm php-mysql along with other required extensions to set up the scripting language for your web server.
Froxlor relies on PHP, so you need to install the necessary PHP components on your Ubuntu 24.04 system. This includes installing the PHP FastCGI Process Manager (php-fpm) and other essential PHP modules. Running a simple command in the terminal installs the latest PHP and its required extensions.
Then, run the commands below to install the latest PHP version.
sudo apt install php-fpm php-intl php-mysql php-curl php-cli php-zip php-xml php-gd php-common php-mbstring php-xmlrpc php-bcmath php-json php-sqlite3 php-soap php-gmp php-gnupg php-zip php-ldap php-imap
Additional help on installing PHP
Download Froxlor files
Downloading Froxlor source files directly to your Ubuntu 24.04 server lets you set up the latest version of the control panel. Grab the official tarball link from the Froxlor website and use the wget command in your terminal to fetch the archive.
You need to download the Froxlor software onto your Ubuntu 24.04 server. To get the newest version, visit the official Froxlor download page to find the link for the latest files. After downloading the files to your server, you'll unpack them into the correct folder for installation.
To always install the latest version, check the download page for Froxlor. Get the download link and download the archived package to your computer. Then, extract it.
First, navigate to the /tmp/ directory and download the Froxlor files. Next, extract the content into the Froxlor folder in the Nginx root directory.
The final step is to change the permissions. This will allow the Nginx web server to interact safely with the files, ensuring a secure environment for your Froxlor installation.
You must run the following commands to change these permissions, ensuring the Froxlor application can write and read necessary files, such as those in `/var/www/froxlor` or `/var/www/html` (if Froxlor is installed there).
cd /tmp
wget https://files.froxlor.org/releases/froxlor-latest.tar.gz
sudo tar xvfz froxlor-latest.tar.gz -C /var/www/
sudo chown -R www-data:www-data /var/www/froxlor/
Once you have completed all the above steps, continue configuring the Nginx web server below to serve the Froxlor content.
Run the commands below to create an Nginx virtual host file for Froxlor.
sudo nano /etc/nginx/sites-available/froxlor.conf
Then, copy and paste the content block below into the Nginx server block.
server {
    listen 80;
    listen [::]:80;
    root /var/www/froxlor;
    index  index.php;
    server_name  froxlor.example.com;

    access_log /var/log/nginx/example.com.access.log;
    error_log /var/log/nginx/example.com.error.log;

    location / {
        try_files $uri $uri/ /index.php?$args;
    }

    location ~ .php$ {
         include snippets/fastcgi-php.conf;
         fastcgi_pass unix:/var/run/php/php8.3-fpm.sock;
         fastcgi_param SCRIPT_FILENAME $document_root$fastcgi_script_name;
         include fastcgi_params;
    }
}
Save the file.
You can enable the Nginx virtual host by running the commands `sudo a2ensite froxlor.conf` and then restart the Nginx server with `sudo systemctl restart nginx`. This action makes the web server recognize and serve Froxlor.
sudo ln -s /etc/nginx/sites-available/froxlor.conf /etc/nginx/sites-enabled/
sudo systemctl restart nginx.service
sudo systemctl restart php8.3-fpm
Setup Let’s Encrypt SSL/TLS for Froxlor
Setting up Let's Encrypt SSL certificates for Froxlor secures your control panel traffic with free HTTPS encryption on Nginx. Configure your domain and use Certbot to generate and install the security certificates on your Ubuntu server.
Securing your Froxlor setup with HTTPS is vital for website protection, and Let's Encrypt provides free SSL certificates for this on Ubuntu with Nginx. You can set up Let's Encrypt SSL certificates to encrypt the connection between your users and your Froxlor panel, keeping data safe.
Please read the post below for additional resources on installing and creating Let’s Encrypt SSL certificates for Nginx.
How to set up Let’s Encrypt SSL certificate for Nginx on Ubuntu Linux
Once you have restarted the Nginx web server, open your browser and browse to the server hostname or IP address defined in the Nginx server block.
http://froxlor.example.com
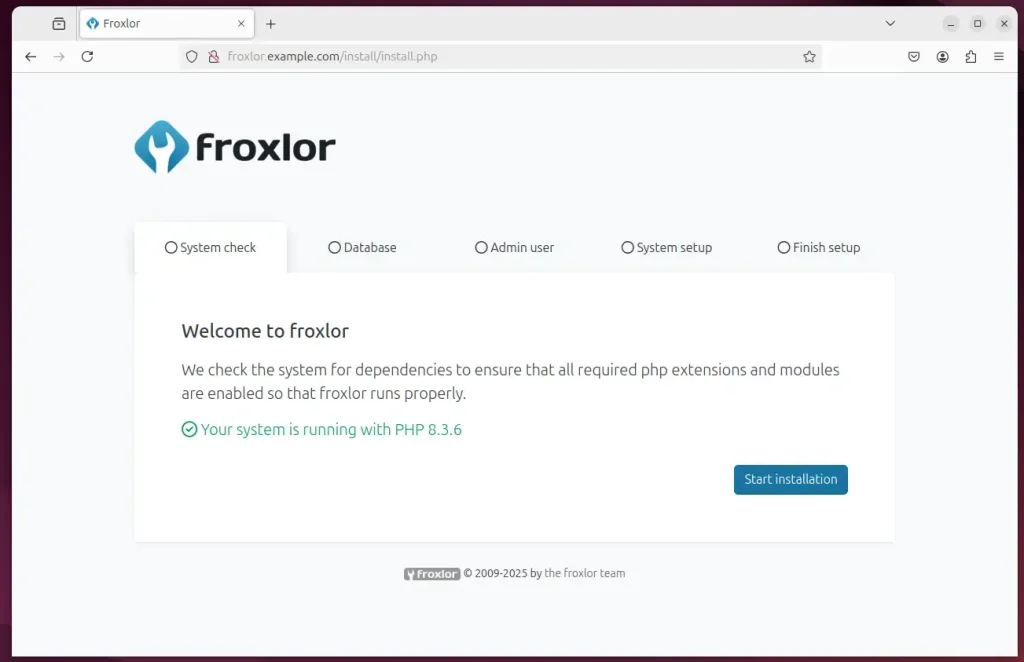
The Froxlor installation wizard should appear.
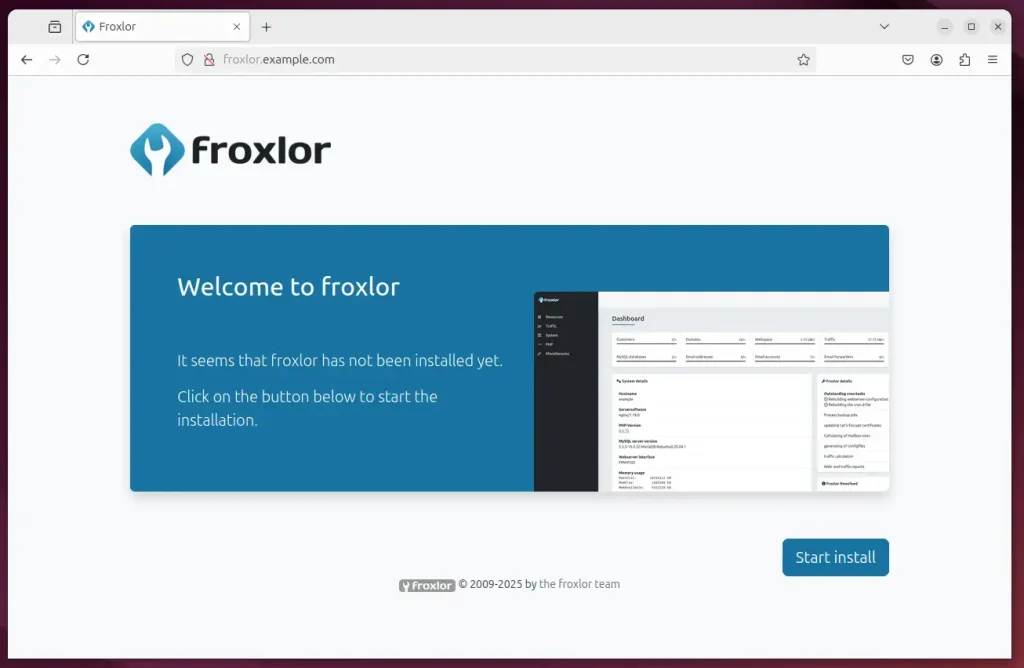
Click Start installation to begin.
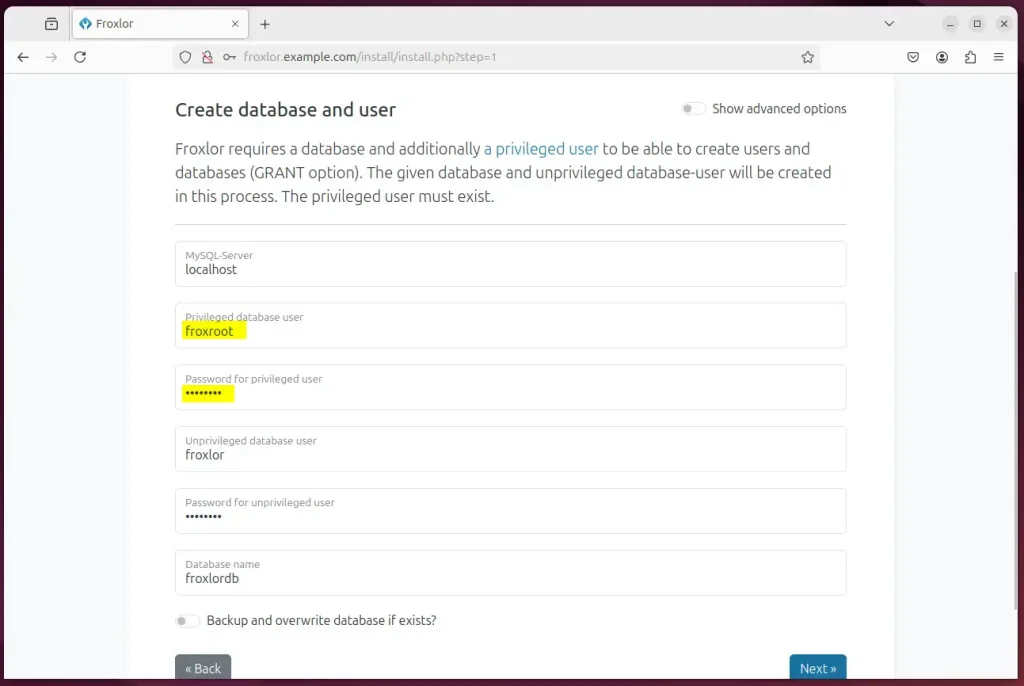
Type in the database name and password, then click Next.
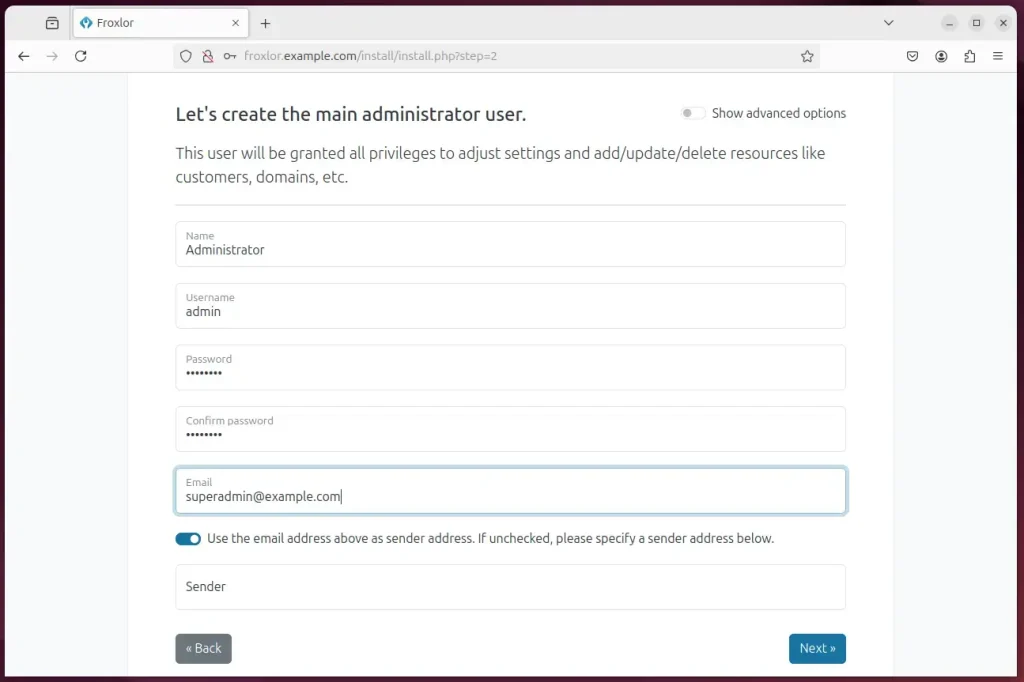
Create an admin account and continue.
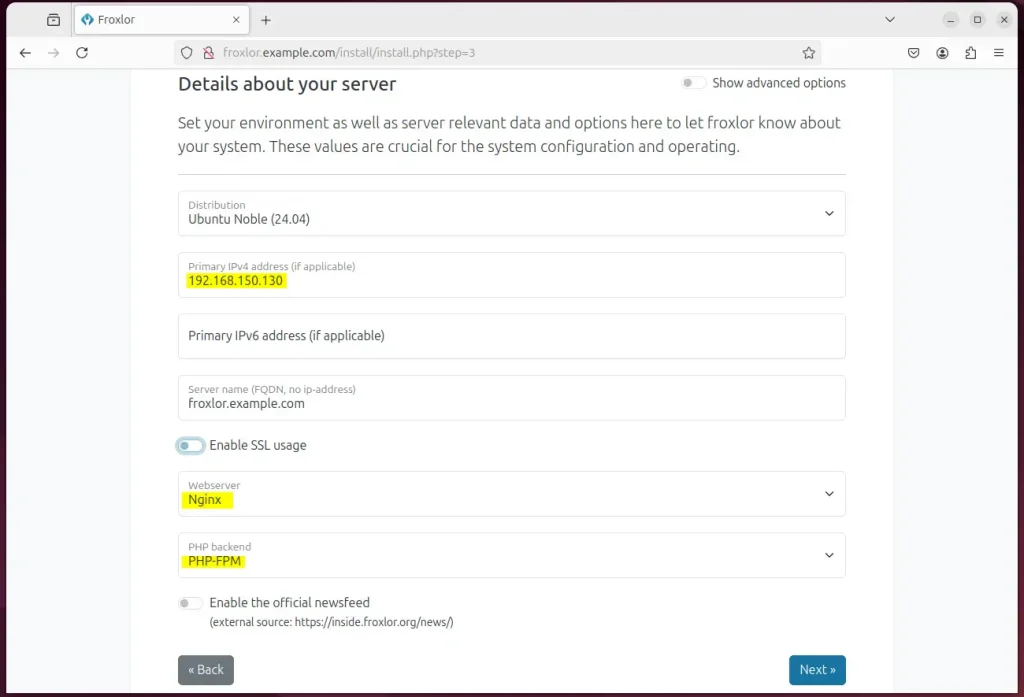
Type in the server primary IP address and choose the webserver and backend for Nginx.
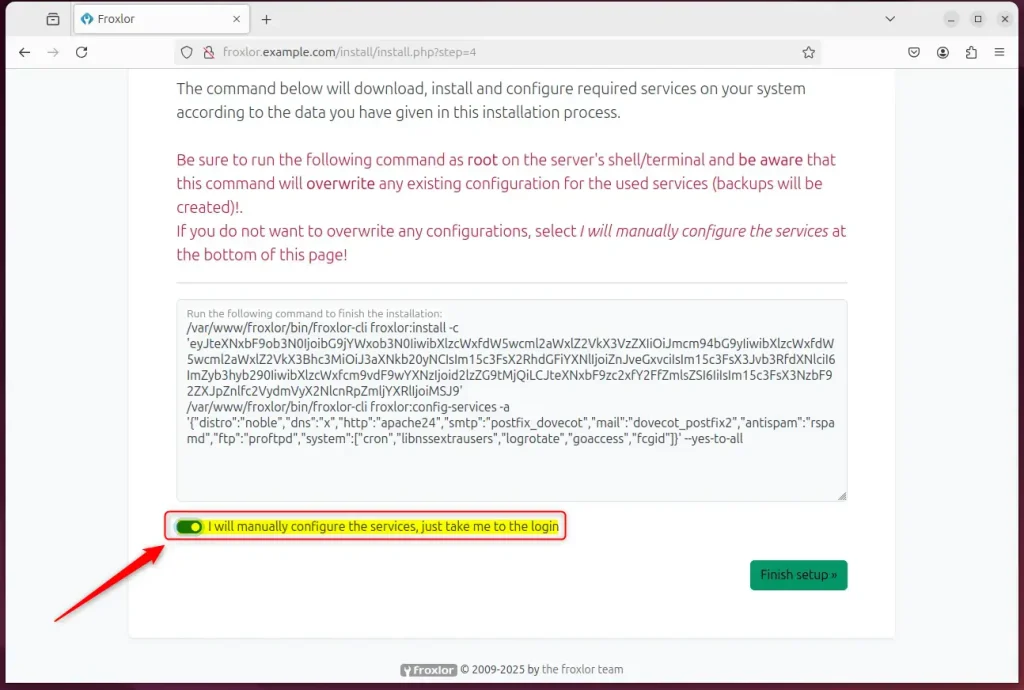
Choose to configure services yourself.
Login and begin configuring your services.
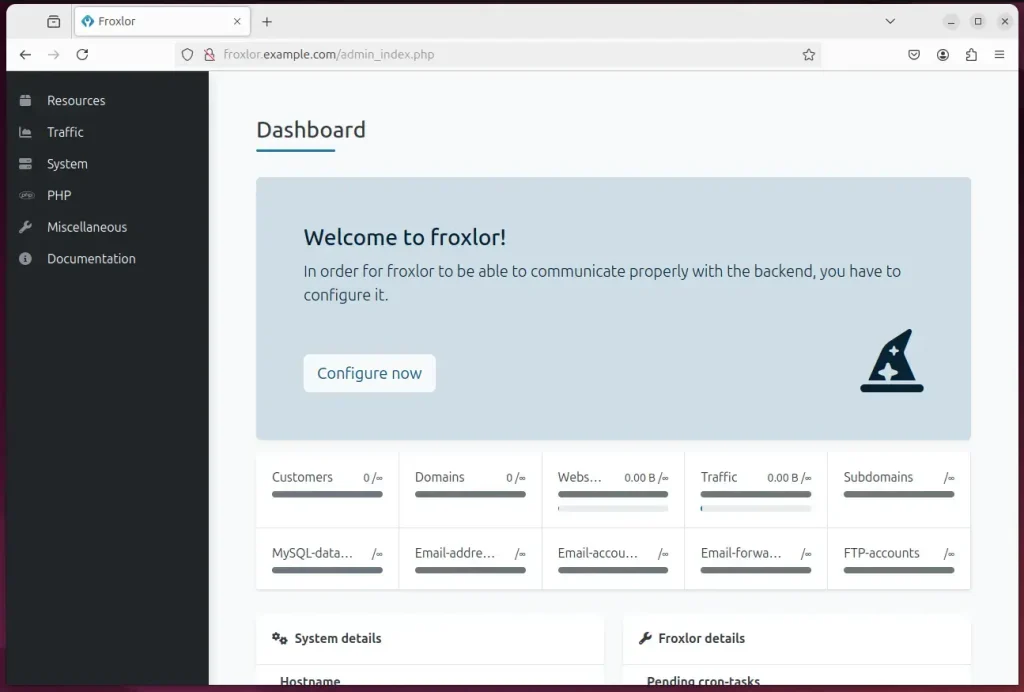
Froxlor should be ready to use.
That should do it!
Conclusion:
In summary, installing the Froxlor server management panel with Nginx on Ubuntu 24.04 involves several key steps:
-
- Nginx Installation: Successfully installed and configured Nginx to serve as the web server for Froxlor.
-
- MariaDB Setup: Installed the MariaDB database server and created a dedicated user for Froxlor’s operations.
-
- PHP Installation: Installed the necessary PHP components required for Froxlor to function effectively.
-
- Downloading Froxlor: Downloaded and extracted Froxlor files to the appropriate directory.
-
- Nginx Configuration: Configured the Nginx virtual host to serve Froxlor and enable PHP processing.
-
- SSL/TLS Security: Suggested securing the installation with an SSL/TLS certificate from Let’s Encrypt.
-
- Admin Setup: Completed the Froxlor installation wizard to set up the admin account and server configuration.
By following these steps, you can efficiently manage your hosting environment using Froxlor, leveraging the performance and benefits of Nginx on Ubuntu.
Create a Froxlor database user
Creating a dedicated Froxlor database user in MariaDB allows the control panel to securely manage its stored data. Log into your MariaDB prompt using sudo mysql and run the necessary SQL commands to create the database user and grant proper permissions.
After setting up MariaDB, you must create a secure user account for Froxlor to manage its data. This user, which we'll call 'froxroot', will have specific permissions within the MariaDB server. You'll log into MariaDB first and then run commands to create this Froxlor-specific user.
As part of the setup, we will create a user account called froxroot.
But first, log on to the MariaDB database server:
sudo mariadb
Then run the commands below to complete the steps:
CREATE USER 'froxroot'@'localhost' IDENTIFIED BY 'CHANGEM3';
GRANT ALL PRIVILEGES ON *.* TO 'froxroot'@'localhost' WITH GRANT OPTION;
FLUSH PRIVILEGES;
exit
Ensure to replace ‘CHANGEM3‘ with your password.
Install PHP on Ubuntu Linux
Installing PHP and the required modules on Ubuntu 24.04 is necessary because Froxlor runs entirely on PHP scripts. Run the command sudo apt install php-fpm php-mysql along with other required extensions to set up the scripting language for your web server.
Froxlor relies on PHP, so you need to install the necessary PHP components on your Ubuntu 24.04 system. This includes installing the PHP FastCGI Process Manager (php-fpm) and other essential PHP modules. Running a simple command in the terminal installs the latest PHP and its required extensions.
Then, run the commands below to install the latest PHP version.
sudo apt install php-fpm php-intl php-mysql php-curl php-cli php-zip php-xml php-gd php-common php-mbstring php-xmlrpc php-bcmath php-json php-sqlite3 php-soap php-gmp php-gnupg php-zip php-ldap php-imap
Additional help on installing PHP
Download Froxlor files
Downloading Froxlor source files directly to your Ubuntu 24.04 server lets you set up the latest version of the control panel. Grab the official tarball link from the Froxlor website and use the wget command in your terminal to fetch the archive.
You need to download the Froxlor software onto your Ubuntu 24.04 server. To get the newest version, visit the official Froxlor download page to find the link for the latest files. After downloading the files to your server, you'll unpack them into the correct folder for installation.
To always install the latest version, check the download page for Froxlor. Get the download link and download the archived package to your computer. Then, extract it.
First, navigate to the /tmp/ directory and download the Froxlor files. Next, extract the content into the Froxlor folder in the Nginx root directory.
The final step is to change the permissions. This will allow the Nginx web server to interact safely with the files, ensuring a secure environment for your Froxlor installation.
You must run the following commands to change these permissions, ensuring the Froxlor application can write and read necessary files, such as those in `/var/www/froxlor` or `/var/www/html` (if Froxlor is installed there).
cd /tmp
wget https://files.froxlor.org/releases/froxlor-latest.tar.gz
sudo tar xvfz froxlor-latest.tar.gz -C /var/www/
sudo chown -R www-data:www-data /var/www/froxlor/
Once you have completed all the above steps, continue configuring the Nginx web server below to serve the Froxlor content.
Run the commands below to create an Nginx virtual host file for Froxlor.
sudo nano /etc/nginx/sites-available/froxlor.conf
Then, copy and paste the content block below into the Nginx server block.
server {
    listen 80;
    listen [::]:80;
    root /var/www/froxlor;
    index  index.php;
    server_name  froxlor.example.com;

    access_log /var/log/nginx/example.com.access.log;
    error_log /var/log/nginx/example.com.error.log;

    location / {
        try_files $uri $uri/ /index.php?$args;
    }

    location ~ .php$ {
         include snippets/fastcgi-php.conf;
         fastcgi_pass unix:/var/run/php/php8.3-fpm.sock;
         fastcgi_param SCRIPT_FILENAME $document_root$fastcgi_script_name;
         include fastcgi_params;
    }
}
Save the file.
You can enable the Nginx virtual host by running the commands `sudo a2ensite froxlor.conf` and then restart the Nginx server with `sudo systemctl restart nginx`. This action makes the web server recognize and serve Froxlor.
sudo ln -s /etc/nginx/sites-available/froxlor.conf /etc/nginx/sites-enabled/
sudo systemctl restart nginx.service
sudo systemctl restart php8.3-fpm
Setup Let’s Encrypt SSL/TLS for Froxlor
Setting up Let's Encrypt SSL certificates for Froxlor secures your control panel traffic with free HTTPS encryption on Nginx. Configure your domain and use Certbot to generate and install the security certificates on your Ubuntu server.
Securing your Froxlor setup with HTTPS is vital for website protection, and Let's Encrypt provides free SSL certificates for this on Ubuntu with Nginx. You can set up Let's Encrypt SSL certificates to encrypt the connection between your users and your Froxlor panel, keeping data safe.
Please read the post below for additional resources on installing and creating Let’s Encrypt SSL certificates for Nginx.
How to set up Let’s Encrypt SSL certificate for Nginx on Ubuntu Linux
Once you have restarted the Nginx web server, open your browser and browse to the server hostname or IP address defined in the Nginx server block.
http://froxlor.example.com
The Froxlor installation wizard should appear.
Click Start installation to begin.
Type in the database name and password, then click Next.
Create an admin account and continue.
Type in the server primary IP address and choose the webserver and backend for Nginx.
Choose to configure services yourself.
Login and begin configuring your services.
Froxlor should be ready to use.
That should do it!
Conclusion:
In summary, installing the Froxlor server management panel with Nginx on Ubuntu 24.04 involves several key steps:
-
- Nginx Installation: Successfully installed and configured Nginx to serve as the web server for Froxlor.
-
- MariaDB Setup: Installed the MariaDB database server and created a dedicated user for Froxlor’s operations.
-
- PHP Installation: Installed the necessary PHP components required for Froxlor to function effectively.
-
- Downloading Froxlor: Downloaded and extracted Froxlor files to the appropriate directory.
-
- Nginx Configuration: Configured the Nginx virtual host to serve Froxlor and enable PHP processing.
-
- SSL/TLS Security: Suggested securing the installation with an SSL/TLS certificate from Let’s Encrypt.
-
- Admin Setup: Completed the Froxlor installation wizard to set up the admin account and server configuration.
By following these steps, you can efficiently manage your hosting environment using Froxlor, leveraging the performance and benefits of Nginx on Ubuntu.
Install the MariaDB database server on Ubuntu
Installing the MariaDB database server on Ubuntu 24.04 gives Froxlor the database system it needs to store user and panel data. Open your terminal and run sudo apt install mariadb-server to download and set up MariaDB on your server.
Froxlor requires a database to store its information, and MariaDB is an excellent option for your Ubuntu 24.04 server. You can easily install the MariaDB database server using simple commands in the Ubuntu terminal, setting up the essential data management system Froxlor needs.
To install and use the MariaDB database server, use the instructions below.
Open the Ubuntu terminal and run the commands below to install the MariaDB database server.
sudo apt update
sudo apt install mariadb-server
Once the MariaDB database server is installed, use the commands below to stop, start, and enable the MariaDB server to start automatically when the server boots.
sudo systemctl stop mariadb
sudo systemctl start mariadb
sudo systemctl enable mariadb
Run the following commands to validate and test if the MariaDB database server is installed successfully.
sudo mariadb
Once you run the commands above, it will log you onto the MariaDB console and display a message similar to the one below.
Welcome to the MariaDB monitor.  Commands end with ; or g.
Your MariaDB connection id is 32
Server version: 10.11.2-MariaDB-1 Ubuntu 23.04

Copyright (c) 2000, 2018, Oracle, MariaDB Corporation Ab and others.

Type 'help;' or 'h' for help. Type 'c' to clear the current input statement.

MariaDB [(none)]>
The message tells you that the server is installed successfully.
Additional help on installing MariaDB.
-
- MariaDB without password prompt
Create a Froxlor database user
Creating a dedicated Froxlor database user in MariaDB allows the control panel to securely manage its stored data. Log into your MariaDB prompt using sudo mysql and run the necessary SQL commands to create the database user and grant proper permissions.
After setting up MariaDB, you must create a secure user account for Froxlor to manage its data. This user, which we'll call 'froxroot', will have specific permissions within the MariaDB server. You'll log into MariaDB first and then run commands to create this Froxlor-specific user.
As part of the setup, we will create a user account called froxroot.
But first, log on to the MariaDB database server:
sudo mariadb
Then run the commands below to complete the steps:
CREATE USER 'froxroot'@'localhost' IDENTIFIED BY 'CHANGEM3';
GRANT ALL PRIVILEGES ON *.* TO 'froxroot'@'localhost' WITH GRANT OPTION;
FLUSH PRIVILEGES;
exit
Ensure to replace ‘CHANGEM3‘ with your password.
Install PHP on Ubuntu Linux
Installing PHP and the required modules on Ubuntu 24.04 is necessary because Froxlor runs entirely on PHP scripts. Run the command sudo apt install php-fpm php-mysql along with other required extensions to set up the scripting language for your web server.
Froxlor relies on PHP, so you need to install the necessary PHP components on your Ubuntu 24.04 system. This includes installing the PHP FastCGI Process Manager (php-fpm) and other essential PHP modules. Running a simple command in the terminal installs the latest PHP and its required extensions.
Then, run the commands below to install the latest PHP version.
sudo apt install php-fpm php-intl php-mysql php-curl php-cli php-zip php-xml php-gd php-common php-mbstring php-xmlrpc php-bcmath php-json php-sqlite3 php-soap php-gmp php-gnupg php-zip php-ldap php-imap
Additional help on installing PHP
Download Froxlor files
Downloading Froxlor source files directly to your Ubuntu 24.04 server lets you set up the latest version of the control panel. Grab the official tarball link from the Froxlor website and use the wget command in your terminal to fetch the archive.
You need to download the Froxlor software onto your Ubuntu 24.04 server. To get the newest version, visit the official Froxlor download page to find the link for the latest files. After downloading the files to your server, you'll unpack them into the correct folder for installation.
To always install the latest version, check the download page for Froxlor. Get the download link and download the archived package to your computer. Then, extract it.
First, navigate to the /tmp/ directory and download the Froxlor files. Next, extract the content into the Froxlor folder in the Nginx root directory.
The final step is to change the permissions. This will allow the Nginx web server to interact safely with the files, ensuring a secure environment for your Froxlor installation.
You must run the following commands to change these permissions, ensuring the Froxlor application can write and read necessary files, such as those in `/var/www/froxlor` or `/var/www/html` (if Froxlor is installed there).
cd /tmp
wget https://files.froxlor.org/releases/froxlor-latest.tar.gz
sudo tar xvfz froxlor-latest.tar.gz -C /var/www/
sudo chown -R www-data:www-data /var/www/froxlor/
Once you have completed all the above steps, continue configuring the Nginx web server below to serve the Froxlor content.
Run the commands below to create an Nginx virtual host file for Froxlor.
sudo nano /etc/nginx/sites-available/froxlor.conf
Then, copy and paste the content block below into the Nginx server block.
server {
    listen 80;
    listen [::]:80;
    root /var/www/froxlor;
    index  index.php;
    server_name  froxlor.example.com;

    access_log /var/log/nginx/example.com.access.log;
    error_log /var/log/nginx/example.com.error.log;

    location / {
        try_files $uri $uri/ /index.php?$args;
    }

    location ~ .php$ {
         include snippets/fastcgi-php.conf;
         fastcgi_pass unix:/var/run/php/php8.3-fpm.sock;
         fastcgi_param SCRIPT_FILENAME $document_root$fastcgi_script_name;
         include fastcgi_params;
    }
}
Save the file.
You can enable the Nginx virtual host by running the commands `sudo a2ensite froxlor.conf` and then restart the Nginx server with `sudo systemctl restart nginx`. This action makes the web server recognize and serve Froxlor.
sudo ln -s /etc/nginx/sites-available/froxlor.conf /etc/nginx/sites-enabled/
sudo systemctl restart nginx.service
sudo systemctl restart php8.3-fpm
Setup Let’s Encrypt SSL/TLS for Froxlor
Setting up Let's Encrypt SSL certificates for Froxlor secures your control panel traffic with free HTTPS encryption on Nginx. Configure your domain and use Certbot to generate and install the security certificates on your Ubuntu server.
Securing your Froxlor setup with HTTPS is vital for website protection, and Let's Encrypt provides free SSL certificates for this on Ubuntu with Nginx. You can set up Let's Encrypt SSL certificates to encrypt the connection between your users and your Froxlor panel, keeping data safe.
Please read the post below for additional resources on installing and creating Let’s Encrypt SSL certificates for Nginx.
How to set up Let’s Encrypt SSL certificate for Nginx on Ubuntu Linux
Once you have restarted the Nginx web server, open your browser and browse to the server hostname or IP address defined in the Nginx server block.
http://froxlor.example.com
The Froxlor installation wizard should appear.
Click Start installation to begin.
Type in the database name and password, then click Next.
Create an admin account and continue.
Type in the server primary IP address and choose the webserver and backend for Nginx.
Choose to configure services yourself.
Login and begin configuring your services.
Froxlor should be ready to use.
That should do it!
Conclusion:
In summary, installing the Froxlor server management panel with Nginx on Ubuntu 24.04 involves several key steps:
-
- Nginx Installation: Successfully installed and configured Nginx to serve as the web server for Froxlor.
-
- MariaDB Setup: Installed the MariaDB database server and created a dedicated user for Froxlor’s operations.
-
- PHP Installation: Installed the necessary PHP components required for Froxlor to function effectively.
-
- Downloading Froxlor: Downloaded and extracted Froxlor files to the appropriate directory.
-
- Nginx Configuration: Configured the Nginx virtual host to serve Froxlor and enable PHP processing.
-
- SSL/TLS Security: Suggested securing the installation with an SSL/TLS certificate from Let’s Encrypt.
-
- Admin Setup: Completed the Froxlor installation wizard to set up the admin account and server configuration.
By following these steps, you can efficiently manage your hosting environment using Froxlor, leveraging the performance and benefits of Nginx on Ubuntu.
Froxlor with Nginx on Ubuntu 24.04 gives you a complete web hosting control panel to manage websites, email accounts, and databases from a single dashboard. Froxlor is a free management tool, and Nginx is a fast web server that keeps your sites running smoothly.
Install Nginx, MariaDB, and PHP by running `sudo apt install nginx mariadb-server php-fpm php-intl php-mysql php-curl php-cli php-zip php-xml php-gd php-common php-mbstring php-xmlrpc php-bcmath php-json php-sqlite3 php-soap php-gmp php-gnupg php-ldap php-imap`. Then, create a Froxlor database user and download the Froxlor files.
Ubuntu 24.04 provides a stable foundation for this setup. You need root access on your server to run a few commands and get everything running.
- Open your Ubuntu terminal and update your package list with
sudo apt update. - Install the Nginx web server using
sudo apt install nginx. - Start and enable the Nginx service with
sudo systemctl start nginxandsudo systemctl enable nginx. - Install the MariaDB database server by running
sudo apt install mariadb-server. - Create a secure database user for Froxlor. Log into MariaDB with
sudo mariadb, then runCREATE USER 'froxroot'@'localhost' IDENTIFIED BY 'YOUR_STRONG_PASSWORD';GRANT ALL PRIVILEGES ON *.* TO 'froxroot'@'localhost' WITH GRANT OPTION;FLUSH PRIVILEGES;(replace 'YOUR_STRONG_PASSWORD' with a secure password). - Install PHP and its necessary modules with
sudo apt install php-fpm php-intl php-mysql php-curl php-cli php-zip php-xml php-gd php-common php-mbstring php-xmlrpc php-bcmath php-json. - Download the latest Froxlor files from their official website, extract them to
/var/www/, and set permissions withsudo chown -R www-data:www-data /var/www/froxlor/. - Create an Nginx virtual host file for Froxlor at
/etc/nginx/sites-available/froxlor.conf, adjusting server names and log paths. - Enable the Froxlor site and restart Nginx and PHP-FPM using
sudo ln -s /etc/nginx/sites-available/froxlor.conf /etc/nginx/sites-enabled/,sudo systemctl restart nginx, andsudo systemctl restart php8.3-fpm. - Open your web browser and go to your server's IP address or domain name (e.g.,
http://froxlor.example.com) to complete the Froxlor installation wizard.
Install Nginx HTTP server on Ubuntu.
Installing Nginx on Ubuntu 24.04 takes just a few terminal commands and provides the web server needed to run Froxlor. Open your terminal and run sudo apt update followed by sudo apt install nginx to download and set up the web server on your system.
You need a web server like Nginx to run Froxlor on your Ubuntu 24.04 system. Installing Nginx is straightforward using the terminal. After installation, you can manage Nginx, starting and stopping it as needed, and ensure it launches automatically when your server boots up.
To do that, open the Ubuntu terminal and run the commands below to install the Nginx web server.
sudo apt update
sudo apt install nginx
Once Nginx is installed, the commands below can start, stop, and enable the Nginx web server to start automatically when your server boots up.
sudo systemctl stop nginx
sudo systemctl start nginx
sudo systemctl enable nginx
You can test the Nginx web server is running by opening your web browser and browsing to the server's localhost or IP address.
http://localhost
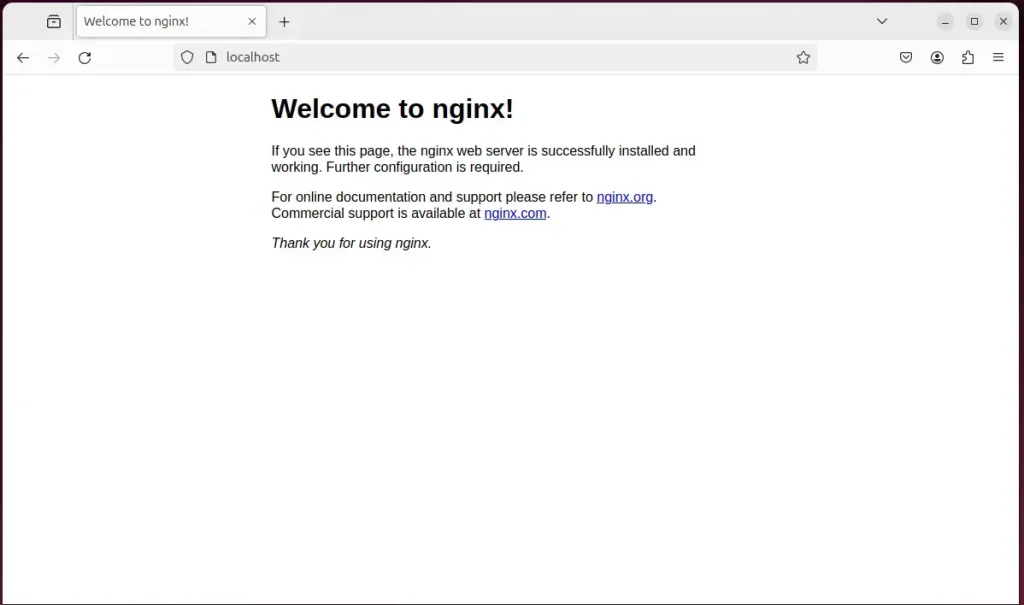
When you see the Welcome to nginx!, it means the Nginx HTTP server is successfully installed.
Additional help on installing Nginx on Ubuntu is in the link below.
Install the MariaDB database server on Ubuntu
Installing the MariaDB database server on Ubuntu 24.04 gives Froxlor the database system it needs to store user and panel data. Open your terminal and run sudo apt install mariadb-server to download and set up MariaDB on your server.
Froxlor requires a database to store its information, and MariaDB is an excellent option for your Ubuntu 24.04 server. You can easily install the MariaDB database server using simple commands in the Ubuntu terminal, setting up the essential data management system Froxlor needs.
To install and use the MariaDB database server, use the instructions below.
Open the Ubuntu terminal and run the commands below to install the MariaDB database server.
sudo apt update
sudo apt install mariadb-server
Once the MariaDB database server is installed, use the commands below to stop, start, and enable the MariaDB server to start automatically when the server boots.
sudo systemctl stop mariadb
sudo systemctl start mariadb
sudo systemctl enable mariadb
Run the following commands to validate and test if the MariaDB database server is installed successfully.
sudo mariadb
Once you run the commands above, it will log you onto the MariaDB console and display a message similar to the one below.
Welcome to the MariaDB monitor.  Commands end with ; or g.
Your MariaDB connection id is 32
Server version: 10.11.2-MariaDB-1 Ubuntu 23.04

Copyright (c) 2000, 2018, Oracle, MariaDB Corporation Ab and others.

Type 'help;' or 'h' for help. Type 'c' to clear the current input statement.

MariaDB [(none)]>
The message tells you that the server is installed successfully.
Additional help on installing MariaDB.
-
- MariaDB without password prompt
Create a Froxlor database user
Creating a dedicated Froxlor database user in MariaDB allows the control panel to securely manage its stored data. Log into your MariaDB prompt using sudo mysql and run the necessary SQL commands to create the database user and grant proper permissions.
After setting up MariaDB, you must create a secure user account for Froxlor to manage its data. This user, which we'll call 'froxroot', will have specific permissions within the MariaDB server. You'll log into MariaDB first and then run commands to create this Froxlor-specific user.
As part of the setup, we will create a user account called froxroot.
But first, log on to the MariaDB database server:
sudo mariadb
Then run the commands below to complete the steps:
CREATE USER 'froxroot'@'localhost' IDENTIFIED BY 'CHANGEM3';
GRANT ALL PRIVILEGES ON *.* TO 'froxroot'@'localhost' WITH GRANT OPTION;
FLUSH PRIVILEGES;
exit
Ensure to replace ‘CHANGEM3‘ with your password.
Install PHP on Ubuntu Linux
Installing PHP and the required modules on Ubuntu 24.04 is necessary because Froxlor runs entirely on PHP scripts. Run the command sudo apt install php-fpm php-mysql along with other required extensions to set up the scripting language for your web server.
Froxlor relies on PHP, so you need to install the necessary PHP components on your Ubuntu 24.04 system. This includes installing the PHP FastCGI Process Manager (php-fpm) and other essential PHP modules. Running a simple command in the terminal installs the latest PHP and its required extensions.
Then, run the commands below to install the latest PHP version.
sudo apt install php-fpm php-intl php-mysql php-curl php-cli php-zip php-xml php-gd php-common php-mbstring php-xmlrpc php-bcmath php-json php-sqlite3 php-soap php-gmp php-gnupg php-zip php-ldap php-imap
Additional help on installing PHP
Download Froxlor files
Downloading Froxlor source files directly to your Ubuntu 24.04 server lets you set up the latest version of the control panel. Grab the official tarball link from the Froxlor website and use the wget command in your terminal to fetch the archive.
You need to download the Froxlor software onto your Ubuntu 24.04 server. To get the newest version, visit the official Froxlor download page to find the link for the latest files. After downloading the files to your server, you'll unpack them into the correct folder for installation.
To always install the latest version, check the download page for Froxlor. Get the download link and download the archived package to your computer. Then, extract it.
First, navigate to the /tmp/ directory and download the Froxlor files. Next, extract the content into the Froxlor folder in the Nginx root directory.
The final step is to change the permissions. This will allow the Nginx web server to interact safely with the files, ensuring a secure environment for your Froxlor installation.
You must run the following commands to change these permissions, ensuring the Froxlor application can write and read necessary files, such as those in `/var/www/froxlor` or `/var/www/html` (if Froxlor is installed there).
cd /tmp
wget https://files.froxlor.org/releases/froxlor-latest.tar.gz
sudo tar xvfz froxlor-latest.tar.gz -C /var/www/
sudo chown -R www-data:www-data /var/www/froxlor/
Once you have completed all the above steps, continue configuring the Nginx web server below to serve the Froxlor content.
Run the commands below to create an Nginx virtual host file for Froxlor.
sudo nano /etc/nginx/sites-available/froxlor.conf
Then, copy and paste the content block below into the Nginx server block.
server {
    listen 80;
    listen [::]:80;
    root /var/www/froxlor;
    index  index.php;
    server_name  froxlor.example.com;

    access_log /var/log/nginx/example.com.access.log;
    error_log /var/log/nginx/example.com.error.log;

    location / {
        try_files $uri $uri/ /index.php?$args;
    }

    location ~ .php$ {
         include snippets/fastcgi-php.conf;
         fastcgi_pass unix:/var/run/php/php8.3-fpm.sock;
         fastcgi_param SCRIPT_FILENAME $document_root$fastcgi_script_name;
         include fastcgi_params;
    }
}
Save the file.
You can enable the Nginx virtual host by running the commands `sudo a2ensite froxlor.conf` and then restart the Nginx server with `sudo systemctl restart nginx`. This action makes the web server recognize and serve Froxlor.
sudo ln -s /etc/nginx/sites-available/froxlor.conf /etc/nginx/sites-enabled/
sudo systemctl restart nginx.service
sudo systemctl restart php8.3-fpm
Setup Let’s Encrypt SSL/TLS for Froxlor
Setting up Let's Encrypt SSL certificates for Froxlor secures your control panel traffic with free HTTPS encryption on Nginx. Configure your domain and use Certbot to generate and install the security certificates on your Ubuntu server.
Securing your Froxlor setup with HTTPS is vital for website protection, and Let's Encrypt provides free SSL certificates for this on Ubuntu with Nginx. You can set up Let's Encrypt SSL certificates to encrypt the connection between your users and your Froxlor panel, keeping data safe.
Please read the post below for additional resources on installing and creating Let’s Encrypt SSL certificates for Nginx.
How to set up Let’s Encrypt SSL certificate for Nginx on Ubuntu Linux
Once you have restarted the Nginx web server, open your browser and browse to the server hostname or IP address defined in the Nginx server block.
http://froxlor.example.com
The Froxlor installation wizard should appear.
Click Start installation to begin.
Type in the database name and password, then click Next.
Create an admin account and continue.
Type in the server primary IP address and choose the webserver and backend for Nginx.
Choose to configure services yourself.
Login and begin configuring your services.
Froxlor should be ready to use.
That should do it!
Conclusion:
In summary, installing the Froxlor server management panel with Nginx on Ubuntu 24.04 involves several key steps:
-
- Nginx Installation: Successfully installed and configured Nginx to serve as the web server for Froxlor.
-
- MariaDB Setup: Installed the MariaDB database server and created a dedicated user for Froxlor’s operations.
-
- PHP Installation: Installed the necessary PHP components required for Froxlor to function effectively.
-
- Downloading Froxlor: Downloaded and extracted Froxlor files to the appropriate directory.
-
- Nginx Configuration: Configured the Nginx virtual host to serve Froxlor and enable PHP processing.
-
- SSL/TLS Security: Suggested securing the installation with an SSL/TLS certificate from Let’s Encrypt.
-
- Admin Setup: Completed the Froxlor installation wizard to set up the admin account and server configuration.
By following these steps, you can efficiently manage your hosting environment using Froxlor, leveraging the performance and benefits of Nginx on Ubuntu.
Was this guide helpful?





No comments yet — be the first to share your thoughts!