How to Install ownCloud with Nginx on Ubuntu 24.04


ownCloud with Nginx on Ubuntu 24.04 gives you a private cloud storage server to sync and share files securely while keeping full control of your data. This setup uses ownCloud version 10.13.1 running on top of the Nginx web server to handle traffic quickly and efficiently.
The setup has five parts. You install the web server, the database and PHP, then download ownCloud, point Nginx at it, and finish in your browser. Before you start, make sure you have an Ubuntu 24.04 server and a user account that can run commands with sudo. If you want HTTPS, which you should for anything reachable from the internet, you also need a domain name that points at the server.
To install ownCloud with Nginx on Ubuntu 24.04, first run sudo apt update and sudo apt install nginx mariadb-server php-fpm to set up the web server, database and PHP. Then download ownCloud 10.13.1, point an Nginx server block at its folder, and finish the setup in your browser at http://localhost or your server’s IP address.
Install Nginx HTTP server on Ubuntu
To install the Nginx HTTP server on Ubuntu, open your terminal and run the commands sudo apt update and sudo apt install nginx. This free web server handles incoming web traffic and serves your ownCloud files to visitors over the internet.
Open the Ubuntu terminal and run the commands below to install the Nginx web server. The first command refreshes the package list, so you get the current Ubuntu 24.04 package. The second installs Nginx. If apt asks you to confirm, type Y and press Enter.
sudo apt update
sudo apt install nginx
Once Nginx is installed, use the commands below to start, stop, and enable the Nginx web server. Enabling it makes Nginx start automatically every time your server boots. On Ubuntu, Nginx usually starts on its own right after installation, but it is worth running the enable command so you know it will survive a reboot.
sudo systemctl stop nginx
sudo systemctl start nginx
sudo systemctl enable nginx
Test the Nginx web server by opening your web browser and browsing to the server’s localhost or IP address. Use localhost if you are working on the server itself. Use the server’s IP address if you are connecting from another computer. The address looks like this:
http://localhost
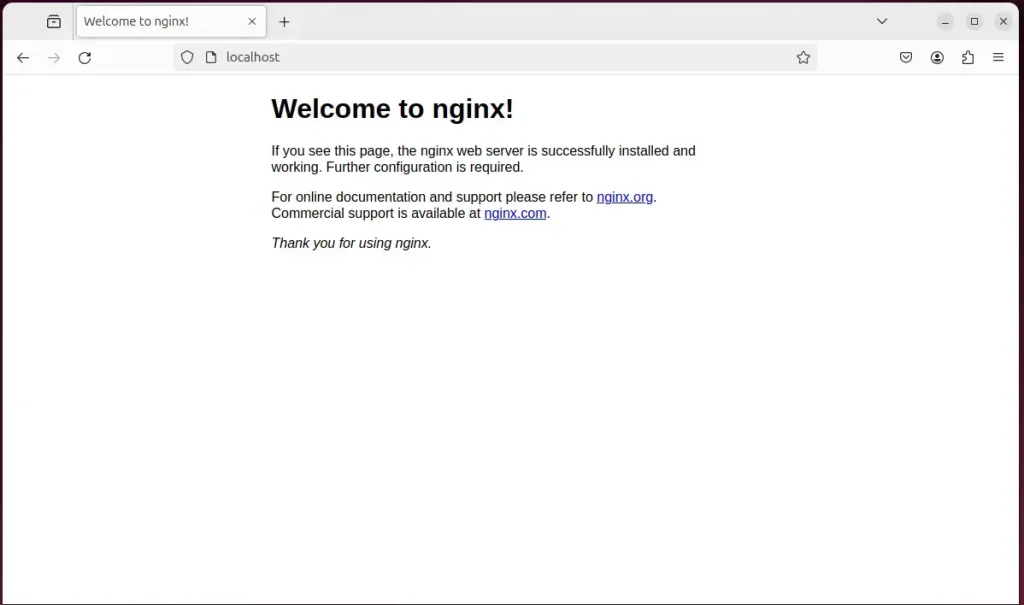
When you see "Welcome to nginx!" the Nginx HTTP server has been installed.
Also check whether a firewall on the server or your network is blocking ports 80 and 443. Those are the ports for HTTP and HTTPS, and you will need both later.
Additional help on installing Nginx on Ubuntu is in the link below.
Install MariaDB database server on Ubuntu Linux
To install the MariaDB database server on Ubuntu Linux, open your terminal and run the commands sudo apt update and sudo apt install mariadb-server. This database system stores all user accounts, file details, and settings for your ownCloud installation. The files themselves stay on disk. The database holds the information about them.
To install and use the MariaDB database server, use the instructions below.
Open the Ubuntu terminal and run the commands below to install the MariaDB database server.
sudo apt update
sudo apt install mariadb-server
Once the MariaDB database server is installed, use the commands below to stop, start, and enable the MariaDB server. Enabling it makes MariaDB start automatically when the server boots. If the database is not running after a reboot, ownCloud will show an error page even though Nginx is up.
sudo systemctl stop mariadb
sudo systemctl start mariadb
sudo systemctl enable mariadb
Run the following commands to validate and test that the MariaDB database server is installed successfully.
sudo mariadb
Once you run the commands above, you are logged onto the MariaDB console and see a message similar to the one below.
Welcome to the MariaDB monitor.  Commands end with ; or g.
Your MariaDB connection id is 32
Server version: 10.11.2-MariaDB-1 Ubuntu 23.04

Copyright (c) 2000, 2018, Oracle, MariaDB Corporation Ab and others.

Type 'help;' or 'h' for help. Type 'c' to clear the current input statement.

MariaDB [(none)]>
The message tells you that the server is installed successfully and is accepting connections.
Additional help on installing MariaDB.
- How to install MariaDB on Ubuntu Linux
- MariaDB without password prompt
Create an ownCloud database
To create an ownCloud database, log into your MariaDB prompt and run the SQL commands to create a dedicated database named ownclouddb and a user account called ownclouddbuser with full permissions on it. This gives your cloud storage a secure, isolated space to store information. It also means ownCloud never needs the MariaDB root account.
As part of the setup, we will create a database named 'ownclouddb' and a corresponding user account called 'ownclouddbuser.'
Finally, we'll grant the ownclouddbuser full access to the ownclouddb database. The grant covers this one database only, so the account cannot touch anything else on the server.
All the database steps above can be done using the commands below:
But first, log on to the MariaDB database server:
sudo mariadb
Then run the commands below to complete the steps. Each SQL statement ends with a semicolon. MariaDB waits for it before it runs the statement, so if the prompt changes and seems stuck, you probably left one out.
CREATE DATABASE ownclouddb CHARACTER SET utf8mb4 COLLATE utf8mb4_general_ci;
CREATE USER ownclouddbuser@localhost IDENTIFIED BY 'type_your_password_here';
GRANT ALL ON ownclouddb.* TO ownclouddbuser@localhost WITH GRANT OPTION;
FLUSH PRIVILEGES;
exit
Replace 'type_your_password_here ' with your own password. Choose a strong one and write it down. You will type the database name, the user name and this password into the ownCloud setup wizard at the end of this guide.
Install PHP-FPM on Ubuntu Linux
To install PHP-FPM on Ubuntu Linux, run the package installation commands in your terminal to set up the PHP version required by your cloud software. PHP-FPM (FastCGI Process Manager) processes the backend code that makes your ownCloud interface run. Nginx does not run PHP itself. It hands PHP requests to PHP-FPM.
PHP 8.x is not currently supported. Always check the official PHP requirements page to ensure you are installing the latest compatible version for ownCloud.
Ubuntu 24.04 ships with a newer PHP release in its own repositories, so the PHP 7.4 packages are not available by default. That is why the next step adds an extra repository first.
Run the commands below to install PHP 7.4-FPM.
First, add the following repository. Because it is a third-party source, it is not maintained by Ubuntu. Keep that in mind when you plan updates for this server.
sudo apt-get install software-properties-common
sudo add-apt-repository ppa:ondrej/php
Then, install PHP 7.4 and the extra PHP modules ownCloud needs using the command below.
sudo apt install php7.4-fpm php7.4-intl php7.4-mysql php7.4-curl php7.4-cli php7.4-zip php7.4-xml php7.4-gd php7.4-gmp php7.4-common php7.4-mbstring php7.4-xmlrpc php7.4-json php7.4-sqlite3 php7.4-ldap php7.4-imap php7.4-pgsql php7.4-ssh2 php7.4-soap php7.4-zip
Additional help on installing PHP
Download ownCloud files
To download ownCloud files, visit the official download page to get the latest archive release and extract it to your web server directory. Getting the official source files is the necessary first step before you configure permissions and run the web installer.
Always check the download page for the latest release. This guide uses ownCloud 10.13.1. If a newer 10.x release is listed, replace the download link in the commands below with the current one so you get the latest version.
First, navigate to the /tmp/ directory and download the ownCloud files. After unzipping the file, move the content into the ownCloud folder in the Nginx root directory. When the move is done, the ownCloud files should sit directly inside that folder and not in a second nested folder.
The final step is to change the permissions. This allows the Nginx web server to safely interact with the files, ensuring a secure environment for your ownCloud installation. Nginx and PHP-FPM run as the web server user, and that user must own the files. If the setup wizard later complains that it cannot write to the folder, permissions are the first thing to check.
wget https://download.owncloud.com/server/stable/owncloud-complete-20240226.zip -P /tmp
sudo unzip /tmp/owncloud-complete-20240226.zip -d /var/www
sudo chown -R www-data:www-data /var/www/owncloud/
Once all the steps are done, configure the Nginx web server to serve the ownCloud content.
Run the commands below to create an Nginx server block file for your ownCloud. This opens a new, empty file in a text editor.
sudo nano /etc/nginx/sites-available/owncloud.conf
Then, copy and paste the content block below into the Nginx server block. Change the server name in the block to your own domain name or server IP address. Whatever you put there is the address you will browse to later.
upstream php-handler {
    server unix:/var/run/php/php7.4-fpm.sock;
}

server {
    listen 80;
    listen [::]:80;
    server_name owncloud.example.com;
    root /var/www/owncloud;

    location = /robots.txt {
        allow all;
        log_not_found off;
        access_log off;
    }

    # set max upload size
    client_max_body_size 512M;
    fastcgi_buffers 64 4K;

    # Enable gzip but do not remove ETag headers
    gzip on;
    gzip_vary on;
    gzip_comp_level 4;
    gzip_min_length 256;
    gzip_proxied expired no-cache no-store private no_last_modified no_etag auth;
    gzip_types application/atom+xml application/javascript application/json application/ld+json application/manifest+json application/rss+xml application/vnd.geo+json application/vnd.ms-fontobject application/x-font-ttf application/x-web-app-manifest+json application/xhtml+xml application/xml font/opentype image/bmp image/svg+xml image/x-icon text/cache-manifest text/css text/plain text/vcard text/vnd.rim.location.xloc text/vtt text/x-component text/x-cross-domain-policy;

    location / {
        rewrite ^ /index.php;
    }

    location ~ ^/(?:build|tests|config|lib|3rdparty|templates|data)/ {
        deny all;
    }
    location ~ ^/(?:.|autotest|occ|issue|indie|db_|console) {
        deny all;
    }

    location ~ ^/(?:index|remote|public|cron|core/ajax/update|status|ocs/v[12]|updater/.+|oc[ms]-provider/.+|.+/richdocumentscode/proxy).php(?:$|/) {
        fastcgi_split_path_info ^(.+?.php)(/.*|)$;
        set $path_info $fastcgi_path_info;
        try_files $fastcgi_script_name =404;
        include fastcgi_params;
        fastcgi_param SCRIPT_FILENAME $document_root$fastcgi_script_name;
        fastcgi_param PATH_INFO $path_info;
        fastcgi_param modHeadersAvailable true;
        # Enable pretty urls
        fastcgi_param front_controller_active true;
        fastcgi_pass php-handler;
        fastcgi_intercept_errors on;
        fastcgi_request_buffering off;
    }

    location ~ ^/(?:updater|oc[ms]-provider)(?:$|/) {
        try_files $uri/ =404;
        index index.php;
    }

    # Adding the cache control header for js, css and map files
    # Make sure it is BELOW the PHP block
    location ~ .(?:css|js|woff2?|svg|gif|map)$ {
        try_files $uri /index.php$request_uri;
        add_header Cache-Control "public, max-age=15778463";
        add_header Referrer-Policy "no-referrer" always;
        add_header X-Content-Type-Options "nosniff" always;
        add_header X-Download-Options "noopen" always;
        add_header X-Frame-Options "SAMEORIGIN" always;
        add_header X-Permitted-Cross-Domain-Policies "none" always;
        add_header X-Robots-Tag "none" always;
        add_header X-XSS-Protection "1; mode=block" always;

        # Optional: Don't log access to assets
        access_log off;
    }

    location ~ .(?:png|html|ttf|ico|jpg|jpeg|bcmap|mp4|webm)$ {
        try_files $uri /index.php$request_uri;
        # Optional: Don't log access to other assets
        access_log off;
    }
}
Save the file and close the editor.
To enable the server block for your ownCloud installation and restart the Nginx web server, run the command sudo ln -s /etc/nginx/sites-available/owncloud.conf /etc/nginx/sites-enabled/ followed by sudo systemctl restart nginx. This makes Nginx use the configuration file you created for ownCloud, allowing it to serve your cloud files.
If Nginx fails to restart, look for a typo in the server block you just saved. A missing semicolon or brace is the usual cause. If you still see the "Welcome to nginx!" page afterwards, make sure the server name in your block matches the address you are browsing to.
sudo ln -s /etc/nginx/sites-available/owncloud.conf /etc/nginx/sites-enabled/
sudo systemctl restart nginx.service
Setup Let's Encrypt SSL/TLS for ownCloud
To set up Let's Encrypt SSL/TLS for ownCloud, install the Certbot tool and request a free security certificate for your domain name. This encryption turns your standard HTTP connection into a secure HTTPS connection to protect your passwords and private files.
Let's Encrypt only issues certificates for real domain names, not bare IP addresses. The domain must point at your server, and port 80 must be reachable from the internet so the certificate can be verified. If you are only testing on a local network, you can skip this part for now and add HTTPS later.
Please read the post below for additional resources on installing and creating Let's Encrypt SSL certificates for Nginx.
How to set up Let's Encrypt SSL certificate for Nginx on Ubuntu Linux
Once you have restarted the Nginx web server, open your browser and browse to the server hostname or IP address defined in the Nginx server block. Use the same name you set in the server block. If you have set up Let's Encrypt, use the https address.
http://owncloud.example.com
An ownCloud installation wizard page should appear. Fill it in as follows:
- Type a user name and password for the administrator account.
- Under the database settings, choose MySQL/MariaDB. If that option is missing and only SQLite is offered, the PHP database module is not installed, so go back to the PHP step.
- Enter the database name, database account name, and password you created earlier. Use ownclouddb and ownclouddbuser with your password. Enter localhost as the database host if the wizard asks for one.
- Click Finish setup.
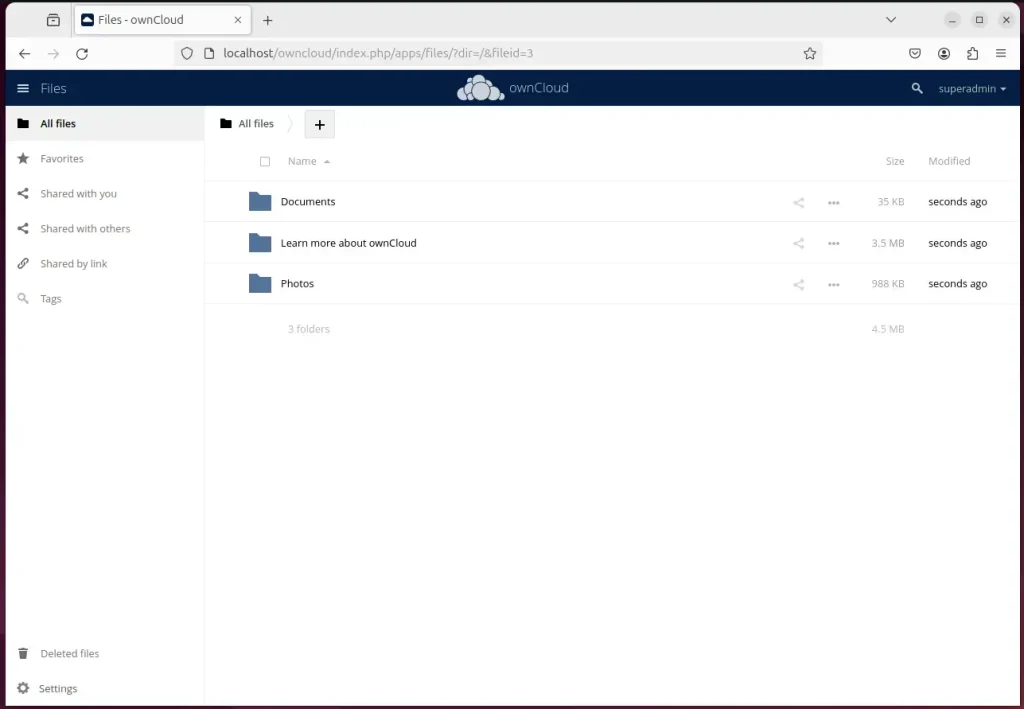
Setup can take a minute. When it finishes, the wizard takes you to the ownCloud login page.
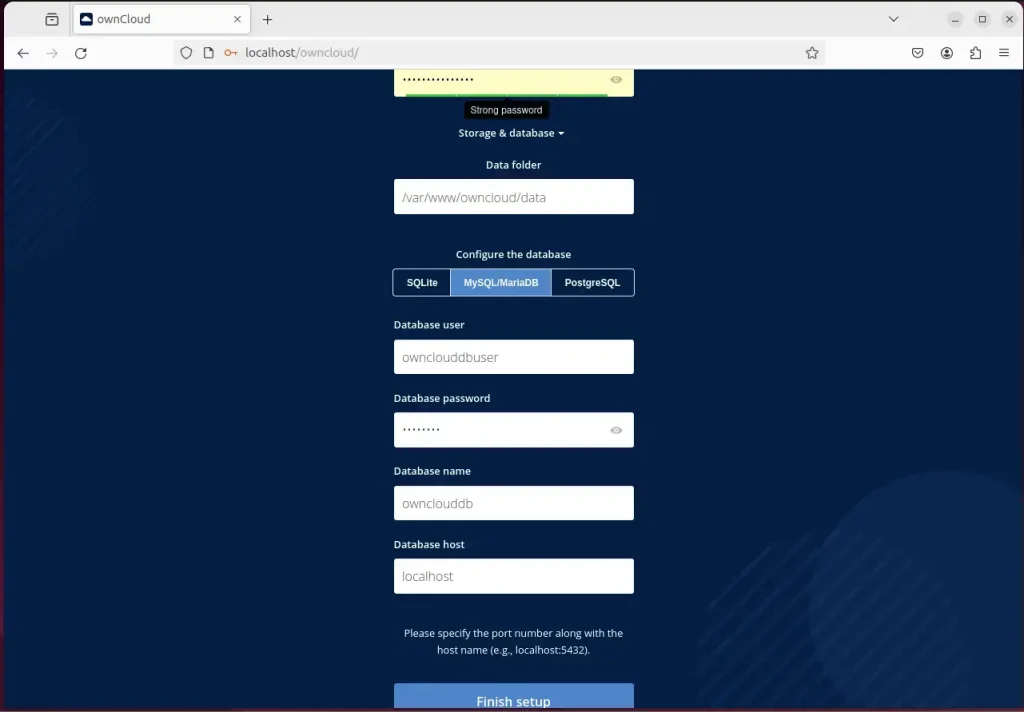
Your ownCloud site should be ready to use. Sign in with the administrator account you just created. From there you can add users, upload files and install the desktop or mobile sync clients.
That should do it!
Conclusion:
- Setting up ownCloud with Nginx on Ubuntu provides a reliable and efficient file hosting service.
- Nginx, known for its high performance and low memory usage, ensures fast and stable performance for file sharing and synchronization needs.
- MariaDB works as the database server, storing user accounts and file information for the ownCloud application.
- Including PHP-FPM completes the environment necessary to run ownCloud, offering robust support for PHP-based applications.
- After following the installation and setup steps, securing the ownCloud installation with Let's Encrypt SSL/TLS ensures a secure browsing experience for users.
Have a question about this guide?
Answered by AI from this guide. Good questions may be added to this page — please don't include personal details.
Did this guide fix your problem?

About the Author
Richard
Tech Writer, IT Professional
Richard is a writer at Geek Rewind who turns complex IT tasks into clear, step-by-step guides. He draws on years of hands-on experience in system administration and enterprise IT operations, focusing on Windows, Linux and WordPress: the problems people actually run into, and the fixes that work. His server and WordPress guides come from systems he runs himself. Richard builds and maintains the platform behind Geek Rewind, from its Ubuntu servers and Nginx configuration to its custom WordPress plugins. Many new tutorials start with readers' questions, and he's always glad to answer them in the comments.
No comments yet — be the first to share your thoughts!