How to Add Multiple Monitors in Windows 11

- 26 steps
- Needs administrator rights
- Includes a restart or sign-out
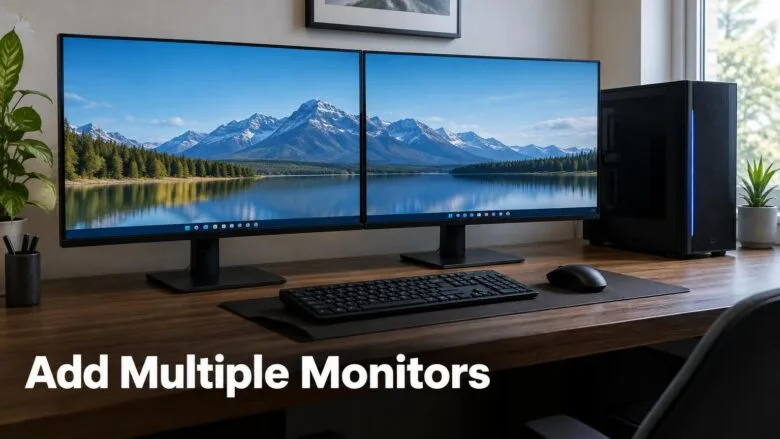
Adding multiple monitors in Windows 11 means connecting a second display to your PC and setting it to Extend these displays, which turns both screens into one large desktop. Windows calls this an extended display. The fastest route is to plug in the monitor, press Win+P, and choose Extend.
Windows 11 supports multiple monitors on every edition, including Home and Pro, with no extra software. Your PC’s graphics hardware sets the limit on how many screens it can drive. This guide covers the cables, the connection, the settings in Settings System Display, and the fixes for a monitor Windows does not detect.
Connect the second monitor, then press Win+P and select Extend. Windows 11 turns both screens into one larger desktop with no extra software, on Home and Pro alike. If the monitor does not appear, check the cable and the monitor’s input setting, then open Settings System Display and select Detect.
What You Need Before You Connect a Second Monitor
Check three things first: a free video output on your PC, a matching input on the monitor, and a cable that fits both. Most connection problems start with a cable or adapter that does not match.
Video Ports and Cables
Modern PCs and monitors use a few common connectors. Look at the back of a desktop or the sides of a laptop to see which ones yours has.
- HDMI carries video and sound over one cable. Nearly every monitor and TV has it.
- DisplayPort is common on graphics cards and gaming monitors. It handles high resolutions and fast refresh rates (how many times per second the screen redraws).
- USB-C works as a video output only if the port supports DisplayPort Alt Mode (a feature that sends video through the USB-C connector) or Thunderbolt. Look for a small DisplayPort or Thunderbolt logo beside the port. Thunderbolt is a fast connection type that can carry video through a USB-C port.
- DVI and VGA are older video connectors. DVI sends a digital signal and VGA sends an analog one, which gives a softer picture. Both still work.
If the PC and monitor have different ports, buy an adapter or a cable with a different connector on each end, such as DisplayPort to HDMI. A docking station (a box that adds extra ports to a laptop) also adds video outputs.
Check How Many Monitors Your PC Supports
If you plan to add three or more displays, check the specifications on the manufacturer’s website for your graphics card or laptop. A free port does not mean the graphics card can drive that screen at the same time as the others.
How to Add Multiple Monitors to Your 🪟 Windows 11 PC
These steps add a second monitor to your Windows 11 PC and set it up as an extended display. None of them needs administrator rights, unless a graphics driver install is needed later.
- Check the video ports on your PC. Find the free HDMI, DisplayPort, or USB-C video output and note which type it is.
- Match a cable to both ports. Use a cable that fits the PC output at one end and the monitor input at the other, or add an adapter.
- Plug the cable into your PC. Push the connector in fully. Screw in any thumbscrews on DVI or VGA plugs.
- Plug the other end into the new monitor. Note which input port you used, such as HDMI 1 or DisplayPort.
- Connect the monitor to power and turn it on. The monitor may show a “no signal” message until Windows sends a picture.
- Select the correct input on the monitor. Use the buttons on the monitor to pick the port you plugged into. Many monitors do this on their own.
- Wait for Windows 11 to detect the monitor. The screen may flicker or go dark for a second. Windows often starts by showing the same picture on both screens.
- Press Win+P. A Project panel opens on the right side of the screen with four choices.
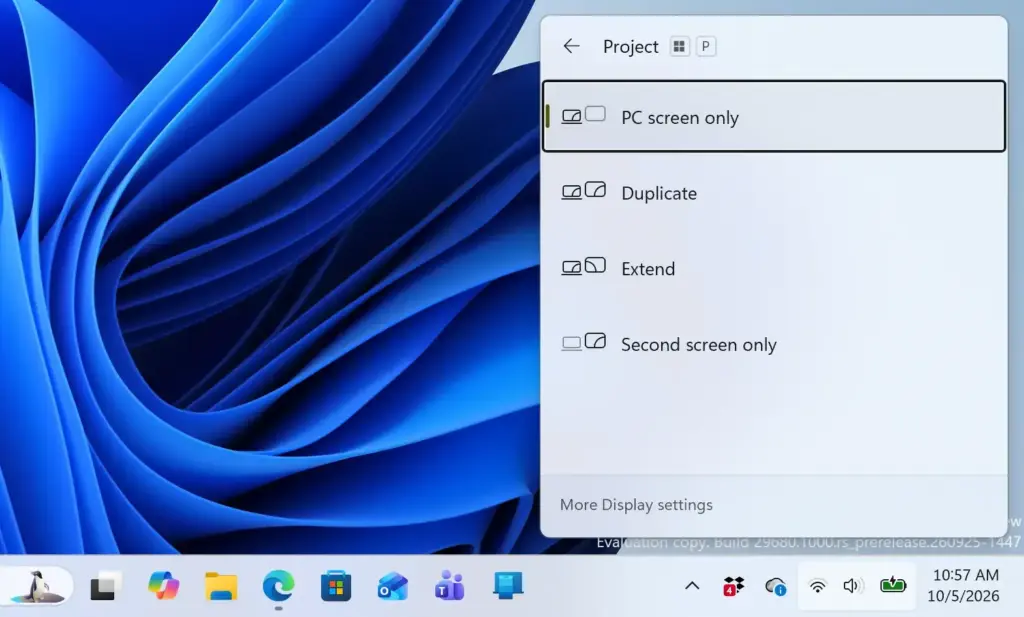
- Select Extend. The other choices are PC screen only, Duplicate, and Second screen only. With Extend, the second monitor shows an empty desktop and the mouse pointer moves between screens.
- Open Settings. Press Win+I, or right-click the desktop and choose Display settings, which skips the next step.
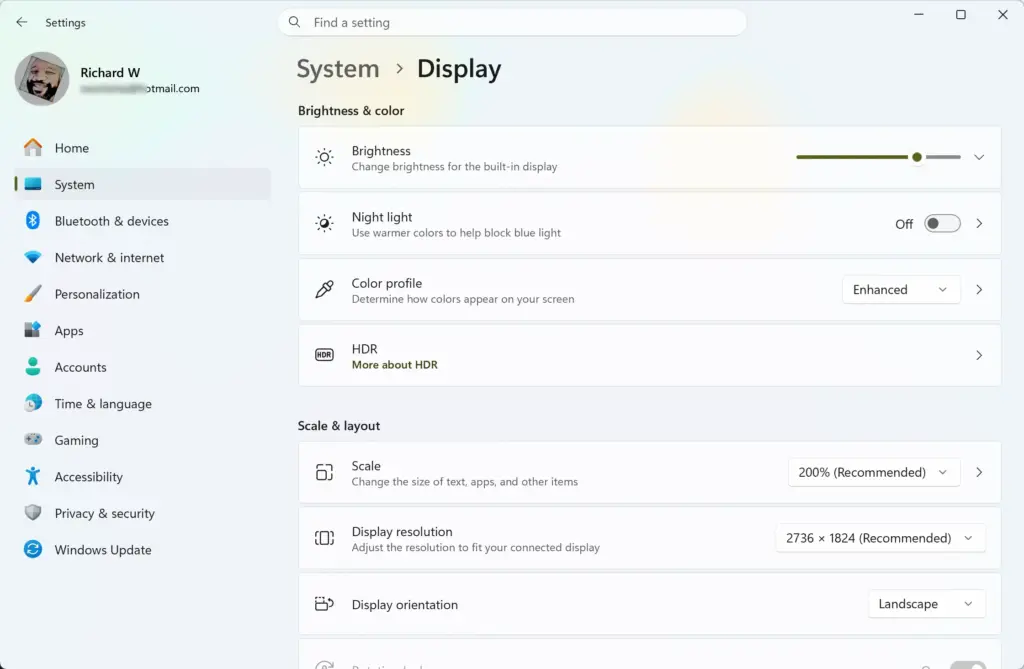
Settings › System › Display - Go to System Display. Select System in the left pane, then Display. Boxes numbered 1 and 2 appear at the top, one for each monitor.
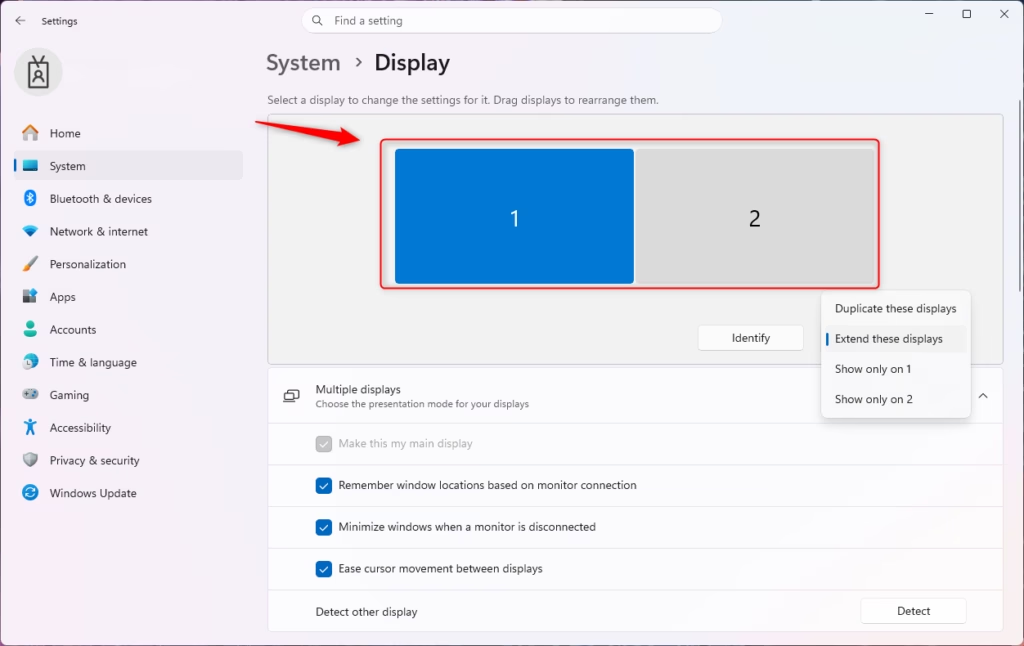
Windows 11 multiple displays settings showing arrangement options. - Select Identify. A large number appears on each physical screen. Use it to match the numbered boxes to your actual monitors.
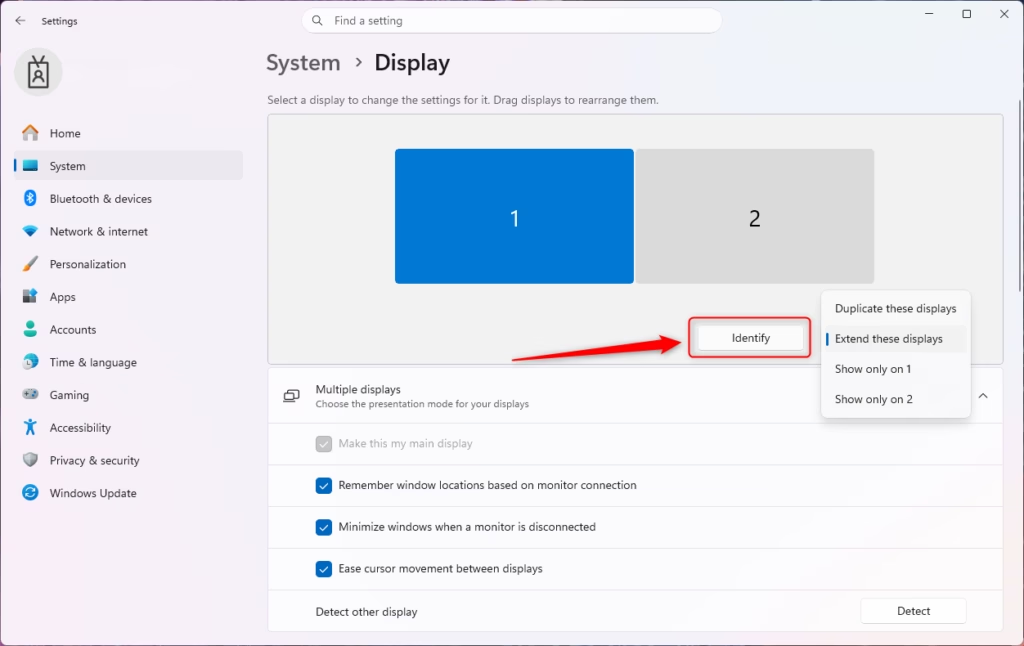
Windows 11 multiple displays identify screen numbers. - Drag the monitor boxes to match your desk. If the second monitor sits to the left of the first, drag box 2 to the left side of box 1. This controls which edge your mouse crosses to reach the other screen.
- Select Apply. This button appears after you move a box. The layout changes at once.
- Scroll to Multiple displays and expand it. Select the arrow beside the heading to show the options.
- Confirm Extend these displays is chosen. The drop-down list also offers Duplicate these displays, Show only on 1, and Show only on 2. If you pick another option, select Keep changes when Windows asks for confirmation.
- Select each monitor box and review Scale and Display resolution. Choose the resolution marked Recommended. This matches the monitor’s native resolution, which gives the sharpest picture.
- Set the refresh rate. Select Advanced display, then use the Choose a refresh rate list. Higher values look smoother on monitors that support them.
- Choose your main display. Select the monitor you want as the main one, then tick Make this my main display. The taskbar, Start menu, and new app windows appear there first.
- Drag a window across to test. Move a window past the edge of one screen. It should appear on the other monitor.
When the steps work, you see a continuous desktop across both monitors. The mouse pointer crosses from one screen to the other at the edge you set when you arrange the screens (see Arrange and Align the Screens below).
Choose the Right Display Mode
The four modes in the Project panel (the list that Win+P opens) serve different purposes. Win+P opens the panel any time, so you can switch without opening Settings.
- PC screen only uses the main display and turns the other off. Use it to go back to one screen.
- Duplicate shows the same picture on both screens. This suits presentations on a projector or TV.
- Extend joins the screens into one desktop. This is the mode to use for everyday work with two monitors.
- Second screen only turns off the main display and uses the other one. A laptop connected to a TV is a typical case.
How to Fine-Tune the Layout
Once the second monitor works, a few settings make the two screens easier to live with. Each one is optional.
Arrange and Align the Screens
If the pointer jumps at the wrong height when it crosses screens, the screen boxes in Settings do not match where your monitors sit on your desk. Drag them until the top edges or the middles line up with the real monitors. For a longer walkthrough of this step, see how to arrange multiple displays in Windows 11 Display settings.
Change the Main Display
The main display is where the Start menu button and notification area normally sit. If Windows picked the wrong monitor, reopen Settings System Display, select the correct box, and tick Make this my main display. The page on selecting your primary monitor in Windows 11 explains this in more detail.
Show the Taskbar on Both Screens
Windows 11 shows the taskbar on every connected monitor by default. If your second screen has no taskbar, go to Settings Personalization Taskbar and expand Taskbar behaviors. Tick Show my taskbar on all displays. The same section lets you decide where taskbar buttons appear. For more on taskbar buttons, read how to configure taskbar behavior on multiple monitors in Windows 11.
Keep Windows in Place When You Reconnect
A laptop that docks and undocks often forgets where windows were. Windows 11 can remember window positions for each monitor setup. The option sits in the Multiple displays section of Settings System Display. The guide on turning window position memory on or off explains how it works.
If 🪟 Windows 11 Does Not Detect the Second Monitor
A blank second screen usually comes from a loose cable, the monitor set to the wrong input (the port it listens to), or an outdated graphics driver (the software that lets Windows communicate with the graphics hardware). Work through these fixes in order, since the first ones take seconds.
- Check both ends of the cable. Unplug and reconnect each end firmly. Try a different cable or port if you have one.
- Check the monitor’s input source. Use the monitor’s own menu to pick the port you plugged into. A monitor set to the wrong input shows “no signal” even when Windows detects it.
- Open Settings System Display and look under Multiple displays. If the monitor is missing from the numbered boxes, select Detect. This button appears when Windows does not list a display.
- Restart the graphics driver. Press Win+Ctrl+Shift+B. The screen flashes and you hear a short beep. This reloads the driver without closing your apps.
- Restart the PC with the monitor connected. Some monitors are only found at startup, especially through docking stations.
- Update the graphics driver. Open Settings Windows Update and select Check for updates. For a dedicated graphics card, download the latest driver from NVIDIA, AMD, or Intel. This step needs administrator rights, and Windows asks for approval when you install.
If the monitor appears but the image is blurry or the wrong size, return to the Display resolution setting and choose the one labelled Recommended. A mismatched resolution is the most common cause of a fuzzy picture.
Check the Port Type for USB-C and Adapters
A USB-C port that carries only data and power shows nothing on a monitor, even if the cable fits. If the second screen stays blank over USB-C, try an HDMI or DisplayPort output instead. Passive adapters, which have no chip inside, fail if the PC’s port does not send the signal that connector needs. Check the adapter’s description for the PC port type it supports.
How to Go Back to One Screen
You can undo the setup at any point. Press Win+P and choose PC screen only. Windows turns off the second monitor but keeps it connected, so you can switch back to Extend later without touching the cable.
To remove the monitor completely, unplug its cable from the PC. Windows moves any open windows back to the remaining screen. For the full picture of cables and settings together, read how to set up external monitors in Windows 11. A separate guide, how to configure multiple monitors correctly in Windows 11 Display settings, covers Display settings in more depth.
What to Do Next
If the second monitor is working, set the main display and taskbar behavior next, since these affect where your apps open each day. The guide on how to set up and use multiple monitors with Windows 11 covers daily use, such as moving and snapping windows across screens. If the monitor still does not appear after you check the cable, the input and the graphics driver, test it on another PC. That shows whether the monitor, the cable, or your graphics output is at fault.
Frequently asked questions
How to add multiple monitors to your 🪟 Windows 11 laptop?
Plug the external monitor into your laptop's HDMI or USB-C port. Press Win+P, then choose Extend these displays. To change the layout, open Settings System Display and drag the screen icons into the order you want. Set the main display there too.
How to add 3 monitors to your 🪟 Windows 11 PC?
Three monitors need a PC with three video outputs, or a docking station or hub that adds more. Your graphics card or laptop decides the limit, so check its specs first. Connect each monitor, then go to Settings System Display and choose Extend these displays from the Multiple displays menu. Home and Pro both support it.
What is com surrogate in 🪟 Windows 11?
COM Surrogate is a normal Windows process, shown as dllhost.exe in Task Manager. It runs small helper tasks for other apps, such as creating thumbnail previews of your files in File Explorer. Several copies running at once is normal. If it keeps using high CPU, run a scan in Windows Security to rule out a malicious program.
How to create users in 🪟 Windows 11 site Microsoft.com?
Open Settings Accounts Other users. Select Add account, then choose I don't have this person's sign-in information. Pick Add a user without a Microsoft account, enter a user name and password, and select Next to finish. Windows calls the new user a local account, which works without a Microsoft sign-in.
How to set up dual monitors on 🪟 Windows 11?
Connect the second monitor to a free video port on your PC, then press Win+P and choose Extend. For the full setup, open Settings System Display, select each screen, and set its resolution, orientation, and whether it is the main display. Drag the screen icons to match where the monitors sit on your desk.
Still have a question?
Answered by AI from this guide. Good questions may be added to this page — please don't include personal details.
Did this guide fix your problem?

About the Author
Richard
Tech Writer, IT Professional
Richard is a writer at Geek Rewind who turns complex IT tasks into clear, step-by-step guides. He draws on years of hands-on experience in system administration and enterprise IT operations, focusing on Windows, Linux and WordPress: the problems people actually run into, and the fixes that work. His server and WordPress guides come from systems he runs himself. Richard builds and maintains the platform behind Geek Rewind, from its Ubuntu servers and Nginx configuration to its custom WordPress plugins. Many new tutorials start with readers' questions, and he's always glad to answer them in the comments.
No comments yet — be the first to share your thoughts!