How to Setup External Monitors in Windows 11

Adding a second monitor to your computer makes your work much easier. It gives you more space to open windows and see more information at once. Windows 11 detects most monitors as soon as you plug them in, so the setup usually takes a few minutes.
This guide covers the cable check, the quick Project menu, the full Display settings, and the wireless option. The steps are written for Windows 11. Menu labels can differ slightly between builds.
Open Settings System Display, and Windows 11 detects your monitor automatically. If it doesn’t appear, scroll to Multiple displays, click Detect, then arrange the screens by clicking and dragging them in the layout preview. Use Win+P to switch between PC screen only, Duplicate, Extend, or Second screen only modes.
Why use external monitors in 🪟 Windows 11?
Multiple screens improve multitasking because you can keep separate applications visible at the same time, such as a document on one screen and research on another. You no longer need to switch tabs all the time. That simplifies your workflow and gives you more visible space for information.
A second screen helps most with comparing two files, keeping email or chat open while you work, and referring to a reference page while you type.
What happens when you are done?
Once you finish these steps, Windows will treat your screens as one larger workspace. You can drag windows from one screen to the other with your mouse. If a window disappears off the edge of one screen, it is on the other screen.
You can undo any change in this guide by returning to the same setting and choosing the previous option. Nothing here needs a restart.
Quick Start: The Win+P Shortcut
The fastest way to manage your displays is the Win+P keyboard shortcut. Follow these steps:
- Press Windows Key + P. The Project menu opens on the right side of the screen.
- Click one of the four options, or keep the Windows key held down and press P again to move through them: PC screen only, Duplicate, Extend, or Second screen only.
- Choose Extend if you want the second monitor to add extra desktop space. The screen may flicker for a moment, and then both displays show your desktop.
Duplicate shows the same picture on both screens, which suits projectors and presentations. Second screen only turns off your main display, which is handy for a laptop connected to a large monitor with the lid closed. If the Project menu does not list a second screen, Windows does not see the monitor yet. Check the cables first.
Check Your Cables First
Before diving into Windows 11 settings for your external monitors, the first thing to check is your cables. Most display problems come from a loose cable, the wrong port, or a monitor set to the wrong input.
- Plug the cable in firmly at both ends. Use a port on your PC that matches the cable, such as HDMI or DisplayPort.
- Turn the monitor on and use its on-screen menu or input button to select the input you are using (for example HDMI 1).
- If you are using USB-C, make sure the port supports video output. Not every USB-C port does.
- If your PC and monitor have different connector types, use an adapter or a dock that supports video.
- If nothing appears, try a different cable or a different port on the PC. Cables fail more often than people expect.
Display Modes Comparison
| Mode | What it does |
|---|---|
| Duplicate | Shows the same image on both screens. |
| Extend | Creates a larger, combined workspace. |
How to Setup External Monitors in 🪟 Windows 11
With the monitor connected and powered on, open the Display settings:
- Click the Start button and select Settings (or press Windows key + I). The Settings app opens.
- Go to the System tab on the left.
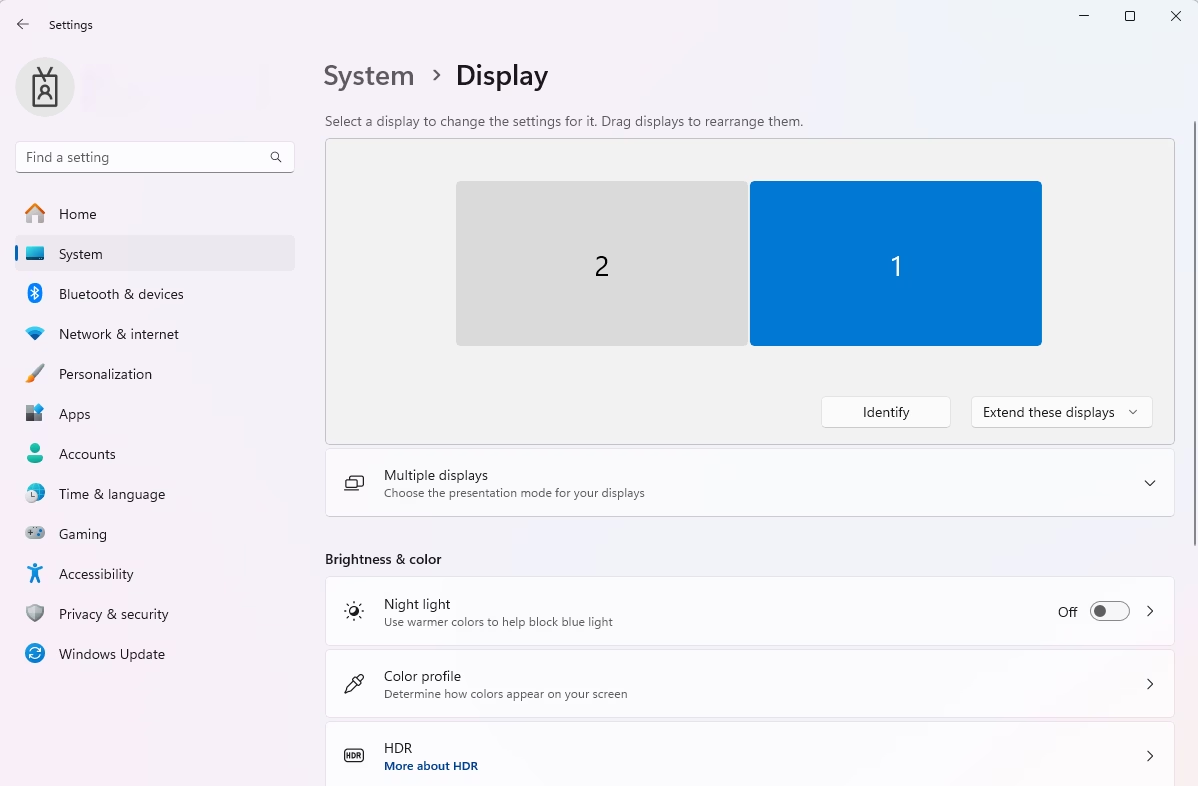
- Click on Display. You should see a box at the top of the page showing each screen as a numbered rectangle.

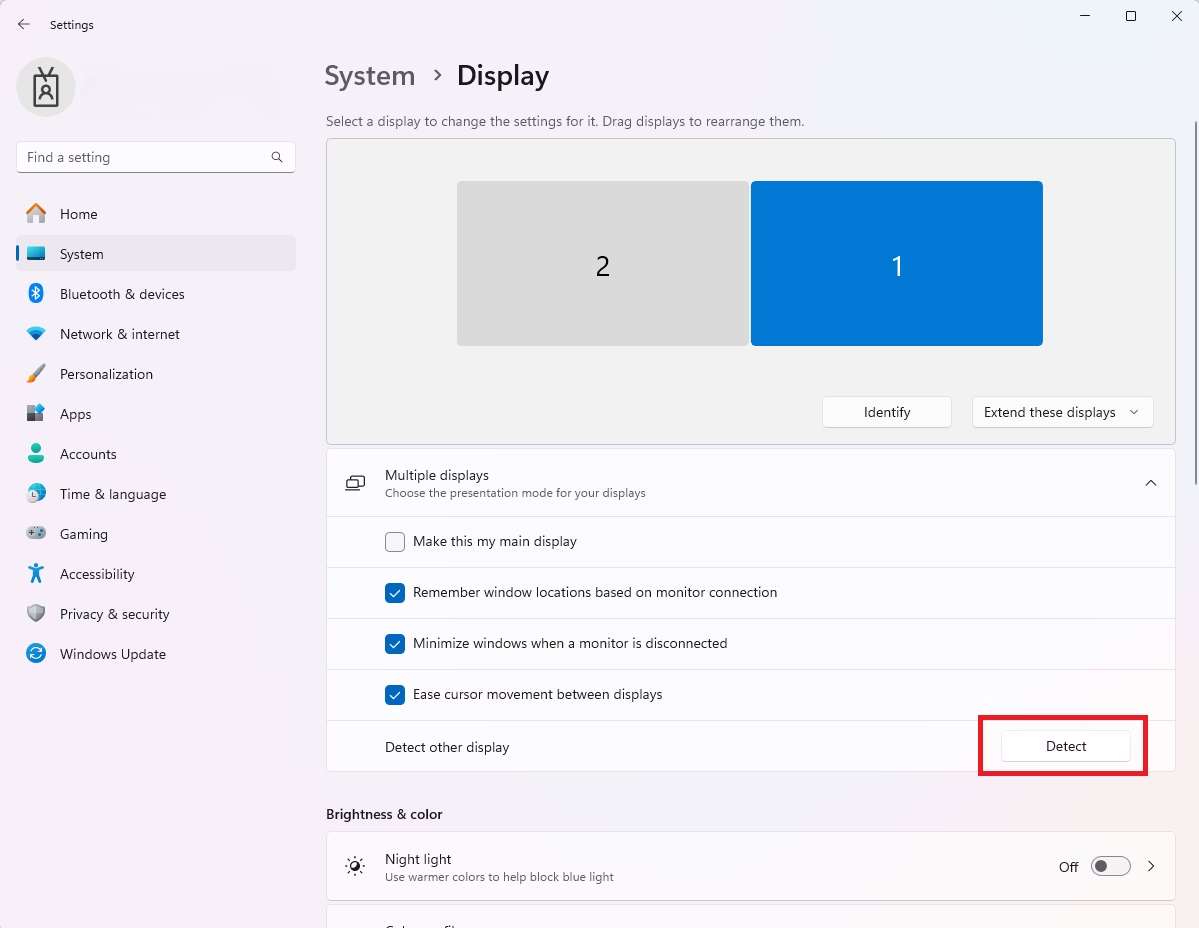
windows 11 start settings - If your monitor is not showing, scroll down to Multiple displays (click it to expand the section if it is collapsed) and click Detect. Windows searches again, and the second screen should appear in the box at the top. If it still does not, go back and check the cable and the monitor input.
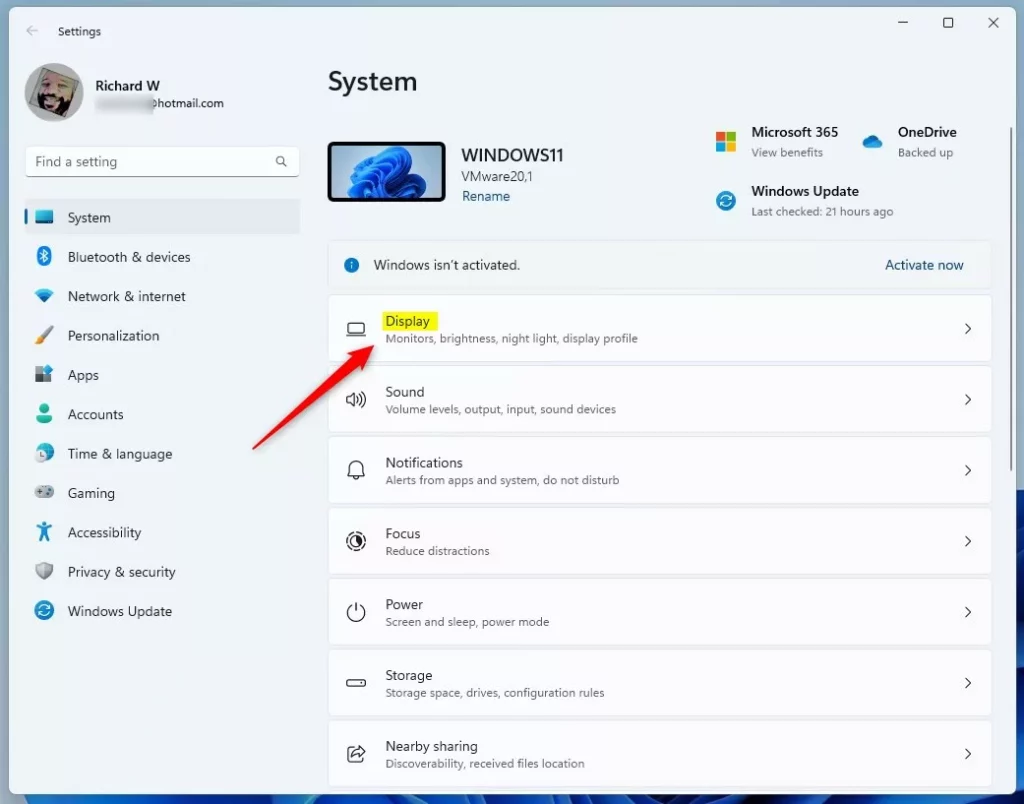
Windows Display Settings tile
How to Identify and Arrange Your Screens
Windows needs to know where your monitors are on your desk. If the layout is wrong, your mouse will move off the "wrong" edge of the screen, which feels odd. Fix it like this:
- In Settings System Display, click Identify. A large number appears on each screen.
- In the Display settings menu, click and drag the numbered boxes to match your physical layout. For example, put box 2 on the right if the second monitor sits to the right of the first.
- Click Apply to save. Test it by moving your mouse across the edge between the screens.
If you want to choose which screen is your main one, select that monitor and tick Make this my main display. The taskbar and new windows usually open there.
Advanced Display Settings
You can customize each screen individually. Follow these steps:
- In the Display menu, select the monitor you want to change by clicking its box at the top.
- Under Display resolution, pick the option marked Recommended. That is the native resolution of the monitor and gives the sharpest picture.
- To change the Refresh rate, scroll down to the related settings and open Advanced display. Higher refresh rates make movement look smoother. Only the rates your monitor and cable support will be listed.
- If your monitor supports it, you can also toggle HDR settings for better color and brightness. If the option is missing or greyed out, the monitor, cable, or graphics driver probably does not support HDR.
Windows asks you to confirm the change, and it reverts on its own if you do not.
Wireless Display Connectivity
You can also connect external monitors to your Windows 11 PC without any cables using wireless display features. Just go to Settings, then System, and select Display to find the option to connect to a wireless display. This lets you add another screen to your setup quickly and easily.
You can also press Windows key + K to open the Cast panel and pick a screen from the list. Wireless display needs a PC and a TV or monitor that both support Miracast. The receiving screen must be powered on and on the same network or in range. If no screens appear, check that the receiver has wireless display turned on.
However, if you are working in a corporate office, you may need admin privileges to change certain driver or display adapter settings located in C:\Windows\System32 or the registry at HKEY_LOCAL_MACHINE\SOFTWARE. On a work PC, ask your IT team before you change anything in those places.
Summary
Setting up external monitors in Windows 11 is a straightforward process that can really boost your productivity. Check the cables, extend your desktop, arrange the screens to match your desk, and set each one to its recommended resolution. If something goes wrong later, start again with Win+P and the Detect button.
Was this guide helpful?

About the Author
Richard
Tech Writer, IT Professional
Richard is a writer at Geek Rewind who turns complex IT tasks into clear, step-by-step guides. He draws on years of hands-on experience in system administration and enterprise IT operations, focusing on Windows, Linux and WordPress: the problems people actually run into, and the fixes that work. His server and WordPress guides come from systems he runs himself. Richard builds and maintains the platform behind Geek Rewind, from its Ubuntu servers and Nginx configuration to its custom WordPress plugins. Many new tutorials start with readers' questions, and he's always glad to answer them in the comments.

What if the in the multiple display setting, Windows 11 does not detect any external monitor (Windows 10 worked fine)