How to Add a Wi-Fi Printer to Windows 11

- 26 steps
- Needs administrator rights
Windows 11 can find and install most Wi-Fi printers automatically if they’re already on your network. It takes about five minutes. Open Settings, go to Bluetooth & devices Printers & scanners, click Add device, and Windows does the rest.
This guide covers that quick path. It also covers what to try when Windows doesn’t find your printer, and how to add a printer manually by its IP address when automatic detection fails. The steps are the same on Windows 11 Home and Pro.
Open Settings, go to Bluetooth & devices Printers & scanners, click Add device, and select your printer when Windows finds it on the network. Your printer must already be joined to the same Wi-Fi network as your PC, and the PC and printer need to be on the same 2.4GHz or 5GHz band. Windows installs the driver automatically, and no restart is needed.
What You Need Before You Start
Check these three things first. They’re behind most “Windows can’t find my printer” problems:
- The printer must already be joined to your Wi-Fi network, not just powered on near your router. Most printers show a Wi-Fi icon on their control panel screen once they’re connected. You can also print a network status page from the printer’s setup menu.
- Your PC and the printer need to be on the same Wi-Fi network. If your router broadcasts separate 2.4GHz and 5GHz networks (two frequency bands that use different names), both devices must be on the same one.
- If the printer is plugged into your PC by USB, Windows may keep using that connection even after the printer joins Wi-Fi. Unplug the USB cable before adding the printer wirelessly if you want to confirm the wireless connection works.
If your PC is on a 5GHz network and the printer is on 2.4GHz, they may be on different networks even though your router shows one Wi-Fi name. Check the printer’s spec sheet or its network settings screen to see which band it joined.
Connect the Printer to Your Wi-Fi Network
The simplest route is often the manufacturer’s phone app. Many manufacturers offer one, such as HP Smart, Epson Smart Panel and Canon PRINT. These apps can set up the printer’s Wi-Fi from your phone, which is usually easier than typing a password on a tiny printer screen. Install the app, follow its setup prompts, and skip to the Windows steps below once the printer shows as connected.
If you’d rather set it up on the printer itself, use its control panel (the screen and buttons on the printer, not your PC):
- Find the wireless setup option on the printer’s screen. It’s usually under a Settings, Network or Wireless Setup Wizard menu. The exact wording varies by manufacturer, so check the manual if you don’t see it.
- Select your Wi-Fi network name from the list the printer displays.
- Enter your Wi-Fi password using the printer’s keypad or touchscreen. Passwords are case-sensitive, so check capital letters.
- Wait for the printer to show a connected status. This is usually a solid Wi-Fi icon or a confirmation message, and it can take up to a minute.
Some printers support WPS (Wi-Fi Protected Setup, which lets you connect without typing your password). Press the WPS button on your router, then the WPS button on the printer within two minutes. Not all routers have WPS enabled by default. If nothing happens after a minute, use the manual network selection method above instead.
Add the Printer in 🪟 Windows 11 Settings
Once the printer is on your Wi-Fi network, add it to Windows:
- Press Win+I to open Settings.

Windows 11 Start menu with Settings gear icon highlighted. - Click Bluetooth & devices in the left-hand menu.
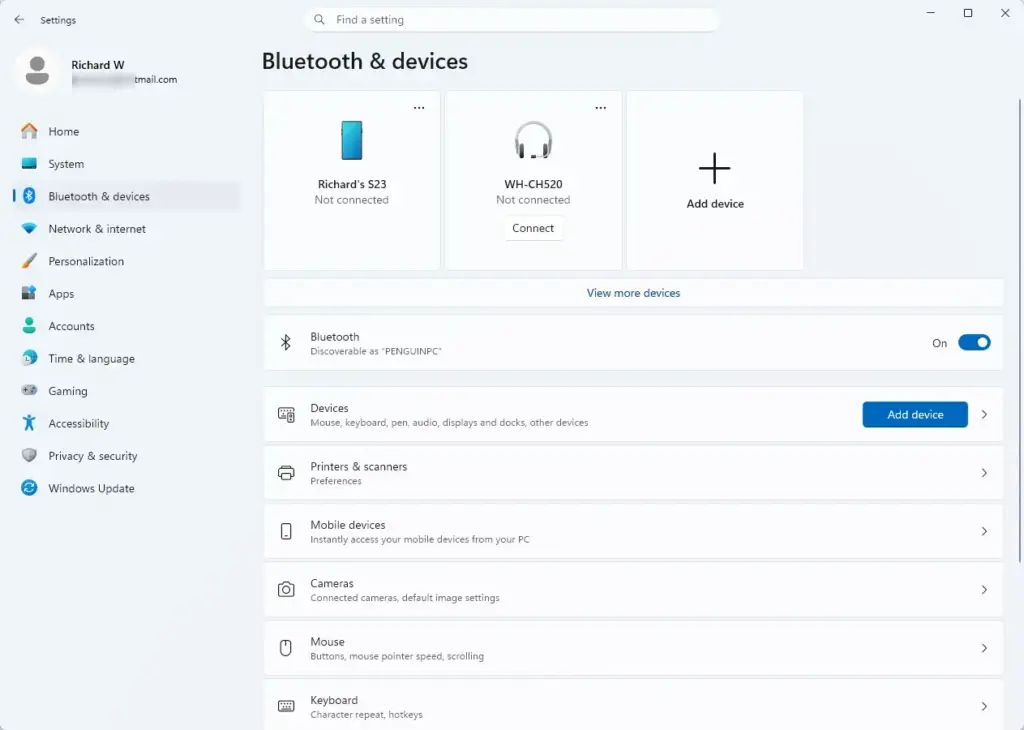
Windows Settings menu highlighting the Bluetooth and devices option for printers - Click Printers & scanners. You’ll see a list of any printers already installed on your PC.
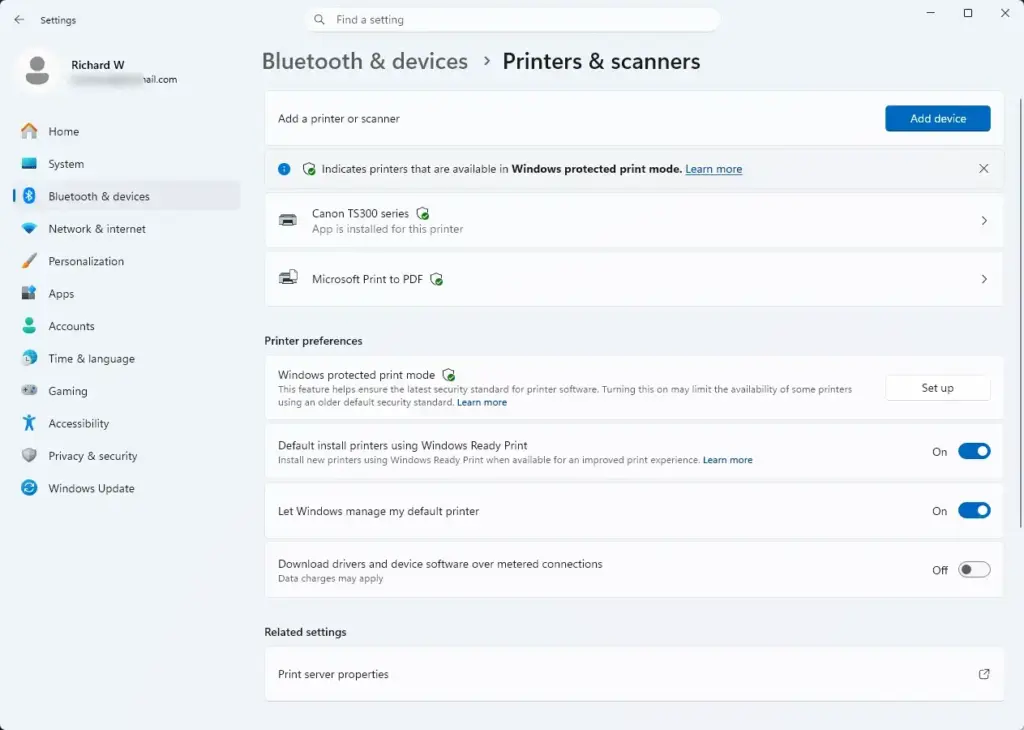
Settings › Bluetooth › Printers - Click Add device next to “Add a printer or scanner.” Windows searches the network for a few seconds, and your printer’s name should appear in the list below.
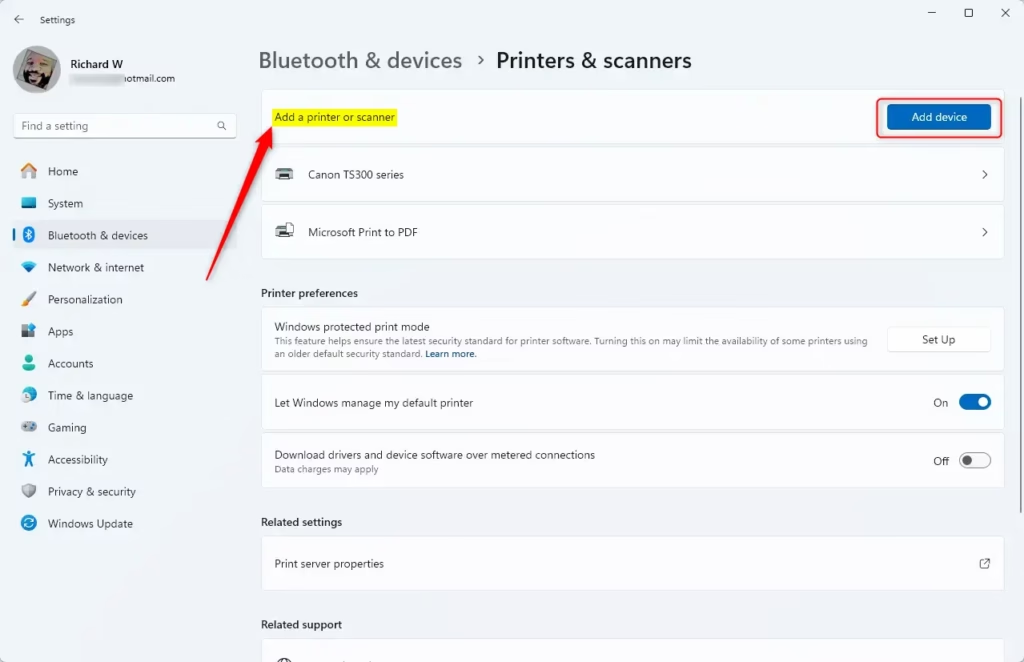
Windows 11 Printers & scanners screen with Add device button highlighted. - Click Add device next to your printer’s name once it shows up. Windows installs a driver automatically, which usually takes under a minute on a normal connection.
After this finishes, your printer appears in the Printers & scanners list and is ready to use from any app’s print dialog. No restart is needed for a printer installed this way.
Recent Windows 11 versions use the built-in Microsoft IPP Class Driver by default for network printers that support it. This is a generic driver, so basic printing works without downloading anything from the manufacturer. Some extras, such as advanced finishing options or scanner features, may need the manufacturer’s own driver or app.
Windows 11 also has an optional setting called Windows Protected Print Mode. When it’s turned on, Windows only works with Mopria-certified printers. Some older printers aren’t certified and may not work with it enabled. It’s optional, but if you or your organisation turned it on and an older printer won’t install, this is a likely cause.
If Windows Can’t Find Your Printer
If nothing shows up after the search in the Add device step above, the most common cause is network discovery being turned off. Network discovery lets your PC see other devices on the same network, including printers.
- Open File Explorer and click Network in the left-hand pane.
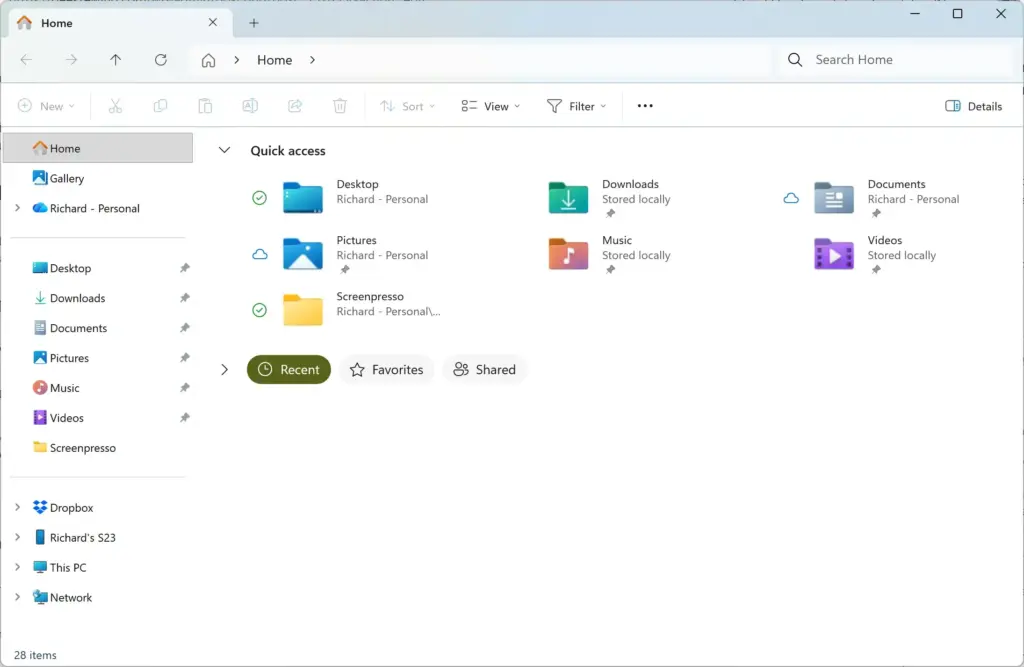
Windows 11 File Explorer showing Dropbox folder in sidebar. - Look for a yellow information bar near the top of the window saying network discovery and file sharing are turned off. Click it.
- Select Turn on network discovery and file sharing from the menu that appears.
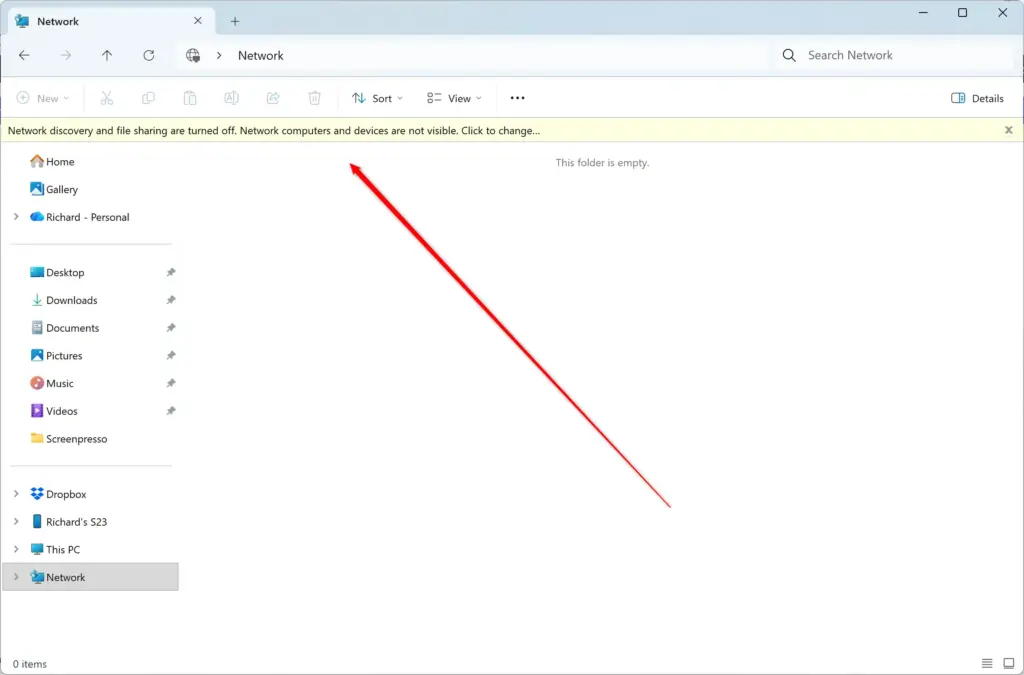
File Explorer - Go back to Settings Bluetooth & devices Printers & scanners and click Add device again. Your printer should now appear in the list.
If the yellow bar doesn’t appear, discovery may already be on, so move on to the checks below.
If your printer still doesn’t appear, check the band issue mentioned earlier. Use your router’s app or admin page to see whether your PC and printer are on the same band, not just the same network name. On networks with separate band names (for example “HomeNetwork” and “HomeNetwork_5G”), temporarily connect your PC to the same band your printer uses to test.
A firewall (software that blocks unauthorised network connections) can also stop your PC from seeing the printer. Microsoft Defender Firewall normally prompts you to allow network communication the first time you search for a printer. If you clicked Don’t allow on that prompt, Windows may not be able to see the printer until you fix it. You can check this under Windows Security Firewall & network protection Allow an app through firewall. If you’re on a managed work or school PC, you may need an administrator to change this.
Add the Printer Manually by IP Address
When automatic detection fails, add the printer using its IP address instead. This tends to happen on larger networks, networks using VPNs, or networks with client isolation enabled (a router setting that stops devices on the Wi-Fi from talking to each other).
- Find the printer’s IP address from its own control panel , usually under Network Settings, or print a network configuration report from the printer’s menu. It looks like four numbers separated by dots, for example 192.168.1.50.
- On your PC, open Settings Bluetooth & devices Printers & scanners and click Add device.
- Wait for the scan to finish, then click Add manually if it appears below the search results. It sits next to the “The printer that I want isn’t listed” message. The Add Printer window opens.
- Select Add a printer using an IP address or hostname, then click Next.
- Choose TCP/IP Device from the device type menu.
- Type the printer’s IP address into the Hostname or IP address field, then click Next. Windows contacts the printer, which can take a moment.
- Follow the remaining prompts to finish the driver installation. Windows either detects the correct driver automatically or asks you to pick the printer manufacturer and model from a list. If your model isn’t listed, download the driver from the manufacturer’s website and use the Have Disk option to point Windows at it.
Printers can be given a new IP address by your router after a restart. If a printer added this way stops working later, check its current IP address. To avoid this, set a DHCP reservation for the printer in your router settings so it always gets the same address.
If the printer’s IP address changes later — which happens if your router reassigns addresses — Windows will show the printer as offline even though it’s working fine. Setting a static IP or a DHCP reservation for the printer in your router’s settings avoids this, though the steps for that vary by router and aren’t a Windows 11 setting.
Install the Manufacturer’s Full Driver
Windows often installs a generic or basic driver automatically. This driver handles printing but may not support scanning, ink or toner level reporting, or duplex (two-sided) printing options. If you notice the Printers & scanners page shows your printer but no scanning option appears when you search for “scan” in the Start menu, this is usually why.
To fix it, go to the manufacturer’s support site (HP, Canon, Epson, Brother, and so on), search for your exact printer model, and download the full driver and software package for Windows 11. Installing this package requires administrator privileges — Windows shows a User Account Control prompt during setup, and you’ll need to click Yes to continue.
Set the Printer as Your Default
By default, Windows 11 automatically manages which printer is used as default, switching based on which one you used most recently at your current location. If you’d rather always print to one specific printer:
- Open Settings Bluetooth & devices Printers & scanners.
- Turn off the toggle next to Let Windows manage my default printer.
- Click your Wi-Fi printer’s name in the list, then click Set as default.
You can turn the toggle back on at any time if you’d rather let Windows switch automatically again.
Remove a Wi-Fi Printer
If you need to start over — say the printer was added incorrectly or you’re replacing it — remove it first rather than trying to fix a broken entry:
- Go to Settings Bluetooth & devices Printers & scanners.
- Click the printer’s name to expand its details.
- Click Remove, then confirm by clicking Yes when prompted.
This removes the printer entry from the PC; the driver package may remain installed. Add it again from scratch using the steps earlier in this article.
Common Problems After Setup
Printer shows as "Offline" even though it's on: this almost always means the printer's IP address changed, or it disconnected from Wi-Fi and reconnected with a new address. Remove it and add it again, or set up a DHCP reservation on your router so its address never changes.
**Printer disappears after a restart:** this points to a sleep or power-saving setting on the printer itself that takes it off the network when idle. Check the printer's power or energy-saving settings and increase the sleep timeout, or disable Wi-Fi sleep mode if the printer offers that option.
Print jobs sit in the queue and never print: open the print queue by double-clicking the printer in Printers & scanners, and check whether a stuck earlier job is blocking the rest. Right-click the stuck job, click Cancel, and try printing again.
What to Do Next
Once your printer is added and working, set up scanning if your printer supports it by searching for "Windows Scan" in the Start menu and selecting your printer there. If you manage printers for several PCs on the same network or want to control which devices appear during network discovery, check your network's sharing and discovery settings on each PC individually — Windows 11 applies these per device, not network-wide.
Once the printer is installed, right-click it in the Printers & scanners list or open its page, and print a test page to confirm it works. If you added the wrong printer or driver, select the printer in the list and click Remove, then repeat the steps above.
Frequently asked questions
Why isn't my Wi-Fi printer showing up in 🪟 Windows 11?
Check that your printer is connected to Wi-Fi (look for a Wi-Fi icon on its screen), and make sure both your PC and printer are on the same network band—routers often split into 2.4GHz and 5GHz, and both devices must use the same one. Restart your printer and try searching again in Settings Bluetooth & devices Printers & scanners.
How do I add a network printer that is not listed?
Open Settings Bluetooth & devices Printers & scanners, select Add device, wait for the list to load, then scroll down and choose your printer. If it still doesn't appear, select Add a printer using an IP address or hostname at the bottom and enter your printer's IP address from its network settings menu.
How do I get my computer to recognize my wireless printer?
Go to Settings Bluetooth & devices Printers & scanners and click Add device. Windows searches your network for available printers. If your printer doesn't appear, verify it's powered on, connected to Wi-Fi, and on the same network band as your PC—most connection failures come from mismatched network bands.
I can't add a printer to 🪟 Windows 11. What can I do?
Restart both your printer and PC, then try adding it again through Settings Bluetooth & devices Printers & scanners. If that fails, use Add a printer using an IP address instead. You can find your printer's IP in its network settings menu or by printing a network status page from the printer's control panel.
Still have a question?
Answered by AI from this guide. Good questions may be added to this page — please don't include personal details.
Did this guide fix your problem?

About the Author
Richard
Tech Writer, IT Professional
Richard is a writer at Geek Rewind who turns complex IT tasks into clear, step-by-step guides. He draws on years of hands-on experience in system administration and enterprise IT operations, focusing on Windows, Linux and WordPress: the problems people actually run into, and the fixes that work. His server and WordPress guides come from systems he runs himself. Richard builds and maintains the platform behind Geek Rewind, from its Ubuntu servers and Nginx configuration to its custom WordPress plugins. Many new tutorials start with readers' questions, and he's always glad to answer them in the comments.
No comments yet — be the first to share your thoughts!