How to Join a Wireless Network in Windows 11 Network Settings

You can join a wireless network in Windows 11 from Quick Settings (the network icon in the system tray ) or from the Settings app under Network & internet. Quick Settings is the faster route when the network is already in range. The Settings app gives you more control over how you connect.
Both methods work the same way at the core. You pick the network name, enter the password if there is one, and Windows saves the network so you don’t have to type the password again. Use Quick Settings for a fast connect. Use the Settings app when you want to change connection settings or manage saved networks.
Below are the exact steps for each method. After them you’ll find what to do when a network doesn’t appear, when Windows keeps rejecting your password, and what to try as a last resort if nothing will connect.
Open Quick Settings from the network icon on the taskbar , click the arrow beside the Wi-Fi tile, select your network, and click Connect. Enter the network password (security key) if prompted. Windows saves the network so you won’t need to type the password again. If no networks appear, turn on the Wi-Fi tile and check that Airplane mode is off.
Before You Start
Several things must be true before a wireless network shows up in the list:
- Your PC needs a working Wi-Fi adapter. A desktop without built-in wireless needs a USB Wi-Fi adapter or a PCIe Wi-Fi card.
- Airplane mode must be off. It turns off Wi-Fi , Bluetooth and mobile data together.
- Wi-Fi itself must be on. This is a separate switch, so Wi-Fi can be off even when airplane mode is off.
- You must be in range of the router or access point. You also need the network’s password (the security key), unless it’s an open network.
If you’re not sure which of these is the problem, the steps below will show you. Windows tells you plainly when Wi-Fi is off or airplane mode is blocking it.
Turn On Wi-Fi in 🪟 Windows 11
Do this first if you see no list of networks at all, or if the network icon in the taskbar shows a disconnected symbol.
- Click the network, sound or battery icons on the right side of the taskbar to open Quick Settings. A small panel opens with tiles for Wi-Fi , Bluetooth , Airplane mode and others.
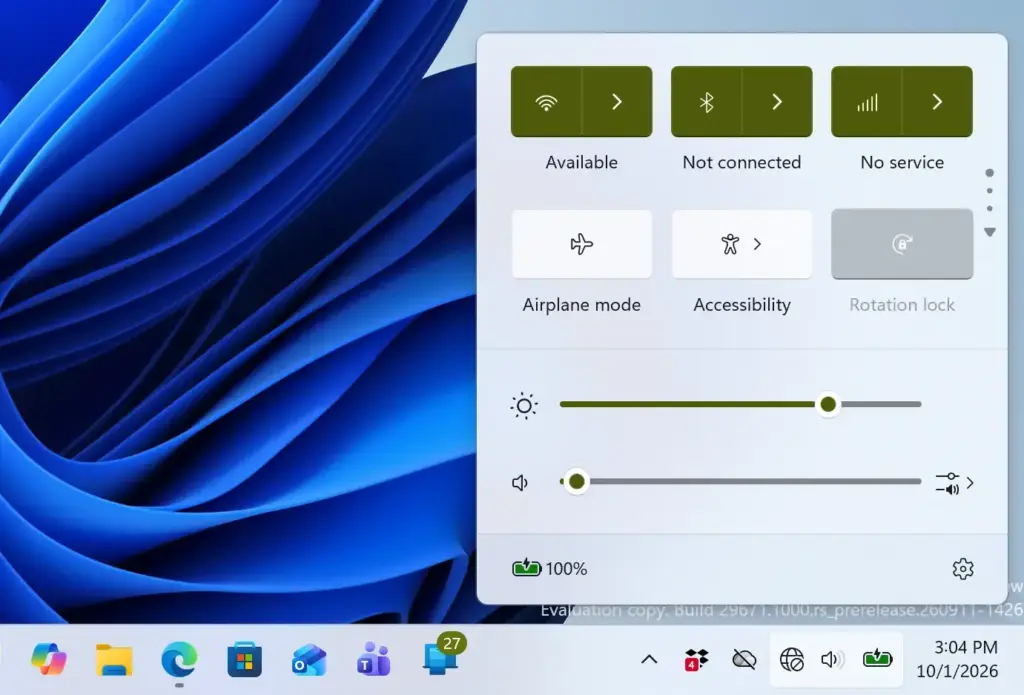
- Click the Wi-Fi tile to turn it on. The tile highlights and the tray icon changes to show Wi-Fi is active.
- Check the Airplane mode tile. If it’s highlighted, click it to turn it off. This re-enables the Wi-Fi and Bluetooth hardware.
Search for Device Manager in the Start menu and open it. You need administrator privileges for this. Expand Network adapters and check that your wireless adapter is listed and enabled. A yellow warning triangle next to it usually means a driver problem. If no wireless adapter is listed at all, the PC may not have one, or it may be switched off in the BIOS or by a physical switch on some laptops.
Join a Wireless Network from Quick Settings
This is the quickest way to connect when you just need to get online.
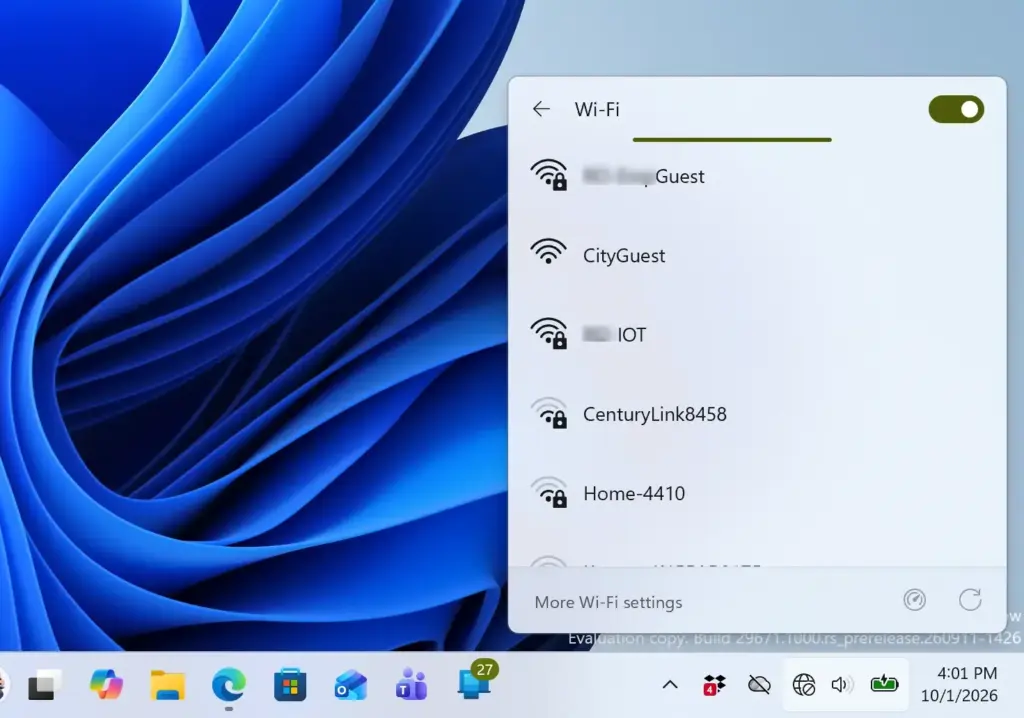
- Click the network icon in the taskbar to open Quick Settings. The Wi-Fi tile has a small arrow next to it.
- Click the arrow next to the Wi-Fi tile to expand the list of available networks. Windows lists every wireless network in range, with signal strength bars next to each one. More bars mean a stronger connection.
Caution with open or public Wi-Fi . Be careful before you join a network that doesn’t ask for a password, such as in a café, hotel or airport. Anyone nearby can try to watch traffic on an open network, and the network itself may not be what it claims to be. If you do join one:
- Set the network to Public when Windows asks, so your PC stays hidden from other devices.
- Avoid sensitive logins, such as banking or work accounts, while you’re on it.
- Consider using a VPN. It encrypts your traffic between your PC and the VPN provider.
- Leave Connect automatically unchecked so Windows doesn’t rejoin the network by itself later.
- Select the network you want to join. If you’ve connected to it before, Windows may connect without asking anything else.
- Check the box for Connect automatically if you want Windows to join this network whenever it’s in range. Leave it unchecked for networks you only use occasionally, like a hotel or café.
- Click Connect. If the network is secured, a password field appears.
- Type the password into the Enter the network security key field. To catch typos, click the eye icon at the right end of the field. It shows what you’ve typed for as long as you hold it or keep it toggled on. Then click Next. Windows briefly shows “Connecting” and then “Connected” once it succeeds.
If you type the password and nothing happens, or Windows returns to the password screen, see the troubleshooting section below. This almost always points to a typo or a mismatched security type rather than a Windows fault. Some public networks also need you to accept terms or sign in on a web page after connecting. If you’re “Connected” but have no internet, open a browser and try any website.
Join a Wireless Network from the Settings App
Use this method when you want more detail about each network, need to manage saved networks, or the Quick Settings flyout isn’t showing networks correctly. The same open-network caution from the previous section applies here.
- Open Settings by pressing Win+I.

Windows 11 Start menu with Settings gear icon highlighted. - Click Network & internet in the left-hand menu. Your current connection status is at the top, with Wi-Fi , Ethernet and other connection types below it.
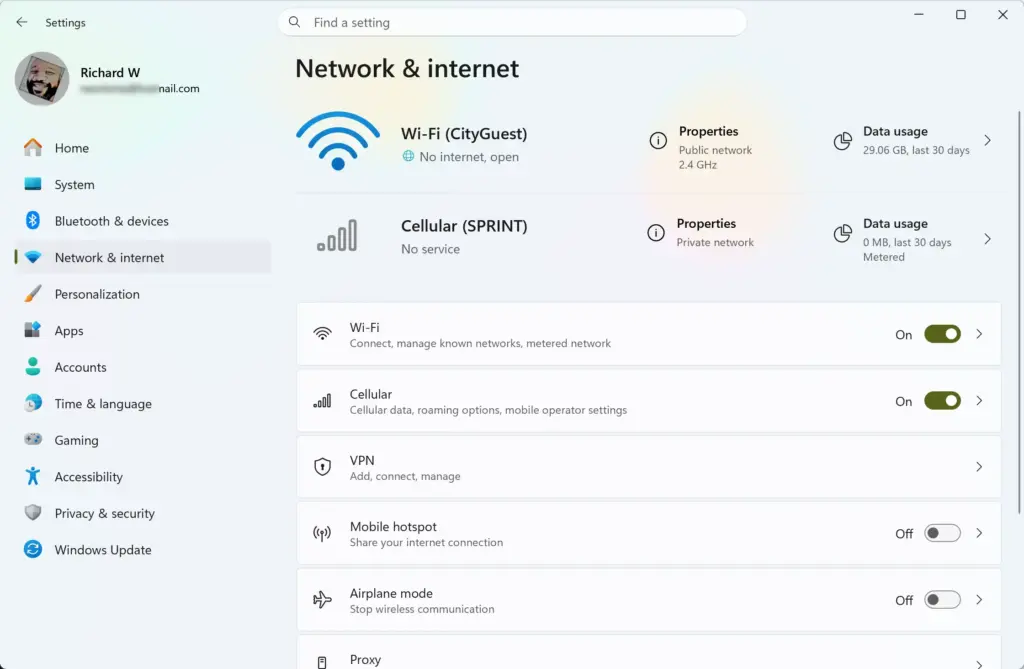
Settings › Network & internet - Click Wi-Fi to open the Wi-Fi settings page. Make sure the toggle at the top is on.
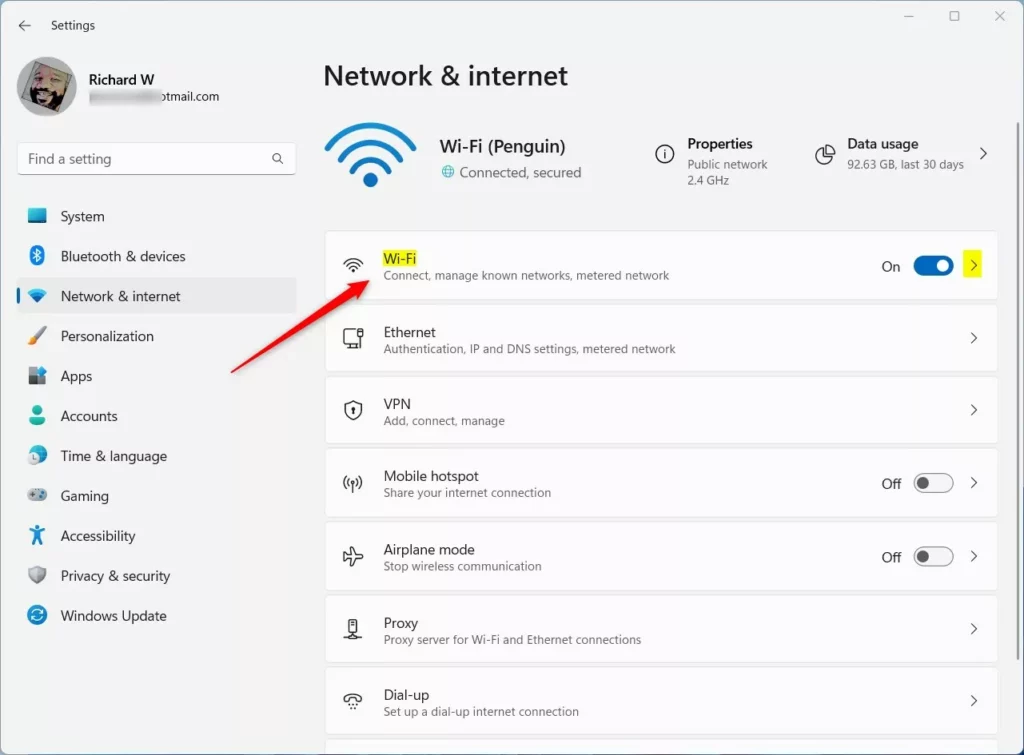
Windows 11 Wi-Fi networks profile tile for setting data limits. - Click Show available networks (or the equivalent link near the top of the page) to expand the list of networks in range. It matches the Quick Settings list but gives you more room to read network names.
- Select the network you want and click Connect.
- Enter the password when prompted. Use the eye icon to check what you typed if you’re unsure, then click Next. Windows connects, and the network appears with “Connected” under its name on the Wi-Fi settings page.
The extra control comes from the per-network options. After you connect, open the Wi-Fi page and click the properties entry for the network, or use Manage known networks and click the network name. Depending on your Windows 11 build, you’ll find these options:
- Metered connection: tells Windows to limit background data use on this network. Turn it on for mobile hotspots or capped data plans.
- Random hardware addresses: uses a random MAC address for this network instead of your adapter’s real one, which makes you harder to track across networks. This only appears if your adapter and driver support it.
- Properties: shows details such as the network name (SSID), security type, network profile (Public or Private), IP address and DNS settings.
Wi-Fi Sense, the old feature that shared Wi-Fi passwords with your contacts, no longer exists in Windows 11. Passwords are saved only on your PC. If you need to see a saved password, for example to give it to someone else, open Settings Network & internet Advanced network settings More network adapter options. Double-click your Wi-Fi adapter, click Wireless Properties, open the Security tab and tick Show characters. This only works while you’re connected to that network and needs administrator rights.
Connecting to a Hidden Network
Some networks don’t broadcast their name (SSID) for privacy or security reasons, so they won’t show up in either list no matter how strong the signal is. If you know a network is nearby but can’t find it, it’s probably hidden. You’ll need to add it manually:
- Open Settings Network & internet Wi-Fi
Windows 11 Wi-Fi networks profile tile for setting data limits. - Click Manage known networks.
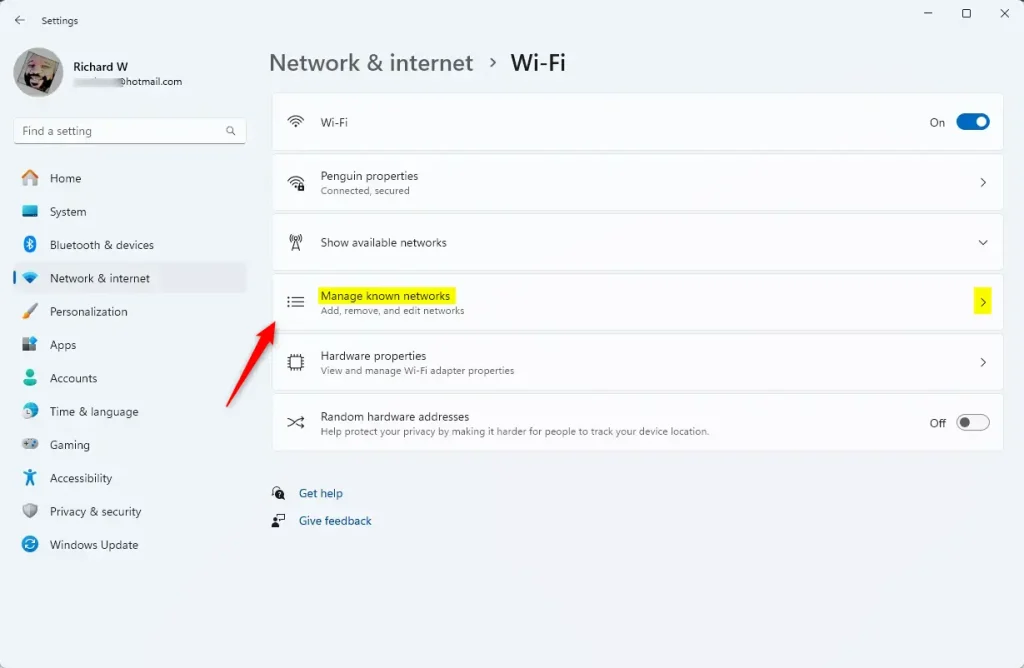
manage known wifi networks - Click Add network near the top of the page. A form opens asking for the network name and security details.
- Type the exact network name into the Network name field. It must match the SSID precisely, including upper and lower case.
- Choose the correct Security type from the dropdown, for example WPA2-Personal or WPA3-Personal. If you’re not sure, check the router or ask whoever set it up. The wrong type makes the connection fail even with the right password.
- Enter the Security key (the password), then click Save. Windows tries to connect immediately.
When the Network You Want Isn’t in the List
A few common reasons a network doesn’t show up, beyond Wi-Fi being off:
- You’re out of range or the signal is too weak. Move closer to the router and reopen the network list. Windows refreshes it periodically, and you can force a rescan by clicking away and reopening Quick Settings.
- It’s a 5GHz network and your adapter only supports 2.4GHz. Older or cheaper adapters sometimes can’t see 5GHz networks at all, even next to the router. If the router offers both, look for a separate 2.4GHz network name.
- The network is hidden. Use the Add network steps above.
- Your adapter driver is outdated or broken. Open Device Manager (administrator privileges needed), right-click your wireless adapter under Network adapters, and choose Update driver.
Fixing a Password That Keeps Getting Rejected
If Windows connects briefly and then asks for the password again, or shows “Can’t connect to this network,” the usual causes are:
- A typo in the password. Wi-Fi passwords are case-sensitive. Click the eye icon in the password field to check what you typed. Also watch for autocorrect or autocapitalize if you’re copying the password from a phone or a note.
- A saved password that’s out of date, usually because the router’s Wi-Fi password changed after your PC last connected. Forget the network (steps below) and reconnect with the current password.
- A mismatched security type when you added the network manually. Check it against the router’s settings.
Choosing Public or Private for a New Network
The first time you join a new network, Windows may ask whether to make your PC discoverable on it. This sets the network as Private (other devices can see your PC, which you need for file sharing and printers) or Public (your PC stays hidden from other devices, which is safer on networks you don’t control, like coffee shop or airport Wi-Fi ).
Pick Private only for networks you trust, like your home or office. Pick Public everywhere else. You can change this later for a saved network:
- Open Settings Network & internet Wi-Fi
- Click Manage known networks, then click the network you want to adjust.
- Choose between Public network and Private network under the network properties. The change applies straight away and doesn’t need a restart.
Forgetting a Network (Undo)
If you want Windows to stop connecting automatically to a network, or you need to clear a saved password so you can enter the correct one, forget the network rather than trying to edit it:
- Open Settings Network & internet Wi-Fi
- Click Manage known networks. Every network Windows has saved on this PC is listed by name.
- Click the network you want to remove, then click Forget. Windows deletes the saved password and connection settings for that network immediately. There’s no confirmation prompt, so make sure you’ve picked the right one.
After you forget a network, it drops out of the saved list but still appears in the available networks list if it’s in range. You’ll need to enter the password again the next time you connect. To undo a mistake, just reconnect and re-enter the password.
If This Didn’t Work
If your PC still won’t join any wireless network after the steps above, the problem is usually the adapter driver or the Windows network stack rather than the specific network. A reasonable next step is the built-in network troubleshooter at Settings System Troubleshoot Other troubleshooters
If that doesn’t help, Network reset is the last resort. Be aware of what it does before you use it:
- Open Settings Network & internet Advanced network settings
- Click Network reset. You’ll see a short explanation of what the reset does.
- Click Reset now and confirm. Windows reinstalls your network adapters and sets networking back to its defaults, and the PC restarts.
Make sure you have your Wi-Fi passwords and VPN details to hand first. Save your work before you start, because the PC restarts.
Once you're connected, a natural next task is setting up Night light or Storage Sense to tidy up other everyday settings, or checking your network profile if you're also sharing files and printers across the same connection.
Frequently asked questions
How to open Network connections in 🪟 Windows 11?
Open Settings and go to Network & internet. On the left sidebar, click Wi-Fi to see your available networks and connection status. You can also click the network icon in your system tray to open Quick Settings, or right-click it and choose Network and Internet settings.
How do I manually add a Network?
Open Settings, go to Network & internet Wi-Fi, then scroll down and click Manage known networks. Select Add network, enter the network name (SSID) and password, choose your security type, then click Save. Windows stores it for future automatic connections.
How do I trigger a Wi-Fi login page in Windows?
Connect to the Wi-Fi network through your system tray or Settings. Open your web browser and try visiting a website. Windows usually detects the captive portal and opens a login page automatically. If it doesn't appear, manually navigate to any HTTP website (not HTTPS).
How to turn on Wi-Fi on Acer laptop 🪟 Windows 11?
Click the network icon in your system tray (bottom right). Select Wi-Fi and toggle it on. Your available networks appear below. Select your network, enter the password if prompted, and click Next. Acer laptops may also have a dedicated Wi-Fi key on the keyboard.
Still have a question?
Answered by AI from this guide. Good questions may be added to this page — please don't include personal details.
Did this guide fix your problem?

About the Author
Richard
Tech Writer, IT Professional
Richard is a writer at Geek Rewind who turns complex IT tasks into clear, step-by-step guides. He draws on years of hands-on experience in system administration and enterprise IT operations, focusing on Windows, Linux and WordPress: the problems people actually run into, and the fixes that work. His server and WordPress guides come from systems he runs himself. Richard builds and maintains the platform behind Geek Rewind, from its Ubuntu servers and Nginx configuration to its custom WordPress plugins. Many new tutorials start with readers' questions, and he's always glad to answer them in the comments.
No comments yet — be the first to share your thoughts!