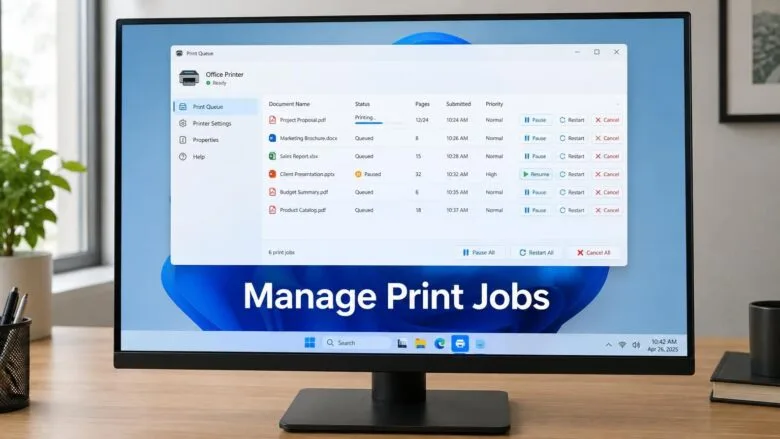
How to Manage Print Jobs in the Windows 11 Print Queue

- 57 steps
- Needs administrator rights
To check print jobs in the print queue, go to Settings Bluetooth & devices Printers & scanners, select your printer and select Open print queue. While a document is printing, you can also double-click the small printer icon near the clock.
The print queue is a window that lists every document waiting to print on one printer. From it you can pause, restart or cancel individual jobs. That makes it the fastest way to clear a stuck job or pull back something you didn’t mean to send.
Windows stores each print job in a service called the Print Spooler. The spooler holds the documents on disk until the printer is ready for them. Most printing problems show up in the queue first, so look there before you change anything else.
From the queue window, the Document menu lets you pause, resume, restart or cancel any job you select. The Printer menu works on the whole queue. Both are covered below.
To check print jobs in the print queue on Windows 11, go to Settings Bluetooth & devices Printers & scanners, select your printer, then select Open print queue. While a document is printing, double-click the small printer icon near the clock. The window lists every waiting job, with its status and owner.
Open the print queue
Pick whichever route suits you. All three open the same queue window for one printer. Each printer has its own queue, so if you have more than one printer, make sure you open the one you printed to.
Open the queue from Settings
Use this route when no job is printing and the taskbar icon is not there. These steps open the print queue from Printers & scanners so you can see every job waiting for that printer.
- Open Settings. Press Win+I. The Settings app opens.

Windows 11 Start menu with Settings gear icon highlighted. - Select Bluetooth & devices. It is in the left pane.
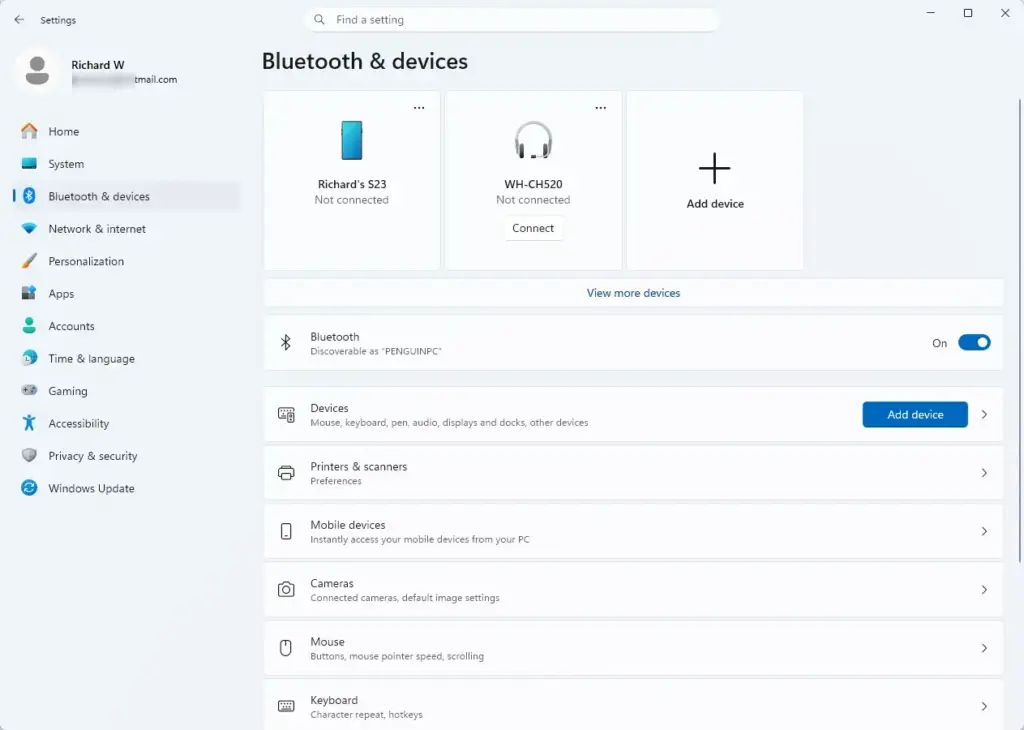
Windows Settings menu highlighting the Bluetooth and devices option for printers - Select Printers & scanners. You see a list of installed printers.
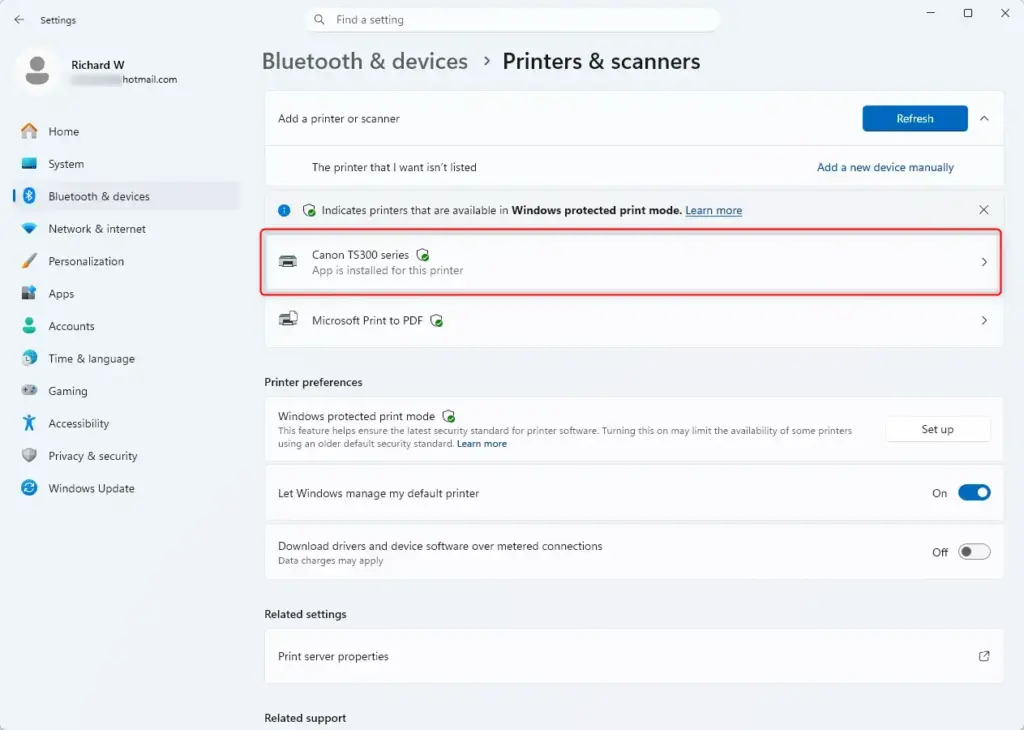
Windows 11 Settings app showing list of installed printers. - Select the printer name, for example Example Printer. The printer’s page opens.
- Select Open print queue. A window opens with the printer’s name in the title bar. If it is empty, no jobs are waiting.
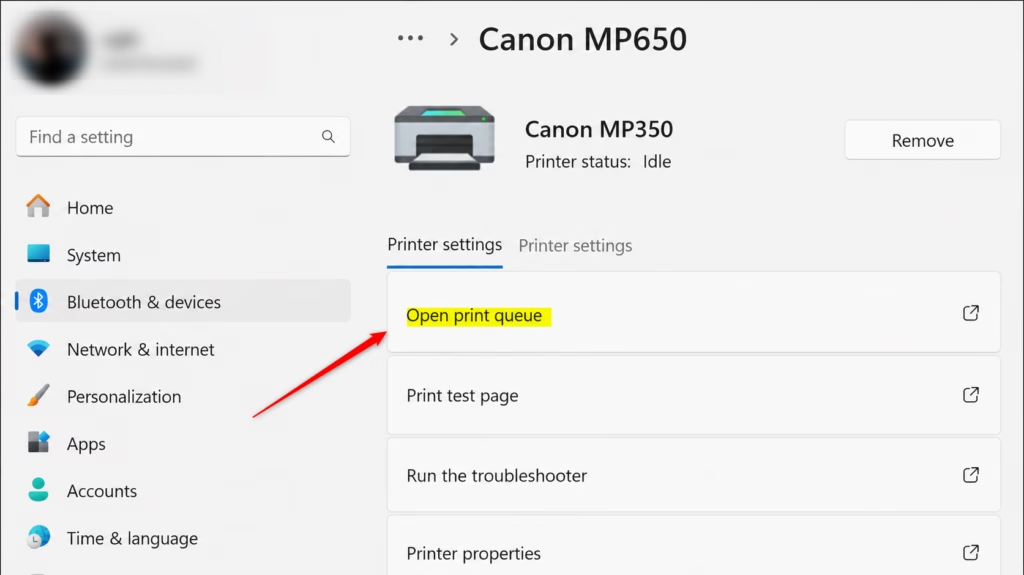
Clicking the Open print queue button to check print queue on this computer
Open the queue from the notification area
While a document is printing, Windows shows a small printer icon near the clock. This is the quickest route during a problem, because you get to the queue in two actions.
- Look for the printer icon in the notification area . It sits at the bottom right of the taskbar . If you don’t see it, select the up arrow (Show hidden icons) first.

windows 11 show hidden icons - Double-click the printer icon. The print queue opens.
The icon disappears when the queue is empty, and it only shows while a job is waiting or printing. If you can’t find it, use the Settings route above.
Open the queue from Control Panel
This route is useful if you manage several printers and want to see them in one place. It also works when you want to reach the queue without going through Settings.
- Press Win+R. The Run box opens.
- Type
control printersand press Enter. The Devices and Printers window opens. - Right-click your printer under Printers. A menu appears.
- Select See what’s printing. The queue opens.
If the right-click menu in Windows 11 looks shortened, select Show more options to see the full list.
Read the print queue window
Each job is one row, so the window works as a print queue list for that printer. To check current print jobs in the queue on Windows, open it and read the rows from top to bottom. Knowing the columns helps you pick the right job to act on, especially on a shared printer.
- Document Name is the file name or the title the app sent.
- Status shows what is happening to the job. This is your print queue status at a glance. Common values are Spooling (Windows is still preparing it), Printing, Paused, Error and Deleting.
- Owner is the account that sent the job. This matters on shared computers and network printers.
- Pages and Size show how large the job is.
- Submitted shows when the job was sent.
The first job in the list prints first. A job in an Error or Paused state at the top of the list can block the jobs behind it in some cases. That is the most common reason a queue looks stuck.
The queue window has three menus: Printer, Document and View. Most actions below use the first two. If the list looks out of date, open the View menu and select Refresh.
Pause, resume, restart or cancel a single print job
Use these actions when one document is wrong, stuck or not needed. They leave the other jobs alone. In every case, start by opening the print queue for the right printer.
Pause a job
Pausing holds a job in the queue without deleting it. Use it when you need to let a more urgent document print first. These steps pause one job.
- Open the print queue. Use any of the routes above.
- Right-click the job. A menu appears.
- Select Pause. The Status column changes to Paused.
The jobs behind it continue to print.
Resume a paused job
Resuming puts a paused job back in line. These steps resume it.
- Right-click the paused job. A menu appears.
- Select Resume. The status changes and the job prints when its turn comes.
Restart a job
Restart sends the whole document to the printer again from page one. Use it after a paper jam or a garbled page. These steps restart one job.
- Right-click the job. A menu appears.
- Select Restart. The job goes back to the beginning.
If the job is no longer in the queue, restart is not possible. You have to print the document again from the app, unless you turned on Keep printed documents (covered further down).
Cancel a job
You can't undo it, so you have to print the document again if you need it. These steps cancel one job.
- Right-click the job. A menu appears.
- Select Cancel. A prompt asks whether you are sure.
- Select Yes. The job disappears, or shows Deleting for a moment before it goes.
You can also select the job and open the Document menu to reach Pause, Resume, Restart and Cancel.
If a page is already printing when you cancel, the printer may keep going. Printers store part of a job in their own memory, so Windows can't clear it from there. Cancel the job on the printer's own screen or buttons too, or turn the printer off and on.
Pause or cancel every job at once
These actions apply to the whole queue for one printer. Use them when something is wrong with the printer itself, such as a paper jam or an empty toner cartridge, and you don't want jobs piling up.
Pause the whole printer
Pausing the printer stops everything in this queue, not just one job. These steps pause printing for the whole printer.
- Open the print queue. Use any of the routes above.
- Open the Printer menu. The list of printer actions appears.
- Select Pause Printing. A check mark appears beside the option, and the window title shows Paused.
New jobs still join the queue, but nothing prints. To start again, open the Printer menu and select Pause Printing a second time to remove the check mark.
If you forget this setting, you see jobs queue up that never print. Check it first when everything is stuck.
Cancel all documents
It can't be undone. Use it when the list is full of jobs you don't want.
- Open the Printer menu. The list of printer actions appears.
- Select Cancel All Documents. A prompt asks for confirmation.
- Select Yes. The list empties.
Check that the printer is not set to work offline
If jobs stay in the queue and the title bar says Offline, Windows thinks the printer is unavailable. The title bar is the quickest printer status check, because it shows Paused or Offline when either is set.
- Open the Printer menu. The list of printer actions appears.
- Check whether Use Printer Offline has a check mark. If it does, select it to remove the check mark. The Offline label should leave the title bar.
If the option is not checked and the printer still shows Offline, check that the printer is on and connected to the same network or USB port as before. Waiting jobs usually print once Windows reaches the printer again.
Change the order of jobs with priority
You can't drag jobs into a new order in the print queue. Priority is the supported way to make one job print ahead of others that are waiting. These steps raise the priority of one job.
- Open the print queue. Use any of the routes above.
- Right-click the job you want to move up. A menu appears.
- Select Properties. The document's properties window opens on the General tab.
- Drag the Priority slider toward Highest. Higher means it prints sooner.
- Select OK. The job moves ahead of lower-priority jobs.
Priority only works for jobs waiting to print. It won't stop or interrupt a job that's already printing.
Print a job at a set time
You can hold a large job until later, for example after hours on a shared printer. The job stays in the queue until the time you set. The computer and the printer both have to be on when that time arrives.
- Right-click the job in the print queue. A menu appears.
- Select Properties. The properties window opens on the General tab.
- Find Schedule. It is on the General tab.
- Select Only from. The time boxes become available.
- Set the start and end times. Use the hours when you want the job to print.
- Select OK. The job waits until the time window opens.
To undo this, open the same properties window and select No time restriction.
Clear a job that won't cancel
When a job stays at Deleting or Error and nothing removes it, the Print Spooler is usually stuck. Restarting it often clears the job. Both methods below need administrator rights. Try the restart first, and only clear the spooler folder if that fails.
Restart the Print Spooler from Services
This step requires administrator privileges. It is the gentler fix, and it works for most stuck jobs. These steps restart the Print Spooler service.
- Press Windows key + R. The Run box opens.
- Type
services.mscand press Enter. Select Yes if User Account Control asks for permission. A list of services opens. - Scroll to Print Spooler in the list.
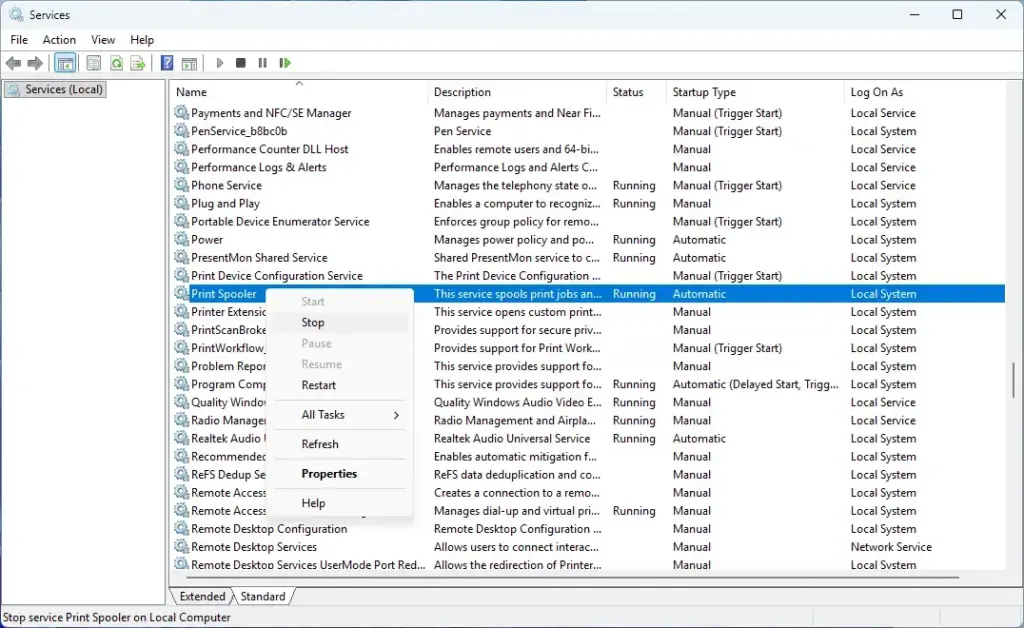
- Right-click Print Spooler. A menu appears.
- Select Restart. The status briefly changes, then shows Running.
- Open the print queue again. Check whether the stuck job is gone.
Stop the spooler and delete the stuck files
This step requires administrator privileges. It permanently deletes every waiting job for every printer on this computer, so use it only when the restart didn't work.
- Right-click the Start button and select Terminal (Admin). Select Yes if User Account Control asks for permission.
- Type the following command and press Enter to stop the spooler:Code
net stop spooler - Open File Explorer and go to
C:\Windows\System32\spool\PRINTERS. Select Continue if Windows asks for permission to open the folder. - Delete the files inside the folder. Leave the PRINTERS folder itself in place. These files are the saved copies of your waiting jobs.
- Go back to the terminal, type the following command, and press Enter to start the spooler again:Code
net start spooler - Open the print queue. It should be empty.
If net stop spooler reports that it can't stop the service, you did not open the terminal as administrator. Close it and repeat step 1.
Keep printed documents so you can reprint them
By default, a job leaves the queue as soon as it finishes printing. You can tell Windows to keep finished jobs in the queue so you can restart them later. This step requires administrator privileges on most computers.
- Open the print queue. Use any of the routes above.
- Open the Printer menu and select Properties. The printer's properties window opens.
- Select the Advanced tab. Its options appear.
- Select Keep printed documents. A check mark appears in the box.
- Select OK. Finished jobs now stay in the queue.
To reprint a kept job, right-click it and select Restart. Kept jobs use disk space, so clear them out from time to time with Cancel. To reverse this change, clear the Keep printed documents check box.
On the same Advanced tab, you also see options for when printing starts, such as Start printing after last page is spooled and Start printing immediately. The first is slower to start but is less likely to produce a half-printed page if the app is slow to finish sending the document.
Why options are greyed out or missing
Some menu items in the print queue may be greyed out or missing. These are the usual reasons.
- The job belongs to another account. A standard user can manage their own jobs. Pausing, cancelling or restarting someone else's job needs administrator rights or the Manage documents permission on the printer. Sign in with an administrator account or ask your IT contact to grant it.
- The printer is shared from another computer. The queue you see may be a local copy. The computer that hosts the printer has the real queue, and you may have to manage jobs there.
- The job has already left Windows. A job that is fully sent and printing from the printer's own memory can't be controlled from the queue. Use the printer's screen or buttons.
- The printer's Properties are locked. Settings such as Keep printed documents need administrator rights. Reopen the queue from an administrator account if the options are disabled.
Windows 11 Home and Windows 11 Pro handle the print queue the same way. The difference comes from permissions and from whether a work or school account manages the PC, not from the edition.
If this didn't work
If jobs keep sticking after a spooler restart, update the printer driver or remove and re-add the printer. For a quick check, go to Settings Bluetooth & devices Printers & scanners, select the printer, and use Run the troubleshooter on its page. If the same job fails every time, the problem is probably the document itself, so try printing it from a different app or saving it as a PDF first.
If your printer doesn't show in the list at all, the next task is adding it again from Printers & scanners. Once it is back, set it as your default printer so new jobs go to the right queue.
Frequently asked questions
How to clear print queue on 🪟 Windows 11?
Open Settings and go to Bluetooth & devices Printers & scanners. Select your printer, then click Open queue. In the window that opens, select each job and click Document Cancel If jobs won't delete, restart the Print Spooler service through Services or Command Prompt.
What does "print queue" mean?
The print queue is a list of documents waiting to print on your computer. It shows every job sent to a printer, stored by the Print Spooler service until your printer finishes each one. You can pause, resume, or cancel jobs from the queue window.
How do I get my computer to print to my printer?
Install your printer driver, then add the printer through Settings Bluetooth & devices Printers & scanners Add device. Once installed, open the document you want to print, press Ctrl+P, select your printer, and click Print. Check the print queue if nothing appears.
Where is my HP printer queue?
Open Settings and select Bluetooth & devices Printers & scanners. Find your HP printer in the list, click it, then click Open queue. The queue window shows all jobs waiting to print on that specific printer.
Print in order?
Asked by a reader
Yes, jobs print in queue order: the first job in the list prints first. You can't drag jobs to reorder them. To move one job ahead:
- Open the print queue.
- Right-click the job and select Properties.
- On the General tab, drag the Priority slider toward Highest.
- Select OK.
Priority only affects jobs still waiting; it won't interrupt a job that is already printing.
Still have a question?
Answered by AI from this guide. Good questions may be added to this page — please don't include personal details.
Did this guide fix your problem?

About the Author
Richard
Tech Writer, IT Professional
Richard is a writer at Geek Rewind who turns complex IT tasks into clear, step-by-step guides. He draws on years of hands-on experience in system administration and enterprise IT operations, focusing on Windows, Linux and WordPress: the problems people actually run into, and the fixes that work. His server and WordPress guides come from systems he runs himself. Richard builds and maintains the platform behind Geek Rewind, from its Ubuntu servers and Nginx configuration to its custom WordPress plugins. Many new tutorials start with readers' questions, and he's always glad to answer them in the comments.
No comments yet — be the first to share your thoughts!