How to Find Shared Printer Name in Windows 11

The shared printer name is the network label other computers use to find and connect to your printer. It matters when the printer is plugged into one PC (or connected by Wi-Fi or Ethernet) and you want to print from a second laptop or desktop. Windows needs that exact name to add the printer on the other machine.
Checking the name takes less than a minute, and you only read it, so nothing on the PC changes. The quickest route is the Settings app : open Bluetooth & devices, click Printers & scanners, and select your printer to see its properties. This article also covers the older Devices and Printers window and a PowerShell command. All three methods work the same on Windows 11 Home and Pro, and none needs a restart.
Access the printer’s properties via Settings Bluetooth & devices Printers & scanners, then click Printer properties. The shared name is listed on the Sharing tab. Alternatively, use the command Get-Printer | Format-List Name,ShareName,Shared in PowerShell.
Why Do You Need the Shared Printer Name?
- It helps other devices locate and connect to your printer on the network. When you add the printer on another PC, you pick or type this name, so it needs to be correct.
- You save money by not buying multiple printers. One shared printer can serve every computer in a home or small office.
- It makes troubleshooting printing problems much easier. If a second PC cannot print, you can compare the name it is using with the real shared name and spot a typo or a renamed printer quickly.
Method 1Using the Settings App
- Open the Settings app. Click the Start button and select Settings, or press Win+I on your keyboard. The Settings window opens with the category list on the left.
- Click Bluetooth & devices in the left menu. The device options for your PC appear on the right.
- Click Printers & scanners on the right side. You will see a list of every printer Windows knows about on this PC.
- Find your printer in the list and click it to open its details. If you have several printers, pick the physical one, not entries such as Microsoft Print to PDF. A page with the printer’s settings and links opens.
- Click Printer properties. A separate Properties window opens with several tabs across the top.
- Go to the Sharing tab. You will see the Shared name of the printer here. If the name box is greyed out or empty, the printer is not shared yet. Tick Share this printer to turn sharing on and the name box becomes editable. If that option is greyed out, click Change Sharing Options first and approve the admin prompt.
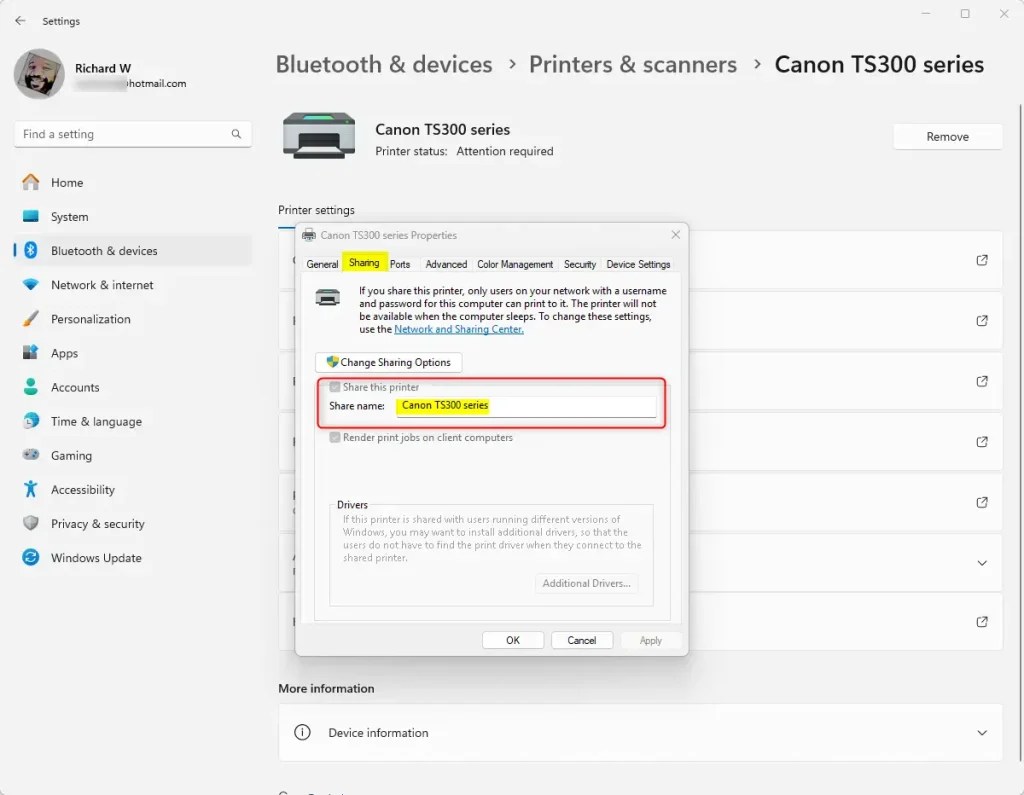
Finding your shared printer name in Windows 11 with the Settings app takes just a few clicks through the hardware menus. Open the printer’s properties and check the Sharing tab. The name shown there is the one other computers on your network need in order to connect to the correct printer without guessing. If you only wanted to read the name, close the window with Cancel so nothing is changed by accident.
Method 2Using Devices and Printers
- Open the Devices and Printers window. Press Win+R, type
control printers, and press Enter. A window opens listing your devices, with a Printers section below them. - Right-click your printer and choose Printer properties. Do not choose the plain Properties entry, because that one shows hardware details and has no Sharing tab.
- Click the Sharing tab. The sharing options for this printer appear.
- Look for the Shared name listed on this tab. Write it down exactly as shown, including capital letters, dashes and numbers.
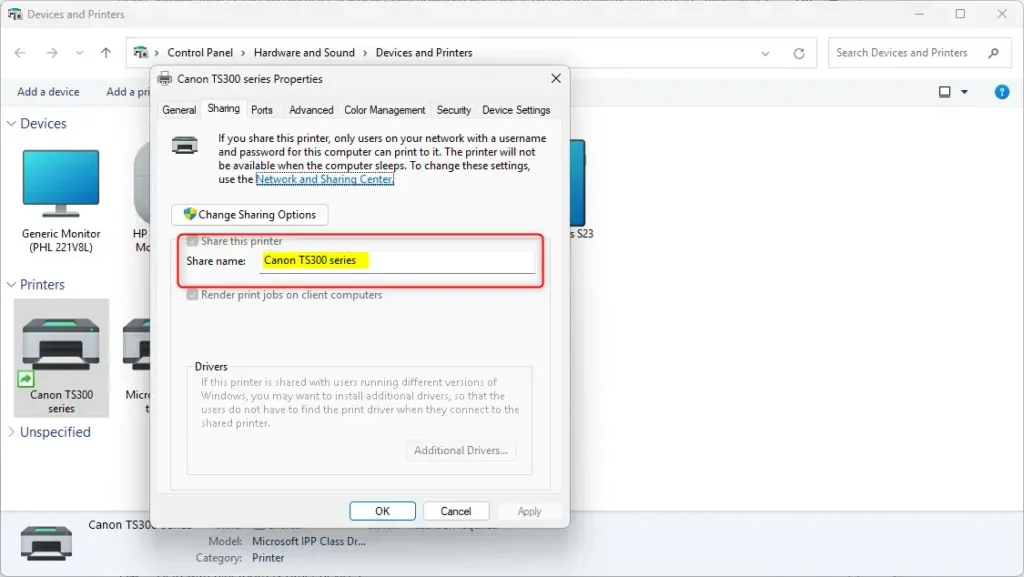
If the Shared name box is empty or greyed out, the printer is not currently shared. Tick Share this printer on the same tab. If the checkbox cannot be changed, click Change Sharing Options and confirm the admin prompt. Untick the box later if you want to stop sharing.
Method 3Using PowerShell
PowerShell lets you view the names of all your printers and their shares at once using one short command. It skips the menu clicks and shows a list of printer names and share names for this computer. This is handy when you manage several printers or want to copy the name rather than retype it.
- ⚠️ Requires admin privileges: Right-click the Start button and select Windows Terminal (Admin). On some newer Windows 11 builds the entry is labelled Terminal (Admin). Click Yes if the User Account Control prompt appears.
- Make sure the tab shows PowerShell. You can select it from the dropdown menu if needed. The prompt should start with PS.
- Type this command and press Enter:
Get-Printer | Format-List Name,ShareName,Shared - Look at the results. Find the ShareName value. This is your printer’s shared name. Match the row to your printer using the Name column. A blank ShareName means that printer is not shared.

The command only reads information, so it changes nothing on your PC. When you finish, type exit or close the terminal window.
Summary
You can find the shared printer name in three ways: the Settings app, the Devices and Printers window, or a PowerShell command. Settings is the easiest for most people, Devices and Printers is a quick alternative, and PowerShell is best when you want to see every printer at once. Whichever you use, a blank name means the printer is not shared yet, and you can turn sharing on from the Sharing tab.
Have a question about this guide?
Answered by AI from this guide. Good questions may be added to this page — please don't include personal details.
Did this guide fix your problem?

About the Author
Richard
Tech Writer, IT Professional
Richard is a writer at Geek Rewind who turns complex IT tasks into clear, step-by-step guides. He draws on years of hands-on experience in system administration and enterprise IT operations, focusing on Windows, Linux and WordPress: the problems people actually run into, and the fixes that work. His server and WordPress guides come from systems he runs himself. Richard builds and maintains the platform behind Geek Rewind, from its Ubuntu servers and Nginx configuration to its custom WordPress plugins. Many new tutorials start with readers' questions, and he's always glad to answer them in the comments.
No comments yet — be the first to share your thoughts!