How to Share a Local Printer in Windows 11

Printer sharing in Windows 11 lets up to 20 other devices on your home or office network print through your main computer. This setup connects a wired USB printer to a host PC so everyone else can use it without needing a direct cable connection.
You need administrator rights on the host computer and “File and Printer Sharing” turned on in your network settings to make this work. The host computer must stay turned on, awake and connected to the network whenever anyone else wants to print. If it goes to sleep or shuts down, the shared printer disappears for everyone else.
Printer sharing works on both Windows 11 Home and Pro, so the edition does not matter. The network profile does. Windows turns off file and printer sharing on networks marked Public. Before you start, check that the host PC is on a Private network, then turn on file and printer sharing:
- Open Settings Network & internet Wi-Fi (or Ethernet if the PC is wired), then click your connection’s properties.
- Set the Network profile type to Private network. The change applies immediately.
- Go back to Settings Network & internet Advanced network settings Advanced sharing settings
- Under Private networks, switch File and printer sharing to On.
If you ever want to stop sharing everything, switch that setting back to Off.
Open Settings Bluetooth & devices Printers & scanners, click your printer, select Printer properties, go to the Sharing tab, click Change Sharing Options, check Share this printer, give it a name, and click OK. Your printer is now shared on the network.
Method 1Share Your Printer Using Windows Settings
It uses the modern interface and does not need the older Control Panel . Before you begin, make sure the printer is plugged into the host PC by USB, powered on, and already printing a test page from that PC. If it does not print locally, it will not print for anyone else.
Open Settings by clicking the Start menu and choosing Settings, or use the keyboard shortcut in step 1. Then follow the steps below.
- Open Settings by clicking the Start menu and choosing Settings, or press
Windows key + Ion your keyboard. The Settings window opens with a list of categories on the left. - Click Bluetooth & devices on the left side. The right pane shows your connected devices.
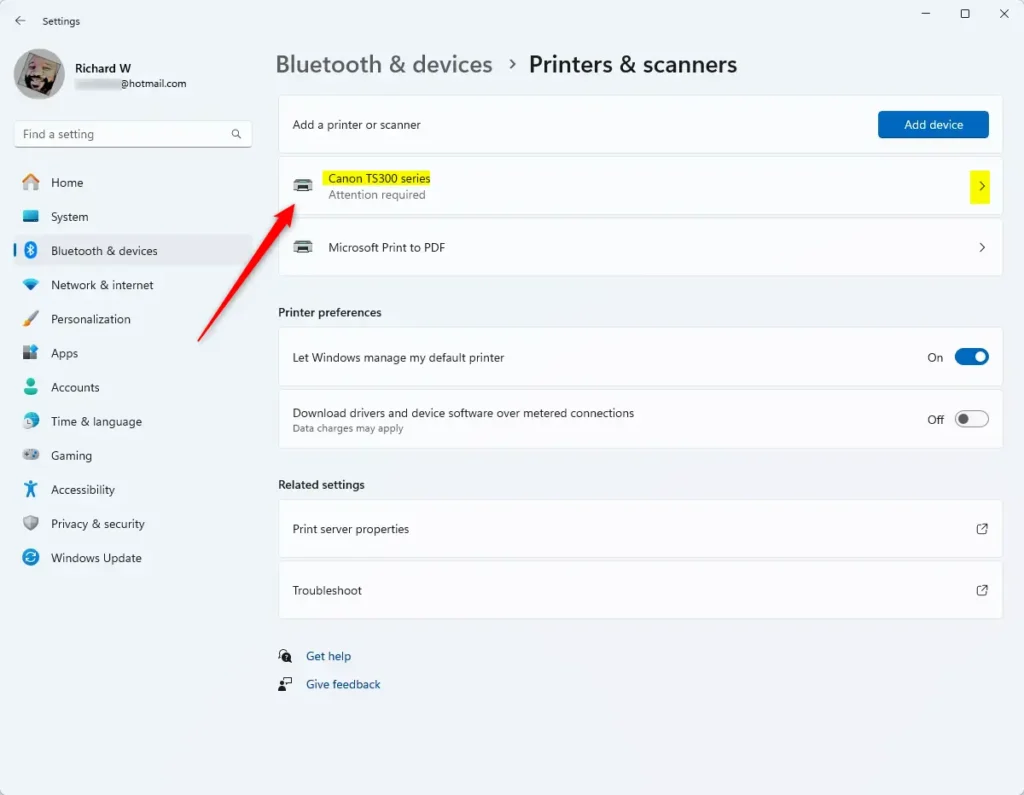
- On the right, click Printers & scanners. You should now see a list of every printer installed on this PC.

The printer you want to share should appear in this list. If it is missing, check the USB cable and the power, then wait a moment for Windows to detect it. If it still does not show up, install the manufacturer’s driver and come back to this page.
- Click on the printer you want to share. Its own settings page opens, with options such as Print a test page.
- Click Printer properties. A separate properties window opens with several tabs, such as General, Sharing and Ports.
This is the classic properties window that Windows still uses for printers. Everything you need for sharing is on its Sharing tab.
- Select the Sharing tab in the new window.
- Click the Change Sharing Options button. If a User Account Control prompt appears, approve it with an administrator account. Without admin rights, the sharing options stay greyed out and you cannot go further.

If they are still greyed out, you are not running with administrator rights. Close the window and sign in with an admin account.
- Check the box that says Share this printer.
- Give it a share name if you want—this is what others will see when they look for your printer. Keep it short and simple, with no spaces or special characters. That makes it easier to type when someone connects by name.
- Click OK to save your settings. The window closes and the change takes effect straight away. You do not need to restart.
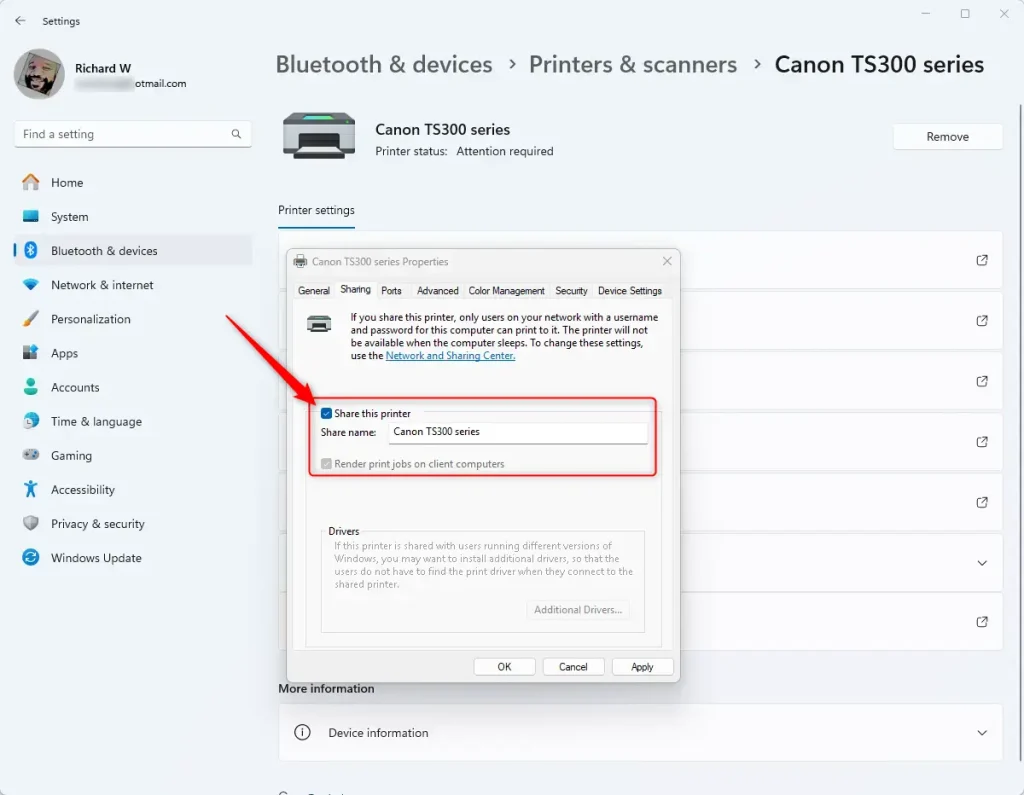
To undo this later, return to the same Sharing tab, click Change Sharing Options, clear the Share this printer checkbox and click OK.
Your local printer is now successfully shared across your network. This means that any other computer connected to the same network can discover and print documents using your printer. Sharing a printer makes it easy for multiple users in a home or small office to access a single printing device without needing individual printers.
To test it, go to another PC on the same network. Open Settings Bluetooth & devices Printers & scanners and click Add device. The shared printer should appear in the list. If it does not, click Add manually and choose Select a shared printer by name. Then type the host computer’s name followed by the share name. The other PC may need the printer driver, and Windows will usually download it for you.
Method 2Share Your Printer Using Devices and Printers
If you prefer the traditional interface, you can share the printer through the classic Control Panel window. This method makes your connected printer available to other computers on your home network using the older system settings. The result is the same as the Settings method, and the printer properties window is identical. Only the way you get to it differs.
You can open Devices and Printers from the Control Panel or from the Start menu . In Control Panel, it is under Hardware and Sound.
- Open Open Devices and Printers from the Control Panel or Start menu . The window lists your printers and other connected devices as icons.
- Right-click the printer you want to share and select Printer properties. Make sure you pick Printer properties and not the plain Properties entry, which shows the hardware details instead. The printer’s properties window opens.
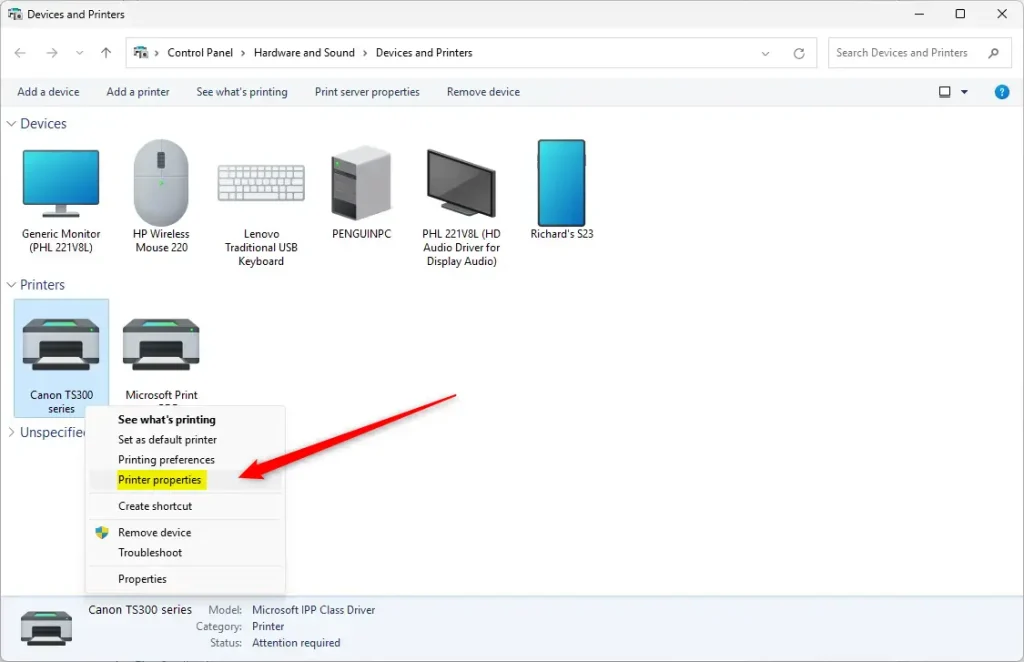
You should see the printer’s properties window with its row of tabs along the top. If you do not see the printer in the window, check that it is plugged in and powered on.
- Go to the Sharing tab.
- Click Change Sharing Options. Approve the User Account Control prompt if it appears. This button is how Windows checks for administrator rights, so the options below stay greyed out until you use it.
- Check the box Share this printer. You can also edit the share name in the field below it.
- Click OK to save. No restart is needed.
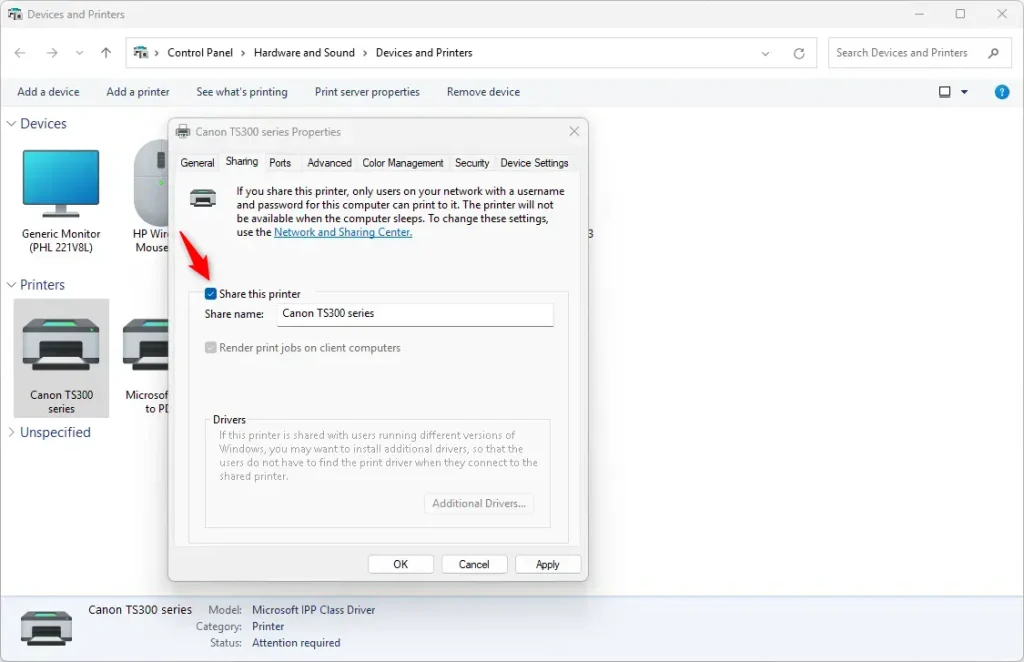
Once the window closes, the printer is shared. Back in Devices and Printers, the printer's icon may show a small people symbol to mark it as shared. To stop sharing, repeat these steps and clear the Share this printer checkbox.
Method 3Share Your Printer Using PowerShell (Advanced)
You can also share the printer from the command line instead of the graphical interface. This method is quicker if you manage several PCs or want to script the setup. It requires administrator rights, so open Windows PowerShell as an administrator before you run any of the commands. The easiest way is to right-click the Start button and choose Terminal (Admin), which opens PowerShell by default on Windows 11.
- ⚠️ Requires admin privileges: Open Windows PowerShell as an administrator. Approve the User Account Control prompt. The window title should include the word Administrator.
- Type this command to see all printers on your PC. It lists each printer with its name and other details:
PowerShellGet-Printer | Format-List Name,ShareName,Shared - Find the exact name of the printer you want to share. Then run this command:
PowerShellSet-Printer -Name "Your Printer Name" -Shared $TrueReplace
Your Printer Namewith your printer's actual name. The name must match what the list showed. If it contains spaces, keep it inside the quotation marks. - If you want to set a custom share name, use this command instead. It shares the printer and sets the name in one go:
PowerShellSet-Printer -Name "Your Printer Name" -Shared $True -ShareName "New Share Name"
Your printer will now be shared on the network! If PowerShell reports an error, the most common causes are a mistyped printer name or a window that was not opened as administrator. You can check the result by opening the printer's Sharing tab, as in the first method. The Share this printer box should be ticked.
Summary
Sharing your printer in Windows 11 lets everyone on your network print without needing separate devices. To do this, ensure your PC is on, you have admin rights, and file and printer sharing is enabled on a Private network. Then use Settings, Devices and Printers, or PowerShell. All three methods give the same result, so pick whichever you find easiest. If another PC cannot find the printer, check the host's network profile and the file and printer sharing setting first, as those are the usual culprits.
Have a question about this guide?
Answered by AI from this guide. Good questions may be added to this page — please don't include personal details.
Did this guide fix your problem?

About the Author
Richard
Tech Writer, IT Professional
Richard is a writer at Geek Rewind who turns complex IT tasks into clear, step-by-step guides. He draws on years of hands-on experience in system administration and enterprise IT operations, focusing on Windows, Linux and WordPress: the problems people actually run into, and the fixes that work. His server and WordPress guides come from systems he runs himself. Richard builds and maintains the platform behind Geek Rewind, from its Ubuntu servers and Nginx configuration to its custom WordPress plugins. Many new tutorials start with readers' questions, and he's always glad to answer them in the comments.
No comments yet — be the first to share your thoughts!