How to Connect to a Shared Printer in Windows 11


Connecting to a shared printer in Windows 11 lets you print to a printer that someone else on your local network has set up and shared from another machine. You don’t plug the printer into your own computer. That is handy in homes and offices where several people use one device.
To add the printer, you need the network name or IP address of the host computer, which is the PC the printer is attached to. The host must be switched on and connected to the same network, and the printer must be shared there. Windows 11 gives you three ways to add it: the Settings app , the classic Devices and Printers folder, and PowerShell. All three are covered below.
Open Settings Bluetooth & devices Printers & scanners, click Add device, then Add a device manually. Select Select a shared printer by name, type the network path like \\ComputerName\PrinterName, click Next, and wait for Windows to install the driver.
What is a Shared Printer?
A shared printer is connected to one computer, and other computers on the network send their print jobs through it. One printer then serves everyone, which costs less than buying one for each device.
If the host computer is asleep or turned off, nobody can print through it. Some printers connect to the network directly and need no host PC. Those are added the same way, usually by IP address.
Why Use a Shared Printer?
Shared printers help a home or office run smoothly. One printer serves many computers, which cuts costs and reduces clutter. It also means one place to refill paper and replace ink or toner.
What Do You Need?
It takes one of two forms. It can be a set of numbers and periods, like 192.168.1.100 (an IP address). Or it can be a computer name followed by a printer name, like \\MyHomePC\Canon TS300 series. Have this ready before you begin, because most setup errors come from a mistyped path.
The name-based path follows this pattern:
\\ComputerName\PrinterName
For example:
\\MyHomePC\Canon TS300 series
Here, MyHomePC is the name of the computer sharing the printer. Canon TS300 series is the printer’s share name. Spaces in the printer name are part of the path, so type them exactly as they appear.
If you can’t get the details from whoever set up the printer, ask them. Or sit at the host computer and check its name and the printer’s share name there. Browsing the network from your own PC, as shown in the methods below, also works if the host is visible.
How to Add a Shared Printer Using Windows Settings
The Settings app is the simplest way to add a shared printer in Windows 11. You open Bluetooth & devices, start a printer search, and then switch to the manual option to enter the network path.
- Open the Settings app. You can do this by:
- Clicking the Start button and then selecting Settings
- Or pressing Win+I on your keyboard
- In Settings, click Bluetooth & devices on the left side.
- Click Printers & scanners. You should see a list of printers already installed on your PC.
- Click the Add device button at the top. Windows starts searching for nearby printers.
- When the search finishes, or if your printer doesn’t show up, click Add a device manually at the bottom. On some builds this link reads Add manually. The Add Printer window opens.
- Select Select a shared printer by name.
- Type the network path of the printer (like
\\MyHomePC\Canon TS300 series). - If you’re not sure about the path, click the Browse button to find printers on your network. Double-click the host computer in the list to see the printers it shares. If the host doesn’t appear, check that it is on and that both PCs are on the same network.
- Click Next and wait for Windows to connect to the printer. Windows may need to download or install a driver. If a sign-in prompt appears, enter the username and password of an account on the host computer.
- Print a test page to make sure it works. Go back to Settings Bluetooth & devices Printers & scanners, click the printer, and choose the test page option under its printer properties.
The printer must be shared and the host must be awake. On a work PC, a policy may block driver installation. In that case you need an administrator to approve the install.
To undo this, go to Settings Bluetooth & devices Printers & scanners, click the printer, and select Remove. This only removes the connection on your PC. The printer stays shared on the host. No restart is needed either way.


How to Add a Shared Printer from Devices and Printers Folder
The classic Devices and Printers folder is another reliable way to add a shared printer. It is useful when the Settings app doesn’t find the printer on its own, and the steps after the search are almost the same.
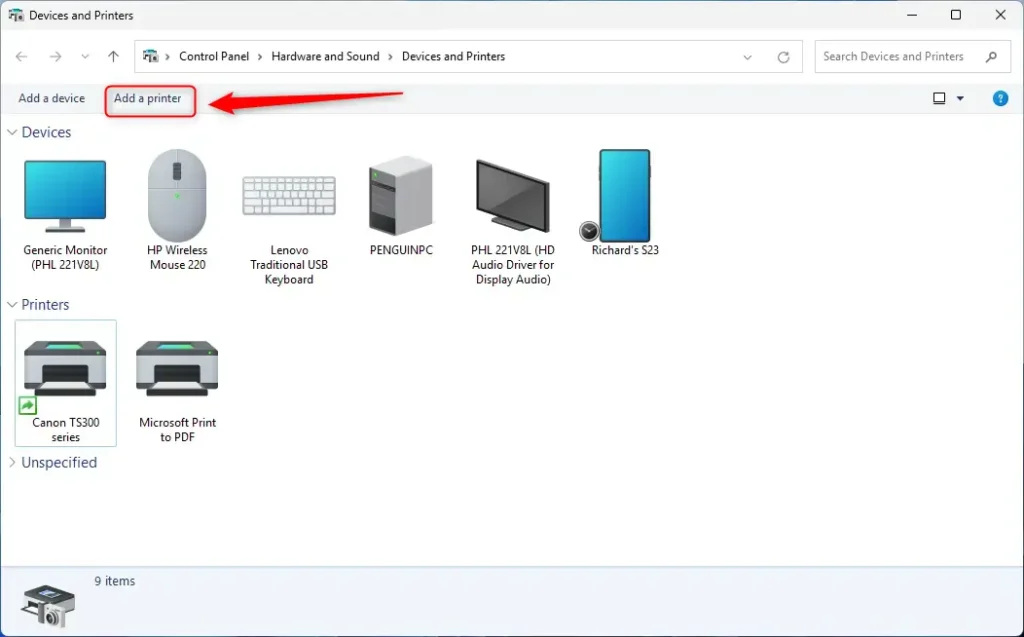
- Open the Devices and Printers folder. You can search for “Devices and Printers” in the Start menu and open the result.
- Click the Add a printer button at the top. Windows starts searching for printers.
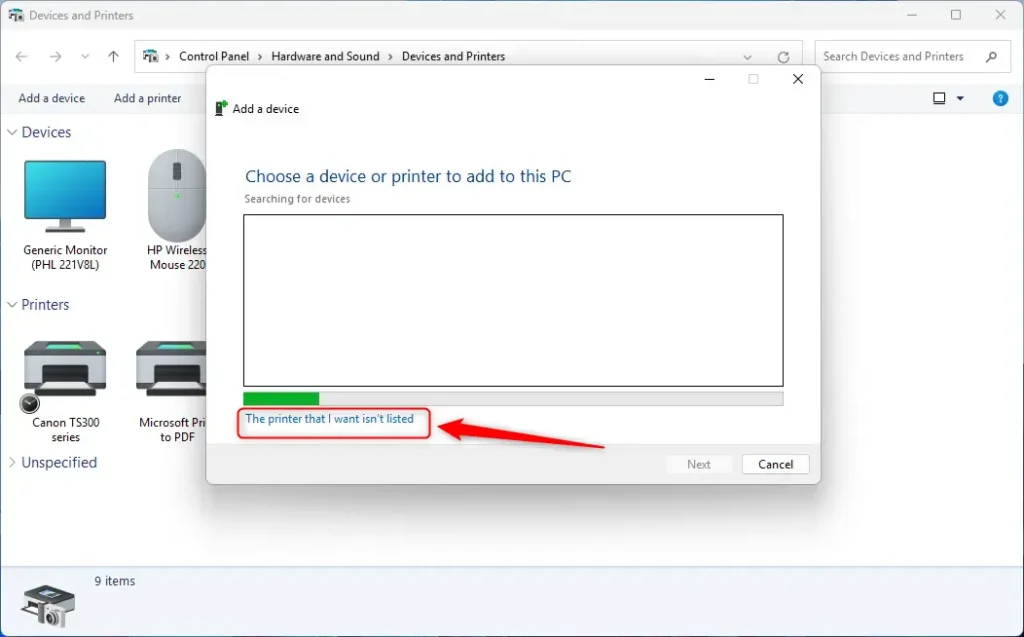
- When the search finishes, click the The printer that I want isn’t listed link at the bottom. The Add Printer window opens.
- Choose Select a shared printer by name.
- Type the printer’s network path (for example,
\\MyHomePC\Canon TS300 series). - Or click Browse to find it on the network. Double-click the host computer, then pick the printer from its list.
- Click Next. Wait while Windows connects and installs the driver, and enter the host’s credentials if asked.
- Click Finish when done. The printer now appears in the Devices and Printers folder.
To remove the printer later, right-click it in the Devices and Printers folder and choose Remove device. As with the Settings method, this only removes it from your PC.
How to Add a Shared Printer Using PowerShell
PowerShell is the quickest method once you know the printer's path, and it is handy if you set up several PCs. You open Windows Terminal as an administrator and run one command with the printer's address.
- Open Windows Terminal as an administrator:
- Search for "Windows Terminal" in the Start menu
- Right-click it and choose Run as administrator
- Click Yes if User Account Control asks for permission
- Open a PowerShell tab inside Windows Terminal if one isn't already showing. Use the down-arrow next to the new tab button and pick Windows PowerShell.
- Type this command to add the printer, replacing the placeholders with your own host and printer names:
Add-Printer -ConnectionName "\\ComputerName\PrinterName" - For example:
Add-Printer -ConnectionName "\\MyHomePC\Canon TS300 series" - Or, if you prefer using the IP address:
Add-Printer -ConnectionName "\\192.168.1.2\Canon TS300 series" - Press Enter. If the command succeeds, PowerShell returns to the prompt without an error and the printer is added.
To confirm, open Settings Bluetooth & devices Printers & scanners and look for the new printer in the list. If you get a red error, the usual causes are a typo in the path, a host that is off, or a printer that isn't shared.
Summary
Connecting to a shared printer in Windows 11 lets you print from any computer on your network without a printer nearby, which saves money and is convenient. Once you have the host name or IP address, any of the three methods takes only a few minutes. If one doesn't work, try another, and check the host computer first.
Have a question about this guide?
Answered by AI from this guide. Good questions may be added to this page — please don't include personal details.
Did this guide fix your problem?

About the Author
Richard
Tech Writer, IT Professional
Richard is a writer at Geek Rewind who turns complex IT tasks into clear, step-by-step guides. He draws on years of hands-on experience in system administration and enterprise IT operations, focusing on Windows, Linux and WordPress: the problems people actually run into, and the fixes that work. His server and WordPress guides come from systems he runs himself. Richard builds and maintains the platform behind Geek Rewind, from its Ubuntu servers and Nginx configuration to its custom WordPress plugins. Many new tutorials start with readers' questions, and he's always glad to answer them in the comments.
No comments yet — be the first to share your thoughts!