How to Check Active Print Jobs in the Windows 11 Print Queue

The Windows 11 print queue is a built-in list of every document waiting to print on a printer. Use it to check active print jobs, see file sizes and status, cancel stuck documents, or pause printing when a printer stops responding. There are three ways to open it, and all of them end at the same window.
Open Settings , go to Bluetooth & devices Printers & scanners, click your printer name, then click Open print queue. A window displays all active print jobs with document names, status, owners and submission times.
Using Settings to view the print queue
The Settings app is the most direct route in Windows 11. It works on both Home and Pro, and you don’t need extra software. You’ll see every pending document in one window.
- Open the Start menu and click Settings, or press the Win+I. The Settings window opens.

Windows 11 Start menu with Settings gear icon highlighted. - Click Bluetooth & devices in the left-hand menu.
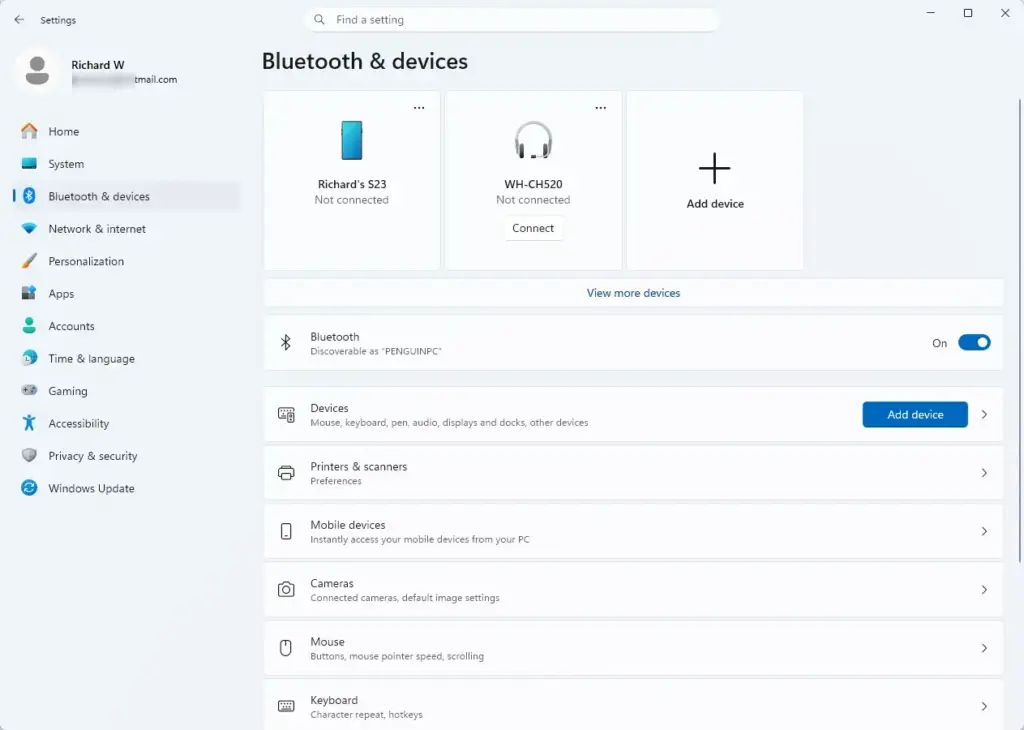
Windows Settings menu highlighting the Bluetooth and devices option for printers - Click Printers & scanners on the right side. Your installed printers are listed.
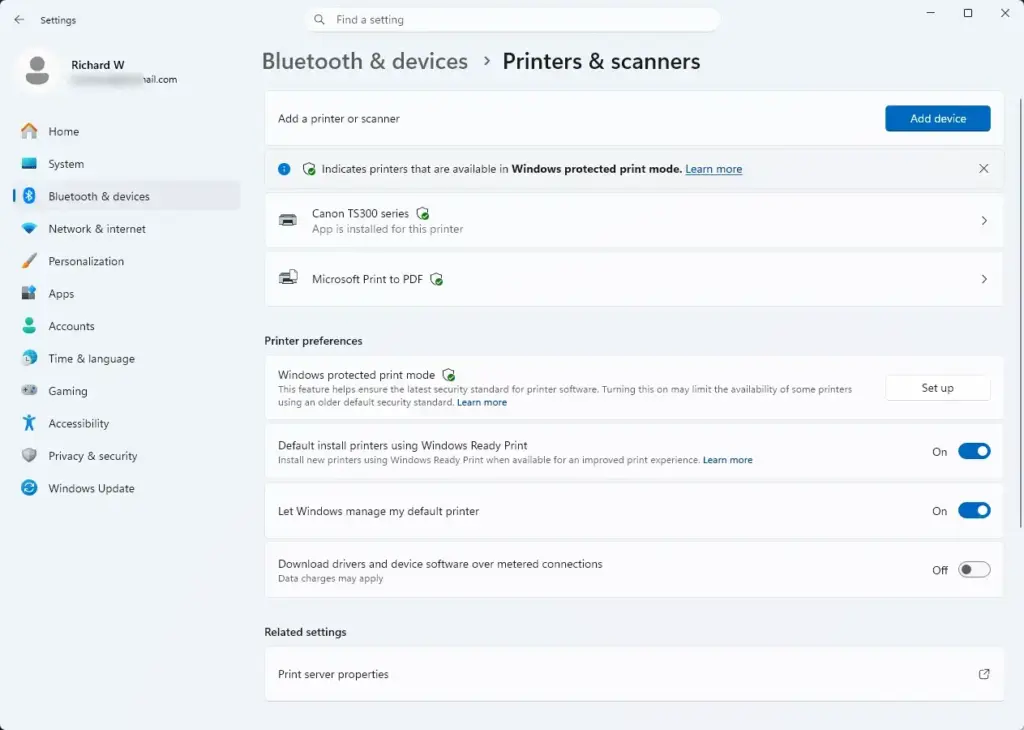
Settings › Bluetooth › Printers - Click the name of your printer in the list. Its device page opens.
- Click Open print queue near the top of the device page. A new window opens with the active print jobs, including document names, status, owners and submission times.
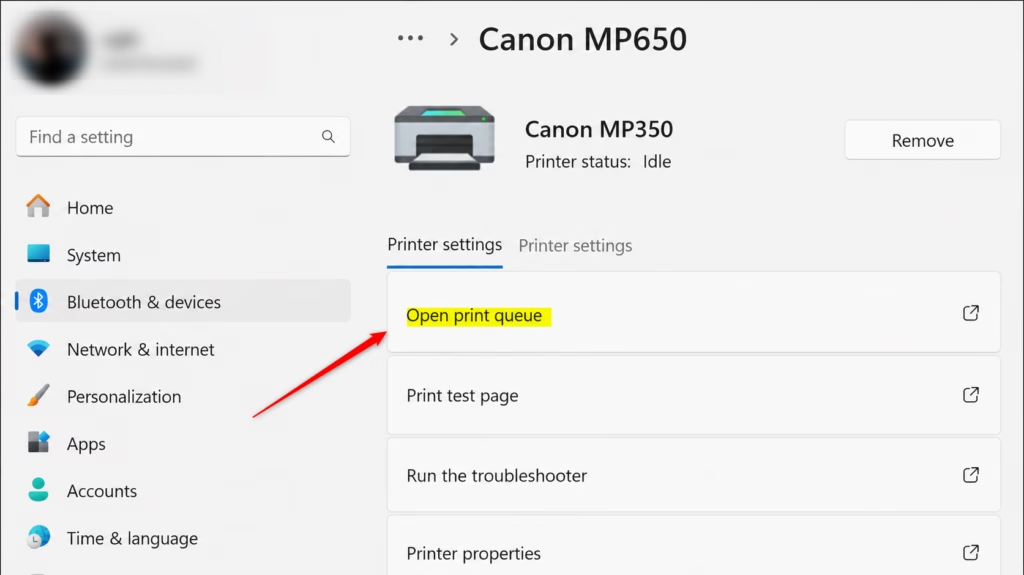
Clicking the Open print queue button to check print queue on this computer
If the queue is empty, the window shows no documents. That means nothing is waiting to print on that printer. If you have several printers installed, check that you opened the right one, because each printer has its own queue.
Using Control Panel to open the print queue
The Control Panel route is the older, traditional way. It is useful when you want to see all connected printing hardware in one place.
- Open the Start menu , type Control Panel , and press Enter.
- Under the Hardware and Sound category, click View devices and printers.
- Find your printer in the Printers section of the list.
- Right-click your printer icon and select See what’s printing from the context menu . The traditional print queue window opens with all active and pending print jobs.
If Control Panel opens in Category view, you’ll see the Hardware and Sound heading. If it opens in icon view, look for Devices and Printers instead. Both lead to the same list.
Using the Taskbar notification area shortcut
While a document is printing, Windows shows a small printer icon in the system tray . Using it skips the menus entirely. The icon only appears while a job is active, so it won’t be there if nothing is printing.
- Look at the system tray, the area at the far right of the taskbar near the clock. If printing is active, a small printer icon appears there. If you don't see it, click the upward-pointing arrow (Show hidden icons).
- Double-click the printer icon. The print queue window opens for the current job.
If the icon never shows up, the job may have already finished or failed before reaching the printer. Use the Settings or Control Panel method to open the queue instead.
How to switch between list view and tiles view in the print queue
A clear, column-based list makes a long queue much easier to read. The print queue window normally opens as a list with columns for Document Name, Status, Owner, Pages, Size and Submitted time. The exact layout can vary slightly depending on how the window was opened, so the steps below cover both cases.
- Open your print queue using the Settings or Control Panel method.
- Look at the top-right corner of the window, next to the printer name, for a View icon (small horizontal lines or grid squares). If you don't see one, the window is already showing the list layout, and you can skip to the last step.
- If the icon is there, click it and select Details. This switches from tiles to the spreadsheet-style list, with columns for Document Name, Status, Owner, Pages, Size and Submitted time.
- If a column is cut off, drag the border between column headings to widen it. This is useful for reading long document names or the full submission time.
The Status column is the one to watch. A job that stays on a status such as Error, or sits on Deleting for a long time, is usually the one blocking everything behind it.
Managing and canceling active print jobs
You can only cancel your own jobs with a standard account. Cancelling jobs sent by other people on the network needs administrator permissions.
- Click the document in the print queue list to select it.
- Right-click the selected document and choose Cancel to stop that single print job.
- To clear the whole queue instead, open the menu at the top of the queue window and choose Cancel All Documents. In the classic queue window this option sits under the Printer menu. Older instructions sometimes point to the Document menu, which only acts on the selected job.
- Click Yes on the confirmation prompt to confirm that you want to remove the selected print jobs.
The job should disappear from the list within a few seconds. If it stays and shows Deleting, wait a moment and close and reopen the queue window. If it still remains, see the next section.
Open the Printer menu in the queue window and choose Pause Printing. Choose it again to resume. You can also select one document and use the Document menu to pause just that job.
What to do next
If clearing the queue doesn't restore normal printing, the Windows Print Spooler service is the next thing to restart. It is the Windows service that hands jobs to the printer, and a stuck job can leave it in a bad state. Restarting it from the Services app needs administrator rights. If that doesn't help, remove and reinstall the printer, which also reinstalls its driver.
If documents keep stalling after that, visit the printer manufacturer's website. Look for updated drivers and firmware for your exact model. Also check the basics: the printer is on, it has paper and ink or toner, and it is connected to the same network or USB port as before.
Have a question about this guide?
Answered by AI from this guide. Good questions may be added to this page — please don't include personal details.
Did this guide fix your problem?

About the Author
Richard
Tech Writer, IT Professional
Richard is a writer at Geek Rewind who turns complex IT tasks into clear, step-by-step guides. He draws on years of hands-on experience in system administration and enterprise IT operations, focusing on Windows, Linux and WordPress: the problems people actually run into, and the fixes that work. His server and WordPress guides come from systems he runs himself. Richard builds and maintains the platform behind Geek Rewind, from its Ubuntu servers and Nginx configuration to its custom WordPress plugins. Many new tutorials start with readers' questions, and he's always glad to answer them in the comments.
No comments yet — be the first to share your thoughts!