How to Add or Remove Microsoft Print to PDF in Windows 11

Microsoft Print to PDF is a built-in virtual printer. It turns any document or web page into a PDF file without extra software. It looks like a real printer in the print dialog, but it saves a file on your computer instead of printing on paper.
Most Windows 11 computers have it by default. Occasionally an update or a glitch removes it from your printer list. When that happens, you can add it back, or remove it if you don’t want it, using the Windows features list, Command Prompt or PowerShell.
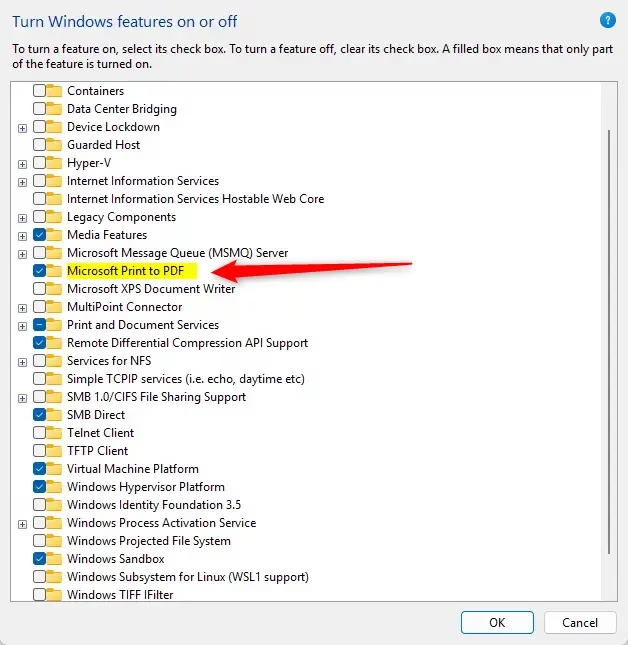
Open Start , type Windows Features, and select Turn Windows features on or off. Find Microsoft Print to PDF, tick the box to add it or clear it to remove it, then click OK. Restart if prompted. The printer appears in your print dialog immediately after.
What Is Microsoft Print to PDF?
Microsoft Print to PDF saves documents, web pages and photos as PDF files. You pick it from the printer list in any app’s print dialog, choose a name and a folder, and Windows writes the PDF there. It works the same on Windows 11 Home and Pro.
If the printer goes missing from the list or stops working, turning the feature off and then back on usually fixes it. Do this in two passes: remove it, restart if asked, then add it again.
If you are on a standard account, Windows will ask for an administrator password. If you don’t have one, ask whoever manages the PC.
How to Add or Remove Microsoft Print to PDF
Option 1Using Windows Features
This is the easiest method and the best place to start. It needs no commands.
- Click the Start button, type
Windows Features, and open Turn Windows features on or off. Approve the User Account Control prompt if one appears. A Windows Features window opens with a list of optional components. It may take a few seconds to fill in. - Scroll the list and find Microsoft Print to PDF.
- To add it, tick the box. To remove it, clear the box.
- Click OK. Windows applies the change and shows a progress window.
- Restart your computer if Windows prompts you to. If it doesn't, the change is already in effect.
To check the result, open any document and press Ctrl + P. Microsoft Print to PDF should be in the printer list if you added it, and gone if you removed it. To undo either change, run the same steps and flip the checkbox back.
If the Windows Features window won't open, stays empty, or throws an error when you click OK, the Windows Modules Installer service may be disabled. Check it like this:
- Press Windows + R, type
services.msc, and press Enter. The Services window opens. - Find Windows Modules Installer in the list.
- Double-click it and set Startup type to Automatic.
- If the service status shows as stopped, click Start. Then click OK.
Now go back and try the Windows Features steps again. Services like this one normally start on demand (usually set to Manual), so you can set it back to that afterwards if you prefer.
Here is what the Windows Features window looks like:
Option 2Using Command Prompt (DISM)
Use this method if the Windows Features window fails, or if you prefer typing commands. It uses DISM, the built-in Windows servicing tool.
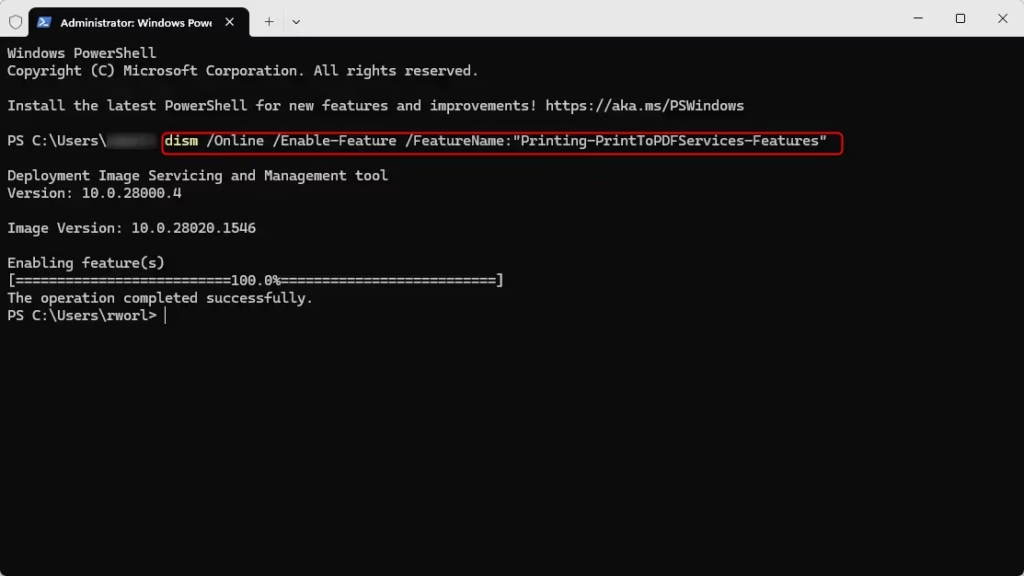
- Right-click the Start button and choose Windows Terminal (Admin). Approve the User Account Control prompt. A terminal window opens with administrator rights.
- To add Microsoft Print to PDF, type this command and press Enter:
dism /Online /Enable-Feature /FeatureName:"Printing-PrintToPDFServices-Features" - To remove it instead, type this command and press Enter:
dism /Online /Disable-Feature /FeatureName:"Printing-PrintToPDFServices-Features" - Wait for the operation to report that it finished, then close the terminal.
Its title bar usually says so. Restart the PC if Windows says one is needed. To undo the change, run the other command.
Option 3Using PowerShell
PowerShell does the same job with a built-in cmdlet. It suits administrators and anyone who manages Windows features through scripts.
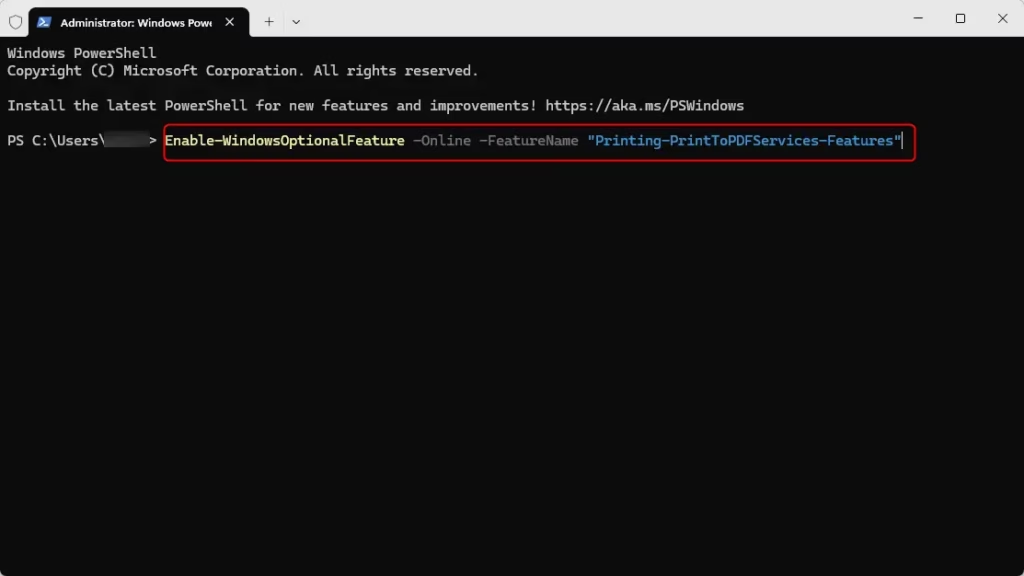
- Open Windows Terminal (Admin) with administrator rights and approve the User Account Control prompt.
- Make sure you are in the PowerShell tab. If you are not, type
powershelland press Enter. - To add Microsoft Print to PDF, type this command and press Enter:
Enable-WindowsOptionalFeature -Online -FeatureName "Printing-PrintToPDFServices-Features" - To remove it, type this command and press Enter:
Disable-WindowsOptionalFeature -Online -FeatureName "Printing-PrintToPDFServices-Features" - Close PowerShell when the command finishes.
PowerShell may ask you to restart the computer. If it does, restart before you test the printer. Then press Ctrl + P in any app to confirm that the printer is there, or gone, as you intended. To undo the change, run the opposite command.
Summary
Microsoft Print to PDF is a handy built-in tool that lets you save files as digital documents in Windows 11 without installing extra software. You can easily add or remove this feature using the Windows Features menu, Command Prompt, or PowerShell depending on your preference. Restoring the printer through any of these methods quickly fixes missing or broken PDF options on your computer.- Microsoft Print to PDF is a handy tool to save files as PDFs without extra software.
- You can add or remove it using Windows Features, Command Prompt, or PowerShell.
- Make sure you run these as an administrator.
- If you have trouble, check that the Windows Modules Installer service is running.
- Once restored, you can print to PDF from any app that supports printing.
Have a question about this guide?
Answered by AI from this guide. Good questions may be added to this page — please don't include personal details.
Did this guide fix your problem?

About the Author
Richard
Tech Writer, IT Professional
Richard is a writer at Geek Rewind who turns complex IT tasks into clear, step-by-step guides. He draws on years of hands-on experience in system administration and enterprise IT operations, focusing on Windows, Linux and WordPress: the problems people actually run into, and the fixes that work. His server and WordPress guides come from systems he runs himself. Richard builds and maintains the platform behind Geek Rewind, from its Ubuntu servers and Nginx configuration to its custom WordPress plugins. Many new tutorials start with readers' questions, and he's always glad to answer them in the comments.
No comments yet — be the first to share your thoughts!