How to Enable or Disable Windows Protected Print Mode in Windows 11

Windows Protected Print Mode (WPP) blocks untrusted, third-party printer drivers from running on your PC. Printing then relies on Microsoft’s own print components, which cuts down the risk from old or poorly written driver software. Microsoft introduced the feature in Windows 11 build 26016, and it is part of current Windows 11 releases.
When the mode is on, only certified drivers are allowed. A printer that depends on a vendor-specific driver may stop working or be removed from your device list, so check that your printers are supported before you switch it on. You can turn the feature on or off in Settings, with the Local Group Policy Editor, or in the Windows Registry. The default state is off.
Open Settings Bluetooth & devices Printers & scanners, find your printer, click Printer preferences, then click Set Up next to Windows protected print mode and confirm. The mode activates after Windows checks your printers against the new rules.
How to Turn On or Off Windows Protected Print Mode from Settings
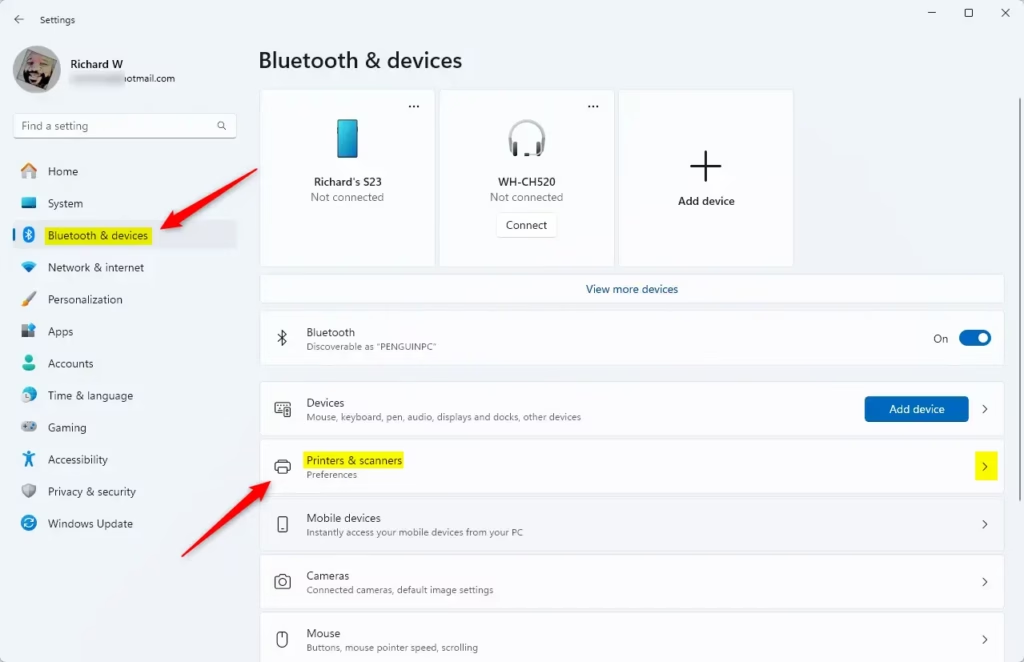
- Press Win+I to open Settings . The Settings window opens with the list of categories on the left.
- Click Bluetooth & devices on the left. Then choose Printers & scanners on the right. Or click here to open the page directly: Open Printers & scanners settings. You should now see the list of printers installed on your PC.
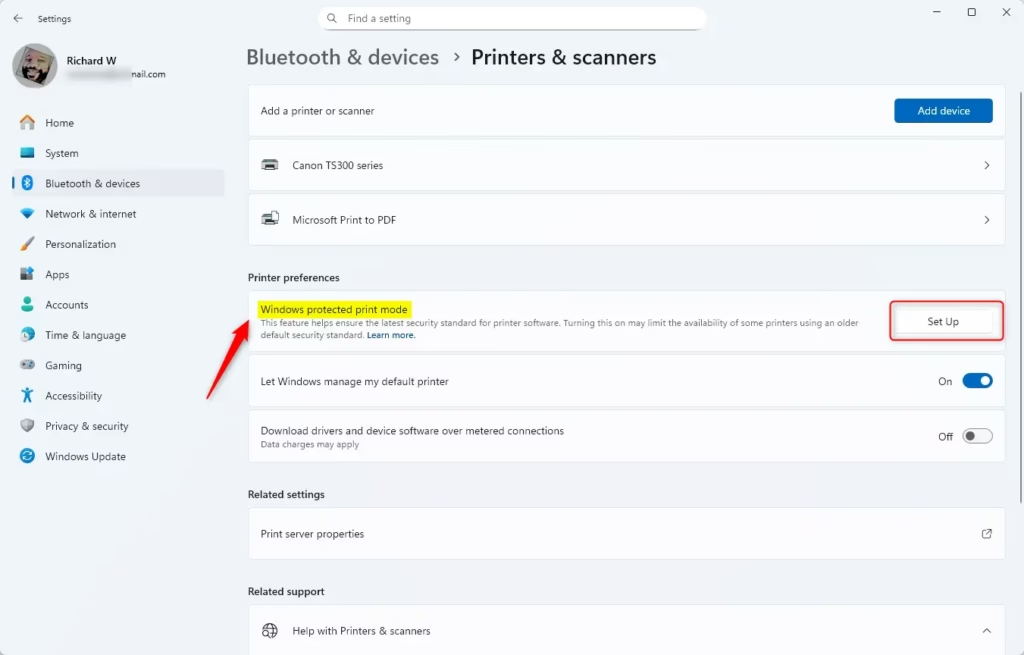
- Find your printer. Then click on Printer preferences. This is where the “Windows protected print mode” setting is. If you can’t see it, your PC may be running a Windows 11 version older than the build that introduced the feature, so run Windows Update first.
The Settings app is the simplest way to switch Windows Protected Print Mode on or off. It suits home users and personal devices, and it doesn’t need Group Policy or any registry editing. Open the printer options, choose the setting, and confirm the prompts.
If one of them relies on a third-party driver, Windows may remove it during setup, and you would have to add it back after turning the mode off.
- Click the Set Up button next to “Windows protected print mode”. A confirmation prompt appears and explains what the mode does.
- Click Yes, continue to confirm. Windows then checks your installed printers against the new rules.
- If any printers are removed as part of the setup, click Yes, continue again. The setting should now show that the mode is on, and the button next to it changes to Turn Off.
To turn off Windows Protected Print Mode (default):
This returns your PC to its default state. If setup removed a printer earlier, add it again afterwards from the same Printers & scanners page.
- Click the Turn Off button next to "Windows protected print mode". A confirmation prompt appears.
- Click Yes to confirm. The button should change back to Set Up.
How to Turn On or Off Windows Protected Print Mode Using Local Group Policy Editor
The Local Group Policy Editor lets administrators turn Windows Protected Print Mode on or off, and a domain policy can apply the same setting across many computers on a network. A policy gives you more control than the Settings app and can be enforced centrally.
The Local Group Policy Editor is only included in Windows 11 Pro, Enterprise and Education. On Windows 11 Home it won't open, so use the Settings method above or the registry method below instead. If a policy is set, it can override what you choose in Settings, and the setting may appear locked there.
Follow these steps:
- Open the Start menu. Type
Edit group policy. Press Enter to open the Local Group Policy Editor. ⚠️ Admin privileges required The editor opens with a folder tree on the left. - Go to this folder path:
Computer Configuration > Administrative Templates > Printers. The policies in that folder are listed on the right. - On the right side, double-click Configure Windows protected print. A settings window opens.
- You will see three options:
- Not Configured: Uses default settings (WPP off). Pick this to undo a policy you set earlier.
- Enabled: Turns on Windows Protected Print Mode.
- Disabled: Turns off Windows Protected Print Mode.
- Choose your option and click OK. The policy list should now show the new state for this setting.
- Restart your computer to apply the changes.


How to Enable or Disable Windows Protected Print Mode Using Registry Editor
You can also enable or disable Windows Protected Print Mode by editing the Windows registry. This method works on every edition, including Windows 11 Home, where Group Policy isn't available. Open the Registry Editor from the Start menu search and change the values listed below. Be careful: a wrong change can cause system instability.
Ensure you back up your registry before proceeding. In Registry Editor, you can do this with File Export. Save the file somewhere safe so you can double-click it to restore the keys later. Creating a system restore point first is also a good idea.
Here's how:
- Open Registry Editor by typing
regeditin the Start menu and pressing Enter. ⚠️ Admin privileges required Click Yes if User Account Control asks for permission. - Go to this key:
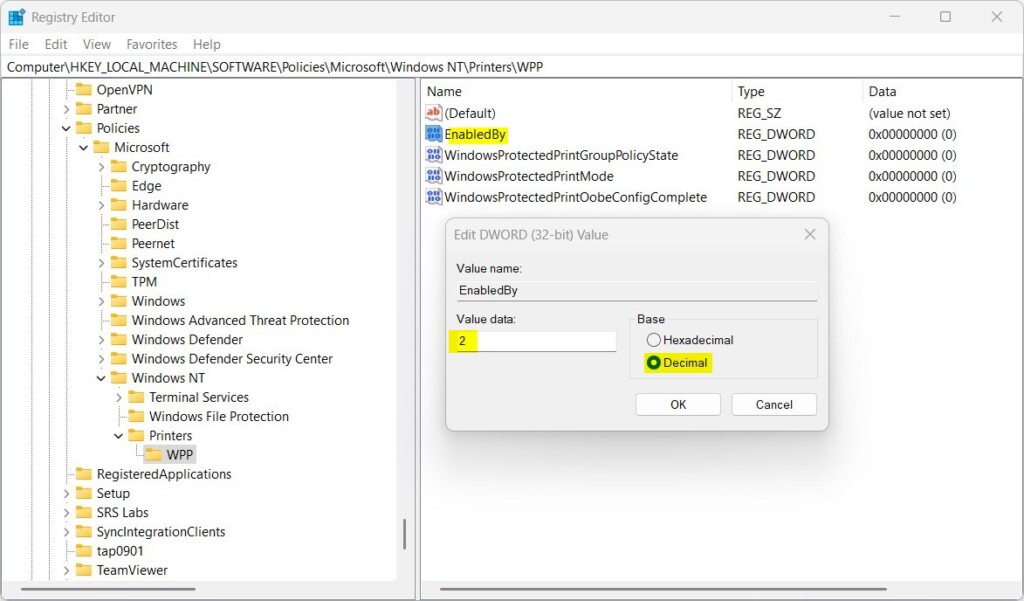
HKEY_LOCAL_MACHINE\SOFTWARE\Policies\Microsoft\Windows NT\Printers\WPP. You can paste the path into the address bar at the top of Registry Editor. The values stored in the key appear in the right pane. - Look for these items in the right pane:
- EnabledBy
- WindowsProtectedPrintGroupPolicyState
- WindowsProtectedPrintMode
- WindowsProtectedPrintOobeConfigComplete
- If they don't exist, right-click on empty space in the right pane. Choose New DWORD (32-bit) Value. Type the exact name from the list above and press Enter. Repeat for each missing item. The new value is created with a data of 0 until you change it.
To turn on WPP, adjust these values:
Double-click each value, enter the number shown in the Value data box, and click OK.
- EnabledBy = 2
- WindowsProtectedPrintGroupPolicyState = 1
- WindowsProtectedPrintMode = 1
- WindowsProtectedPrintOobeConfigComplete = 1
To turn WPP off, delete the first, second, and fourth items. Then, set 'WindowsProtectedPrintMode' to 0.
To delete a value, right-click it, choose Delete, and confirm. Do both parts below.
- Delete the first, second, and fourth items: EnabledBy, WindowsProtectedPrintGroupPolicyState, and WindowsProtectedPrintOobeConfigComplete.
- Set WindowsProtectedPrintMode to 0. Leave the value in place and change only its data.
- Restart your PC for the changes to take effect. If something goes wrong, double-click the backup file you exported earlier to restore the original values.

Summary
Windows Protected Print Mode is a built-in security feature that protects your printed documents by blocking untrusted printer drivers. Home users can manage this setting through the standard Settings app, while workplaces often use group policy or registry tools to enforce it across many computers at once.
- What is it? Windows Protected Print Mode helps keep your printed documents secure by using only trusted printer drivers.
- When to use it? It is especially useful for workplaces handling sensitive or private information like banks or hospitals. Before you roll it out, test it with the printers you actually use, because printers that depend on third-party drivers may stop working.
- How to use it? You can turn this feature on or off easily through Windows Settings, Group Policy Editor, or Registry Editor.
- Which method should I choose? Use the method that best fits your comfort level and needs. Settings is the easiest and works on every edition. Group Policy needs Windows 11 Pro or higher. The registry works everywhere but needs the most care.
- Important reminder: Always restart your computer after making changes for them to work properly.
- Need more help? For more information, you can check out the official Microsoft page about this feature here: Microsoft Tech Community - Secure Print Experience
Have a question about this guide?
Answered by AI from this guide. Good questions may be added to this page — please don't include personal details.
Did this guide fix your problem?

About the Author
Richard
Tech Writer, IT Professional
Richard is a writer at Geek Rewind who turns complex IT tasks into clear, step-by-step guides. He draws on years of hands-on experience in system administration and enterprise IT operations, focusing on Windows, Linux and WordPress: the problems people actually run into, and the fixes that work. His server and WordPress guides come from systems he runs himself. Richard builds and maintains the platform behind Geek Rewind, from its Ubuntu servers and Nginx configuration to its custom WordPress plugins. Many new tutorials start with readers' questions, and he's always glad to answer them in the comments.
[…] How to Enable or Disable Windows Protected Print Mode in Windows 11 […]