The Print Spooler in Windows 11 is a built-in software service that manages print jobs sent to your printer or network fax machine. When this service fails to start, your print queue stops working entirely and error messages appear whenever you try to print a document.
Advertisement
Fixing a broken Print Spooler usually involves restarting the service, clearing stuck print files from 📁C:\Windows\System32\spool\PRINTERS, and repairing damaged system files using Command Prompt. These steps get your printer communicating with Windows again so you can get back to printing normally.
A damaged or outdated printer driver is one of the most common reasons the spooler crashes or refuses to start. The sections below start with the safest fix, updating the driver, and move on to clean removal and the service restart. Work through them in order and test your printer after each one, so you know which step solved it.
⚡ Quick Answer
To update printer drivers in Windows 11, open Settings ⚙️, select Windows Update 🔃 from the left sidebar, click Advanced options, then Optional updates, then Driver updates, check the box next to your printer manufacturer’s driver, and click Download & install. If no driver appears there, open Device Manager, expand Print queues, right-click your printer, select Update driver, and click Search automatically for drivers.
Advertisement
Updating Printer Drivers Through Windows Update
Updating printer drivers through Windows Update 🔃 lets you download stable printer software directly from Microsoft without visiting manufacturer websites. Windows checks for certified hardware packages automatically through the system settings menu, ensuring your printer communicates properly with Windows 11 without risking downloaded files from third-party sites.
One thing to know first: driver updates are usually listed as optional. Windows will not always install them on its own, so you need to look for them yourself.
Open Settings by pressing the Win and selecting the gear icon, or by pressing Win+I. Windows 11 Start menu with Settings gear icon highlighted.
Select Windows Update 🔃 from the left sidebar. The update page opens on the right.
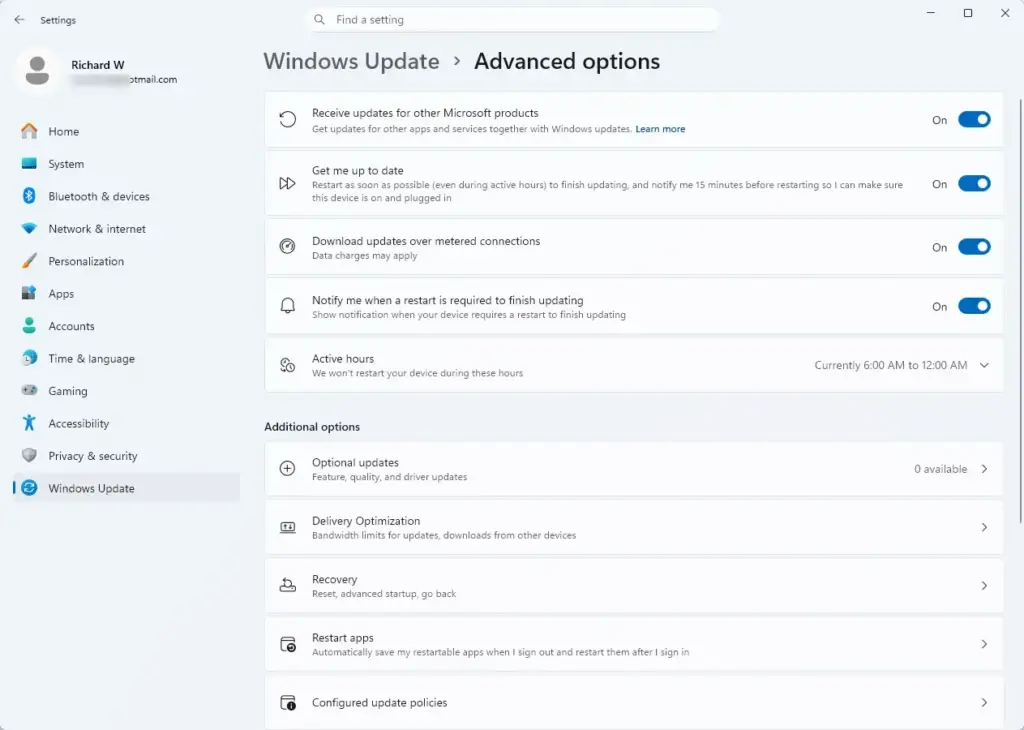
Click Advanced options to view additional system update categories. Settings › Windows Update › Advanced options
Select Optional updates to expand the list of available driver packages and extra updates. If you do not see this entry, Windows has no optional updates waiting. Click Check for updates 🔃 on the main page and look again.
Click Driver updates to view hardware-specific software waiting for installation.
Check the box next to your printer manufacturer’s driver update.
Click Download & install to apply the update to your system. Windows shows the progress next to the update.
Restart your 🔄 computer if prompted to finalize the driver installation.
If no printer driver appears in the list, Microsoft has nothing newer for your model. Move on to the next method.
Advertisement
Using Device Manager to Update Printer Drivers
Using Device Manager to update printer drivers forces Windows to scan your system and online databases for newer hardware software. This built-in tool helps you bypass automatic update delays by letting you target your specific printer queue directly and install missing files immediately.
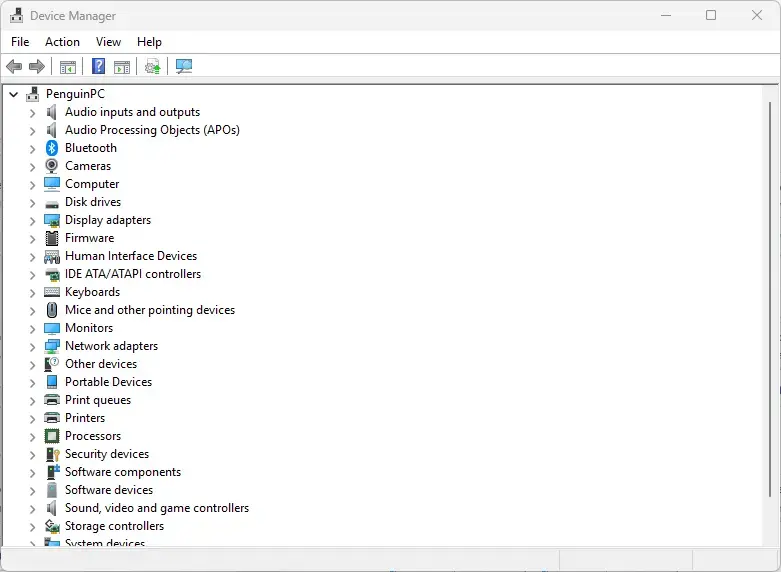
Right-click the Start button and select Device Manager (requires administrator privileges). Windows 11 Device Manager window showing hardware and drivers.
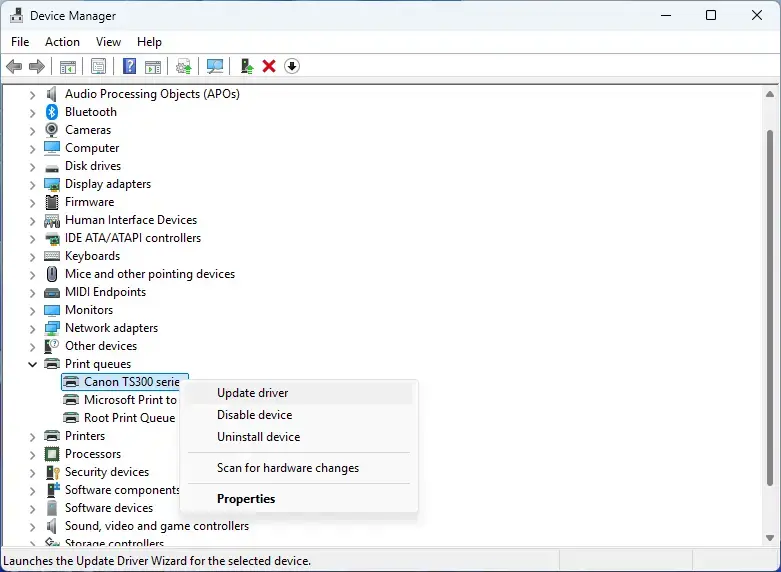
Scroll down the hardware list and click the arrow next to Print queues to expand the section.
Locate your printer in the expanded list, right-click it, and select Update driver.
Click Search automatically for drivers to let Windows scan your computer and the internet for the newest available software. You need a working internet connection for this step.
Follow any remaining on-screen prompts, then close Device Manager and test your printer.
If Windows says the best drivers are already installed, that only means it found nothing newer in its own sources. The manufacturer's website may still have a newer version, so try the next method.
Downloading and Installing Drivers Manually From the Manufacturer
Downloading and installing drivers manually from the manufacturer provides the newest features and diagnostic tools when automated Windows updates fail. Visiting official brand websites like HP, Canon, or Epson ensures you get the exact software package needed to fix stubborn printer connection errors.
Open your web browser and navigate to the official support website for your printer brand, such as HP, Brother, Canon, or Epson.
Locate the support or download section and enter your exact printer model number into the search field. The model number is usually printed on the front or back of the printer.
Select your operating system version if the website does not detect it automatically. Choose Windows 11, and pick the 64-bit version if you are given the choice.
Download the recommended full feature software package or basic driver executable. The basic driver is smaller and enough if you only need the printer to work.
Double-click the downloaded file (usually ending in .exe) from your Downloads folder (requires administrator privileges).
Follow the manufacturer setup wizard instructions to unpack and install the driver files.
Restart your PC once the installation completes.
⚠️WarningDownload only from the manufacturer's own site.
Driver download sites run by third parties often bundle unwanted software.
Advertisement
Removing Old Printer Drivers Before Updating
Removing old printer drivers before updating clears out corrupted files that cause print loop errors and failed installations. Deleting outdated driver packages through Windows settings or the Print Management tool forces a clean installation state, giving your new printer software a fresh start.
Print Management is only included in Windows 11 Pro, Enterprise, and Education. On Home, remove the printer in Settings and use the Command Prompt method in the next section.
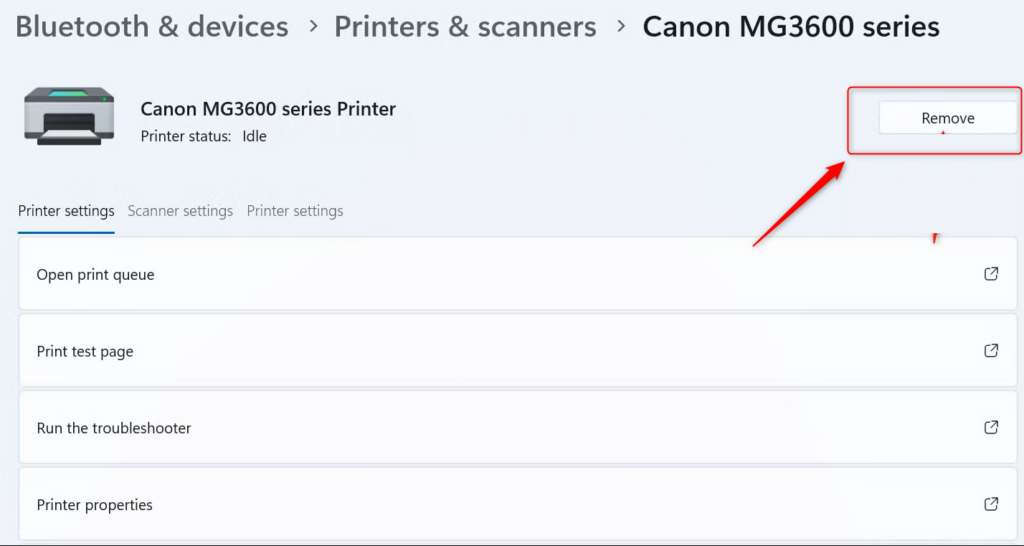
Open Settings and navigate to Bluetooth & devices, then select Printers & scanners.
Click on your printer, select Remove, and confirm the deletion. Windows 11 Settings showing Bluetooth & devices and Printers & scanners options. The printer disappears from the list.
Press Windows Key + R to open the Run dialog box, type printmanagement.msc, and press Enter to open Print Management (requires administrator privileges).
Click All Drivers in the left panel. The installed drivers are listed in the middle.
Right-click the old driver package you want to remove and select Remove Driver Package.
Confirm the removal by selecting Remove driver and driver package, then click OK.
If Windows says the driver is still in use, make sure you removed the printer in step 2 first. Restart the PC and try again. Once the old driver is gone, reinstall the printer with one of the earlier methods.
Managing Printer Drivers via Command Line
Managing printer drivers via command line lets advanced users view, add, or delete driver packages using text commands in Command Prompt. This administrative method uses tools like PnPutil to handle stubborn printer software that refuses to uninstall through standard Windows menus.
Advertisement
⚠️WarningThis method works on both Home and Pro.
Be careful with the delete command, because it removes the package you name and nothing asks you to double-check.
Type cmd in the Windows search bar, right-click Command Prompt, and select Run as administrator (requires administrator privileges). Click Yes if User Account Control asks for permission.
To view all installed printer drivers, type pnputil /enum-drivers and press Enter. Windows prints a list of driver packages.
Locate the published name of the printer driver (such as oem12.inf) from the list. Match it against the provider and driver description so you pick the right one.
To delete a specific driver package, type pnputil /delete-driver oem12.inf /uninstall and press Enter, replacing oem12.inf with your actual driver file name. A message confirms when the package is deleted.
Close the Command Prompt window once the process finishes.
Troubleshooting Common Printer Driver Update Failures
Troubleshooting common printer driver update failures usually involves restarting the Print Spooler, which is a background service that manages print jobs. When this background service freezes, it blocks new driver installations, and restarting it through the Services app clears the stuck queue so updates can finish.
Type services.msc in the Windows search bar and press Enter to open the Services app (requires administrator privileges).
Scroll down and locate Print Spooler. The Status column shows Running if the service is active. If it is blank, the service is stopped.
Right-click Print Spooler and select Stop. If Stop is greyed out, the service is already stopped, so go on to the next step.
Open File Explorer and navigate to C:\Windows\System32\spool\PRINTERS, then delete all files inside this folder to clear stuck print jobs. Delete only the files, not the folder itself. If Windows asks for administrator permission, click Continue.
Return to the Services window, right-click Print Spooler, and select Start. The Status column should change to Running.
Attempt your driver update process again.
If the spooler stops again right after you start it, or Start returns an error, double-click Print Spooler and check that Startup type on the General tab is set to Automatic. A bad driver is the usual cause of a repeated crash, so remove it with the methods above and install a fresh one.
What to do next
Test your printer by printing a test page from the printer properties menu to verify that the updated software communicates correctly with your hardware. If issues persist, check your network connection settings or configure your firewall rules to allow local print traffic.
Advertisement
Open Settings, go to Bluetooth & devices, and select Printers & scanners.
Click your printer, then select Printer properties.
On the General tab, click Print Test Page. A page should come out of the printer within a few seconds.
If the test page prints, the spooler and driver are working. If it does not, check that the printer is on and connected, and that the Print Spooler service still shows Running. For a network printer, confirm the PC and the printer are on the same network, and check that your firewall is not blocking local printing traffic.
How to update printer driver on desktop?
Open Settings, select Windows Update, then Advanced options and Optional updates. Under Driver updates, install any printer driver listed. If none appears, open Device Manager, expand Print queues, right-click your printer, and choose Update driver. Restart the PC afterward and test a print job.
Why is my computer suddenly not recognizing my printer?
A sudden change usually comes from a loose connection, a driver damaged by a recent Windows update, or a printer that dropped off your Wi-Fi network. Turn the printer off and on, restart your PC, and check the USB cable or network connection. If it still does not appear, remove it under Printers & scanners and add it again.
How to update canon print driver?
Open the Canon support website for your country and search for your printer model. Select your model, choose Windows 11 as the operating system, and download the full driver package. Run the downloaded file and follow the prompts. Restart your PC when finished. Use Canon's own site, not third-party driver sites.
How do I manually update drivers?
Open Device Manager from the Start menu, then expand the category for your device. Right-click the device and select Update driver. Choose Search automatically for drivers to let Windows find one, or Browse my computer for drivers if you already downloaded a driver file. Restart the PC when the update finishes.
📬 Get new Windows tips in your inbox
One email when we publish something worth your time. No spam, unsubscribe anytime.
Have a question about this guide?
Answered by AI from this guide. Good questions may be added to this page — please don't include personal details.
Richard is a writer at Geek Rewind who turns complex IT tasks into clear, step-by-step guides. He draws on years of hands-on experience in system administration and enterprise IT operations, focusing on Windows, Linux and WordPress: the problems people actually run into, and the fixes that work.
His server and WordPress guides come from systems he runs himself. Richard builds and maintains the platform behind Geek Rewind, from its Ubuntu servers and Nginx configuration to its custom WordPress plugins.
Many new tutorials start with readers' questions, and he's always glad to answer them in the comments.
One email when we publish a guide worth your time — new Windows features, the fixes that actually
work, and a heads-up when Microsoft breaks something. Unsubscribe in one click.
📬 Get new Windows tips in your inbox
One email when we publish something worth your time. No spam, unsubscribe anytime.



No comments yet — be the first to share your thoughts!