How to Update Printer Drivers Manually in Windows 11 Device Manager

Outdated or damaged printer drivers are behind many printing problems in Windows 11, such as errors, missing paper trays and jobs that cancel on their own. Device Manager is the built-in tool that lists and manages the hardware on your PC. You can use it to update a printer driver without installing the manufacturer’s full software suite.
Before you start, check two things:
- You are signed in with an administrator account, or you know an administrator’s password. Windows will not install a driver without that permission.
- Windows itself is current. Open Settings, click Windows Update , and install any pending updates first. Restart if Windows asks you to.
If you plan to install a driver you downloaded from the manufacturer, unzip it to a folder you can find again, such as your Downloads folder. This works the same in Windows 11 Home and Pro.
Open Device Manager by right-clicking the Start button and selecting Device Manager. Expand Print queues, right-click your printer, select Update driver, click Browse my computer for drivers, then choose your printer model and click Next. Windows installs the driver and displays a success message when complete.
Open Device Manager in 🪟 Windows 11
Device Manager shows every piece of hardware Windows knows about, including printers. You can open it from the Start button ’s right-click menu . This is the fastest route, and the menu is the same on Home and Pro.
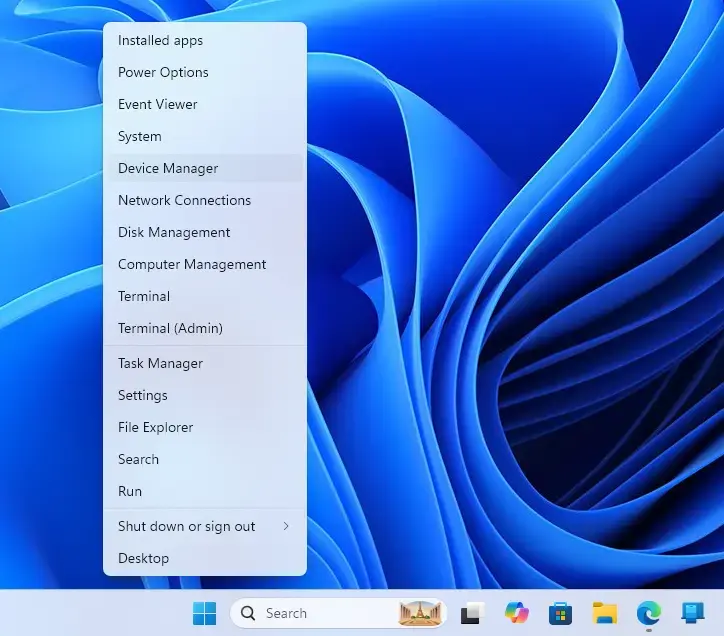
- Right-click the Start button in the bottom-left corner of your screen (or press the Win+X). A short menu of system tools appears.
- Select Device Manager from the menu. The Device Manager window opens with a list of hardware categories.
In the list, look for a category named Print queues. On some PCs you may also see Printers. Either one can hold your printer. If you see neither, make sure the printer is turned on and connected by USB or network, then wait a few seconds and look again.
Locate and Select Your Printer
Be careful to pick the right entry, because Print queues often contains several items.
- Click the arrow next to Print queues to expand the list. The printers installed on this PC appear underneath.
- Find your specific printer model in the expanded list. Ignore entries such as Microsoft Print to PDF or OneNote, which are built-in virtual printers and not physical hardware.
- Right-click your printer name. A context menu opens.
- Select Update driver. The Update Drivers window opens and asks how you want to search for drivers.
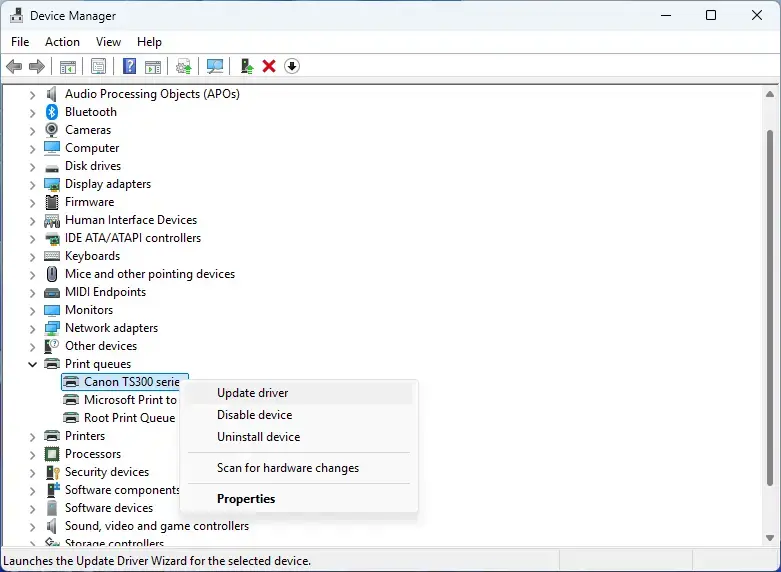
If Update driver is missing from the menu, you most likely right-clicked the category name and not the printer itself. Click the printer entry and try again.
Choose the Manual Update Method
The manual method lets you choose the driver yourself instead of letting Windows search online. You can pick a driver Windows already has stored, or point it to a driver you downloaded.
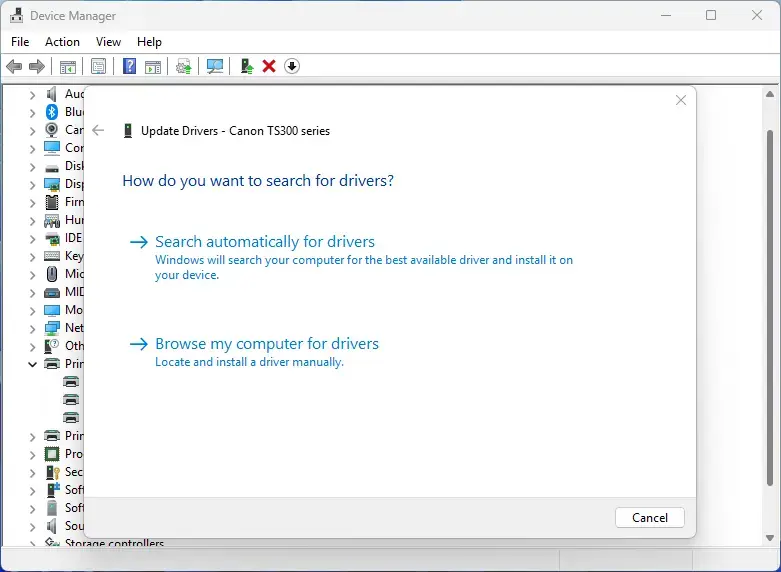
- Click Browse my computer for drivers in the Update Drivers window. (The other option, Search automatically for drivers, makes Windows look online instead.)
- Click Let me pick from a list of available drivers on my computer. Windows shows the drivers stored locally.
- Check the box labeled Show compatible hardware to filter the list to drivers that fit your device. If you can't find the right model with the box checked, uncheck it to see the full manufacturer list, but choose carefully.
If you downloaded a driver from the manufacturer's site, click Have Disk on this screen, then Browse, and select the driver's .inf file from the folder where you unzipped it. Windows then lists the models in that package.
Select and Install the Driver Package
Take your time here, because a driver for a similar but different model can cause odd behavior.
- Choose your printer manufacturer from the list on the left.
- Select the exact model from the list on the right.
- Click Next to begin the installation. If Windows warns that the driver is not recommended or is unsigned, stop and confirm you chose the right file before continuing.
- Wait while Windows applies the new software package. This usually takes under a minute.
- Click Close when you see the message that Windows has successfully updated your drivers.
If the new driver causes problems, you can undo it. In Device Manager, right-click the printer, choose Properties, open the Driver tab if it is shown, and click Roll Back Driver. The button is greyed out when Windows has no earlier driver to go back to. In that case, repeat these steps and choose the previous driver from the list.
What to do next
Restart your computer so Windows loads the new driver files cleanly. It also clears any print jobs stuck in the queue. After you sign back in, confirm that the printer works.
- Open Settings and click Bluetooth & devices.
- Select Printers & scanners.
- Click your printer in the list, then click Printer settings.
- Click Print a test page. The page should print without errors, and the paper trays and options should be available again.
If the test page fails, check that the printer is online and has paper, then try the roll-back steps above or install the driver from the manufacturer's website.
Was this guide helpful?

About the Author
Richard
Tech Writer, IT Professional
Richard is a writer at Geek Rewind who turns complex IT tasks into clear, step-by-step guides. He draws on years of hands-on experience in system administration and enterprise IT operations, focusing on Windows, Linux and WordPress: the problems people actually run into, and the fixes that work. His server and WordPress guides come from systems he runs himself. Richard builds and maintains the platform behind Geek Rewind, from its Ubuntu servers and Nginx configuration to its custom WordPress plugins. Many new tutorials start with readers' questions, and he's always glad to answer them in the comments.
No comments yet — be the first to share your thoughts!