How to Roll Back a Windows 11 Update When It Causes Problems

- 5 ways to do it
- Needs administrator rights
- Includes a restart or sign-out
Rolling back a Windows 11 update means undoing an installation that caused problems on your PC. Windows stores recent updates for a limited time, so you can remove them through Settings — but the method depends on whether you’re undoing a monthly patch or a full version upgrade like moving from 23H2 to 24H2.
Monthly updates uninstall from Windows Update Update history Uninstall updates. Full version upgrades roll back through System Recovery Go back, which typically works for 10 days after the upgrade installs.
If the rollback option has disappeared, your PC won’t start, or Windows reinstalls the same update the next day, you’ll need a different approach. This guide covers both rollback methods, how to handle missing options, what to do when your PC won’t boot, and how to prevent Windows from forcing the same update back onto your system.
Press Win+I to open Settings, go to Windows Update Update history, scroll to Related settings, and select Uninstall updates. Find the update by its KB number, select it, click Uninstall, and restart your PC. For a version upgrade like 23H2 to 24H2, use System Recovery Go back instead, which works for 10 days after upgrade.
Choose the right rollback method
Windows 11 installs two kinds of updates, and each has its own way back.
- Quality updates (also called cumulative updates) are the monthly bundles of security fixes and bug fixes. They have a KB number, such as KB0000000. Remove these with Uninstall updates.
- Feature updates are yearly version upgrades that replace large parts of Windows. Reverse these with Go back in the Recovery settings.
- Driver updates change one device’s software, such as a graphics or network driver. Reverse these in Device Manager, covered further down.
If you are not sure which one caused the problem, open Settings Windows Update Update history. Each entry shows an install date. Match the date to when the problem started.
Before you roll back an update
Rolling back is safe for your personal files, but it can change other things. Check these first.
- Back up anything important. A rollback does not normally delete documents, but a failed rollback can leave the PC in a bad state.
- Plug in a laptop. A rollback that loses power halfway is the main way to turn a small problem into a big one.
- Sign in with an administrator account. Every method below needs one. On a work or school PC, your IT team may block rollbacks. If so, the options are missing or greyed out, and you need to ask them.
- Know your password. Going back to an earlier version of Windows asks for the password you used on that version.
- Expect to reinstall some apps. A feature-update rollback removes apps and drivers you installed after the upgrade, and it resets settings you changed.
Windows 11 Home and Windows 11 Pro behave the same for every method in this article. The only difference you may notice is on managed Pro devices, where a company policy can disable options.
Method 1Uninstall a monthly update from Settings
Use this method when a recent cumulative update caused crashes, slow performance, broken printing, or a similar problem. It removes only that update and leaves the rest of Windows alone. This step requires administrator privileges.
- Press Win+I to open Settings.

Windows 11 Start menu with Settings gear icon highlighted. - Select Windows Update in the left pane.

Settings › Windows Update - Select Update history. You now see a list of installed updates grouped under headings such as Quality Updates and Driver Updates. Note the KB number and install date of the update you want to remove.
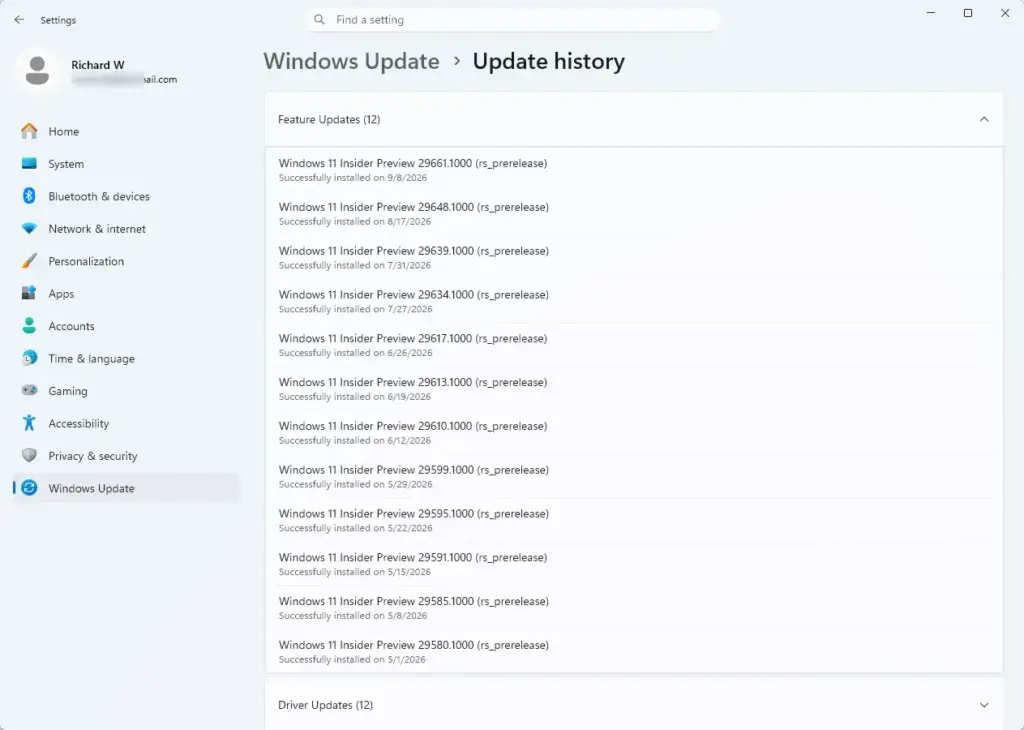
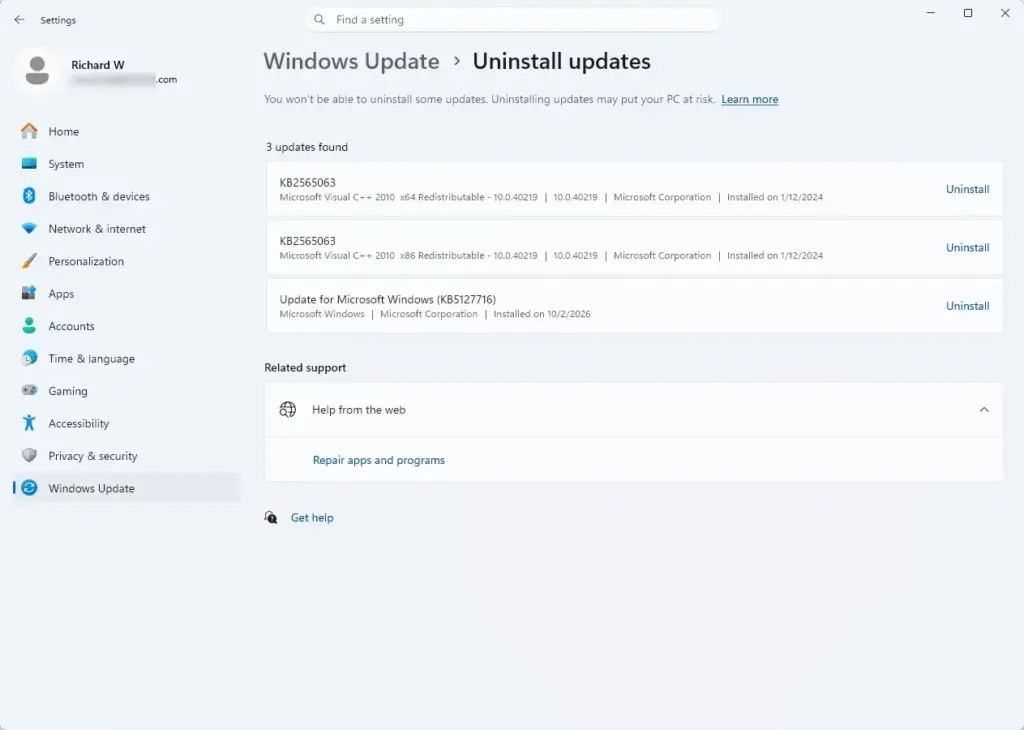
Settings › Windows Update › Update history - Scroll to the bottom of the page. Under Related settings, select Uninstall updates. The classic Installed Updates list opens in Control Panel .
- Find the update by its KB number or by the Installed On column. Updates for Windows sit under the Microsoft Windows heading.
- Select the update, then select Uninstall in the toolbar above the list. You can also right-click the update and choose Uninstall.
Settings > Windows Update - Select Yes when Windows asks you to confirm. A progress message appears while Windows removes the update.
- Select Restart now when prompted. The restart can take longer than usual because Windows finishes the removal while it shuts down and starts up.
After the restart, return to Update history. The update no longer appears in the list of installed updates.
If there is no Uninstall button
Not every update can be removed this way. If you select an update and no Uninstall button appears, Windows treats it as permanent. This happens with some servicing stack updates (updates to the part of Windows that installs other updates) and with updates that were combined into a larger package. Try the Command Prompt method below. If that also fails, use System Restore.
If the list is empty or the update is missing after a version upgrade, the update was folded into the new version. In that case, use Method 2.
Method 2Go back to the previous version of 🪟 Windows 11
Use this method when a feature update, meaning a new version of Windows 11, caused the problem. Windows keeps a copy of your old installation in a folder called Windows.old (a folder that stores the previous version of Windows). The Go back option uses that copy to restore the old version. This step requires administrator privileges.
Windows 11 keeps the old copy for 10 days by default. After that, it deletes the copy and the option disappears.
- Open Settings and select System.
- Scroll down and select Recovery.
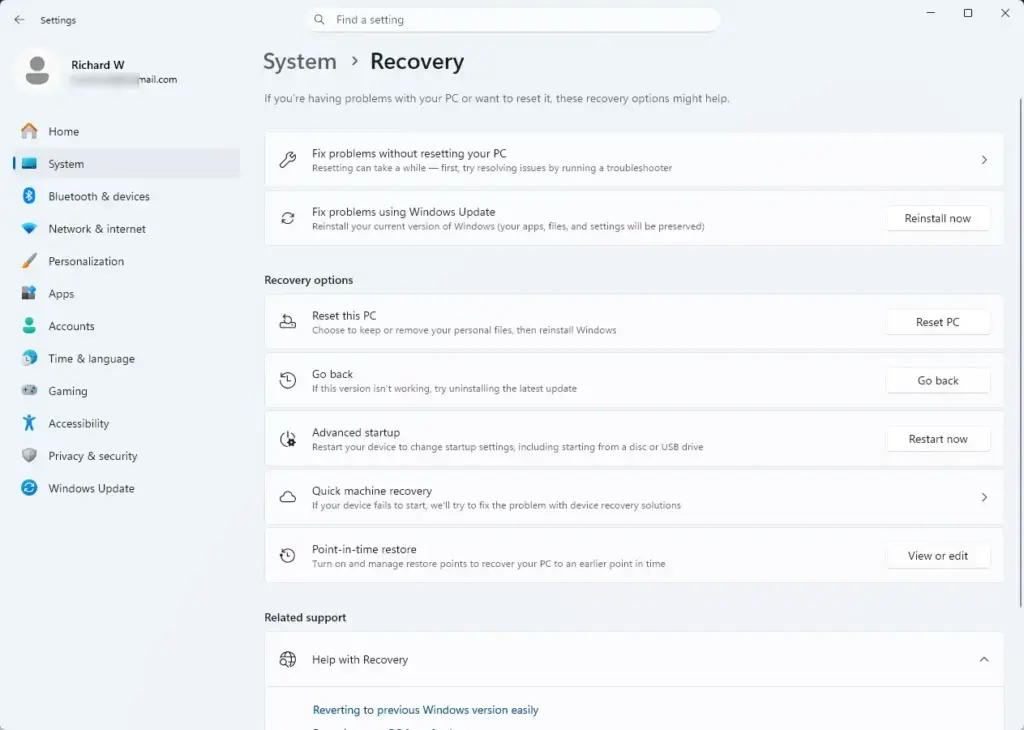
Settings › System › Recovery - Under Recovery options, find Go back and select the Go back button. A window opens that asks why you are going back.
- Choose a reason, or write your own, then select Next.
- If Windows offers to check for updates , select No, thanks. The offer is there in case a newer update fixes your problem. If you want to try that first, select the check option instead.
- Read the warning screen about what you will lose, then select Next.
- Read the note about your password, then select Next.
- Select Go back to earlier build. The PC restarts and shows a progress screen. Do not turn the PC off during this stage. It can take 20 minutes or more.
When you reach the sign-in screen, use the password from the earlier version. Open Settings System About to confirm the version number changed.
Why Go back is missing or greyed out
If the Go back button is greyed out or the whole option is gone from the Recovery page, one of these is almost always the reason:
- More than 10 days have passed. Windows deletes the old installation after the window closes, and you cannot get it back.
- You deleted Windows.old. Disk Cleanup, Storage Sense, and third-party cleaners can all remove it. If you ticked Previous Windows installation(s) in Disk Cleanup, the rollback files are gone.
- You are on a monthly update only. Go back applies to version upgrades, not cumulative updates. Use Method 1 instead.
- A reset or clean install happened. Resetting the PC or doing a clean install removes the old installation.
- A policy controls the device. Work and school PCs can block the option.
If Windows.old is gone, your remaining choices are System Restore (Method 4) or a clean install of the older version from installation media. A clean install erases apps and settings, so back up first.
Extend the 10-day window
If you are within the 10 days and want more time to decide, you can lengthen the window. Do this before the time runs out, because it cannot bring back files that are already deleted. This step requires administrator privileges.
- Select Start, type Command Prompt, right-click the result, and select Run as administrator.
- Select Yes at the User Account Control prompt.
- Type the following command and press Enter to see the current window:Code
DISM /Online /Get-OSUninstallWindowDISM (Deployment Image Servicing and Management) is a built-in Windows command-line tool. When you run the command above, it prints the number of days left before the rollback window closes.
- Type the following command and press Enter to set a longer window, in days:Code
DISM /Online /Set-OSUninstallWindow /Value:30The value accepts a number of days from 2 to 60. The message The operation completed successfully appears.
Keeping Windows.old longer uses disk space, often many gigabytes. On a nearly full drive, Windows may delete it early to free room.
Method 3Uninstall an update from Command Prompt
Use this method when the Uninstall button is missing, or when you need to remove an update on several PCs. Both commands below require administrator privileges, so open Command Prompt with Run as administrator as in the previous section.
- Type the following command, replacing 0000000 with the digits of the KB number from Update history, and press Enter:Code
wusa /uninstall /kb:0000000wusa is the Windows Update Standalone Installer. A confirmation window opens.
- Select Yes, then restart when asked.
If wusa says the update cannot be uninstalled, the update may be part of a combined package. For these, remove the package with DISM instead.
- Type the following command and press Enter to list installed packages:Code
DISM /Online /Get-PackagesA long list appears. Each entry has a Package Identity line and an Install Time line.
- Find the package whose Install Time matches the problem update. Its identity usually starts with Package_for_RollupFix. Copy the full identity text.
- Type the following command, replacing PACKAGE-NAME with the identity you copied, and press Enter:Code
DISM /Online /Remove-Package /PackageName:PACKAGE-NAMEWindows removes the package. If it asks for a restart, type Y and press Enter.
Check the install time carefully. Removing the wrong package can leave Windows in a worse state, and you cannot easily undo this change without reinstalling the update.
Method 4Use System Restore
Use this method when the update changed more than one thing, or when the other options are unavailable. System Restore (a feature that rolls system files and settings back to an earlier snapshot) can return Windows to a restore point created before the problem. It does not touch your personal files. This step requires administrator privileges.
System Restore works only if a restore point exists. Windows 11 often does not turn on System Protection by default, so check first.
- Select Start, type Create a restore point, and open the result. The System Properties window opens on the System Protection tab.
- Look at the Protection Settings list. If your Windows drive shows Off, no restore points exist and this method will not work for you.
- Select System Restore, then select Next. A list of restore points appears with dates and descriptions.
- Choose a restore point dated before the problem started. If you see no options, select Show more restore points.
- Select Scan for affected programs. This shows which apps and drivers Windows will remove or restore. Select Close when you finish reading.
- Select Next, then select Finish and confirm. The PC restarts and applies the restore point.
After the restart, a message tells you whether the restore succeeded. If it failed, repeat the steps and pick an earlier restore point. You can also undo the restore by opening System Restore again and choosing Undo System Restore.
Method 5Roll back when 🪟 Windows 11 will not start
If the update stops Windows from reaching the desktop, use the Windows Recovery Environment (a built-in repair menu that runs outside normal Windows). Windows often opens it on its own after two or three failed starts. If it does not, force it by turning the PC on and holding the power button to shut it down as soon as the Windows logo appears. Repeat this until a screen titled Automatic Repair or Choose an option appears.
If you can reach the sign-in screen, there is an easier route: hold Shift, select the Power button, then select Restart.
- Select Troubleshoot.
- Select Advanced options.
- Select Uninstall Updates.
- Choose Uninstall latest quality update to remove the most recent monthly update, or Uninstall latest feature update to remove the most recent version upgrade.
- Select your account and enter its password if asked.
- Select the uninstall button to confirm. Windows removes the update and shows a completion message.
- Select Done, then select Continue to start Windows.
If your drive uses BitLocker (a Windows security feature that encrypts your drive), the repair menu may ask for your recovery key. Find it by signing in to your Microsoft account on another device and opening the page for your devices. Without the key, you cannot go further. Windows 11 Home often has device encryption turned on, so have the key ready.
If Uninstall Updates is missing or fails, the same menu also has System Restore under Advanced options. Use it as described in Method 4.
Stop Windows from reinstalling the update
Windows Update tries to install any update you removed. It can do this within hours, so pause updates right after you roll back. Pausing buys time for Microsoft or your hardware maker to fix the issue.
- Open Settings Windows Update.
- Next to Pause updates, select Pause for 1 week. The button changes and a message shows the date updates resume.
- To pause longer, open the drop-down menu next to Pause updates and choose a longer period. The menu lets you pause for up to 5 weeks.
This pause is temporary. When it ends, Windows installs every pending update. It also does not skip security updates forever, so use the pause time to find a fix, not to ignore updates for months. To cancel a pause early, select Resume updates on the same page.
Roll back a driver update instead
If the problem is a single device, such as a display flicker, no sound, or a Wi-Fi adapter that drops out, a driver update is the likelier cause than a full Windows update. Reversing one driver is a smaller change. This step requires administrator privileges.
- Right-click Start and select Device Manager.
- Expand the category for the device, such as Display adapters or Network adapters.
- Double-click the device. The Properties window opens.
- Select the Driver tab.
- Select Roll Back Driver, choose a reason, and select Yes.
If Roll Back Driver is greyed out, Windows has no earlier driver stored for that device. Download the previous driver from the device maker's website instead.
If Windows Update stops working after a rollback
After a rollback, Windows Update sometimes shows errors, sits on Checking for updates, or fails to install anything. The rollback can leave update files in an inconsistent state. Start with a restart, then run the built-in troubleshooter.
- Restart the PC.
- Open Settings System Troubleshoot Other troubleshooters.
- Next to Windows Update, select Run. The troubleshooter scans and reports what it fixed.
- Return to Settings Windows Update and select Check for updates.
If the page still reports the same failure, note the error code shown under the failed update and search for that exact code. Different codes have different causes, so a generic fix can waste time.
How to undo a rollback
A rollback is reversible, as long as you keep the old files in mind.
- For a monthly updateselect Check for updates in Settings Windows Update. Windows downloads and installs it again.
- For a feature updateWindows offers the newer version again through Windows Update. After a Go back, there is no one-click undo, so you reinstall the upgrade the normal way.
- For System Restoreopen System Restore and select Undo System Restore.
- For a driverreinstall the newer driver from Windows Update or from the maker's website.
What to do next
Windows will offer the update again once your pause ends, so check Update history then to see whether a newer update replaced the broken one. If the problem was a version upgrade, wait for the next monthly update before you try again, and note the KB number of anything that breaks. Before your next big upgrade, turn on System Protection so a restore point exists if you need one.
Frequently asked questions
How do I revert back to the previous update?
Open Settings, then go to Windows Update Update history Uninstall updates. Select the update you want to remove, click Uninstall, and restart your PC. For a full version upgrade, use System Recovery Go back instead, which works for about 10 days after the upgrade.
What does rollback mean?
Rollback means returning Windows to how it was before an update was installed. You remove the update, or go back to the earlier Windows version, to fix problems it caused. Your personal files stay put, though some apps may need reinstalling.
Is it safe to rollback a Windows Update?
Yes, it is generally safe. Your personal files and most apps stay in place. However, removing a security update leaves your PC open to the flaws it fixed, so reinstall the fix as soon as the problem is sorted. Back up important files before you start.
How long does a Windows Update rollback take?
Removing a monthly update usually takes 5 to 15 minutes, plus a restart. A full version rollback through Go back often takes 30 minutes to an hour or longer, because Windows restores the earlier version's files. Times depend on your PC's speed and storage.
Still have a question?
Answered by AI from this guide. Good questions may be added to this page — please don't include personal details.
Did this guide fix your problem?

About the Author
Richard
Tech Writer, IT Professional
Richard is a writer at Geek Rewind who turns complex IT tasks into clear, step-by-step guides. He draws on years of hands-on experience in system administration and enterprise IT operations, focusing on Windows, Linux and WordPress: the problems people actually run into, and the fixes that work. His server and WordPress guides come from systems he runs himself. Richard builds and maintains the platform behind Geek Rewind, from its Ubuntu servers and Nginx configuration to its custom WordPress plugins. Many new tutorials start with readers' questions, and he's always glad to answer them in the comments.
No comments yet — be the first to share your thoughts!