How to Set Up Windows Hello Sign-in in Windows 11

- 19 steps
- Needs administrator rights
- Includes a restart or sign-out
Windows Hello setup in Windows 11 lets you sign in with your face, fingerprint or a PIN instead of typing a password. Open Settings Accounts Sign-in options, choose Facial recognition (Windows Hello) or Fingerprint recognition (Windows Hello), and follow the prompts.
Windows Hello is the sign-in feature built into Windows 11. It compares your face or fingerprint (a biometric) with data stored on your PC. Windows does not use the name Face ID. Its equivalent is Facial recognition (Windows Hello), and Fingerprint recognition (Windows Hello) is the fingerprint lock for your PC.
This guide covers the full setup, what to do when the option is greyed out, and how to remove it again.
Open Settings Accounts Sign-in options, then select Facial recognition (Windows Hello) or Fingerprint recognition (Windows Hello) and choose Set up. Enter your PIN, scan your face or fingerprint, and select Close. Windows then signs you in with the camera or reader, with your PIN as backup. The option is greyed out if your PC lacks a compatible camera or fingerprint reader.
What you need before you start
Windows Hello works only if your PC has the right hardware. Check this first, because it explains most “option missing” problems. The feature is part of both Windows 11 Home and Pro, so your edition does not matter.
- For face sign-in: a camera that supports Windows Hello. This is usually an infrared (IR) camera, which reads depth and works in low light. Most standard webcams cannot do this.
- For fingerprint sign-in: a fingerprint reader. It can be built into the laptop or plugged in over USB.
- A PIN: Windows sets up face and fingerprint sign-in alongside a PIN. If the camera or reader fails, the PIN is your backup. If you do not have one, Windows asks you to create one during setup. For more detail, see Set Up a Windows Hello PIN In Windows 11.
If your PC has neither a compatible camera nor a fingerprint reader, you can still use a Windows Hello PIN. The biometric options will not appear or will be greyed out.
Windows Hello setup: step by step
To set up Windows Hello, open Settings Accounts Sign-in options, expand Facial recognition (Windows Hello) or Fingerprint recognition (Windows Hello), and select Set up. The steps below walk through each screen. Use the same list for both methods. Where the two differ, the step says so.
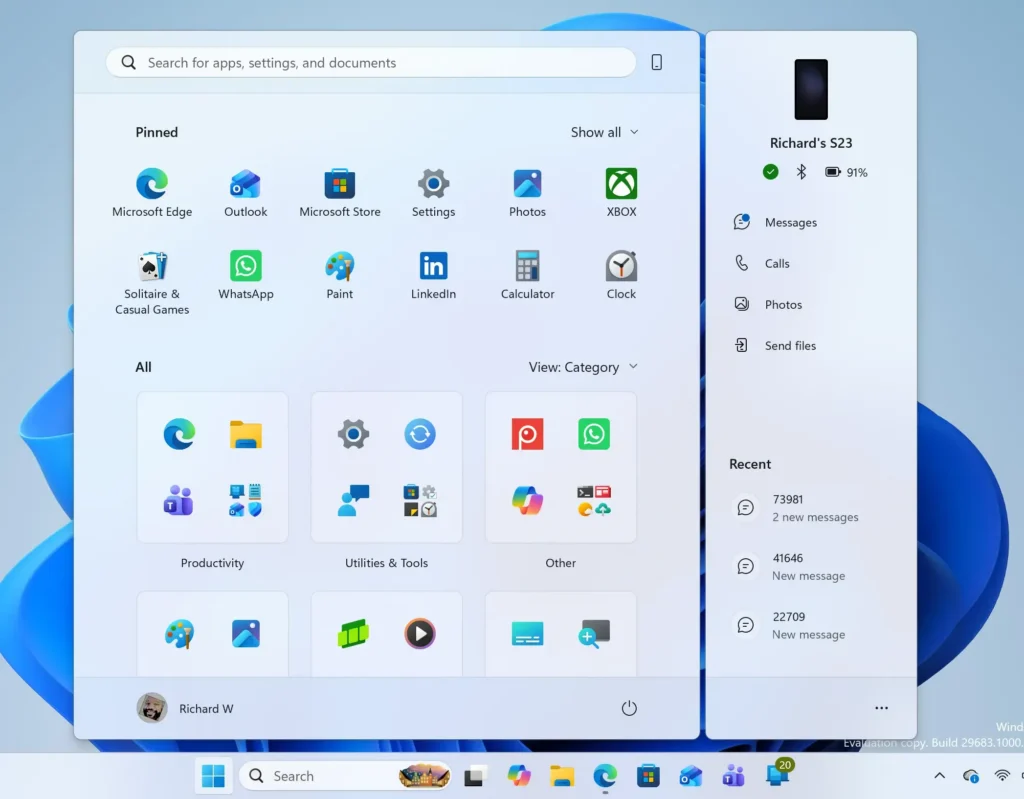
- Open Settings. Press the Win+I, or right-click Start and select Settings. The Settings window opens.
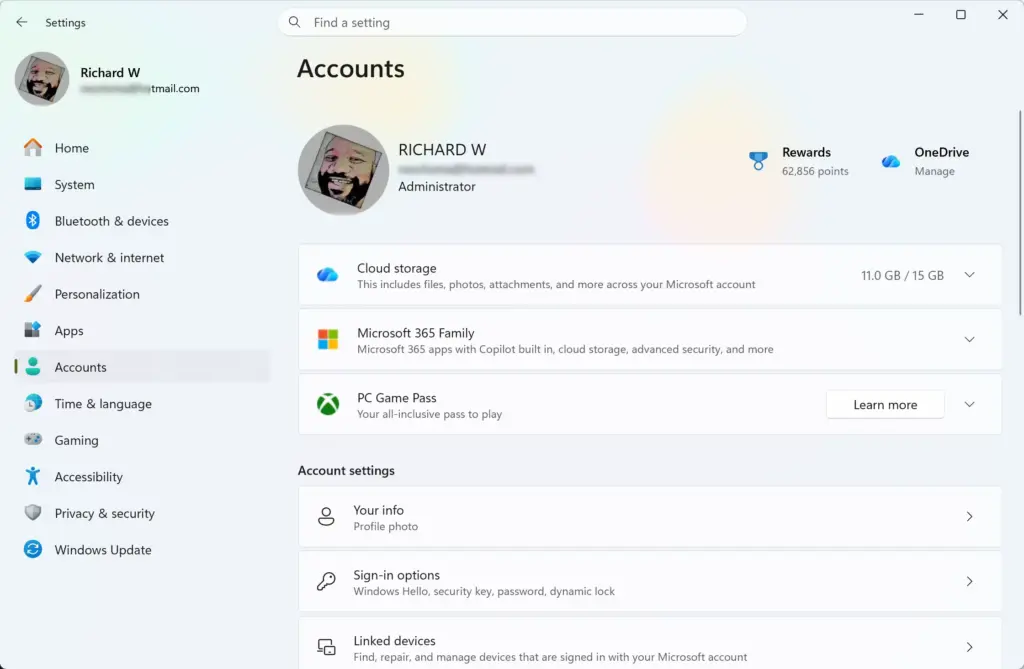
- Select Accounts. It is in the left pane of the Settings window. The page shows your account details.
- Select Sign-in options. The page lists every way you can sign in to this PC. Options your hardware does not support appear greyed out or do not appear at all.
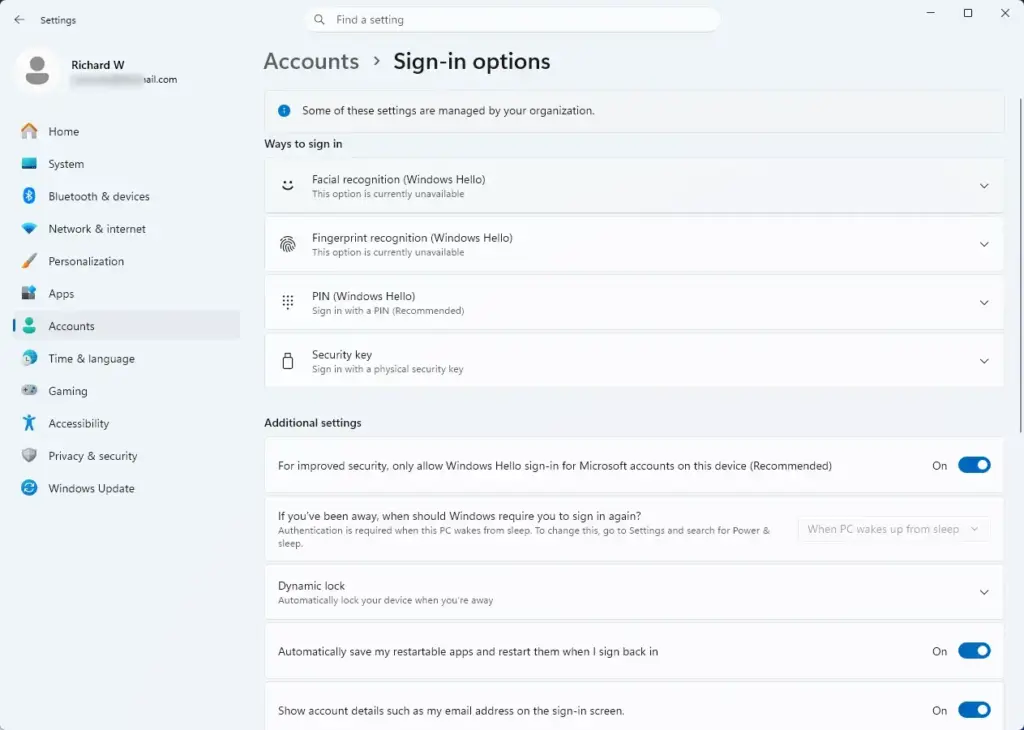
- Expand the method you want. Select Facial recognition (Windows Hello) for face sign-in, or Fingerprint recognition (Windows Hello) for fingerprint sign-in. The section opens and shows a short description with a Set up button.
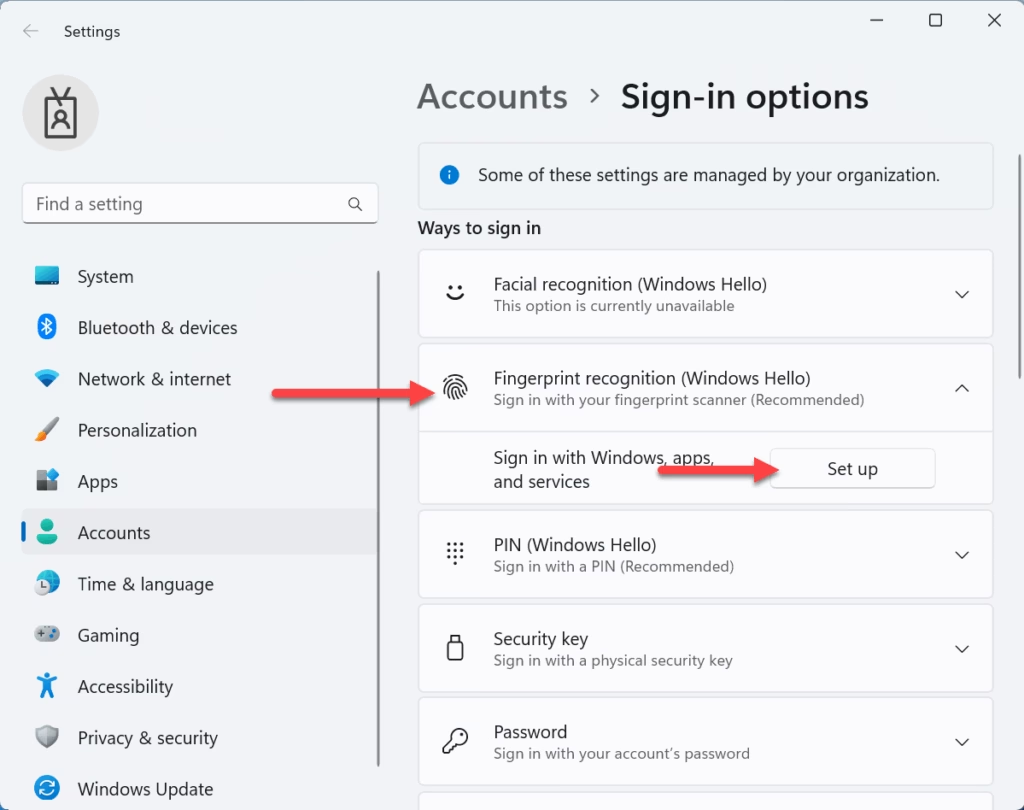
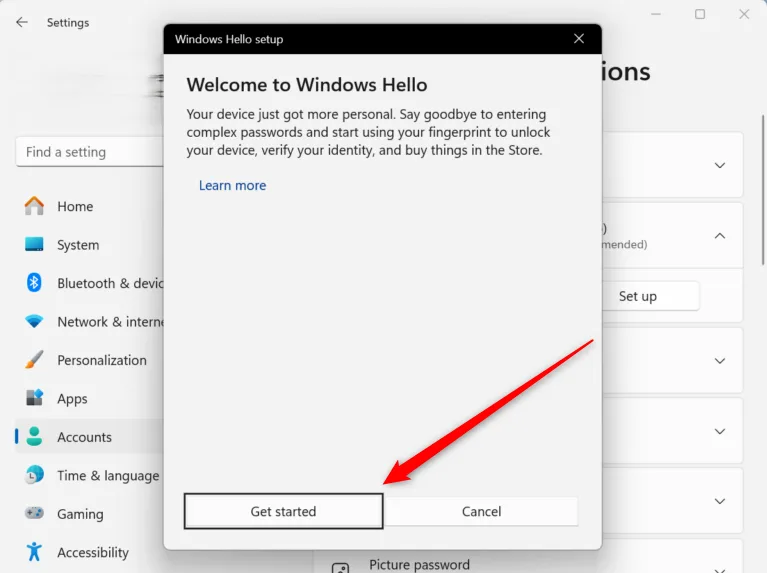
- Select Set up. The Windows Hello setup window opens with a welcome screen.
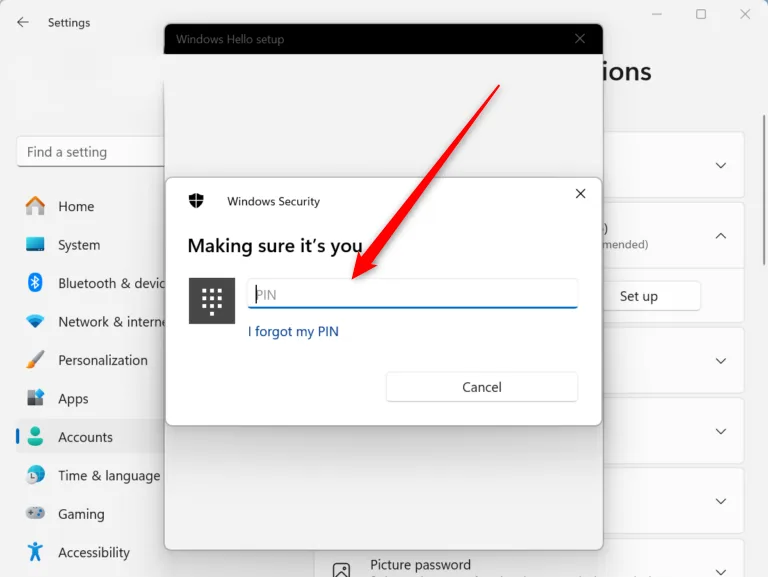
- Select Get started. Windows now asks you to prove it is you before it saves any biometric data.
- Enter your PIN. If you have no PIN yet, Windows prompts you to create one first. Follow the prompts, then continue.
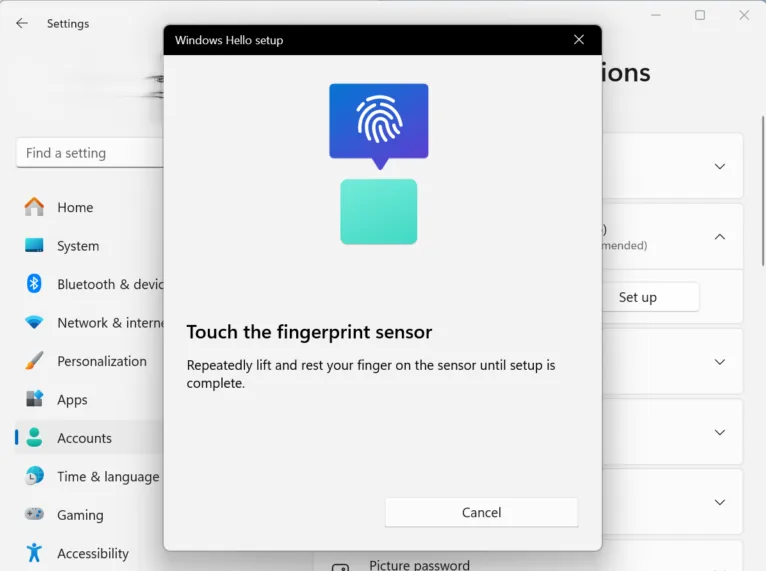
- Scan your face or fingerprint. For face sign-in, look straight at the camera until the progress completes. For fingerprint sign-in, touch the reader, lift, and touch again, shifting your finger slightly each time until the progress bar fills. Windows needs several touches to capture the whole fingertip.
- Select Close. The screen says setup is finished. Face setup also offers Improve recognition, and fingerprint setup offers Add another. You can use either now or later.
That’s it. Windows Hello is now set up on this PC, and Windows saves your choice automatically. You do not need to restart or sign out.
Check the setup before you move on. Press the Win+L to lock your PC, then wake the screen. Look at the camera or touch the reader. Windows should sign you in without asking for a password or PIN.
Tips for a clean face scan
Face recognition works best when the camera gets a clear, steady view. Sit at your normal distance from the screen. Keep your face centred and remove anything covering it, such as a hat pulled low.
If you wear glasses some of the time, run Improve recognition once with them on and once with them off. Windows then recognises you in both cases.
Tips for a reliable fingerprint scan
Clean the sensor and dry your finger before you start. Cover as much of the fingertip as the sensor allows, including the edges. A partial scan is the usual reason a fingerprint fails to match later. Register the finger you use most often, which is usually your index finger or thumb.
The full fingerprint sign-in walkthrough covers more detail on the sensor side.
Add another finger or improve recognition
You can register more than one finger, and you can retrain face recognition at any time. This helps if you switch hands often or your appearance changes.
- Open the sign-in settings. Go to Settings Accounts Sign-in options, then expand Fingerprint recognition (Windows Hello) or Facial recognition (Windows Hello).
- Select Add finger or Improve recognition. The label depends on the method you expanded. The setup window opens again.
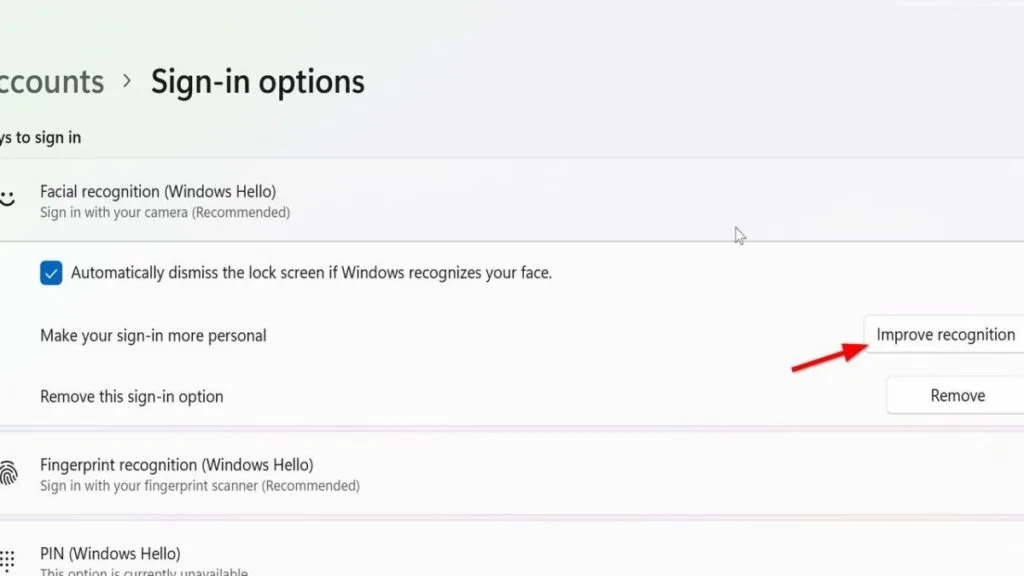
- Enter your PIN and scan again. Follow the same prompts as in the main setup.
You should now have an extra finger or a refreshed face scan on file. Windows keeps your earlier scans, and the new scan adds to them rather than replacing them.
Choose how you sign in
With Windows Hello face or fingerprint set up, you still have other options on the lock screen. These include your PIN and, if you kept it, your password. Select Sign-in options on the sign-in screen to switch between them.
Recent updates change which method Windows offers first. On Windows 11 24H2 and 25H2, the preview update KB5089573, which you can choose to install, makes Windows Hello face or fingerprint the default method at every sign-in when it is set up and available. This applies even if you used something else last time. Note that 24H2 Home and Pro stopped receiving updates on October 13, 2026, so the supported versions are now 25H2 and 26H2.
If you use your PIN three times in a row, Windows stays with PIN until you switch methods. If your PC does not behave this way, it probably does not have that update yet.
Microsoft has also announced face and fingerprint improvements for Windows 11 25H2, aimed at faster, more reliable sign-in. Its release notes list a “More reliable sign-in” fix rolling out from October 15, 2026. Availability varies by device configuration and usage. Keeping Windows Update current is all you need to do to receive these changes.
Stop using a password altogether
Windows Hello does not remove your password by default. The password stays as a fallback.
To go further, you can require Windows Hello for sign-in on Microsoft accounts. Read How to Enable Windows Hello Sign-In for Microsoft Accounts in Windows 11 for that setting. To make Windows Hello the main way in, see Turn On Passwordless Sign-In with Windows Hello in Windows 11.
If Windows Hello is greyed out or missing
When the Windows Hello options on the Sign-in options page are greyed out, or the page shows a message that the option is unavailable, work through these checks in order.
Check that Windows detects the hardware
Windows shows only the options your hardware supports. If you expect a fingerprint reader or IR camera, open Device Manager, the list of hardware in your PC, and look for the Biometric devices category, which holds fingerprint readers, or the Cameras category.
A reader that appears with a yellow warning icon has a driver problem. A camera that is not an IR model will not support face sign-in, even when it works in video calls.
Update or reinstall the driver
Updating a driver needs administrator rights. A driver is the software that lets Windows talk to a device.
- Open the optional updates. Go to Settings Windows Update Advanced options Optional updates.
- Install the driver updates. Select any driver updates listed for your camera or fingerprint reader, then install them.
- Check the maker’s site. If nothing appears, look on your PC maker’s support site for the biometric driver for your exact model.
- Restart the PC. Do this after the driver installs.
That’s it. With the driver in place, the Windows Hello options should become available on the Sign-in options page.
Check for a work or school policy
On a work or school PC, an administrator can restrict Windows Hello. Settings may then show as managed by your organization. In that case you cannot change them yourself. Ask your IT team.
Look at the firmware settings
On some PCs the fingerprint reader or camera can be switched off in the firmware settings (the low-level startup options, sometimes called UEFI or BIOS). This varies by manufacturer. If Device Manager shows no sign of the device at all, check your PC maker’s documentation. This guide cannot confirm the exact menu names for your model.
Fingerprint sign-in fails after a full shutdown
Some devices on Windows 11 24H2 and 25H2 did not accept fingerprint sign-in after a cold boot (starting from a full shutdown). Microsoft fixed this in update KB5127648. If your reader works after a restart but not after a shutdown, open Settings Windows Update and install any pending updates.
Because 24H2 Home and Pro no longer receive updates, move to 25H2 or 26H2 if you are still on 24H2 and the fix does not appear.
Remove Windows Hello or turn off a method
You can remove a biometric without losing your account. Windows deletes the stored scan from this PC, and you can run the setup steps above again whenever you want.
- Open the sign-in settings. Go to Settings Accounts Sign-in options.
- Expand the method. Select Facial recognition (Windows Hello) or Fingerprint recognition (Windows Hello).
- Select Remove. The stored scan disappears from the list.
You should now be back to signing in with your PIN or password for that method. Your account and your other sign-in options stay as they were.
If you only want to stop using a password, see Remove Your Password from Sign-In with Windows Hello before you change anything.
What to do next
If you want to review every sign-in method on your PC in one place, read How to Set Up Windows 11 Sign-in Options. If you use Windows Hello on a PC with a Google account, Enable Windows Hello Sign-In with a Google Account covers that setup. After your next restart, you should see your face or fingerprint offered first on the sign-in screen.
Frequently asked questions
How to set up Windows hello?
Open Settings, select Accounts, then Sign-in options. Expand Facial recognition (Windows Hello) or Fingerprint recognition (Windows Hello), select Set up, and follow the prompts. Windows Hello signs you in with your face or fingerprint instead of a password, and you need a PIN as a backup.
How to setup Windows hello?
Go to Settings, then Accounts, then Sign-in options. Choose Facial recognition (Windows Hello) or Fingerprint recognition (Windows Hello), select Set up, and follow the prompts. Windows Hello replaces typing a password with your face or fingerprint, and a PIN serves as the backup.
Still have a question?
Answered by AI from this guide. Good questions may be added to this page — please don't include personal details.
Did this guide fix your problem?

About the Author
Richard
Tech Writer, IT Professional
Richard is a writer at Geek Rewind who turns complex IT tasks into clear, step-by-step guides. He draws on years of hands-on experience in system administration and enterprise IT operations, focusing on Windows, Linux and WordPress: the problems people actually run into, and the fixes that work. His server and WordPress guides come from systems he runs himself. Richard builds and maintains the platform behind Geek Rewind, from its Ubuntu servers and Nginx configuration to its custom WordPress plugins. Many new tutorials start with readers' questions, and he's always glad to answer them in the comments.
No comments yet — be the first to share your thoughts!