How to Optimize Windows 11 Performance: Speed Up Your PC


Windows 11 performance optimization speeds up a sluggish computer by clearing out junk files, stopping hidden background apps, and turning off extra startup programs. A slow PC often drags because too many tasks run at once or because the storage drive is more than 85 percent full. When that happens, Windows has too little free room for temporary files and virtual memory.
You do not need special tools or paid software to make your system faster. Everything below uses features already built into Windows 11. Turning off heavy visual effects and cleaning up your startup list takes only a few minutes, and you will usually notice the difference right away. Work through the sections in order, or pick the ones that match your problem. Most changes can be reversed, and I note how where it matters.
Open Disk Cleanup by typing it in the Windows search bar, select your C: drive, check boxes next to temporary files and cached data, then click OK to free up several gigabytes. Next, go to Settings Apps Installed apps, uninstall unused programs, then disable startup apps in Task Manager to reduce background processes.
What Happens When You Optimize 🪟 Windows 11?
System optimization cleans up the operating system by removing unneeded files and stopping unneeded programs from running. The result is a PC that starts faster and runs apps more smoothly. Nothing here is a single magic fix. Each step recovers a little disk space, memory or processor time, and together they add up.
Section 1: Cleaning Up Your System
1Disk Cleanup: Remove Temporary Files
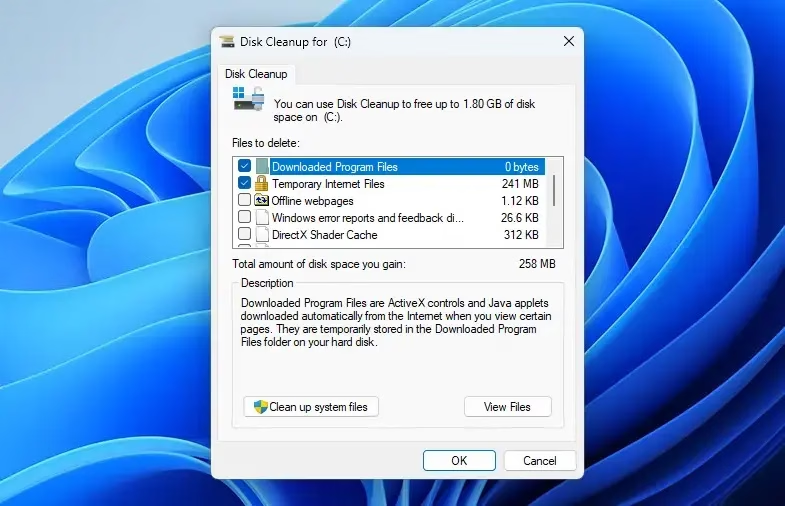
To run Disk Cleanup in Windows 11, search for the Disk Cleanup app in the Start menu , select your main drive, check the boxes next to the temporary files you want to remove, and click OK. This built-in tool finds cached web data, old installation files and error reports. Removing them can give back several gigabytes of storage, which leaves your system more room for active tasks.
Freeing up drive space reduces the amount of data Windows has to sort through. It also gives Windows room for temporary and swap files. A drive with breathing room handles daily operations noticeably better than one that is nearly full.
- Type Disk Cleanup in the Windows search bar and select the app from the results.
- Choose the drive to clean when Windows asks. This is usually your C: drive. Click OK.
- Wait while Disk Cleanup scans the drive. When it finishes, you will see a list of file types you can delete, with the space each one would free.
- Check the boxes next to the files you want to remove. Common choices are Temporary Internet Files, Downloaded Program Files, Recycle Bin and Temporary files. Read each description before you tick it.
- For a more thorough cleanup, click the Clean up system files button. Windows scans again, asks for the drive once more, and then shows extra options such as old Windows update files. You need administrator rights for this step.
- Click OK, then click Delete Files to confirm.
A restart is not needed. Anything you delete here, including the Recycle Bin contents, cannot be recovered afterward, so check the list before you confirm.
2Uninstall Unused Programs
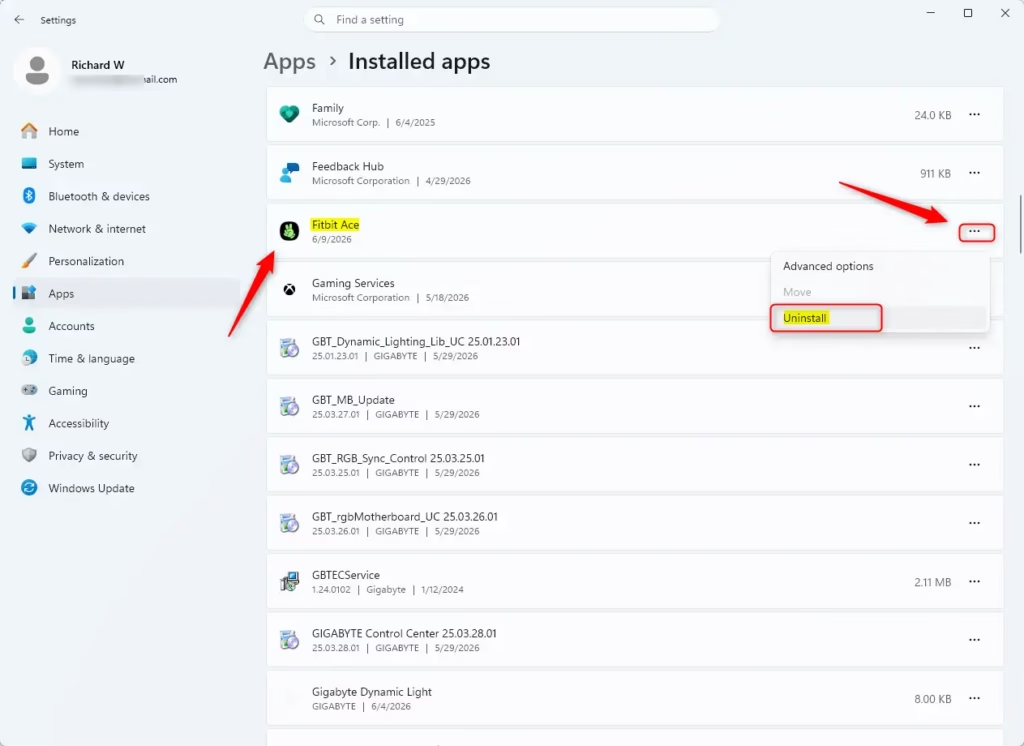
To uninstall unused programs in Windows 11, open Settings , go to Apps, and select Installed apps to find and remove software you no longer use. Removing unwanted apps reclaims disk space. It also stops background processes from using your memory while you work, so the machine feels quicker.
Unwanted software often leaves background processes, startup entries and scheduled tasks behind. Removing it frees storage immediately, and fewer apps compete for hardware resources.
- Right-click the Start button and select Installed apps. On some builds this item is labelled Apps and Features. You can also open Settings, go to Apps, and select Installed apps.
- Scroll through the list of installed applications. Use the sort option to put the largest apps first if you want the biggest savings.
- Find a program you no longer need and click the three dots at the end of its row.
- Select Uninstall, then confirm and follow any instructions on the screen.
The program disappears from the list when the uninstall finishes. Some uninstallers ask you to restart. Do that before you remove another program, since pending changes can cause errors.
Microsoft Visual C++ Redistributables and hardware driver packages are common examples that other software depends on. If you are not sure, leave it installed.
3Empty the Recycle Bin
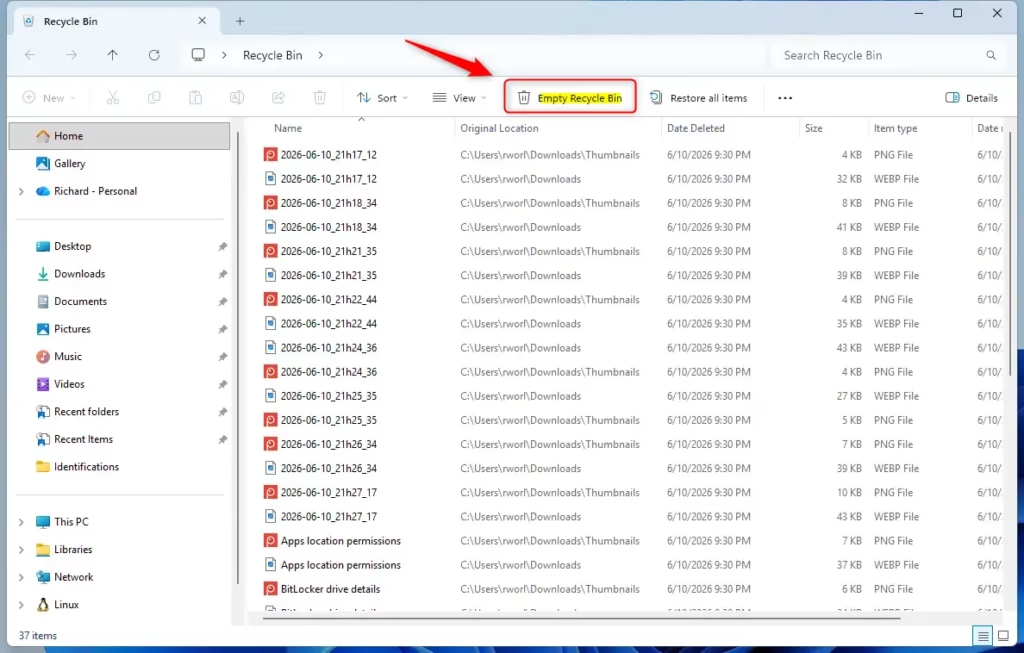
To empty the Recycle Bin in Windows 11, right-click the Recycle Bin icon on your desktop and select Empty Recycle Bin. Deleted documents and media stay in a hidden folder until you clear the bin, so they keep using space on your drive. Emptying it gives your system more room for current operations, new data and better overall performance. For instance, uninstalling a large game that used 50GB only gives that 50GB back once the Recycle Bin no longer holds the game’s deleted files.
What happens when done? The space used by deleted files is freed up on your drive.
- Find the Recycle Bin icon on your desktop. If it is missing, open Settings, go to Personalization, then Themes, then Desktop icon settings, and tick Recycle Bin .
- Right-click the Recycle Bin icon.
- Select Empty Recycle Bin from the menu. On Windows 11 you may need to click Show more options first to see the classic menu, although this entry is usually in the first menu.
- Click Yes if Windows asks you to confirm.
The icon changes to an empty bin. Look through the contents before you empty it, because files removed this way cannot be restored.
Section 2: Managing Startup Programs
4Control Startup Apps
To control startup apps in Windows 11, open Settings , go to Apps, and click Startup to turn off programs you do not want opening automatically when you sign in. Limiting login programs speeds up boot, and the change can improve boot times by up to 30% on older machines. It also leaves more memory and processor time for the apps you actually use. Reclaiming those resources helps active programs run without unexpected stuttering.
What happens when done? Your PC will boot faster, and more RAM and CPU power will be available for the programs you want to use.
- Right-click the Start button and select Task Manager . You can also press Ctrl+Shift+Esc.
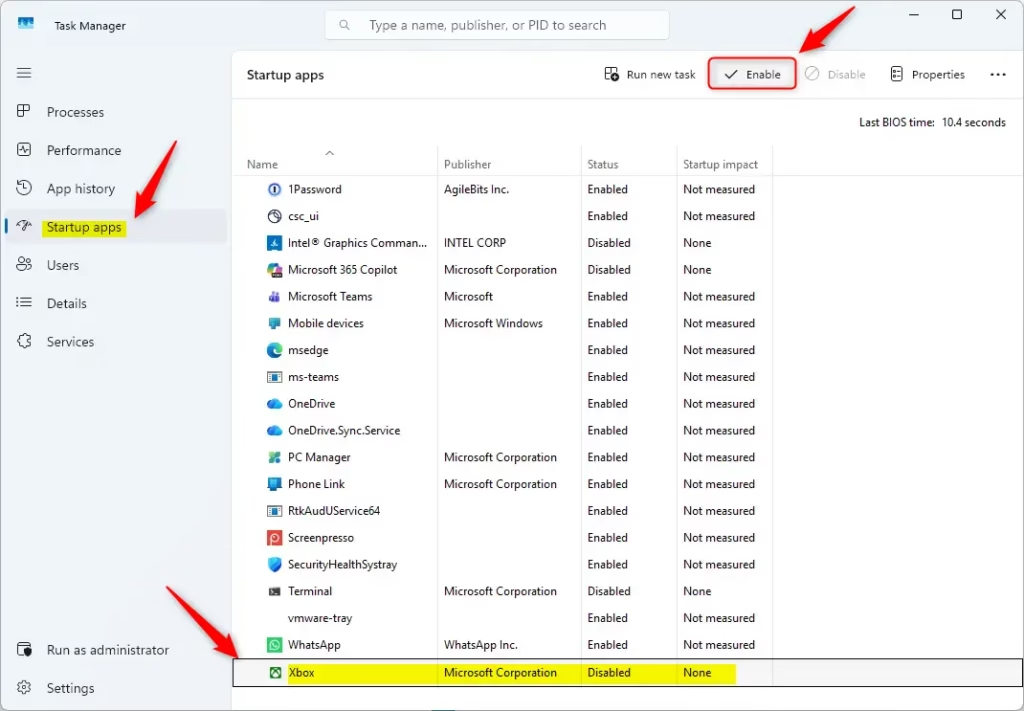
- Click the Startup apps tab on the left side. If you only see a small window, click More details first.
- Read through the list of applications that start with Windows. The Startup impact column shows which ones slow the boot most.
- Click an application you do not need at sign-in.
- Click the Disable button at the top right. Repeat for each program you want to stop.
The status for each app changes to Disabled. The change takes effect the next time you sign in or restart. The program is not uninstalled, so you can click Enable on the same screen to undo it.
If you are unsure what an entry does, leave it enabled. Search for the name online first.
Section 3: Optimizing Storage
5Free Up Space with Storage Sense
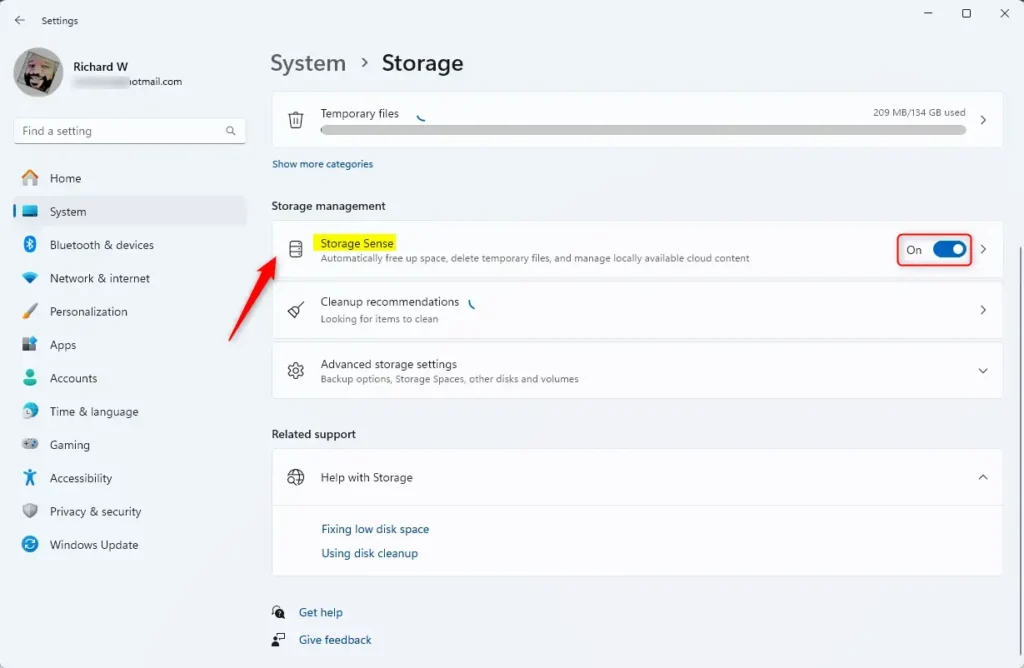
To use Storage Sense in Windows 11, open Settings , go to System, click Storage, and turn on the Storage Sense switch to automate your drive maintenance. This background tool clears temporary files and aging data without manual effort. That stops the drive filling to capacity and helps your computer stay fast.
What happens when done? Your PC will keep more free disk space with little effort from you, which helps maintain consistent performance.
- Open Settings by pressing Win+I.
- Click System.
- Click Storage.
- Turn Storage Sense to On.
- Click Storage Sense to change its settings. You can choose how often it runs (for example daily or weekly). You can also choose when it deletes files from your Recycle Bin and when it deletes files from your Downloads folder.
Be careful with the Downloads folder option. Files there are deleted automatically if they are older than the period you pick, so leave it on Never if you keep important files in that folder. To undo the whole feature, turn the switch back to Off. No restart is needed.
6Move Large Files to Another Drive or Cloud Storage
To move large files to another drive or cloud storage in Windows 11, open File Explorer, right-click your large videos or games, and cut and paste them to an external drive or cloud folder. Keeping your primary drive at least 15% free prevents Windows 11 from struggling under heavy workloads. That headroom lets the operating system manage its virtual memory swap files efficiently, which speeds up daily operations.
What happens when done? Your main drive will have more free space, which improves how well the system works overall.
- Open File Explorer by pressing Windows key + E.
- Go to the large files you want to move. Videos, game libraries and old backups are the usual culprits.
- Right-click the file or folder and select Cut, or select it and press Ctrl + X.
- Go to where you want to move them: another drive, an external drive, or a cloud sync folder such as OneDrive.
- Right-click an empty area in the destination folder and select Paste, or press Ctrl + V.
Check that the files opened fine at the new location before you consider the job done. Installed games and apps are the exception, because moving their folders by hand can break them. Use the app's own move option, or the Move button in Installed apps for apps that offer it. Also note that a cloud sync folder may keep a local copy of each file unless you set it to online-only.
Section 4: Visual Effects and Performance Settings
7Adjust Visual Effects for Performance
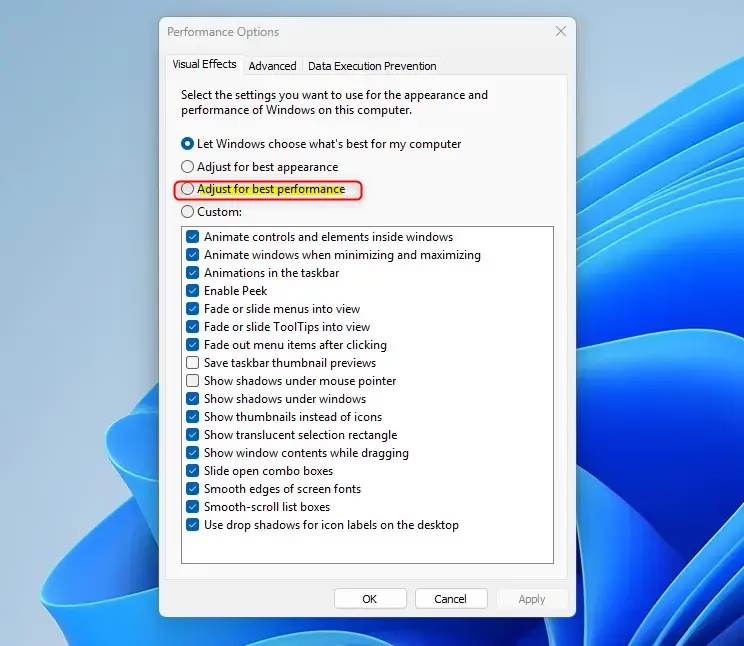
To adjust visual effects in Windows 11, search for "Adjust the appearance and performance of Windows" in the Start menu and select "Adjust for best performance". Windows spends noticeable processing power rendering translucent menus, fading windows and smooth animations. Turning these off sends that processing power to real software tasks instead, which helps most on older computers.
What happens when done? Your Windows interface might look less fancy, but it will feel faster and more responsive.
- Type View advanced system settings in the Windows search bar and select it. The System Properties window opens on the Advanced tab.
- Under the Performance section, click the Settings... button.
- In the Performance Options window, make sure you are on the Visual Effects tab. Select Adjust for best performance. This turns off most visual effects.
- If you prefer to keep some effects, select Custom and uncheck the effects you want to turn off. Turning off Animate windows when minimizing and maximizing and Fade or slide menus into view is a good start. Keeping Smooth edges of screen fonts avoids jagged text.
- Click Apply, then click OK.
The screen may flicker for a moment as the effects change. You do not need to restart. To go back, reopen the same window and choose Let Windows choose what's best for my computer.
8Enable Game Mode
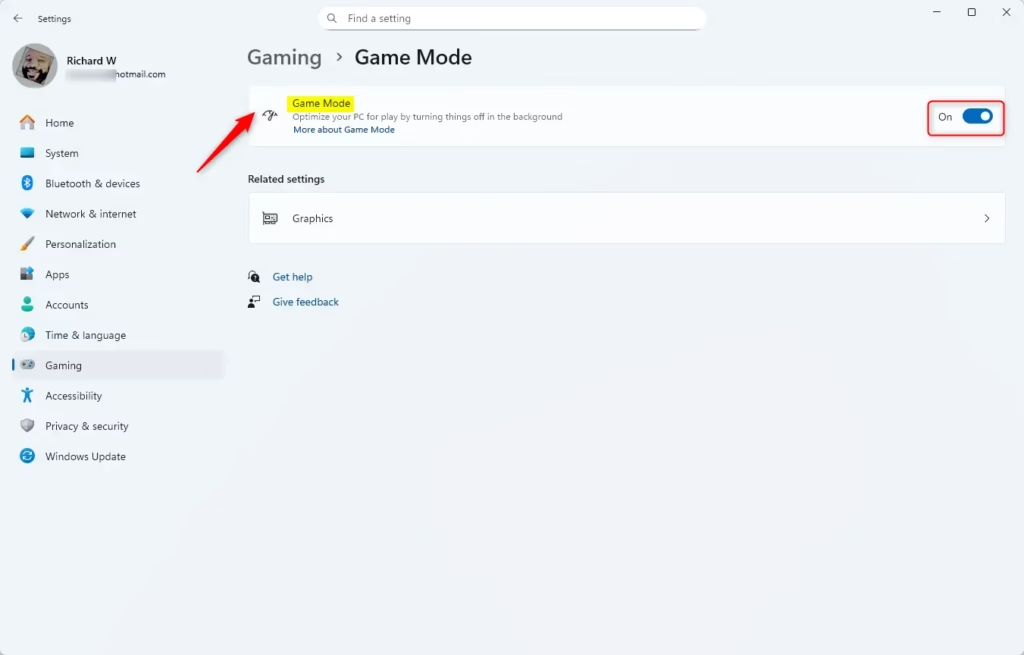
To enable Game Mode in Windows 11, open Settings, go to Gaming, click Game Mode, and turn the switch on. Game Mode gives your game priority by limiting background tasks and some automatic update activity. The hardware focuses on the game, which can improve frame rates and reduce stutter. Without it, Windows can spend resources on background maintenance while you play.
What happens when done? Games will run more smoothly with fewer interruptions, and your PC will give more resources to your gaming.
- Open Settings by pressing Windows key + I.
- Click Gaming.
- Click Game Mode.
- Turn Game Mode to On.
The switch now reads On. Game Mode is on by default in most current Windows 11 installs, so you may find it already enabled. The gain varies by game and hardware. It is usually modest, and a few older titles behave worse with it on. If one does, switch it off and compare.
Section 5: Updates and Drivers
9Keep Windows Updated
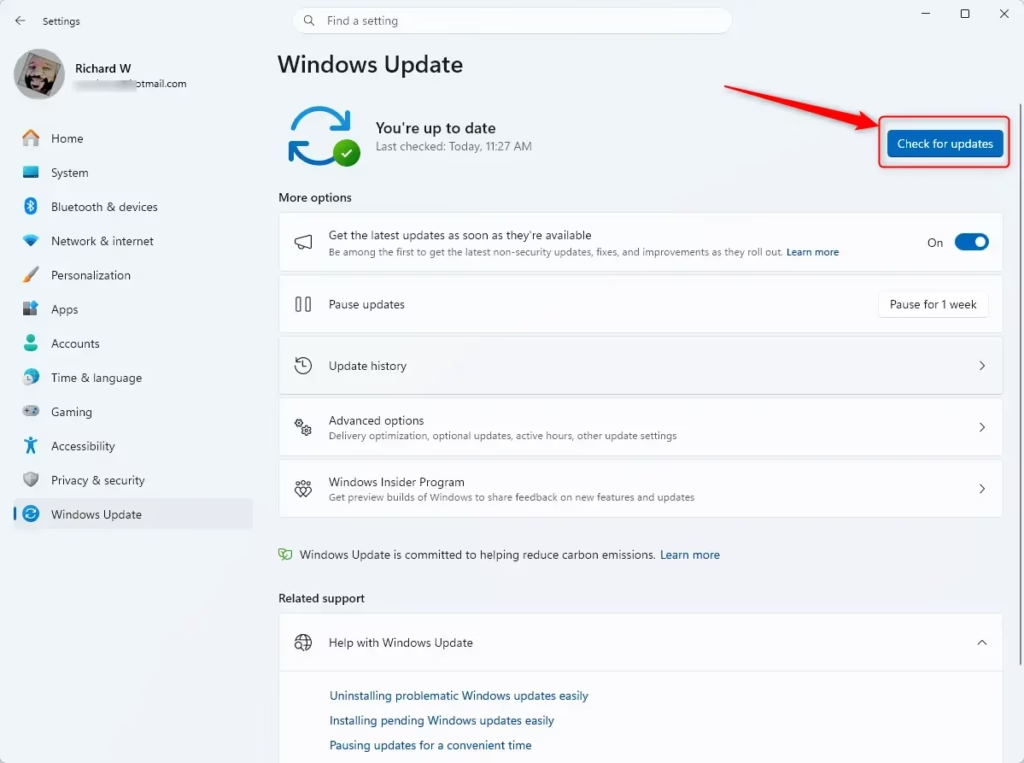
To keep Windows 11 updated, open Settings, go to Windows Update, and click Check for updates to install the latest patches. Microsoft regularly releases updates that include performance improvements, bug fixes and security enhancements. These fix software conflicts that cause lag, and regular updates also prevent the subtle bugs that slow a PC down over time.
What happens when done? Your PC will be more stable, more secure, and possibly faster thanks to the improvements included.
- Open Settings by pressing Windows key + I.
- Click Windows Update.
- Click Check for updates.
- Wait for any available updates to download and install. You may need to restart your PC to finish the installation. If you see Restart now, save your work before you click it.
If you see Advanced options, you can open Optional updates there. Driver updates sometimes appear in that list. Install them only if you have a specific problem to fix. If you are on a work PC, an administrator may control updates, so some options can be missing or greyed out.
10Update Your Drivers
To update your drivers in Windows 11, open Device Manager, right-click your hardware device, and select Update driver to install the latest software. Drivers are the link between physical hardware and Windows. Current ones keep your components communicating correctly and running with fewer errors. You may see noticeable speed gains during graphics-heavy tasks like video editing or gaming.
For Graphics Drivers (NVIDIA, AMD, Intel):
- Go to the manufacturer's website (NVIDIA, AMD or Intel).
- Open their support or driver download section.
- Find your graphics card model and choose Windows 11 as the operating system.
- Download the latest driver.
- Run the downloaded installer and follow the instructions on the screen. A clean installation is often recommended. Look for the Custom or Clean install option in the installer.
Your screen may go black or flicker briefly during installation. This is normal. Restart if the installer asks you to.
For Other Drivers (Device Manager):
- Right-click the Start button and select Device Manager.
- Expand the categories, such as Display adapters or Network adapters.
- Right-click a specific device and select Update driver.
- Choose Search automatically for drivers. Windows will try to find and install the best available driver.
If Windows says the best driver is already installed, that only means it found nothing newer in its own catalog. If Windows cannot find a newer driver, you might need to visit the hardware maker's website for your motherboard or the specific part. If a new driver causes problems, you can go back: right-click the device, choose Properties, open the Driver tab, and click Roll Back Driver. That button is greyed out if there is no earlier driver to return to.
Section 6: Advanced Optimization Techniques
11Defragment and Optimize Drives
To defragment and optimize drives in Windows 11, search for the Defragment and Optimize Drives app in the Start menu, select your drive, and click Optimize. Traditional hard disk drives (HDDs) scatter file fragments across their physical platters over time. Reorganizing those pieces shortens read times and makes Windows more responsive.
Solid-state drives (SSDs) work differently. They use a command called TRIM to clear deleted data blocks in the background and maintain write speeds. They do not need classic defragmentation.
What happens when done? Your drive will work better, leading to faster file access and possibly quicker app loading times.
- Type Defragment and Optimize Drives in the Windows search bar and select it.
- Select the drive you want to optimize, usually your C: drive. The Media type column tells you whether it is a hard disk drive or a solid state drive.
- If it is an HDD, click the Optimize button. Windows will analyze and defragment the drive. This can take a while on a large, fragmented disk.
- If it is an SSD, Windows performs a different optimization called TRIM. Click Optimize for SSDs as well. It is quick and safe.
- Click Change settings if you want to set up a schedule for automatic optimization.
The Current status column updates when the run finishes. Windows already schedules this by default, usually weekly, so you may find your drives listed as OK. A manual run mainly helps if you have just moved or deleted a lot of data.
12Adjust Power Settings for Performance
To adjust power settings in Windows 11, open Control Panel, go to Power Options, and choose the High performance plan to favour speed over saving energy. Power-saving profiles slow the CPU to conserve electricity. Switching to a performance profile stops the processor from down-clocking during demanding workloads, so your PC feels quicker.
What happens when done? Your PC may feel quicker and perform better, especially during demanding tasks. Note: this can increase power use and heat.
- Type Edit power plan in the Windows search bar and select it.
- Click Power Options in the address bar at the top, or in the left-hand path, to go back to the plan list.
- Under Preferred plans, select High performance.
- If High performance is not visible, click Show additional plans.
The selected plan shows a filled radio button. If the plan does not appear even then, your PC may not offer it. Many newer laptops hide it. In that case, open Settings, go to System, then Power & battery, and set Power mode to Best performance. To switch back, choose Balanced in the same place.
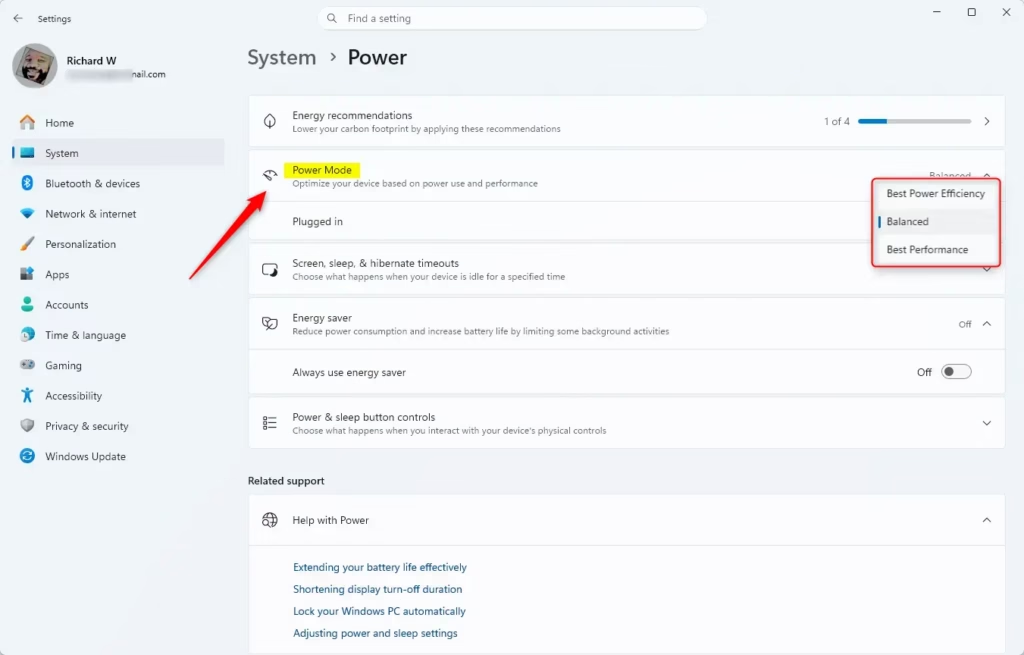
For laptops, this setting will mainly affect performance when plugged in. On battery, expect shorter runtime and more fan noise if you use the high-performance setting.
13Disable Unnecessary Services (Advanced)
To disable unnecessary services in Windows 11, search for services.msc in the Start menu, right-click an unneeded background service, and set its startup type to Manual or Disabled. Services run in the background all the time and use memory and processor cycles. Stopping ones you do not need frees up RAM and CPU capacity. However, disabling critical operating system services breaks dependent features and can destabilize Windows. This is the riskiest section in the guide, so go slowly.
You will need administrator privileges for this. Consider creating a restore point first, so you have a way back if something goes wrong.
- Right-click the Start button and select Run.
- Type
services.mscand press Enter or click OK. - Look at the Services window that opens. It lists each service and its status.
- Look through the list carefully. If you are sure a service is not needed and you understand what it does, you can turn it off. For example, if you never use Bluetooth, you might consider turning off the Bluetooth Support Service.
- Double-click the service you want to change. Its properties window opens.
- Click the Stop button if the service is running.
- Change Startup type to Disabled. Choose Manual instead if you want Windows to be able to start the service when something needs it. This is the safer choice.
- Click Apply, then click OK.
The Status column should now be blank and Startup Type should show your new setting. Change one service at a time and use the PC for a while before you change another. That way you can tell which change caused a problem. To undo a change, reopen the service, set Startup type back to what it was (often Automatic), and click Start. Note the original setting before you change anything.
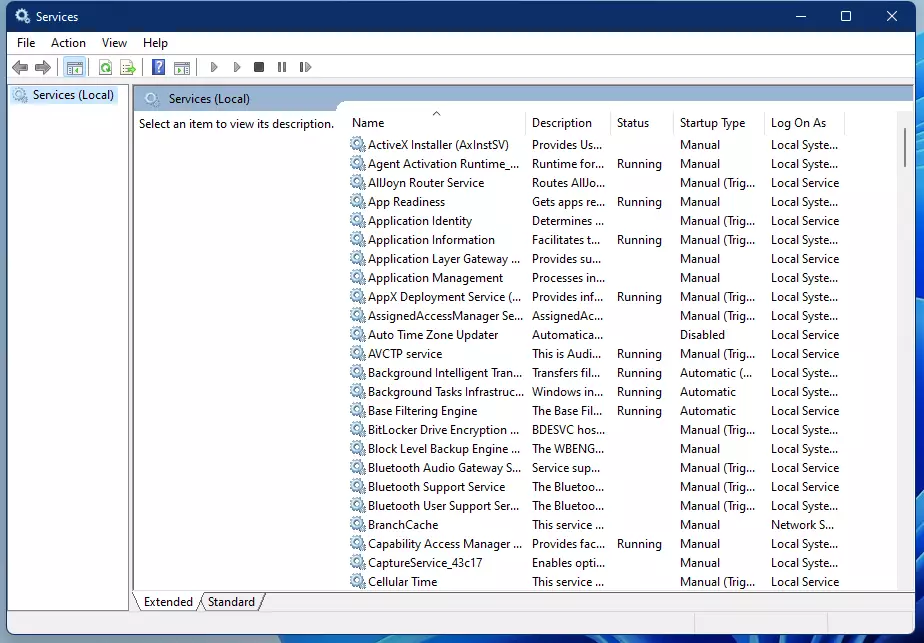
Research each service before you turn it off. If you make a mistake, getting a disabled service working again might require a system restore or advanced troubleshooting.
14Optimize Network Performance
To optimize network performance in Windows 11, open Settings, go to Network & internet, and use the built-in network reset or troubleshooter tools to clear out connection problems. Network resets and fixes clear out corrupt caches, including the DNS cache, and restore default connection settings. Web pages load faster once networking runs cleanly, with faster downloads and smoother streaming.
What happens when done? Faster downloads, smoother streaming, and a more responsive online experience.
The menu names differ slightly between Windows 11 builds, so look for these items under Settings and Network & internet:
- Run the Network troubleshooter: Open Advanced network settings and use the troubleshooter option. It checks for common problems and often fixes them without further input.
- Use Network reset: Open Advanced network settings, then Network reset. This removes and reinstalls your network adapters and resets networking components to their defaults. You will have to reconnect to Wi-Fi and re-enter passwords, and your PC will restart. Treat it as a last resort.
- Update Network Drivers: Make sure your network adapter drivers are up to date. See the driver section above for how to do this in Device Manager.
- Check Background Network Usage: Open Task Manager with Ctrl + Shift + Esc and go to the Performance tab. Select Wi-Fi or Ethernet to see current network activity. Then open the Processes tab and click the Network column heading to find which apps are using the most bandwidth.
Conclusion
Targeted maintenance keeps Windows 11 running fast over the long term. That means cleaning up temporary files, updating drivers, and managing startup programs. Routine care of your hardware and software also helps your PC keep handling gaming, productivity apps and daily browsing without slowing down.
A simple routine works well. Empty the Recycle Bin and check free disk space every month. Run Windows Update regularly. Look over your startup list after you install new software. If your PC is still slow after all of this, check Task Manager for a program using too much CPU, memory or disk, and consider adding RAM or moving to an SSD.
Have a question about this guide?
Answered by AI from this guide. Good questions may be added to this page — please don't include personal details.
Did this guide fix your problem?

About the Author
Richard
Tech Writer, IT Professional
Richard is a writer at Geek Rewind who turns complex IT tasks into clear, step-by-step guides. He draws on years of hands-on experience in system administration and enterprise IT operations, focusing on Windows, Linux and WordPress: the problems people actually run into, and the fixes that work. His server and WordPress guides come from systems he runs himself. Richard builds and maintains the platform behind Geek Rewind, from its Ubuntu servers and Nginx configuration to its custom WordPress plugins. Many new tutorials start with readers' questions, and he's always glad to answer them in the comments.
No comments yet — be the first to share your thoughts!