How to Optimize Windows 11 CPU Scheduling for Speed


Windows 11 CPU scheduling manages how your processor divides its power between active apps and background tasks. This built-in system decides which programs get processor time and for how long, keeping your foreground window running smoothly.
The operating system automatically shifts resources when you launch heavy programs like games or video editors to give them extra processing power. You can also adjust these performance options through advanced system settings to make your PC run faster.
Be realistic about the gains. Windows already picks a sensible default for desktop PCs, so you will rarely see a dramatic jump. This guide covers the two places where you can change the setting, how to check it, and how to put it back if you don’t like the result.
Open System Properties by pressing Win, typing sysdm.cpl, and pressing Enter. Go to Advanced tab > Performance Settings Advanced tab, then under Processor scheduling choose Programs for active apps or Background services for unattended tasks. Click OK to save.
What is CPU Scheduling?
CPU scheduling is the system Windows uses to decide which programs get to use your computer’s processor (the CPU) and when, making sure everything runs smoothly.
Your processor can only run a limited number of tasks at the same instant. Windows hands out very short slices of processor time to each running program in turn. Because the slices are so short, it looks like everything runs at once. The scheduler decides how long each slice lasts and which programs get favored.
How to Change CPU Scheduling in 🪟 Windows 11
Windows 11 CPU scheduling lets you choose whether your processor gives more power to active programs or background tasks. To change Windows 11 CPU scheduling, open System Properties by pressing the Win, typing sysdm.cpl, and pressing Enter. Go to the Advanced tab, click Settings under Performance, select the Advanced tab again, and choose between Programs or Background services.
You may see a User Account Control prompt, and you need an administrator account to save the change. Programs is the usual default on a desktop PC. Background services mainly suits a machine that runs server-style workloads, such as a shared folder host or a local database.
- Open System Properties. Click the Start button, then go to Settings System About On the right side, click Advanced system settings. This link sits under the Related links area. The System Properties window should now open. If you prefer the keyboard, press the Windows key, type sysdm.cpl, and press Enter to get to the same window.
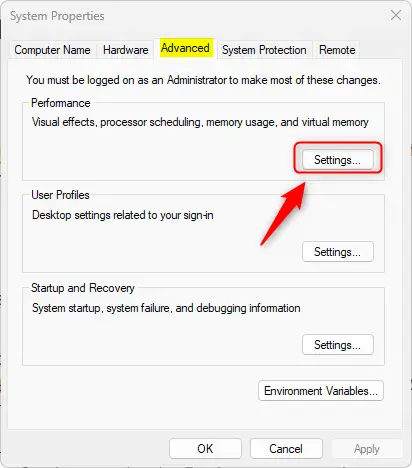
- In the System Properties window, click the Advanced tab. You should see sections named Performance, User Profiles, and Startup and Recovery.
- Under Performance, click the Settings button. A new window called Performance Options should open. Don't confuse this with the Settings button under User Profiles or Startup and Recovery. Each of those opens a different window.
If the Advanced system settings link does nothing or the options look greyed out, you are probably signed in with a standard account. Sign in as an administrator and try again.
- In the Performance Options window, click the Advanced tab. The first tab, Visual Effects, is not the one you want. The Advanced tab shows Processor scheduling, Virtual memory, and Data Execution Prevention.
- Under Processor scheduling, choose one of these options. Only one can be selected at a time:
- Programs – to give more power to apps you are actively using. This favors the window you are working in, so it stays responsive when many things are open.
- Background services – to help tasks running behind the scenes work better. Pick this if the PC mostly does unattended work and you care less about how quickly the foreground window reacts.
For gaming, video editing, and everyday use, leave Programs selected. If you switch to Background services and the system feels slower, come back to this tab and select Programs again.
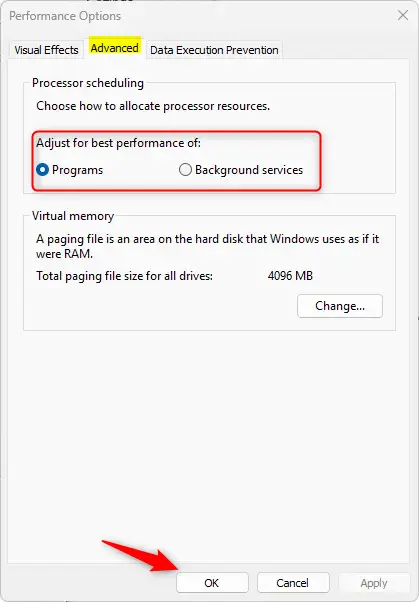
- Click OK to save your changes. The Performance Options window should close. Click OK in System Properties as well if it is still open. This setting normally takes effect straight away, but a restart does no harm and clears any doubt.
Advanced Option: Change CPU Scheduling Using the Registry Editor
Press the Windows key, type regedit, and press Enter to open the tool. Incorrect changes here can break your system, so back up your registry before editing any keys.
To make a backup, open Registry Editor, click File Export, choose All under Export range, give the file a name, and save it somewhere safe. To restore it later, double-click the saved .reg file. Creating a restore point first is also a good idea.
- ⚠️ Admin privileges required. Open the Registry Editor by typing
regeditin the Start menu and pressing Enter. Click Yes if User Account Control asks for permission. The Registry Editor window should open with a tree of keys on the left. - Navigate to this folder path:
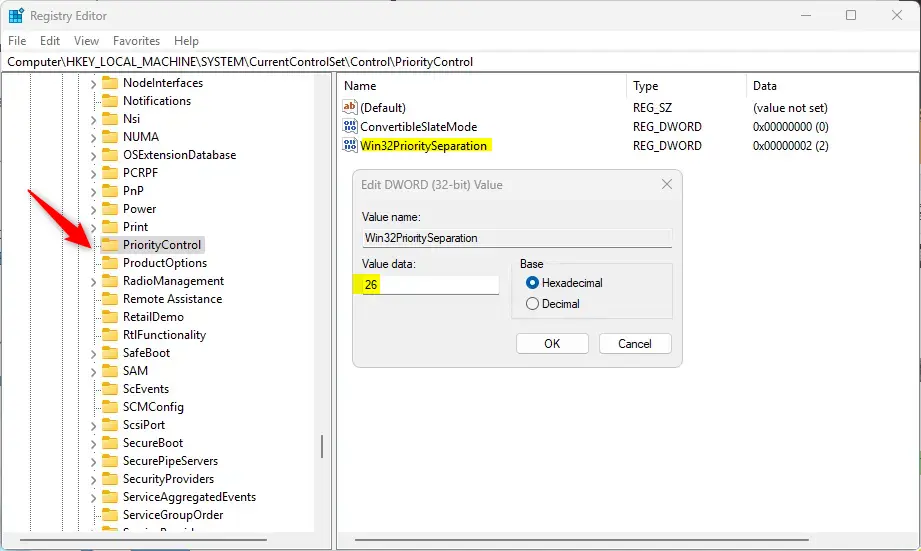
Computer\HKEY_LOCAL_MACHINE\SYSTEM\CurrentControlSet\Control\PriorityControl. You can expand the keys one at a time in the left pane, or paste the path into the address bar at the top of the Registry Editor window. - Right-click the PriorityControl folder, select New DWORD (32-bit) Value, and name it
Win32PrioritySeparation. If a value with that name already exists in the right pane, skip creating a new one and edit the existing value in the next step. - Double-click
Win32PrioritySeparationand set the value to:26for prioritizing Programs18for prioritizing Background services
- Click OK and close the Registry Editor. Check that the value now shows the number you entered in the Data column.
- ⚠️ Admin privileges required. Restart your PC to apply the changes. Registry edits like this one are not applied reliably until you restart.
To undo the change, go back to the same value and enter the number for Programs, or double-click the .reg backup you exported earlier. Then restart again.
Summary
- CPU Scheduling controls how Windows shares your processor's time.
- You can choose to prioritize apps you actively use or background tasks. Programs is the sensible choice for most desktop PCs.
- Changing settings through System Properties is simple and safe. You can switch back at any time.
- Registry editing is for advanced users who want more control. Export a backup first.
- Always restart your PC after making changes to make sure they work.
Windows 11 CPU scheduling controls how your computer shares processor time between open programs and background tasks. You can adjust these settings safely through System Properties or use the Registry Editor for deeper control. Always restart your computer after making changes to make sure your new settings take effect properly. If performance gets worse, set the option back to Programs and restart.
Was this guide helpful?

About the Author
Richard
Tech Writer, IT Professional
Richard is a writer at Geek Rewind who turns complex IT tasks into clear, step-by-step guides. He draws on years of hands-on experience in system administration and enterprise IT operations, focusing on Windows, Linux and WordPress: the problems people actually run into, and the fixes that work. His server and WordPress guides come from systems he runs himself. Richard builds and maintains the platform behind Geek Rewind, from its Ubuntu servers and Nginx configuration to its custom WordPress plugins. Many new tutorials start with readers' questions, and he's always glad to answer them in the comments.
No comments yet — be the first to share your thoughts!