Boost Windows 11 Performance: Delete Trash Automatically

Storage Sense is a built-in Windows 11 tool that deletes files you no longer need. It clears out trash automatically on a schedule you choose. Instead of waiting for your drive to fill up, it runs in the background and removes temporary files and items sitting in your Recycle Bin .
You turn it on in the Windows 11 Settings app and set it to clean your drive every day, week, or month. This stops old files from piling up and slowing the system down, and you don’t have to do any manual cleanup. It is available in both Windows 11 Home and Pro, and turning it on does not need a restart.
Enable Storage Sense in Windows 11 Settings. Navigate to System, then Storage, and switch Storage Sense to On. This feature automatically deletes temporary files and empties the Recycle Bin to free up disk space.
How to Automatically Delete Trash and Temporary Files with Storage Sense
Storage Sense runs quietly in the background. Once you turn it on, Windows handles routine cleanups on its own. It targets temporary and cached data and clears the Recycle Bin , so your drive keeps some free space and the system stays responsive. It only removes files Windows treats as safe to delete. It does not touch your documents, photos or installed apps.
Step 1Open Settings
- Click the Start menu (the Windows icon in the bottom-left corner of the screen). The Start menu opens with your pinned apps.
- Click on Settings. Or press Win+I on your keyboard as a shortcut. The Settings app opens, with a list of categories on the left.
Step 2Go to Storage Settings
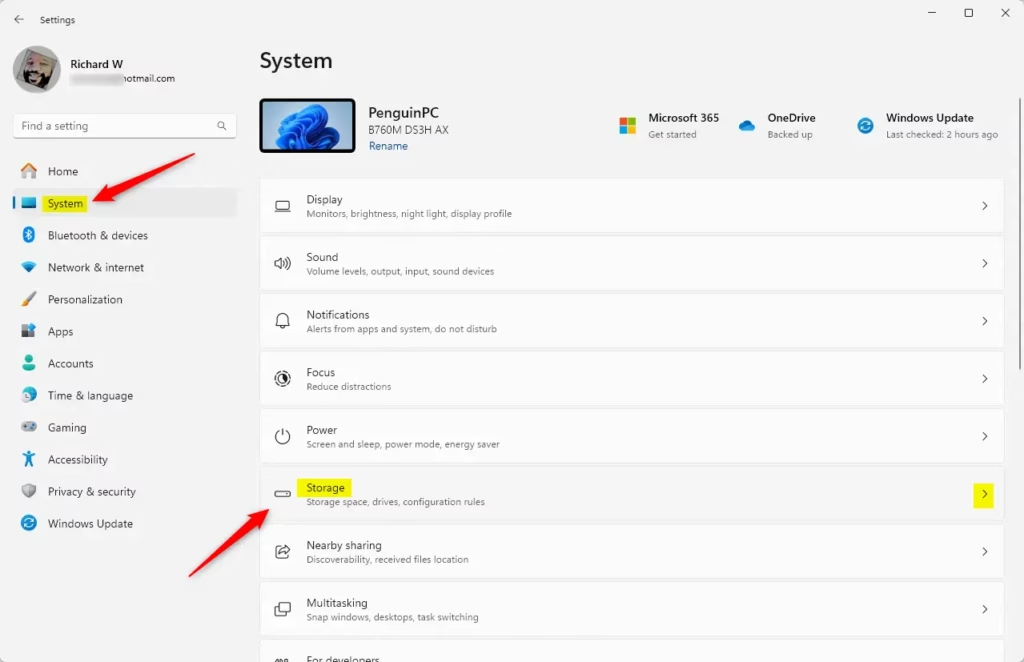
- In Settings, click on System from the left menu. The System settings appear on the right.
- Click on Storage on the right side. You should now see a bar showing how full your drive is, with a list of what is using the space.
Step 3Turn On Storage Sense
- On the Storage page, find Storage Sense. On some Windows 11 versions it sits inside a Storage Management section. If you don’t see it, expand that section.
- Switch it to On. The toggle should now read On. If it is greyed out or you see the message “Some settings are managed by your organization”, a work or school policy controls it, and you will need to ask your administrator. To undo this later, come back to the same spot and switch it to Off.
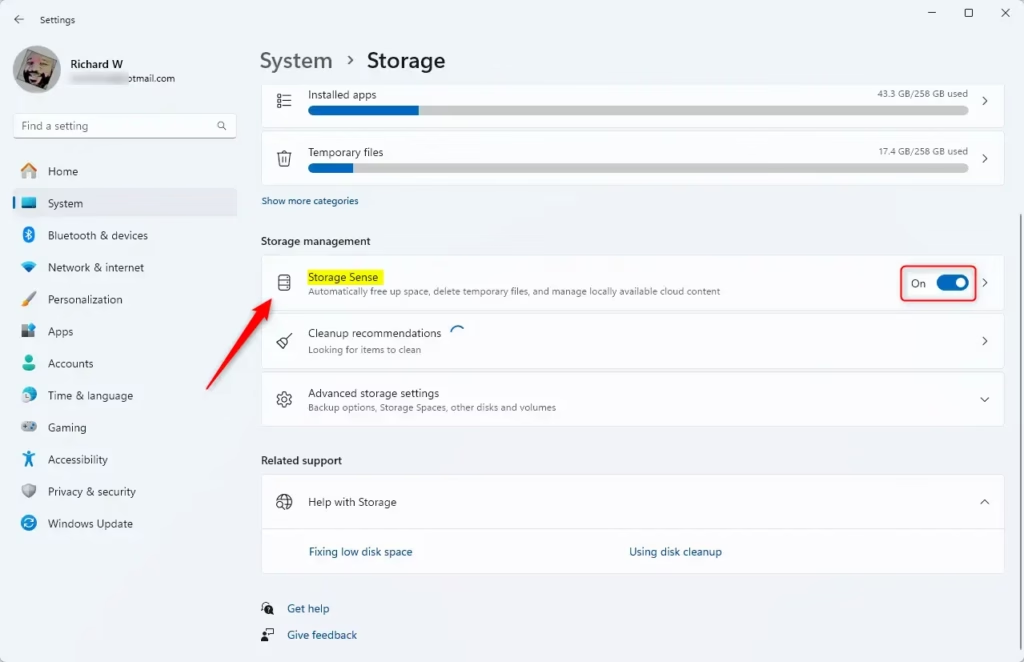
Out of the box, Storage Sense monitors drive space. It deletes cached data and empties the Recycle Bin whenever free space runs low. You won’t need to lift a finger once it is running.
If you would rather have it run on a fixed schedule, you can change that:
- On the Storage page, click Storage Sense itself (not just the toggle) to open its settings.
- Find the option for how often cleanup runs, and pick every day, every week, or every month. Choosing the low free disk space option keeps the default behavior.
- Check the Recycle Bin setting. Here you decide how long deleted items can sit in the bin before they are removed.
- Optionally, click Run Storage Sense now to start a cleanup straight away.
Be careful with any setting that clears the Downloads folder. Anything old in that folder is deleted, so leave it alone if you keep files there.
Step 4 (Optional): Delete Temporary Files Right Now
Deleting temporary files manually gives your PC an immediate lift when your drive gets too full. You do not need to wait for the automatic schedule to clear out junk files. Open the Storage page in Settings to find and remove them right away. This works the same whether or not Storage Sense is turned on.
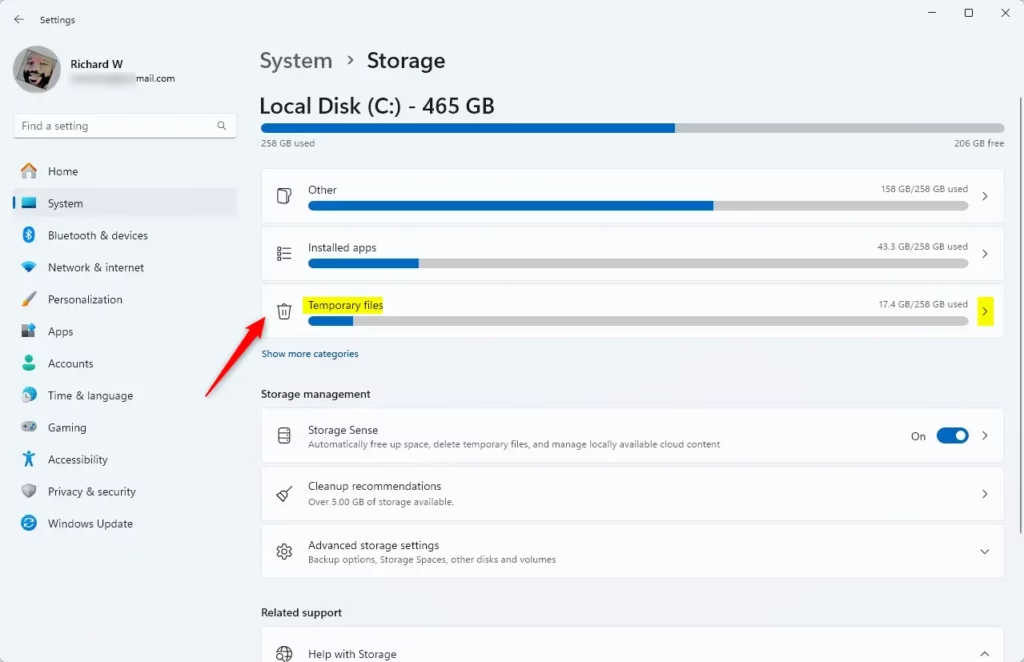
- Go back to the Storage page (Settings System Storage).
- Click on Temporary files under Storage. Windows scans the drive, which can take a few seconds. Then you will see a list of file types with checkboxes and the size of each.
- Check the boxes next to the types of files you want to delete. Read the description under each one first. Check the Recycle Bin and Downloads entries carefully, because anything in them is removed for good.
- Click the Remove files button. Windows asks you to confirm, then deletes the selected files. If the button is greyed out, no boxes are checked.
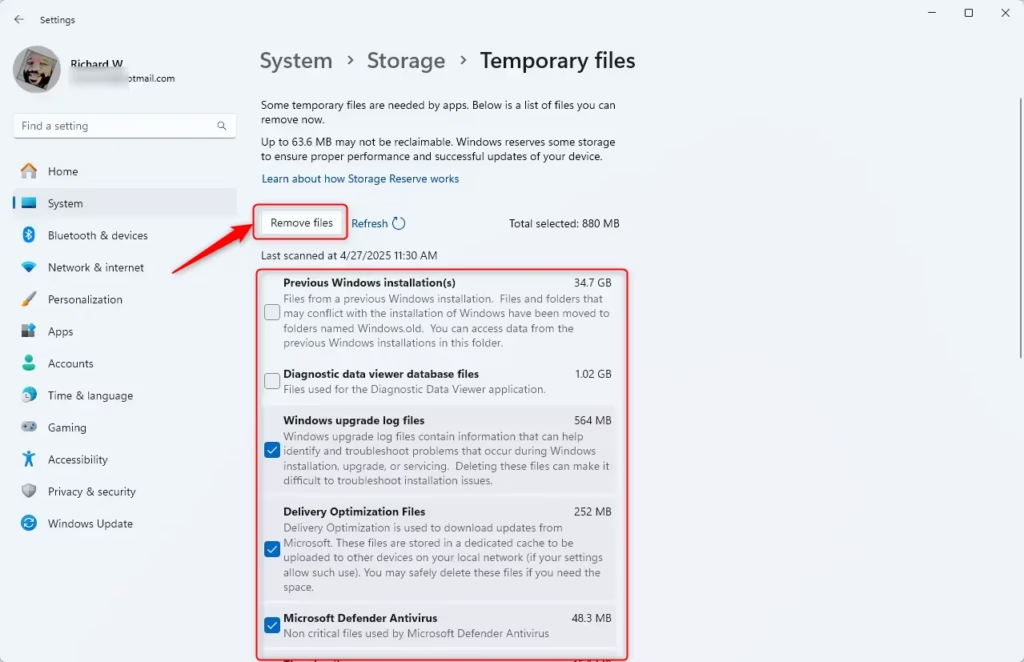
What happens when you click Remove files? Windows deletes those temporary files immediately, and the available storage on your drive increases right away. Deleted files cannot be restored from the Recycle Bin, so only tick what you are sure about. Some items, such as old update files, may only finish clearing after a restart.
Summary
- Temporary files and trash use up drive space and can slow down your PC, especially when the drive is nearly full.
- Storage Sense is a built-in Windows 11 tool that cleans your computer automatically.
- Turning on Storage Sense takes just a few clicks in Settings System Storage
- You can also delete temporary files manually whenever you want, using Temporary files and Remove files.
- With these steps, your computer will stay cleaner and run faster without much extra work from you.
Keeping your PC fast and free of clutter is easy once you set up automated cleaning and know how to clear junk by hand. Temporary files and digital trash use up drive space and can slow your system down. Built-in tools like Storage Sense keep your computer clean without extra work from you. Check the Storage page now and then to see how much space is left.
Was this guide helpful?

About the Author
Richard
Tech Writer, IT Professional
Richard is a writer at Geek Rewind who turns complex IT tasks into clear, step-by-step guides. He draws on years of hands-on experience in system administration and enterprise IT operations, focusing on Windows, Linux and WordPress: the problems people actually run into, and the fixes that work. His server and WordPress guides come from systems he runs himself. Richard builds and maintains the platform behind Geek Rewind, from its Ubuntu servers and Nginx configuration to its custom WordPress plugins. Many new tutorials start with readers' questions, and he's always glad to answer them in the comments.


No comments yet — be the first to share your thoughts!