How to Find Your Motherboard Details in Windows 11

You can find your exact motherboard model in Windows 11 in under two minutes, without opening the case. The motherboard is the main circuit board that connects every other part of your PC. You need its make and model before you buy compatible upgrades, such as a new processor or memory, or before you download chipset, BIOS or other driver updates.
Windows reads this information from the system firmware (BIOS/UEFI). You can see it in the System Information app or by running a short command in Command Prompt or PowerShell. All of these tools are built into both Home and Pro editions, so you don’t need to install anything.
Open System Information by pressing the Win, typing System Information, and clicking the app. In the System Summary tab, scroll down to find the BaseBoard entries: BaseBoard Manufacturer shows who made your motherboard, and BaseBoard Product shows the exact model number. Write down both values and search them together on the manufacturer’s support site for drivers and compatible upgrades.
How to See Motherboard Details in 🪟 Windows 11
The System Information app is easier if you prefer clicking through a window. The command-line method is quicker if you already have a terminal open, and it lets you copy the text straight into a search engine or a support request.
1Using the System Information App
- Click the Start button (Windows icon) on the taskbar, or press the Win on your keyboard.
- Type System Information in the search box. Click the app when it appears in the results. The System Information window opens.
- Make sure System Summary is selected in the left pane. It is normally selected by default. If you see a list of categories instead of system details, click it once.
- Look through the list on the right for the BaseBoard entries. You will see:
- BaseBoard Manufacturer – The company that made your motherboard
- BaseBoard Product – The model name or number
- BaseBoard Version – The version of your motherboard
The list is long and sorted in a fixed order, so you may need to scroll down to find the BaseBoard lines. They sit close to the BIOS Version/Date entry and the SMBIOS version.
The app shows the manufacturer, product name and version in one place, so you can confirm your exact model without any other tool.
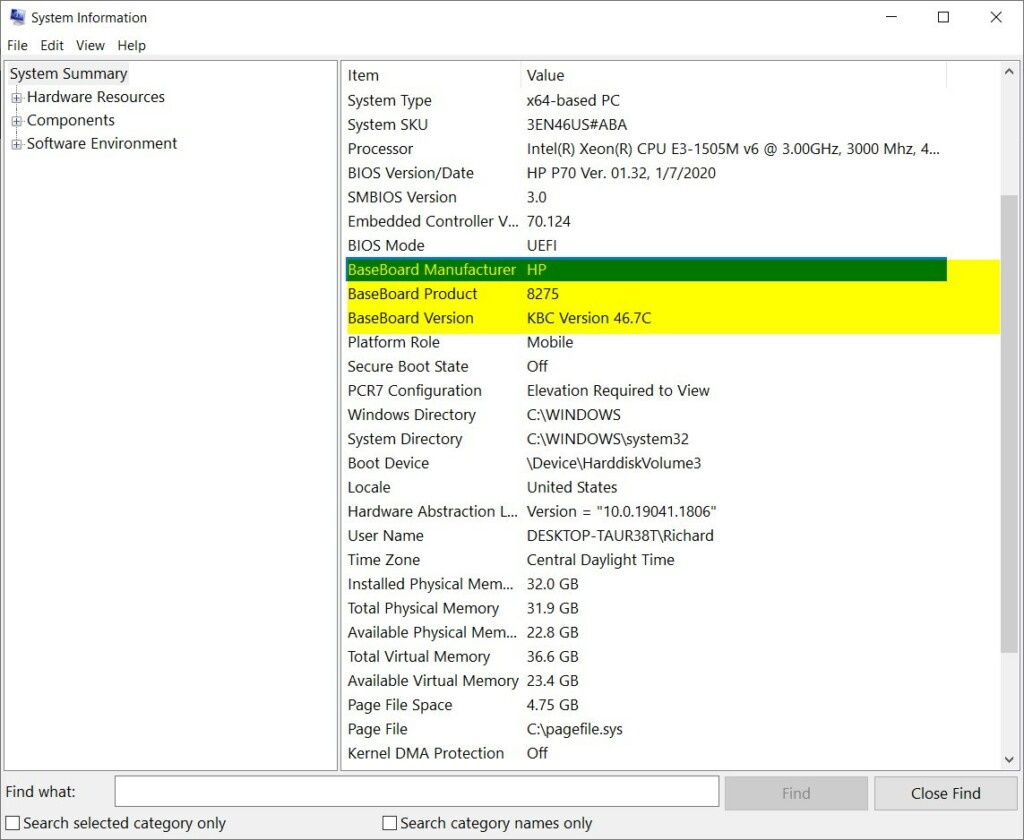
Write down the BaseBoard Manufacturer and BaseBoard Product values exactly as shown. Then search for them together on the manufacturer’s support site to find the right drivers and BIOS updates and the list of supported processors and memory.
This happens on some prebuilt or custom-built PCs, where the maker never filled in the firmware data. It also happens in virtual machines. In that case, check the PC maker's documentation or the label printed on the board itself.
2Using Command Prompt or PowerShell
Command Prompt and PowerShell let you pull the same motherboard details from the system with a text command, with no menus to click through. It takes a few seconds to run and print the results.
- Right-click the Start button and choose Windows Terminal. On some Windows 11 builds this entry is labelled simply Terminal. A terminal window opens.
- Check which shell is running. Windows 11 often opens PowerShell by default. To switch to Command Prompt, click the down arrow next to the plus tab and choose Command Prompt. A new tab opens with a Command Prompt window.
- Type this command and press Enter:
Get-CimInstance Win32_BaseBoard | Format-List Product,Manufacturer,SerialNumber,Version
After a moment, the terminal prints a short table. The output fields show the manufacturer, product name, version and serial number of your motherboard. You don't need administrator rights for this.
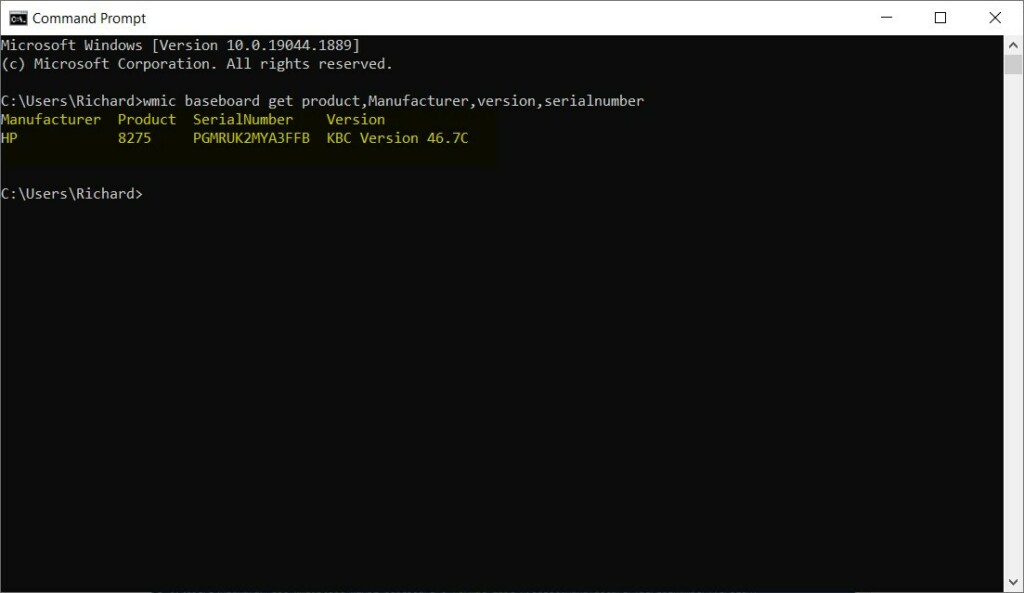
The Product value is the model name you need when searching for drivers or compatible parts. The Manufacturer value tells you whose support site to visit. As with System Information, a blank serial number or a placeholder text is normal on many systems and doesn't mean something is wrong.
If Command Prompt says the command is not recognized, your Windows 11 build may no longer include that tool by default. Newer builds have started removing older command-line utilities. Use the PowerShell method below instead, because it reads the same information.
PowerShell (a command-line shell built for system administration) provides an alternative way to query the same data. Open a PowerShell tab in Windows Terminal, or switch tabs with the down arrow next to the plus tab, then run this command:
Get-WmiObject win32_baseboard | Format-List Product,Manufacturer,SerialNumber,Version
The terminal returns the following result:
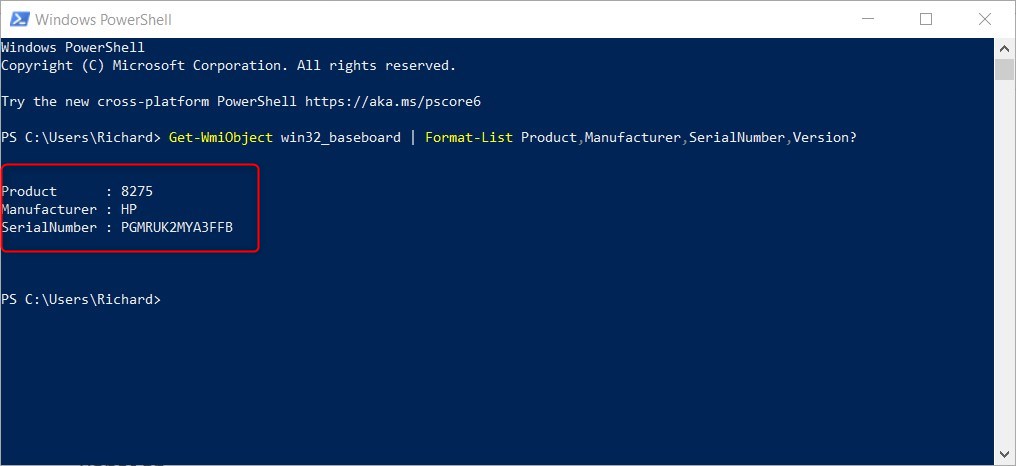
Read the output the same way as before. Look at the manufacturer and product lines to identify your board. You can select the text in the terminal and copy it to paste into a search or a support ticket.
Summary
- Knowing your motherboard details helps when upgrading or fixing your PC.
- Windows 11 makes it easy to find this info without opening your computer.
- You can check motherboard details using the System Information app or by typing commands in Command Prompt or PowerShell.
Finding your motherboard details in Windows 11 is essential when you want to buy compatible upgrade parts like a new processor or memory. You don't need to look at physical labels inside your PC tower, because built-in Windows tools read this information from the firmware. Both the System Information app and the command-line tools give you the exact hardware data you need. If the details come back blank, the label printed on the board itself is your fallback.
Have a question about this guide?
Answered by AI from this guide. Good questions may be added to this page — please don't include personal details.
Did this guide fix your problem?

About the Author
Richard
Tech Writer, IT Professional
Richard is a writer at Geek Rewind who turns complex IT tasks into clear, step-by-step guides. He draws on years of hands-on experience in system administration and enterprise IT operations, focusing on Windows, Linux and WordPress: the problems people actually run into, and the fixes that work. His server and WordPress guides come from systems he runs himself. Richard builds and maintains the platform behind Geek Rewind, from its Ubuntu servers and Nginx configuration to its custom WordPress plugins. Many new tutorials start with readers' questions, and he's always glad to answer them in the comments.
No comments yet — be the first to share your thoughts!