Check Your TPM Security Processor Details in Windows 11

Windows 11 shows your TPM details on the Security processor details page, found under Device security in Windows Security. A TPM (Trusted Platform Module) is a chip or firmware feature that stores encryption keys and helps confirm your PC starts in a trusted state. That page lists the TPM manufacturer, firmware version, specification version and status.
Two other tools show the same hardware in more detail: the TPM Management console (tpm.msc) and PowerShell. Below, you will find both tools and the fixes for a missing or not ready TPM.
To see your security processor details in Windows 11, open Windows Security, select Device security, then select Security processor details. The page lists your TPM (Trusted Platform Module, a chip or firmware feature that stores encryption keys) manufacturer, manufacturer version, specification version and status. Windows 11 needs specification version 2.0.
What “security processor” means in 🪟 Windows 11
Windows Security uses “security processor” as its label for the TPM. A TPM comes in three forms. A discrete TPM is a separate chip on the motherboard. An integrated TPM sits inside another chip, such as the CPU package. A firmware TPM runs in a protected area of the processor, and PC makers brand it differently, for example Intel PTT or AMD fTPM. Windows treats all three the same way, and the details page does not tell you which form you have.
Windows 11 requires TPM version 2.0. Features such as BitLocker Drive Encryption, Windows Hello and Device Encryption use the TPM to protect keys. That is why you check its details: to confirm the PC meets the requirement, to confirm the TPM is working before you turn on BitLocker, or to give support staff the version and manufacturer.
Check security processor details in Windows Security
This is the fastest method and works on Windows 11 Home and Pro. You do not need administrator rights to view the page.
- Select Start, type Windows Security, and press Enter. The Windows Security window opens on its home page.
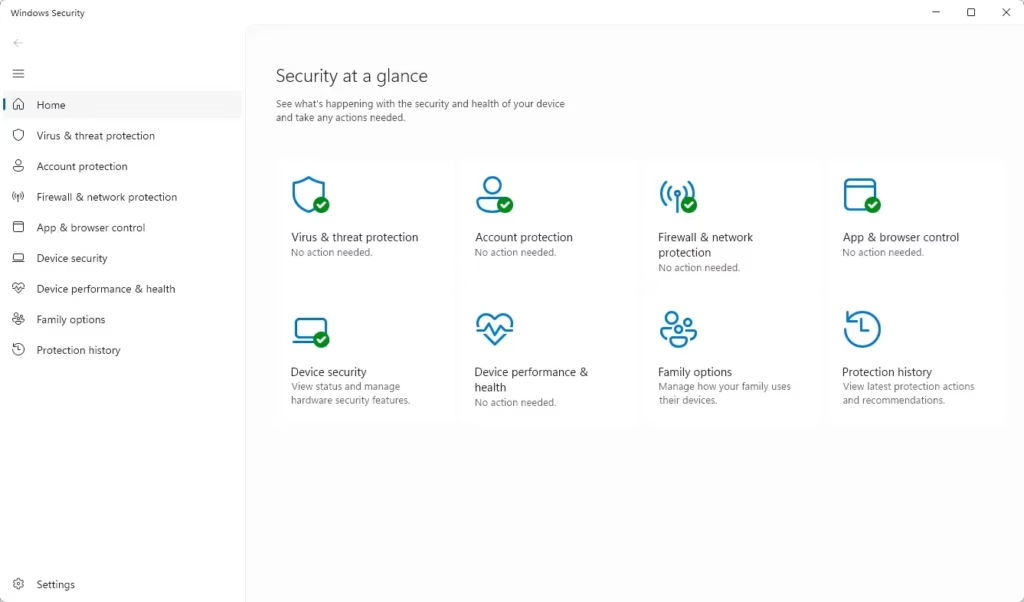
Windows Security dashboard showing an overview of PC protection status. - Select Device security in the left pane. The page shows sections such as Core isolation, Security processor and Secure boot.
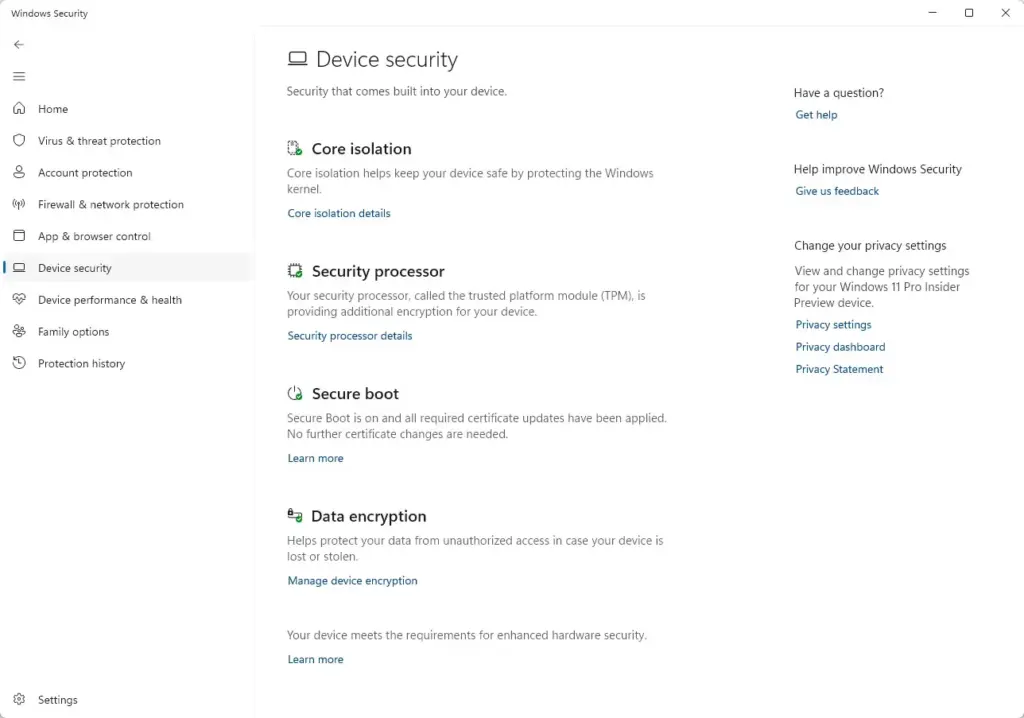
Windows Security › Device security - Find the Security processor section and select Security processor details. A page opens listing your TPM information.
If you do not see a Security processor section on the Device security page, jump to the troubleshooting section below. Windows hides that section when it cannot find a usable TPM.
What each field on the details page means
The page lists the following entries. The exact layout varies slightly between Windows 11 versions.
- Manufacturer: the company that made the TPM, often shown as a short code. Common examples are Intel, AMD, Infineon, STMicroelectronics and Nuvoton. On a virtual machine, it may show the vendor of the virtualisation software (the hypervisor that runs the virtual machine).
- Manufacturer version: the TPM firmware version. This number is specific to the manufacturer, so it is useful for checking whether a firmware update is available from your PC maker. It is not the TPM specification version.
- Specification version: the TPM standard the chip follows. Windows 11 needs 2.0. If you see 1.2, the PC does not meet the Windows 11 TPM requirement.
- Status: whether Windows can use the TPM. You may see separate lines for Attestation (the TPM proving to a service that the PC booted in a trusted state) and Storage (the TPM holding encryption keys). A line that reads ready means Windows can use that function. A line that reads not ready needs attention; see the section on a TPM that is not ready.
If a status line says the TPM is not ready, do not assume the chip is faulty. Often the TPM is simply not initialised yet, or a setting in the firmware is blocking it.
Check the TPM with the TPM Management console
The TPM Management console is an older, separate tool. It shows the same version and manufacturer data in a plainer layout, and it states clearly when no TPM is found. Use it to cross-check Windows Security.
- Press Windows key + R to open the Run dialog.
- Type
tpm.mscand select OK. If a User Account Control prompt appears, select Yes. The TPM Management on Local Computer window opens.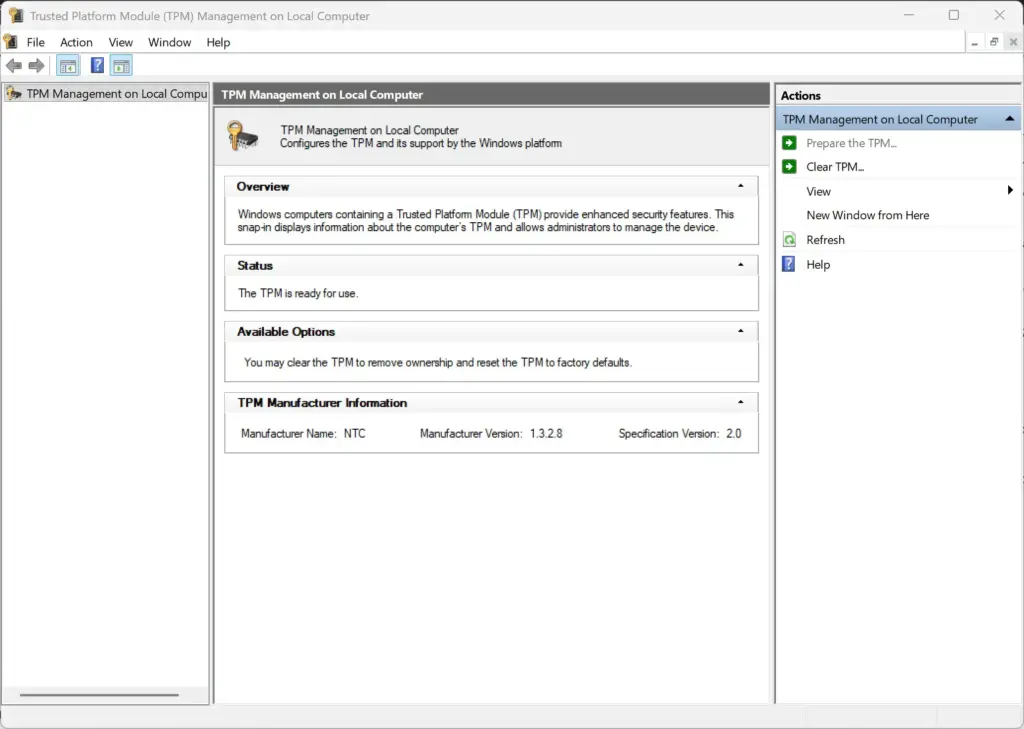
- Read the Status box in the middle of the window. A working TPM shows a message such as "The TPM is ready for use."
- Look at the TPM Manufacturer Information box at the bottom. It lists Manufacturer Name, Manufacturer Version and Specification Version.
If the console shows "Compatible TPM cannot be found", Windows does not detect a TPM at all. The cause is usually a firmware setting, a virtual machine without a virtual TPM, or hardware that has no TPM. The sections below cover each case.
Do not select any of them unless you intend to. Clearing the TPM is covered later and has real consequences.
Check the TPM with PowerShell
PowerShell gives you text you can copy into a support ticket, and it shows a few fields the graphical pages leave out. This method needs an administrator window to return complete results.
- Right-click Start and select Terminal (Admin). Select Yes at the User Account Control prompt. A Windows Terminal window opens with a PowerShell prompt.
- Type
Get-Tpmand press Enter. PowerShell prints a list of TPM properties. - Check TpmPresent. True means Windows detects a TPM. False means it does not.
- Check TpmReady. True means the TPM is initialised and Windows can use it.
- Note ManufacturerIdTxt and ManufacturerVersion. These match the Manufacturer and Manufacturer version entries in Windows Security.
Get-Tpm does not report the specification version. To get it, run this command in the same window:
Get-CimInstance -Namespace "root\cimv2\Security\MicrosoftTpm" -ClassName Win32_Tpm | Select-Object ManufacturerIdTxt, ManufacturerVersion, SpecVersionThe SpecVersion value is a comma-separated string. Read the first number. A value starting with 2.0 means the TPM follows the 2.0 specification. If the command returns an error or nothing at all, no TPM is available to Windows.
Check the TPM in Device Manager
Device Manager confirms that Windows has loaded a driver for the TPM. It does not show the manufacturer or firmware version, so use it as a quick presence check only.
- Right-click Start and select Device Manager.
- Expand Security devices. A working TPM 2.0 appears as Trusted Platform Module 2.0.
If the Security devices category is missing, Windows has not detected a TPM. If the TPM appears with a warning icon, open its properties and read the device status message, then check the firmware settings described below.
If the security processor details are missing or show a problem
A missing Security processor section is the most common problem. It has a short list of causes. Work through them in this order.
The TPM is turned off in the firmware
Many PCs ship with the firmware TPM disabled, or it gets switched off after a firmware reset. Windows cannot see it until you enable it in UEFI (the firmware interface that starts before Windows). The change is reversible; you can switch the setting back at any time.
- Open Settings System Recovery
- Next to Advanced startup, select Restart now, then confirm. Save your work first, because the PC restarts immediately.
- On the blue menu, select Troubleshoot Advanced options UEFI Firmware Settings, then select Restart. The PC restarts into the firmware setup screen.
- Look for a TPM setting. The name depends on the maker. Common labels are Intel Platform Trust Technology (Intel PTT), AMD fTPM, Security Device Support and TPM Device. These are usually under a Security, Advanced or Trusted Computing menu.
- Set it to Enabled, then save and exit. The key for saving varies by firmware and is shown on screen, often F10.
When Windows starts, open Windows Security Device security again. The Security processor section should now appear. If you do not see UEFI Firmware Settings in the menu, the PC uses an older startup method called legacy BIOS (the firmware that came before UEFI), or your maker hides that option. In that case, use the manufacturer's key combination at power-on to enter setup. It is usually listed in the PC's support documentation, and this article cannot list one that works for every model.
The PC has no TPM, or only TPM 1.2
Older PCs may have no TPM, or a TPM 1.2 chip. If the firmware has no TPM option at all and Windows Security shows a message such as "Standard hardware security not supported", the hardware probably lacks a TPM. Check the PC maker's specifications for the exact model. A TPM 1.2 chip cannot be upgraded to 2.0 through Windows.
You are running a virtual machine
A virtual machine has no TPM unless the host provides a virtual TPM. In Hyper-V, you add one in the VM's settings under Security, and only on Generation 2 virtual machines (the type that uses UEFI firmware). Other hypervisors have their own options, so check their documentation. Until a virtual TPM is attached, the guest Windows shows no security processor.
The PC is managed by your work or school
An administrator can hide parts of the Windows Security interface through policy, including the Device security area. If the page shows a message that your organisation manages the setting, or the section is absent on a work PC, ask your IT team. The policy settings for the Device security area live under HKEY_LOCAL_MACHINE\SOFTWARE\Policies\Microsoft\Windows Defender Security Center\Device security, but the exact value that hides the page is not confirmed here. [Registry method: to be verified]. On a managed PC, change this through your administrator rather than editing the key yourself.
The status says the TPM is not ready
If the TPM is detected but a status line reads not ready, restart the PC first and check again. A TPM that Windows has not initialised can be ready after a restart. If the status stays the same, open tpm.msc and read the message in the Status box, which usually names the cause. Then look at the Security processor troubleshooting page, described next.
Use Security processor troubleshooting
The Security processor details page includes a Security processor troubleshooting link. It opens a page that reports TPM errors Windows has recorded, and it offers a Clear TPM button.
Clearing the TPM erases the keys it stores and cannot be undone. Anything protected by those keys becomes unusable. That includes BitLocker-protected drives, Windows Hello sign-in data, and any certificates or virtual smart cards (a sign-in method that keeps credentials in the TPM) stored in the TPM. Before you clear it, make sure you have your BitLocker recovery key, because the PC may ask for it after the restart. Confirm that you can retrieve it from your Microsoft account or your organisation before you continue.
Clearing is a last resort for a TPM that reports a fault. It is not a way to refresh the details page. To use it:
- Open Windows Security Device security Security processor details Security processor troubleshooting
- Read the error shown on the page. If there is no error, leave the TPM alone.
- Select Clear TPM only if you have backed up your recovery keys and accept the loss of TPM-protected data. This step requires administrator privileges.
- Select Clear and restart when prompted. The PC restarts, and the firmware may ask you to confirm the clear with a key press before Windows loads.
After the restart, Windows re-initialises the TPM. Open Security processor details again and confirm the status. You then have to set up Windows Hello and BitLocker again if they were using the TPM.
What to do next
With the TPM confirmed as version 2.0 and ready, you can turn on BitLocker Drive Encryption or Device Encryption and keep a copy of the recovery key. If the manufacturer version is old, check your PC maker's support page for a firmware update for your exact model, since Your PC maker delivers TPM firmware updates, not the Windows Security page. A BIOS or UEFI update, or a reset of firmware settings, can also switch the TPM off again, so re-check the details page after either.
How do I enable TPM 2.0 on my PC?
Restart your PC and open the firmware setup, usually by pressing Del, F2 or F10 during startup. Find the TPM option, which may be called Intel PTT, AMD fTPM or Security Device Support. Set it to Enabled, save your changes and exit. Then check Windows Security under Device security.
Does 🪟 Windows 11 still require a TPM chip?
Yes. Windows 11 requires TPM 2.0 for a standard installation. The TPM does not have to be a separate chip, because a firmware TPM built into the processor also meets the requirement. Without one, the Windows 11 installer will block the install on most PCs.
What is the command to check if my PC has a TPM?
Press Windows key + R, type tpm.msc and press Enter. The TPM Management console shows whether a TPM is present and whether it is ready. For a command-line check, open PowerShell and run Get-Tpm. The TpmPresent and TpmReady lines show the status.
Is TPM 2.0 on motherboard or CPU?
It can be either. A discrete TPM is a separate chip on the motherboard. An integrated TPM sits inside another chip, and a firmware TPM runs on the CPU under names such as Intel PTT or AMD fTPM. Windows does not show which type you have, so check your PC or motherboard manual.
Was this guide helpful?

About the Author
Richard
Tech Writer, IT Professional
Richard is a writer at Geek Rewind who turns complex IT tasks into clear, step-by-step guides. He draws on years of hands-on experience in system administration and enterprise IT operations, focusing on Windows, Linux and WordPress: the problems people actually run into, and the fixes that work. His server and WordPress guides come from systems he runs himself. Richard builds and maintains the platform behind Geek Rewind, from its Ubuntu servers and Nginx configuration to its custom WordPress plugins. Many new tutorials start with readers' questions, and he's always glad to answer them in the comments.



No comments yet — be the first to share your thoughts!