How to Fix Slow or Crashing Apps in Windows 11

- 20 steps
- Needs administrator rights
- Includes a restart or sign-out
Slow or crashing apps in Windows 11 usually trace back to a runaway process (a program that keeps using processor time or memory when it should stop), an outdated app, damaged app files, or a PC that is short on memory or processing power. The quickest fix is to find the app in Task Manager, update it, and then use the Repair option under Settings Apps Installed apps.
Work through these fixes in order. The fastest ones come first, so you can stop as soon as the app behaves. The steps work on Windows 11 24H2 and 25H2. Menu names can differ slightly on older builds. Where a difference changes what you click, the step says so.
Open Task Manager with Ctrl+Shift+Esc, find the app using the most CPU or memory, then update it and run Settings Apps Installed apps > the app’s Advanced options Repair. Restart the PC first, not Shut down, because Fast Startup can keep the fault alive. The app should stop freezing without a reinstall.
Work Out What Kind of Problem You Have
Two quick checks save time before you change anything. Each one points to a different part of the fix list below.
- If one app misbehaves and everything else runs fine, the app itself is the problem. Focus on updating, repairing or resetting it.
- Every app is slow or crashes. The cause is probably Windows itself, free disk space, memory pressure or too many startup apps. Focus on the Task Manager, Windows Update and system file steps.
- The app crashes right after you open it. Damaged app files or a bad update are likely. Repair or reset the app.
- The app slows down the longer it runs. Look for a memory or CPU climb in Task Manager. A leak (an app that keeps claiming memory and never gives it back) usually needs an app update.
Fix Slow or Crashing Apps in 🪟 Windows 11 Step by Step
These steps fix slow or crashing apps in Windows 11, starting with the fastest checks and ending with a full reinstall. Test the app after each step and stop when it behaves.
- Restart the PC. Select Start, then Power, then Restart. Choose Restart, not Shut down, because Shut down can keep some system state through Fast Startup (a hybrid shutdown that speeds up boot), so it may not clear the fault.
- Open Task Manager. Press Ctrl+Shift+Esc. Task Manager is the built-in tool that shows what each app is using in real time.
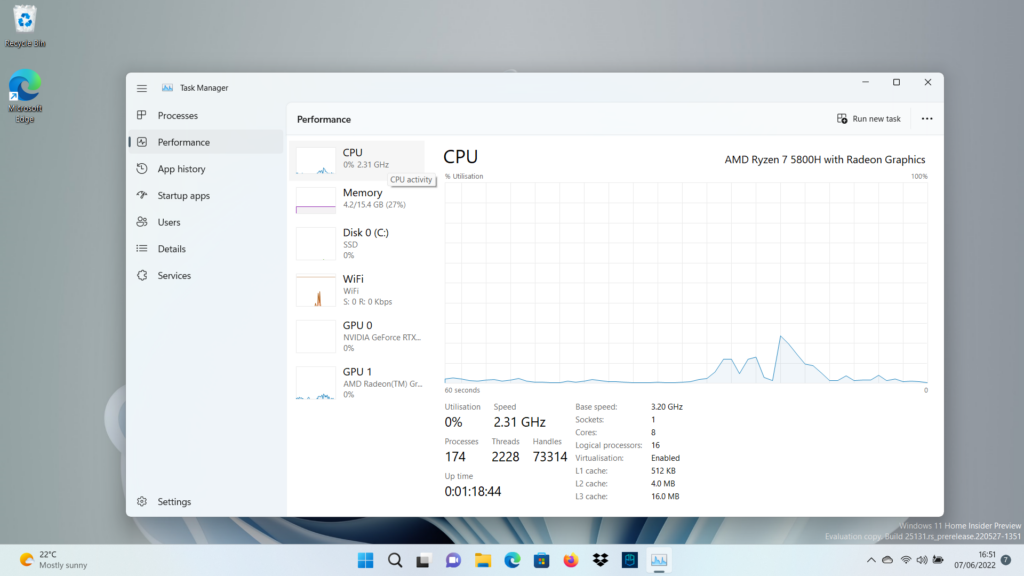
Windows 11 Task Manager dashboard showing startup applications list. - Sort the Processes tab by CPU, Memory or Disk. Select Processes, then click a column heading. Use the app until it slows down and watch which row climbs. A single app holding most of the CPU, or a Memory figure that keeps rising, points to the culprit.
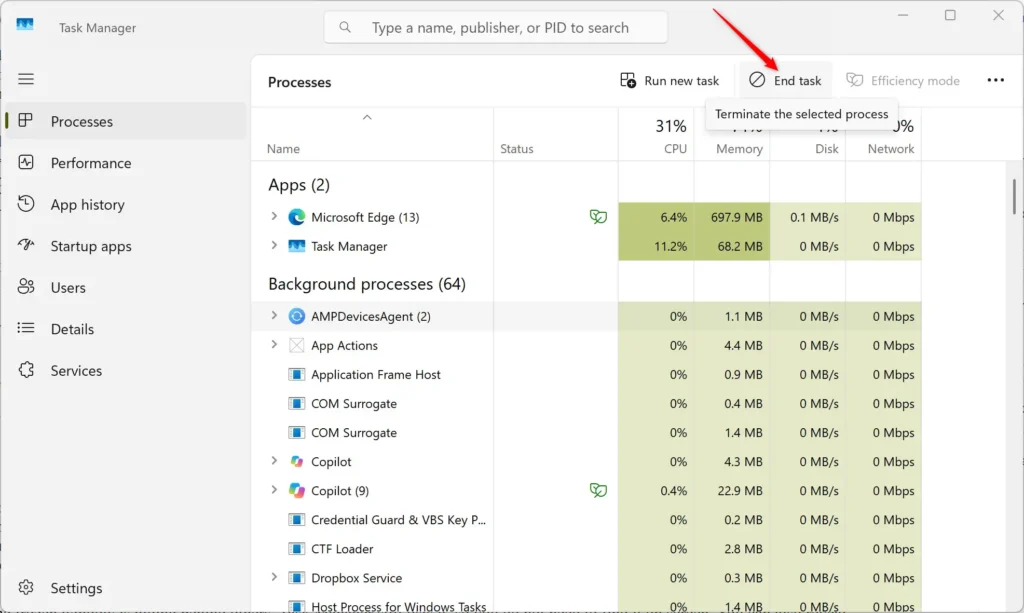
- End any frozen app. Right-click the app and select End task. Reopen it afterwards. If the app is a background hog you want to keep running, right-click it and select Efficiency mode (a setting that lowers the app’s priority) instead.
Task Manager - Check Reliability Monitor for crash records. Select Start, type View reliability history and press Enter. Reliability Monitor is a timeline that logs app crashes, hangs and failed installs by date. A red X next to your app confirms it is crashing, and the date tells you whether it began after an update.
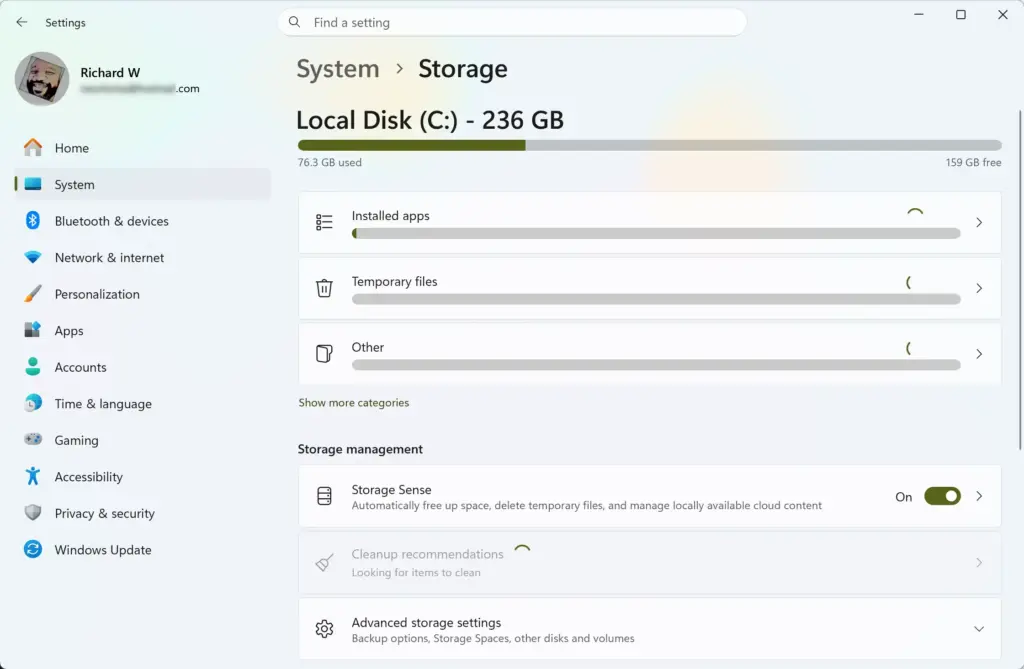
- Check free disk space. Open Settings System Storage. A system drive that is nearly full slows every app. If the drive is almost full, free up space with Temporary files or Storage Sense (a feature that deletes junk files automatically).
Settings › System › Storage - Disable startup apps you do not need. In Task Manager, select Startup apps, right-click an app with a High startup impact and select Disable. Fewer background apps means more memory and CPU for the one you use.
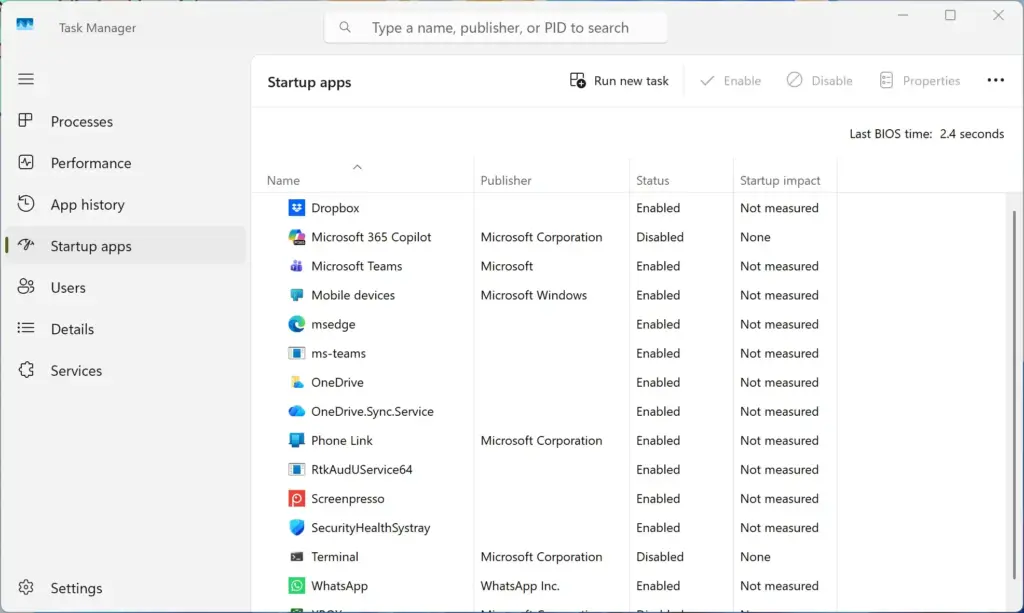
Task Manager › Startup - Raise the power mode. Open Settings System Power & battery and set Power mode to Best performance. On a laptop running on battery, Windows throttles the processor under the balanced and efficiency modes, which makes apps feel slow.
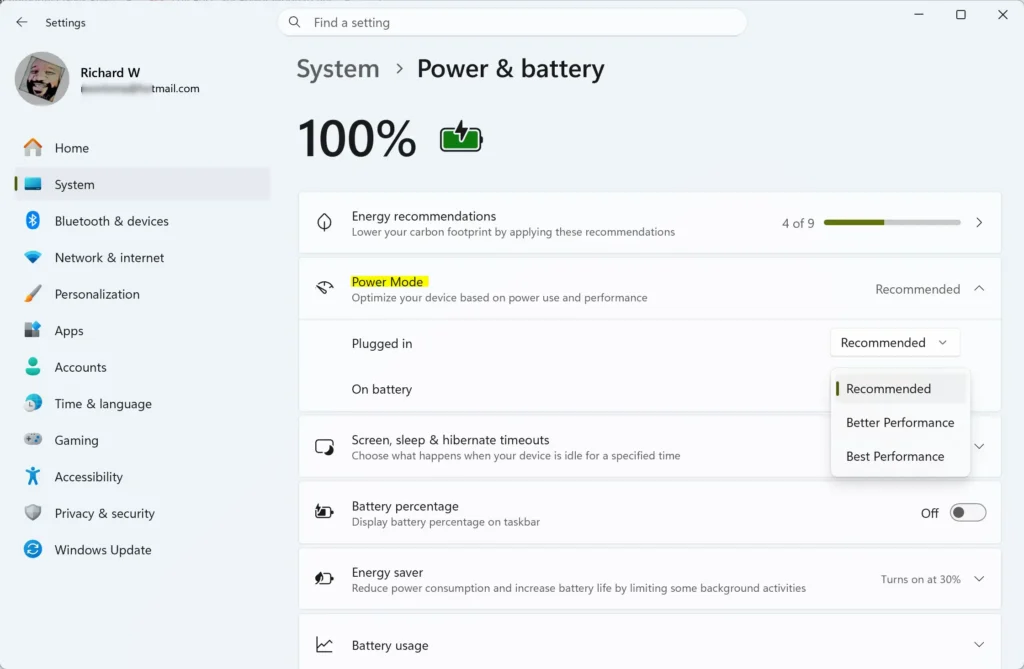
- Install pending Windows updates. Open Settings Windows Update and select Check for updates. Restart when prompted. Many app crashes happen when an app and an older Windows build or driver do not work well together.
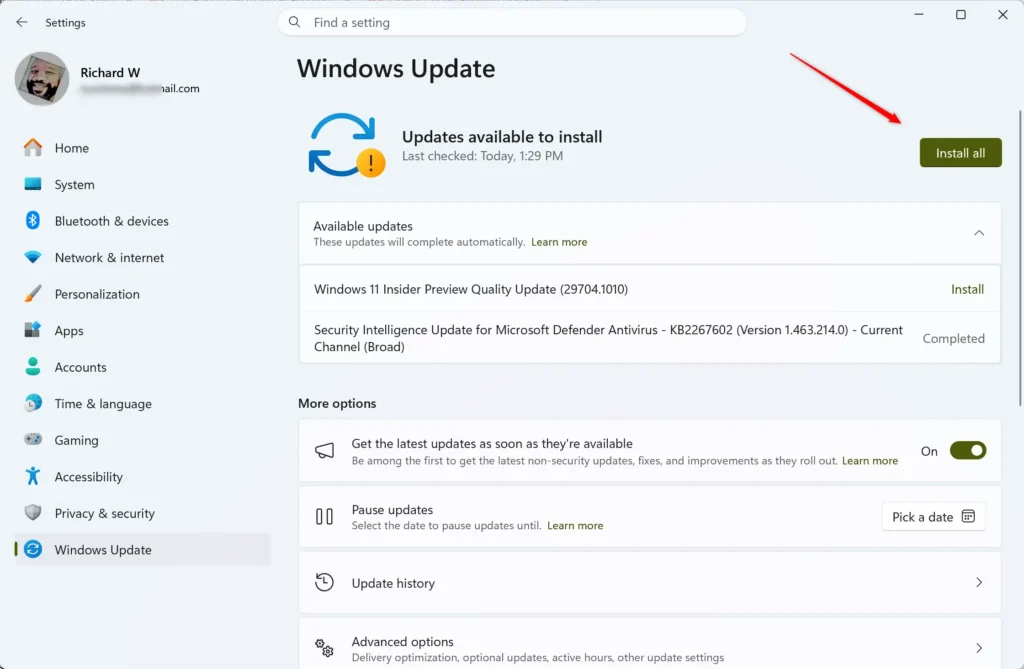
Settings > Windows Update - Update the app itself. For Microsoft Store apps, open Microsoft Store, select Library, then Get updates. For desktop programs, look for a check-for-updates option in the app’s Help or About menu, or download the latest installer from the vendor’s website.
- Open the installed apps list. Go to Settings Apps Installed apps and find the problem app. Use the search box at the top if the list is long.
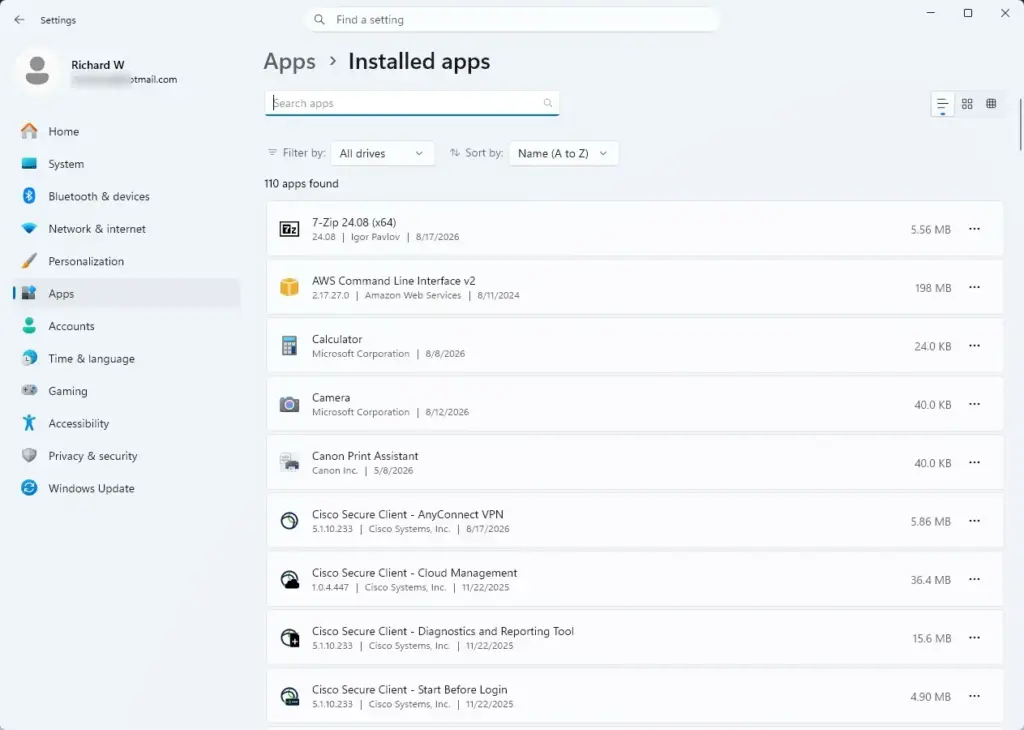
Settings › Apps › Installed apps - Open the app’s Advanced options. Select the three dots next to the app, then Advanced options. This page appears for Microsoft Store apps and some packaged apps (apps installed as a single package, not from an .exe or .msi file). If you see only Modify and Uninstall, go to the desktop-program step below.
- Select Repair. Under the Reset heading, select Repair. Windows tries to fix the app’s files without touching its data. A check mark appears next to the button when it finishes. Open the app and test it.
- Select Reset if Repair did not help. Reset deletes the app’s data and settings on this PC and cannot be undone, so sign-in details and local files for that app are lost. Select Reset, confirm, then reopen the app and sign in again.
- Repair a desktop program through its installer. In the same Installed apps list, select the three dots, then Modify. Many installers offer a Repair option on the first screen. Alternatively, open Control Panel Programs Programs and Features, select the program and choose Repair on the toolbar if it appears.
- Run the Program Compatibility Troubleshooter. Open Settings System Troubleshoot Other troubleshooters, then select Run next to Program Compatibility Troubleshooter. Pick the app and follow the prompts. This helps most with older programs that crash on launch.
- Open Terminal as administrator. This step requires administrator privileges. Right-click Start, select Terminal (Admin) and select Yes at the User Account Control prompt.
- Run System File Checker. Type the command below and press Enter. System File Checker (sfc) scans protected Windows files and replaces damaged ones. The scan takes several minutes.Command Prompt
sfc /scannow - Run DISM if System File Checker reports unfixable files. DISM (Deployment Image Servicing and Management) repairs the Windows component store (the library of clean system files that System File Checker uses for repairs). Type the command below, press Enter and wait for it to finish, then run
sfc /scannowagain.Command PromptDISM /Online /Cleanup-Image /RestoreHealth - Uninstall and reinstall the app. Open Settings Apps Installed apps, select the three dots next to the app, then Uninstall. Restart the PC and install a fresh copy from the Microsoft Store or the vendor’s site. Back up any local data the app stores first.
Why the Repair Button Is Missing or Greyed Out
The Repair button does not appear for every app. Windows only offers it where the app supports it.
- No Advanced options link. Traditional desktop programs (installed with an .exe or .msi file) do not have this page. Use Modify or Programs and Features instead.
- Repair is greyed out or fails immediately. The app may be open or running in the background. Close it, end its tasks in Task Manager and try again.
- Modify opens an installer with no repair choice. Some installers only let you change features. Uninstall and reinstall that app.
- Some apps cannot be reset. Built-in Windows apps may not offer a full uninstall. Reset them from Advanced options or check for updates in the Microsoft Store.
- The three-dots menu shows nothing useful. If the app was installed for another user account, sign in to that account or ask an administrator to repair it.
Check Reliability Monitor and Event Viewer for the Cause
Reliability Monitor gives the quick answer. Select any crash entry and choose View technical details. The faulting module is the file inside the app that failed. If the same module appears repeatedly, search for its name together with the app name.
Event Viewer has more detail. Open it from Start, then go to Windows Logs Application and look for entries marked Error with the app’s name at the time of the crash. A faulting module from a third-party add-on, such as a plug-in or overlay, usually means that add-on is the real cause. Disable or update it.
Cut Down Apps That Load at Sign-In
Apps that start with Windows compete for memory and disk while you are trying to work. Spend a few minutes on them if slowness shows up in the first minutes after sign-in. Read how to manage startup apps in Windows 11 to improve boot speed for the full walkthrough, or disable startup apps in the Task Manager Startup tab for the short version.
If you want an app to start but not slow down sign-in, control the startup delay for apps in Windows 11 instead of disabling it. For a dedicated startup tool, see the guide on whether to use Task Manager or Autoruns to disable startup apps (a tool that lists everything that starts with Windows).
Windows can also reopen apps you left running last time. That adds load at every sign-in. See how to turn on or off automatically restart apps when you sign back in on Windows 11 to switch it off. If the whole desktop drags right after you enter your password, why Windows 11 is slow right after you enter your password covers that case.
How to Undo These Changes
- Startup apps. Return to the Startup apps page in Task Manager, right-click the app and select Enable.
- Power mode. Change Power mode back to Balanced in Settings System Power & battery. Best performance uses more power and drains a laptop battery faster.
- Efficiency mode. Right-click the app in Task Manager and clear Efficiency mode.
- Repair. Repair keeps your data and has nothing to undo.
- Reset and uninstall. Reinstall the app and sign in again. Anything stored only on this PC is lost unless you back it up first.
- System File Checker and DISM. These replace only damaged system files, and there is no setting to roll back.
If This Didn’t Work
If one app still crashes after a reinstall, the fault may sit in a driver or a conflicting background program rather than the app. Run a clean boot (starting Windows with only Microsoft services) and add services back in groups to find the conflict. If every app is slow, check the Performance tab in Task Manager for a disk at 100% or memory nearly full. Those point to hardware limits rather than a software fault. For slow starts in particular, the startup-app guides linked above are the next stop.
Frequently asked questions
How to pin apps to 🪟 Windows 11 taskbar efficiently?
Pin an app to the taskbar by opening Start, finding the app, right-clicking it, and choosing Pin to taskbar. To pin an app that is already open, right-click its icon on the taskbar and select Pin to taskbar. To move a pinned icon, drag it left or right. Pinning the apps you use daily saves time each day.
How to pin apps to start menu in 🪟 Windows 11?
Pin an app to the Start menu by opening Start, selecting All apps, right-clicking the app, and choosing Pin to Start. The app then appears in the pinned section at the top of Start. To remove it, right-click the tile and select Unpin from Start. Pinned apps stay put until you unpin them.
How to set default apps in 🪟 Windows 11?
Set default apps by opening Settings, selecting Apps, then choosing Default apps. Search for a file type such as .pdf or a link type such as http, then click the app currently listed and pick the one you want. You can also choose Set defaults by app to set every file type for one app at once.
How to uninstall apps in 🪟 Windows 11?
Uninstall an app by opening Settings, selecting Apps, then choosing Installed apps. Find the app in the list, click the three dots beside it, and select Uninstall. Confirm when Windows asks. Removing an app deletes its program files, but most personal files in Documents stay put.
How to change default apps in 🪟 Windows 11?
Change a default app by opening Settings, selecting Apps, and choosing Default apps. Scroll to the app type you want to change, such as Web browser or Music player, and click the current app. Pick the app you want from the list. Some apps also show a Set default button on their own page to take over all supported file types.
How to stop background apps in 🪟 Windows 11?
Stop background apps by opening Settings, selecting Apps, and choosing Installed apps. Click the three dots beside an app, select Advanced options, and set Background apps permissions to Never. This stops the app from running when you are not using it. Turning off unneeded background apps can free memory and improve battery life.
Still have a question?
Answered by AI from this guide. Good questions may be added to this page — please don't include personal details.
Did this guide fix your problem?

About the Author
Richard
Tech Writer, IT Professional
Richard is a writer at Geek Rewind who turns complex IT tasks into clear, step-by-step guides. He draws on years of hands-on experience in system administration and enterprise IT operations, focusing on Windows, Linux and WordPress: the problems people actually run into, and the fixes that work. His server and WordPress guides come from systems he runs himself. Richard builds and maintains the platform behind Geek Rewind, from its Ubuntu servers and Nginx configuration to its custom WordPress plugins. Many new tutorials start with readers' questions, and he's always glad to answer them in the comments.
No comments yet — be the first to share your thoughts!