How to Uninstall and Reinstall Outlook on Windows 11


Uninstalling and reinstalling Outlook on Windows 11 can fix frozen screens, sync errors and other stubborn bugs, because it replaces damaged program files with a fresh copy. Outlook is Microsoft’s email app for managing your mail, calendars and contacts in one place.
You remove the app through Windows Settings, then download a fresh copy from the Microsoft Store. A clean install also helps if you want to move from the classic mail program to the newer Outlook, which replaced the older Mail and Calendar apps. This guide covers the new Outlook app from the Store. Classic Outlook, which comes with Microsoft 365 or Office, is removed differently, as part of the Office install.
Your mail is not stored only in the app. Accounts such as Outlook.com, Microsoft 365 and Exchange keep your messages on the server, so removing the app does not delete them. You will need to sign in again after reinstalling.
Remove Outlook via Windows Settings , then reinstall it from the Microsoft Store. Open Settings, navigate to Apps Installed apps, find Outlook, click the three dots, and select Uninstall. Then, open the Microsoft Store, search for Outlook, and click Install.
How to Uninstall the New Outlook App
The simplest way to uninstall Outlook on Windows 11 is the Settings app. Close Outlook first so it is not running in the background. Then open Settings, go to the apps list and remove Outlook from there. The steps are the same on Windows 11 Home and Pro.
- Close Outlook if it is open. Right-click its icon on the taskbar and choose close, or use the X in the top-right corner. If it keeps hanging, press Ctrl+Shift+Esc to open Task Manager , select Outlook and click End task.
- Open Settings on your computer. Click the Start button and type
Settings, or pressWindows key + Ion your keyboard. The Settings window opens with a list of categories on the left. - In Settings, click Apps in the left menu.
- Click Installed apps to see every app on your computer (Settings Apps Installed apps). A long list appears, sorted by name by default.
- Scroll down or use the search box at the top of the list to find
Outlook (New). The new Outlook may be listed as “Outlook (new)”. If you only see Outlook as part of Microsoft 365 or Office, you have the classic version, and it is not removed with these steps. - Click the three dots next to Outlook and choose Uninstall. A small confirmation box appears.
- Click Uninstall again to confirm. Windows removes the app, which usually takes a few seconds.
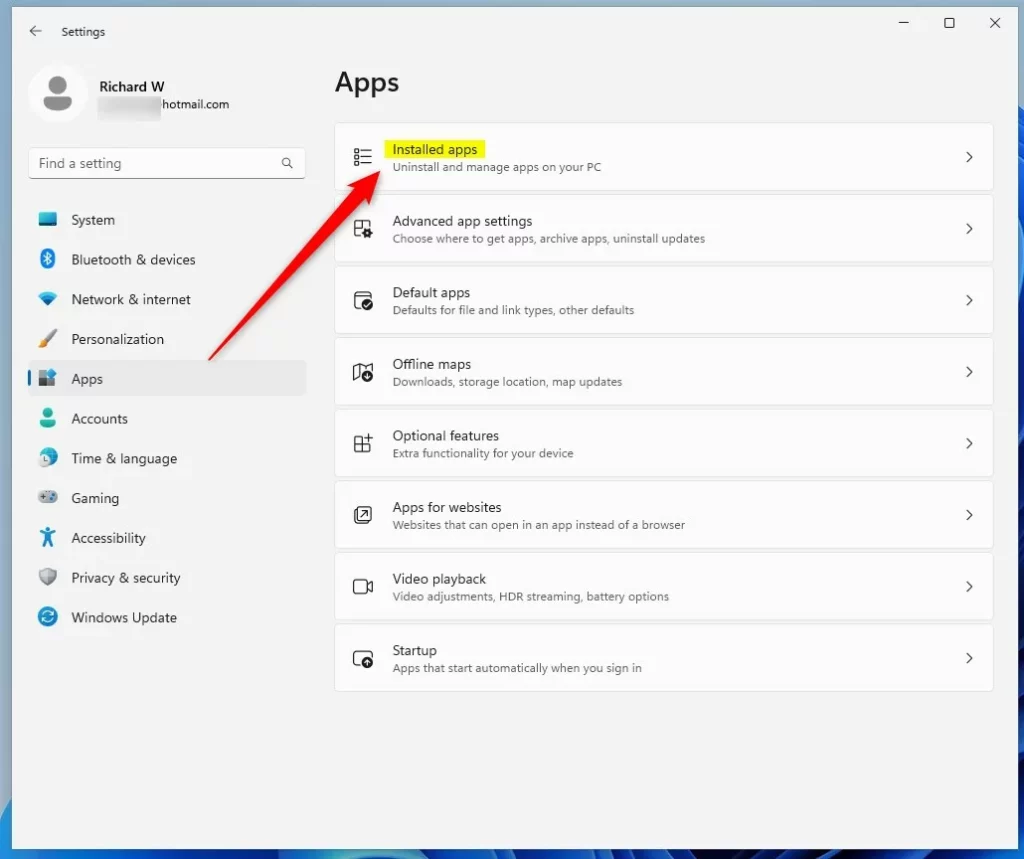
Once the removal finishes, Outlook disappears from the installed apps list. You do not normally need to restart the computer.
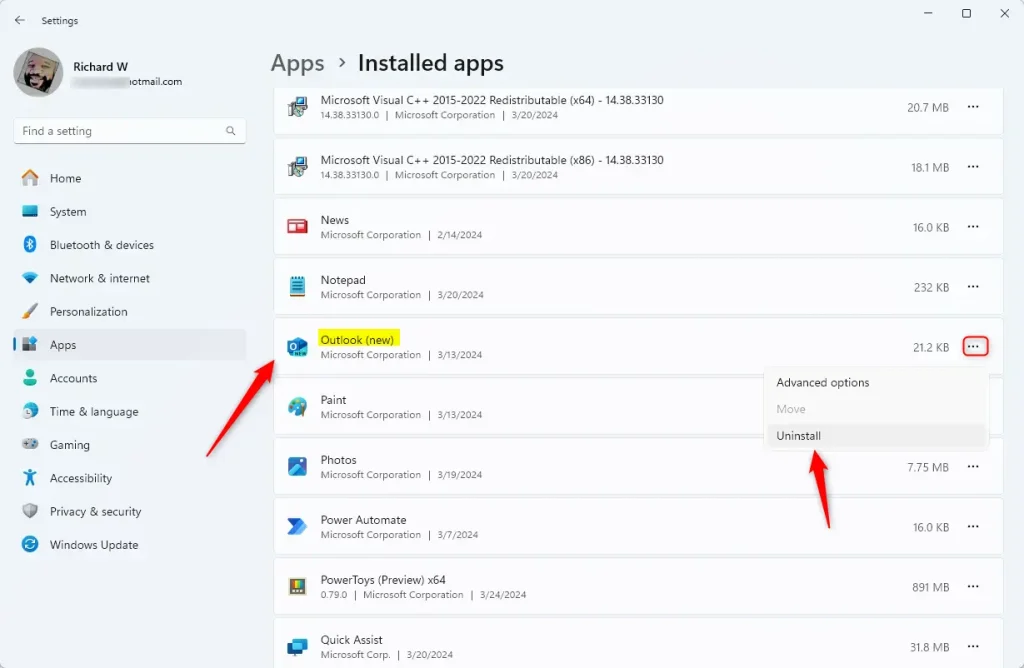
To check that it worked, search for Outlook in the installed apps list again. If it is still there, close Settings, restart Windows and look again. If the Uninstall option is missing or greyed out, use the PowerShell method below instead.
Uninstall Outlook Using PowerShell (Advanced)
PowerShell (a command-line interface for running system commands) is an alternative removal route. It is useful when the Settings button does nothing, is greyed out, or the Settings app itself will not open properly. This first method removes Outlook for your own user account only:
For Your User Account Only
- Open the Windows Terminal app. You do not need administrator rights for this one, because it only affects your own account.
- Copy and paste this command, then press
Enterto uninstall Outlook for your user account. Paste it exactly as shown, as a single line:
Get-AppxPackage | Where-Object {$_.Name -Like '*OutlookForWindows*'} | Remove-AppxPackage -ErrorAction ContinueFor All Users on the PC ⚙️ Admin Required
When the previous command finishes, the prompt comes back, usually with no message, and Outlook is gone from your account. A red error message means the removal failed, so check that you pasted the whole command. If you want to remove Outlook for every user account on the machine, you need a different command and an elevated window:
- Open Windows Terminal as an administrator. Click Start, type Terminal, right-click the result and select Run as administrator. If a User Account Control prompt appears, click Yes.
- Paste this command and press
Enter. Wait for the prompt to return before you close the window:
Get-AppxPackage -AllUsers | Where-Object {$_.Name -Like '*OutlookForWindows*'} | Remove-AppxPackage -AllUsers -ErrorAction ContinueHow to Reinstall the New Outlook App
With Outlook removed, you can put a fresh copy back from the Microsoft Store. You need an internet connection, and the Store must be working. If the Store will not open, sign in to Windows with your Microsoft account or restart the PC and try again. Follow these steps:
- Open the Outlook app page in the Microsoft Store. The Outlook page should show an Install button, since the app is no longer on your PC.
- Click the Install button to download and install Outlook again. A progress indicator shows the download.
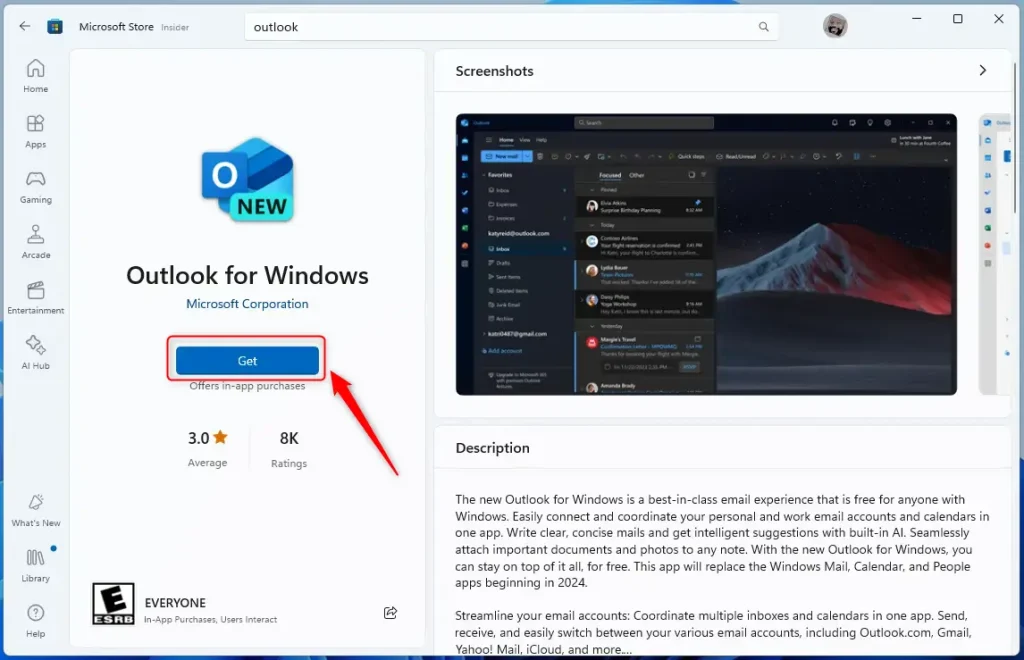
Leave the Store window open until the download finishes. On a normal connection this takes a minute or two.
When the install completes, a confirmation banner tells you Outlook was installed successfully, and the button changes so you can open the app.
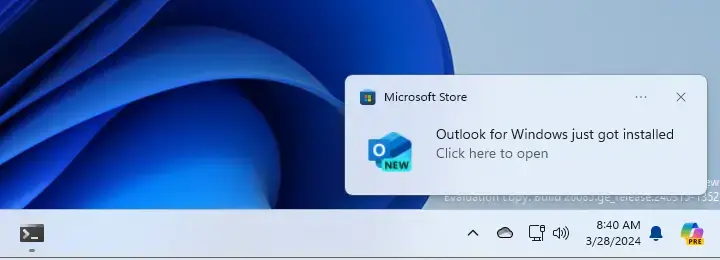
Open Outlook from the Start menu and sign in with your email account. Your mail, calendar and contacts sync back from the server. If the problem you were trying to fix is still there, restart Windows and try again. If it persists, the cause is probably your account or your network rather than the app files.
Summary
- You can remove and reinstall the new Outlook app on Windows 11 through Settings or PowerShell commands.
- Some people uninstall Outlook because they want to use a different email program.
- The Microsoft Store makes it simple to reinstall Outlook whenever you want it back.
- If you need more help, feel free to ask!
You can reinstall Outlook on Windows 11 through the Microsoft Store whenever you need the mail program back on your computer. Some people remove the application to switch to a different email service, while others reinstall it to fix stubborn software glitches. Getting the app back takes only a few minutes and does not require advanced technical steps.
Did this guide fix your problem?

About the Author
Richard
Tech Writer, IT Professional
Richard is a writer at Geek Rewind who turns complex IT tasks into clear, step-by-step guides. He draws on years of hands-on experience in system administration and enterprise IT operations, focusing on Windows, Linux and WordPress: the problems people actually run into, and the fixes that work. His server and WordPress guides come from systems he runs himself. Richard builds and maintains the platform behind Geek Rewind, from its Ubuntu servers and Nginx configuration to its custom WordPress plugins. Many new tutorials start with readers' questions, and he's always glad to answer them in the comments.
No comments yet — be the first to share your thoughts!