How to Reinstall Windows 11 Using Your Recovery Drive

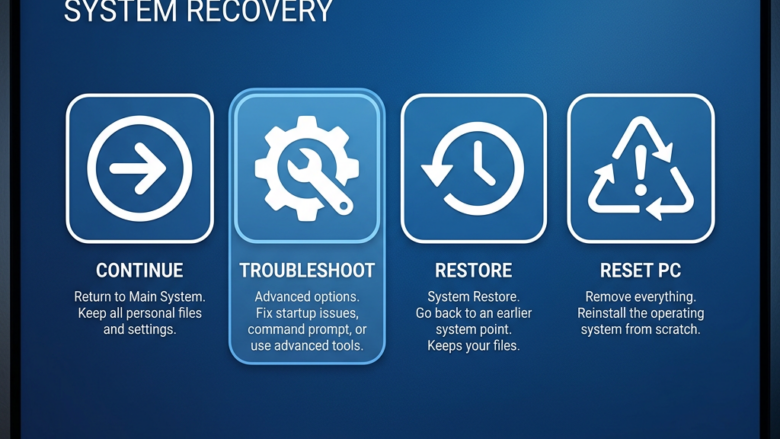
Reinstalling Windows 11 from a recovery drive fixes severe system crashes and restores a PC that won’t start normally. A recovery drive is a bootable USB stick that holds the tools, and optionally the system files, you need to repair Windows or wipe it and reinstall from scratch.
You create the drive with the built-in Recovery Drive tool and a standard 16GB USB flash drive. The reinstall clears out broken settings and bad programs and gives you a clean slate. You don’t need an original installation disc, and you don’t need an internet connection for the reinstall itself. Treat it as a last resort: it removes your apps and, depending on the option you pick, your files.
Plug a 16GB USB drive into a working Windows 11 PC, open Recovery Drive from the Start menu , check Back up system files to the recovery drive, select your USB drive, and click Create. Once finished, plug the drive into the PC you want to repair, restart it, and boot from the USB to reinstall Windows 11.
Before You Start: Get Ready
Before you reinstall Windows, complete a few important tasks. Skipping them risks permanent data loss or a failed installation. Set aside a quiet hour or two for the checks alone. The reinstall itself runs much longer.
1Save Your Important Files
The reinstall removes everything stored on the Windows drive, and you can’t undo it. Copy your documents, photos, and downloads to an external hard drive, a USB flash drive, or cloud storage like OneDrive before you start.
If Windows no longer starts, you can still reach your files. Connect the PC’s drive to another computer, or boot into a recovery or live environment, and copy the files from there. Do this before anything else.
- Where to save: Use an external hard drive, a cloud service like OneDrive or Google Drive, or another USB flash drive if it has enough space. Don’t use the recovery drive itself. It gets erased when you create it and should stay dedicated to recovery.
- What to save: Save your documents, pictures, videos, music, and any other important files you created. Also save any app settings or game saves you want to keep. Check the Desktop, Documents, Downloads, and Pictures folders, and any browser bookmarks you haven’t synced to an account.
Also note down your Microsoft account details and any software license keys you need. If the drive is encrypted with BitLocker or device encryption, find your BitLocker recovery key first. It is usually stored in your Microsoft account. Windows may ask for it when you boot from the recovery drive.
2Make Sure Your Recovery Drive Works
Make sure your recovery drive works before you need it. You need a USB flash drive with at least 16GB of space. 32GB is a safer choice for newer versions of Windows, because the system files take more room. The drive is erased during creation, so use an empty one or copy off anything you want to keep.
- Requirement: The USB drive should be at least 16GB. For newer Windows versions, 32GB is often better. Make sure the drive is empty because the process will erase anything on it.
If you haven't made the drive yet, create it on a working Windows 11 PC. Ideally use the same PC you plan to repair, because the drive holds that PC's system files. Follow these steps:
- Plug the USB drive into the working PC.
- Click Start, type Recovery Drive, and open the result. Click Yes if User Account Control asks for permission. The Recovery Drive window opens.
- Tick Back up system files to the recovery drive. Without this option the drive can boot into the repair tools but can't reinstall Windows.
- Click Next, select your USB drive, and click Next again.
- Click Create. Creation can take a while. When it finishes, click Finish.
If the Back up system files to the recovery drive option is greyed out or missing, Windows can't find the recovery image on that PC. The PC might also have been set up in an unusual way. In that case, try another Windows 11 PC.
3Find Your PC's Power Cord
This process can take a long time, sometimes hours. You don't want your laptop to run out of battery during the reinstallation. Always plug in your laptop, or make sure your desktop PC has a stable power source.
If you use a desktop in an area with unreliable power, a UPS (battery backup) is worth connecting for this job. Don't touch the power button while the progress screen is running, even if it seems stuck.
How to Reinstall Windows Using Your Recovery Drive
After completing the preparations, start the reinstallation by following these steps carefully. Don't skip ahead. Each screen tells you what will happen next.
Step 1Start Your PC from the Recovery Drive
Plug your USB flash drive into the computer and open the boot menu or BIOS/UEFI (the low-level firmware that controls hardware). This forces your computer to load the repair files from the USB drive instead of your main hard drive.
If Windows 11 still starts, there is an easier route. Go to Settings System Recovery, click Restart now next to Advanced startup, then choose Use a device and pick your USB drive. If Windows won't start, use the steps below.
- Insert the recovery drive: Plug your USB recovery drive into a USB port on your computer. On a desktop, a port on the back of the case is more reliable than a front-panel port.
- Restart your PC: Turn off your computer completely, then turn it back on.
- Open the Boot Menu or BIOS/UEFI (Basic Input/Output System/Unified Extensible Firmware Interface): Right when your computer starts to turn on, before the Windows logo shows up, press a special key. This key lets you enter your computer's boot menu or BIOS/UEFI settings. The key is different for each computer brand. Common keys are F2, F10, F12, Delete, or Esc. You might see a message on the screen like "Press F12 for Boot Options." If the Windows logo appears, you missed the window. Shut down and try again, tapping the key repeatedly right after you press the power button.
- Choose the USB drive: In the boot menu or BIOS/UEFI settings, look for an option to choose your boot device. Select your USB drive. It might show its brand name or say "USB HDD" or "Removable Device." If the drive isn't listed, check that it is firmly plugged in and try another port. Some PCs also need USB boot enabled in the BIOS/UEFI settings.
- Confirm: After you pick the USB drive, your computer should restart and start loading files from the recovery drive. You might see a message asking you to "Press any key to boot from USB." If you see this, press any key. You should then see a blue screen asking you to choose a keyboard layout.
Step 2Use the Windows Recovery Environment (Windows RE)
The Windows Recovery Environment (Windows RE) gives you access to troubleshooting tools. Pick your language and keyboard layout, then open the Troubleshoot menu to start fixing or resetting your operating system. If the PC is encrypted, you may be asked for your BitLocker recovery key at some point. Enter it when prompted.
- Language and Keyboard: First, choose your language and keyboard layout. Pick the ones that are right for you and click Next. The wrong layout can cause trouble later if you have to type a recovery key or password.
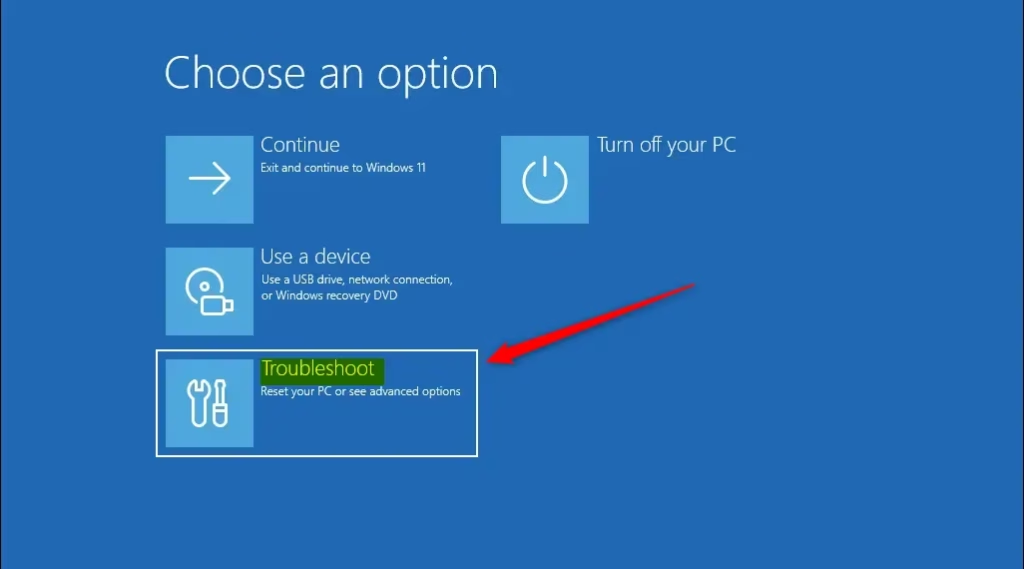
- Troubleshoot: On the Choose an option screen, select Troubleshoot. You should see a list of recovery options.
- Recover from a drive: On the next screen, you'll see more options. Select Recover from a drive. This is the option to reinstall Windows. If it doesn't appear, the recovery drive was created without the system files backup. Create a new drive with the Back up system files to the recovery drive option ticked.
Step 3Pick How to Reinstall Windows
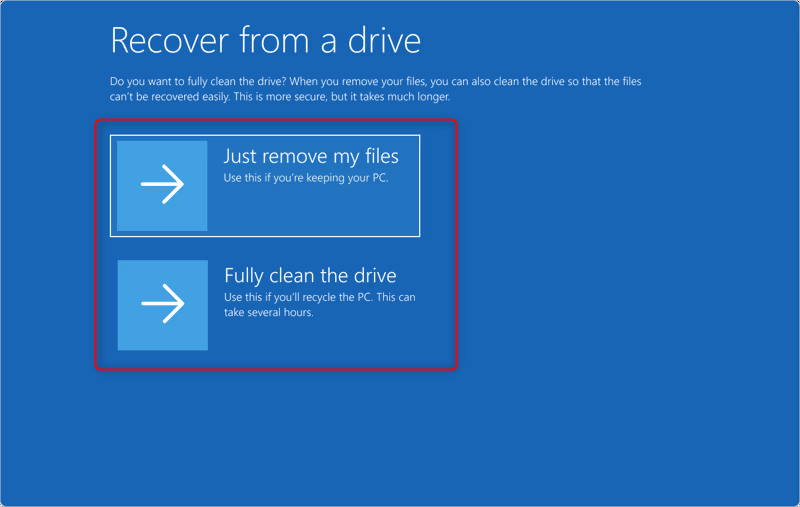
Choosing how to reinstall Windows 11 lets you decide between a faster reset that keeps your PC as it is and a deep clean that wipes the drive completely. Select Just remove my files for a quicker setup when you are keeping the computer. Pick Fully clean the drive if you are giving the PC away or selling it.
- Just remove my files: This is faster. It removes your personal files, accounts, and apps. It doesn't completely erase the drive. This is good if you are keeping the PC and just want a fresh start, or if you are giving it to a family member. However, people with technical skills might still be able to recover some data.
- Fully clean the drive: This is more thorough. It's best if you are selling your PC, giving it away, or giving it to someone you don't know well. It removes your personal files, accounts, and apps. Then it overwrites the drive many times to make it very hard to recover data. This takes much longer than Just remove my files, so plan for the extra time and keep the PC on power.
Either way, you can't undo the choice once the reinstall starts. If you are unsure, pick Just remove my files. You can always wipe the drive more thoroughly later.
Step 4Check and Start the Recovery
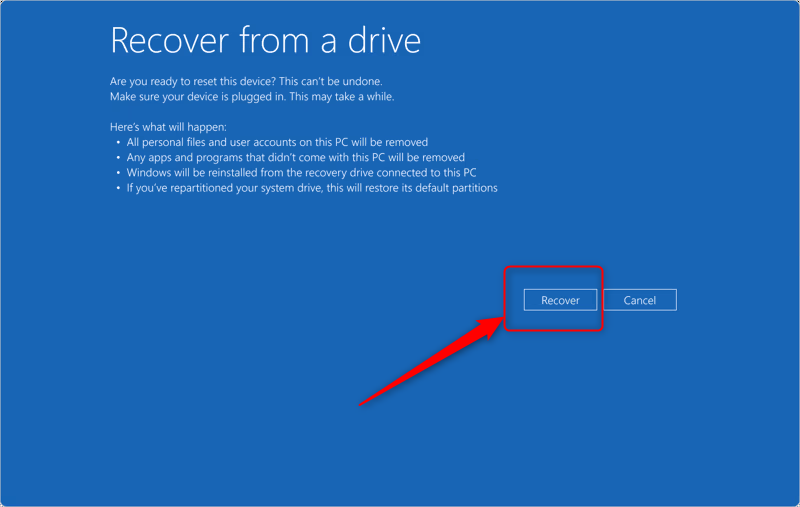
Check the summary screen before you start, because this is your last chance to back out. Click Recover to begin the setup process. Leave your computer plugged in and turned on while it installs, which can take several hours.
- Review the summary: Read the information carefully. Make sure you understand that your files and apps will be removed. If you haven't backed up your files yet, turn off the PC, remove the USB drive, and back them up first.
- Confirm: If you want to continue, click the Recover button. A progress screen with a percentage appears.
- Wait patiently: The reinstallation will start. This can take a long time, from 30 minutes to several hours. It depends on how fast your PC is and which cleaning option you chose. Your computer might restart several times. If it boots from the USB drive again after a restart, let it continue. If you see the "Press any key to boot from USB" message again, don't press anything and let the PC boot from its own drive.
Step 5Start Setting Up Windows
When the reinstall finishes, Windows 11 starts the first-time setup. Here you set your region, language, and internet connection on the fresh system. Go through the on-screen prompts to sign in with your Microsoft account, choose your privacy options, and finish getting your computer ready to use. You can remove the USB drive now and keep it somewhere safe.
- Follow the steps: Go through each part of the setup. Choose your country or region, keyboard layout, and any other settings the screens ask for. Read the privacy screens and switch off what you don't want.
- Connect to the internet: It's a good idea to connect to the internet during setup. Windows can then download the latest updates and drivers. This saves you time later. Windows 11 Home normally requires a connection during setup.
- Create your account: You'll probably be asked to sign in with a Microsoft account or create a local account. The local account option is not always offered, and it depends on your edition and Windows version. Windows 11 Home pushes you toward a Microsoft account more strongly than Pro does.
Once you reach the desktop, open Settings Windows Update and install any pending updates. Then restore your files from your backup and reinstall your apps.
Reinstallation fixes deep system issues and gets the operating system running smoothly again. Keep the recovery drive in a safe place so you have it next time something goes wrong.
Reference:
https://support.microsoft.com/en-us/windows/recovery-drive-abb4691b-5324-6d4a-8766-73fab304c246
Summary
This guide explains how to reinstall Windows 11 using a recovery drive. It covers backing up files, preparing the drive, booting from it, choosing your reinstallation method, and completing the setup, so you can fix problems or get a fresh start.
Have a question about this guide?
Answered by AI from this guide. Good questions may be added to this page — please don't include personal details.
Did this guide fix your problem?

About the Author
Richard
Tech Writer, IT Professional
Richard is a writer at Geek Rewind who turns complex IT tasks into clear, step-by-step guides. He draws on years of hands-on experience in system administration and enterprise IT operations, focusing on Windows, Linux and WordPress: the problems people actually run into, and the fixes that work. His server and WordPress guides come from systems he runs himself. Richard builds and maintains the platform behind Geek Rewind, from its Ubuntu servers and Nginx configuration to its custom WordPress plugins. Many new tutorials start with readers' questions, and he's always glad to answer them in the comments.
… liked this!