Open Advanced Startup Options from the Sign-In Screen in Windows 11

Advanced Startup Options is a blue recovery menu in Windows 11 that you can open from the sign-in screen, even when you can’t get to the desktop. It runs from the Windows Recovery Environment (WinRE), a small separate copy of Windows stored on a hidden recovery partition on your PC.
To open it, hold Shift, select the Power button, and then select Restart while the sign-in screen is showing. Windows restarts into the blue menu instead of loading normally.
The menu is useful when a bad driver, a failed update, or a profile that won’t load stops your PC from starting. It can also help when your PC hangs right after you type your password. From here you can open Safe Mode, Startup Repair, and System Restore, all without needing a working Windows session.
To open Advanced Startup Options from the sign-in screen in Windows 11, hold Shift, select the Power button in the bottom-right corner, then select Restart while still holding Shift. Keep holding Shift until a blue screen says Please wait, then release it. The Choose an option screen appears, giving you Startup Repair, System Restore, Command Prompt and Startup Settings for Safe Mode.
What you get from this menu
Windows doesn’t use the name “Advanced Startup Options” on screen. You will see a blue screen titled Choose an option. Under Troubleshoot there is a page called Advanced options, and inside that is a tile called Startup Settings. People use “startup options” for all three, and this article does too.
The tiles on the Advanced options page depend on your PC and Windows 11 version. A typical set looks like this:
- Startup Repair scans for problems that stop Windows from loading and tries to fix them automatically.
- Uninstall Updates removes the latest quality update or feature update.
- Startup Settings restarts the PC and lets you pick a one-time boot mode, including Safe Mode.
- Command Prompt opens a command line outside Windows, for repair commands.
- UEFI Firmware Settings restarts into the PC’s firmware setup screen. It appears only on PCs that use UEFI (the modern firmware that starts your PC before Windows loads).
- System Restore rolls Windows back to an earlier restore point. It works only if System Protection (the feature that saves restore points) was turned on before the problem started.
If a tile is missing on your PC, that is normal. Manufacturers and Windows versions differ, and some tiles only appear when the feature is available.
Before you start
Check these three things first. They are the main reasons this process goes wrong.
- Use a physical keyboard. The method depends on holding Shift while you click. On a tablet without a keyboard, plug in a USB keyboard or pair a Bluetooth one first.
- Have your BitLocker recovery key ready if the drive is encrypted. BitLocker (Windows drive encryption) or Device encryption on many Windows 11 Home PCs may ask for the key when you open some tools. If you use a Microsoft account, you can usually find the key by signing in from another device at aka.ms/myrecoverykey.
- Know an administrator account password. Some tools, including Command Prompt and Uninstall Updates, ask you to pick an account and enter its password. These steps need an administrator account.
The steps are the same on Windows 11 Home and Windows 11 Pro.
Open Advanced Startup Options from the sign-in screen
This restarts the PC into the recovery menu. Nothing is changed or deleted. Save any open work first if you can, because Windows closes everything when it restarts.
- Go to the sign-in screen. If the screen is dark or showing only the lock screen image, press any key or click the mouse. You should see the clock and your account name or password box.
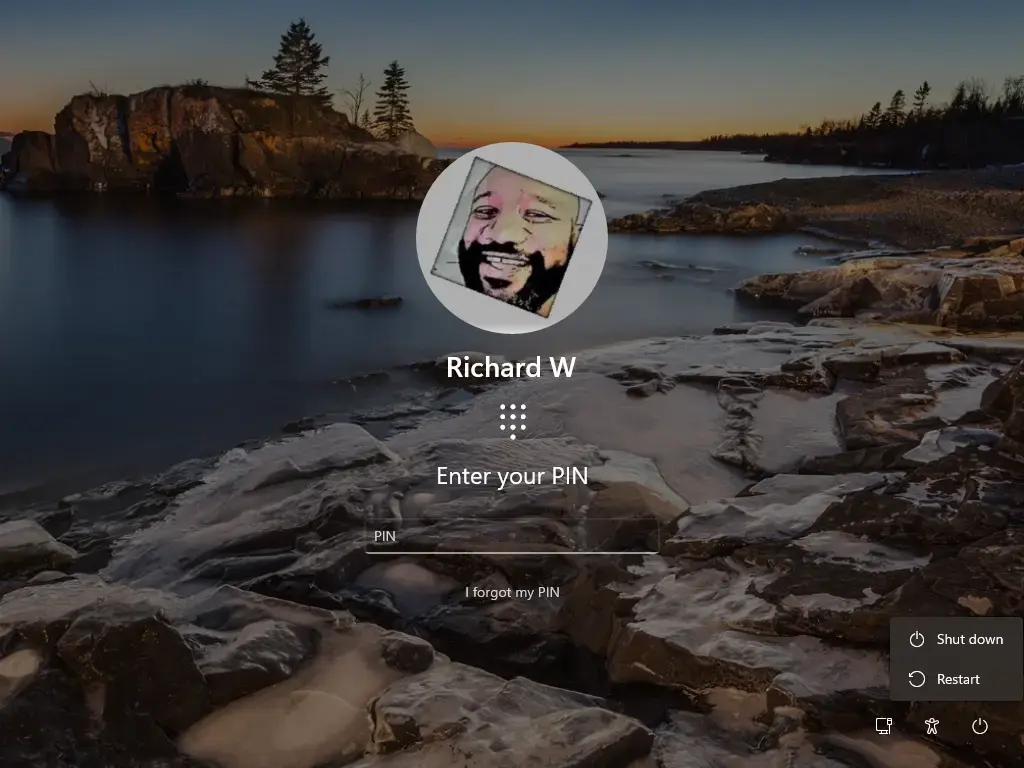
- Find the Power button in the bottom-right corner of the screen. It looks like a circle with a vertical line at the top.
- Press and hold the Shift key. Keep holding it for the next two steps.
- Select the Power button while still holding Shift. A small menu opens with Sleep, Shut down and Restart.
- Select Restart while still holding Shift. Do not release the key yet.
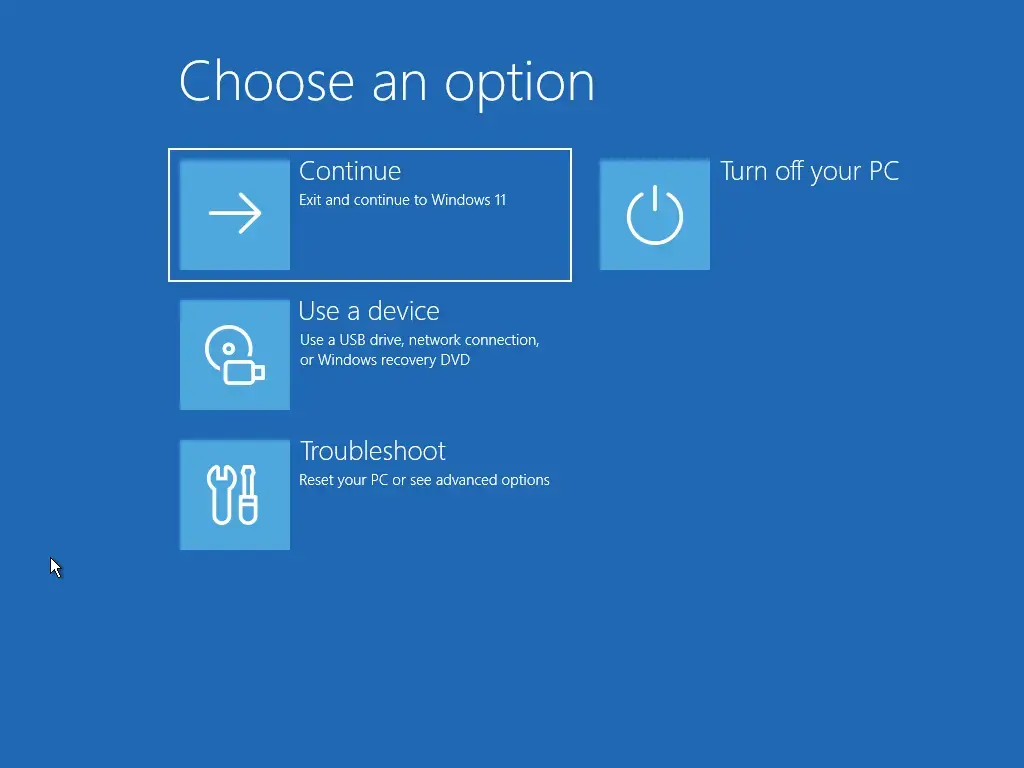
- Keep holding Shift until the screen shows a blue background with the word Please wait, then release it. After a short delay, the Choose an option screen appears.
If the PC restarts and Windows loads or the sign-in screen returns, you released Shift too early or the key press did not register. Repeat the steps and hold Shift longer. Some keyboards register only one Shift key reliably, so try the other one.
If you see a message such as Someone is still using this PC or that other users are signed in, Windows is warning you that restarting could lose their unsaved work. Select Restart anyway to continue. You still need to keep Shift held when you make that choice, or you can hold it again as you click.
Navigate the Choose an option screen
The Choose an option screen has three choices. You can use the mouse or touch, and on most PCs the keyboard arrow keys and Enter also work.
- Continue exits the menu and starts Windows 11 normally.
- Troubleshoot opens the repair and reset tools. This is the one you want.
- Turn off your PC shuts the computer down.
- Select Troubleshoot. A page opens with Reset this PC and Advanced options.
- Select Advanced options. The page of tools described earlier appears.
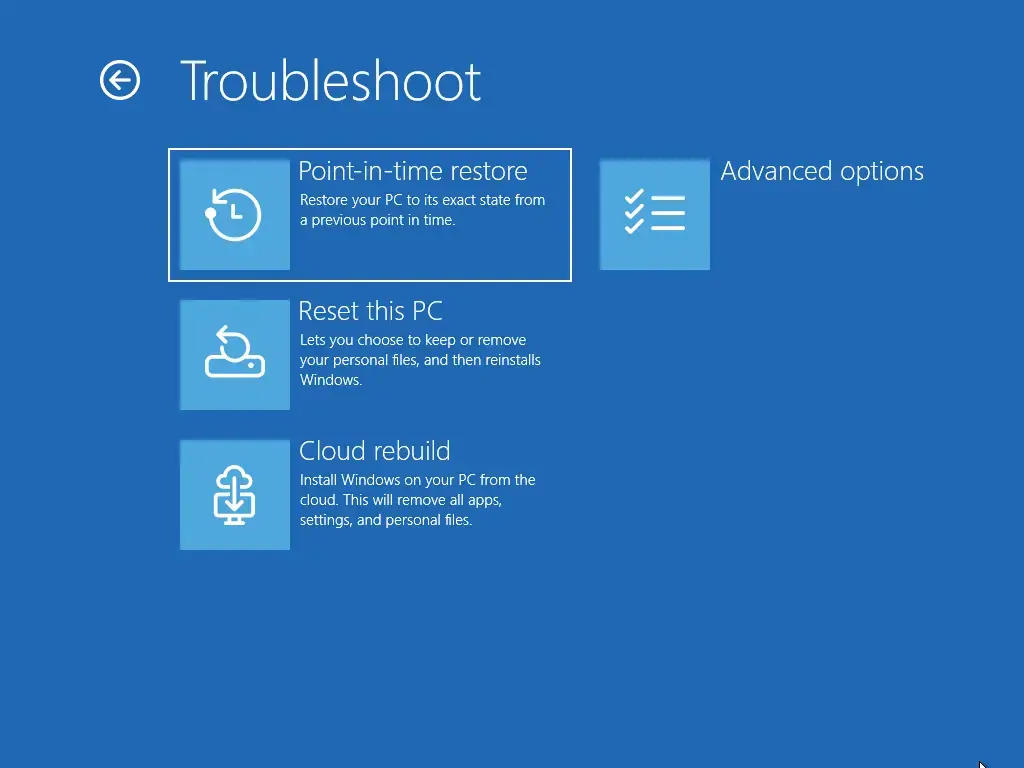
Avoid Reset this PC unless you mean to use it. It reinstalls Windows and lets you choose whether to keep your files, and it is hard to undo once it starts.
If a tool asks you to pick an account, choose an administrator account and type its password. If you sign in with a PIN (a short code you set up on this PC), the recovery environment usually asks for your account password instead. For a Microsoft account, this is the Microsoft account password. If you see a BitLocker recovery key screen, enter the 48-digit key to continue.
Boot into Safe Mode from Startup Settings
Safe Mode starts Windows with a minimal set of drivers (the software that runs your hardware) and services. Use it to remove a faulty driver, uninstall a program that causes crashes, or check whether a problem comes from third-party software. The mode applies to one boot only.
- Select Startup Settings on the Advanced options page.
- Select Restart. The PC restarts and shows a numbered list titled Startup Settings.
- Press 4 or F4 for Enable Safe Mode. Press 5 or F5 for Enable Safe Mode with Networking, which adds internet access. Press 6 or F6 for Enable Safe Mode with Command Prompt.
- Wait while Windows starts. The desktop appears with the words Safe Mode in the screen corners and a black background.
If Startup Settings is not on the Advanced options page, select See more recovery options if it appears, and check there.
The other entries on the list are one-time boot changes too:
- Enable debugging
- Enable boot logging
- Enable low-resolution video
- Disable driver signature enforcement
- Disable early launch anti-malware protection
- Disable automatic restart after failure
Disable automatic restart after failure is useful when the PC shows a blue-screen error and reboots before you can read it. Turning off driver signature enforcement or early launch anti-malware protection lowers your PC's protection. Use them only for a specific reason, such as installing a driver you trust.
Return to normal startup
The choice you make in Startup Settings lasts for one boot. Restart the PC again, from the Start menu or the sign-in screen without holding Shift, and Windows starts normally. You do not have to undo anything.
If you decide you don't need the recovery tools, select Continue on the Choose an option screen. Windows starts as usual. Any repair tool you ran, such as Uninstall Updates or System Restore, has already made its change. Reversing those changes means reinstalling the update or running System Restore again to pick a different restore point.
If the Power button or Restart option is missing
On some PCs the Power button is hidden or the Restart option is greyed out. This happens on managed work PCs where an administrator has restricted shutdown options, and on PCs where the sign-in screen has not fully loaded. Try these in order.
- Wait about 30 seconds on the sign-in screen, then check again. A screen that is still loading may not show the Power button yet.
- Press Ctrl + Alt + Delete. On some systems this brings up a secondary screen with a Power button in the same bottom-right corner.
- Use the physical power button to shut the PC down fully, then turn it on and try again from the sign-in screen.
If your PC is managed by a school or employer and the Restart option is blocked, contact the IT department. They may have disabled this access on purpose.
If the PC never reaches the sign-in screen
Windows opens the recovery environment on its own after repeated failed starts. When the PC fails to boot twice in a row, the next start usually shows Automatic Repair or Preparing Automatic Repair. Select Advanced options on that screen. You land on the same Choose an option page described above.
Forcing this by cutting power during startup is a last resort. Interrupting Windows while it writes to the drive can corrupt files, so try this only if the sign-in screen is unreachable and nothing else has worked. Hold the power button until the PC turns off while the Windows logo shows, repeat once or twice, and wait for the repair screen.
Open the same menu after you sign in
If you can reach the desktop, you can open the same menu without the sign-in screen trick. This is useful if the sign-in screen method keeps failing.
- Open Settings.
- Go to Settings System Recovery
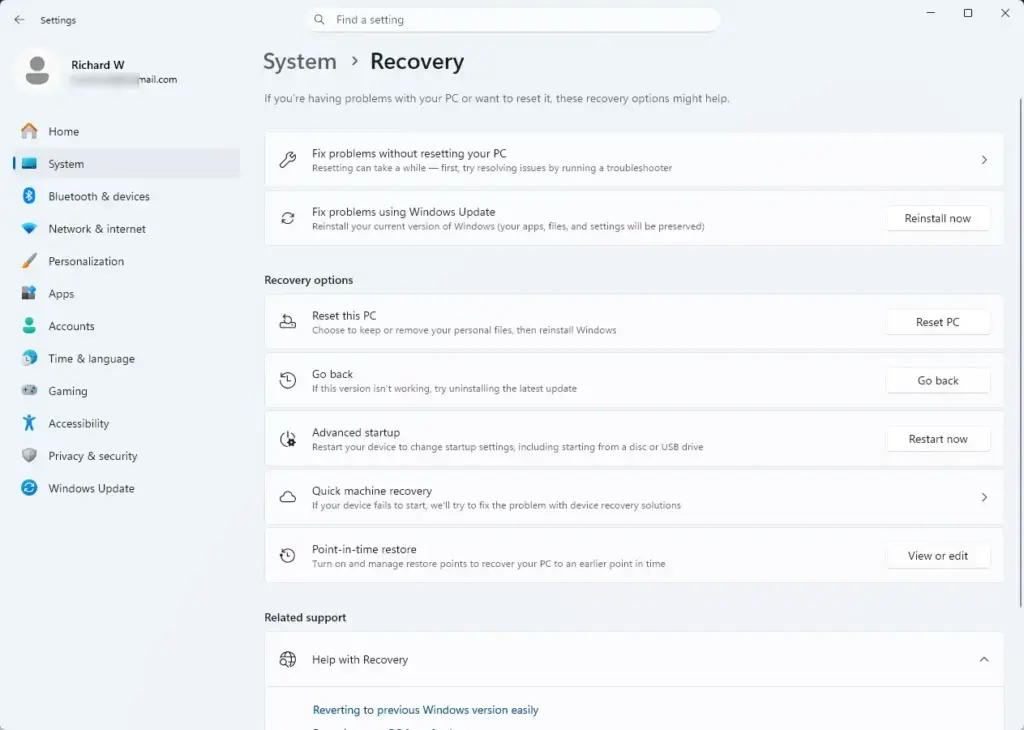
Settings › System › Recovery - Find Advanced startup and select Restart now.
- Select Restart now again if Windows asks you to confirm. The PC restarts to the Choose an option screen.
You can also hold Shift while selecting Restart from the Start menu's Power button. The result is the same.
Common problems
- The PC keeps booting into Windows. Shift was released too early. Keep it held until the blue Please wait screen appears.
- A BitLocker recovery screen appears. The drive is encrypted and Windows can't confirm the startup change is safe. Enter the recovery key from your Microsoft account, your work or school account, or the printout you saved when you turned on BitLocker.
- The tool asks for a password you don't have. You need an administrator account on the PC. Without one, you can still use options that don't need an account, such as Startup Settings.
- The keyboard doesn't respond on the blue screen. Use the mouse or touch instead. On some PCs, USB keyboards work only in certain ports during recovery, so try a different port.
- Startup Repair fails. Windows shows a message saying it could not repair the PC. Select Advanced options to go back and try System Restore or Uninstall Updates instead.
What to do next
Once you are in Safe Mode, remove the driver, update or program that started the trouble, then restart normally to confirm Windows loads. If the problem returns after a future Windows update or a driver reinstall, repeat the Shift and Restart method; it doesn't change any setting, so it is always available. If every tool in the menu fails, a clean reinstall of Windows 11 from a USB drive is the next option, and you should copy your files off the PC first.
Was this guide helpful?

About the Author
Richard
Tech Writer, IT Professional
Richard is a writer at Geek Rewind who turns complex IT tasks into clear, step-by-step guides. He draws on years of hands-on experience in system administration and enterprise IT operations, focusing on Windows, Linux and WordPress: the problems people actually run into, and the fixes that work. His server and WordPress guides come from systems he runs himself. Richard builds and maintains the platform behind Geek Rewind, from its Ubuntu servers and Nginx configuration to its custom WordPress plugins. Many new tutorials start with readers' questions, and he's always glad to answer them in the comments.




No comments yet — be the first to share your thoughts!