How to Create a Recovery Drive in Windows 11

A recovery drive in Windows 11 is a bootable USB stick that holds the tools you need to fix your PC when it refuses to start. To make one, you need a spare USB stick with at least 16GB of free space and a working Windows 11 PC.
You can use the drive to troubleshoot startup errors, restore your system from a backup, or reinstall Windows from scratch if things go wrong. The drive has to be made while Windows still works, so it’s worth doing now, before you need it. It takes a few minutes and costs you one USB stick.
Open Control Panel , click Recovery, then select Create a recovery drive. Plug in a USB stick with at least 16GB free space, check Back up system files if desired, select your USB drive, and click Create. Windows copies the recovery files; when finished, safely eject the drive and label it for storage.
Why Make a Recovery Drive?
You can use it to troubleshoot startup problems or reset your PC. Make it before your system breaks down, because a dead PC can’t make one for itself. With the drive in hand, you can reinstall Windows and get back to work.
The tool is the same on Windows 11 Home and Pro. You should create a new drive at least once a year, because Windows updates frequently and an old drive may not match your current version. If you’ve made a major change to the PC, such as a big feature update, make a fresh one then too.
What You Need
- A USB flash drive with at least 16 GB of free space (32 GB or more is better if you want to back up system files). The drive is erased during creation, so use a stick that holds nothing you need.
- Your Windows 11 PC. It needs to be working and you need to be signed in. You may be asked for administrator approval along the way.
How to Create a Recovery Drive
- Plug in your USB drive. Remember, this drive will be erased, so save anything important first. Use a port directly on the PC rather than a hub if you can. Windows may show a notification or open a File Explorer window for the drive. You can close it.
- Open Control Panel :
- Click the Start button or press the Win.
- Type
Control Paneland open it. The Control Panel window should now appear. - Make sure the view is set to Small icons or Large icons. You change this with the View by drop-down in the top-right corner. In Category view, the Recovery item is easy to miss.
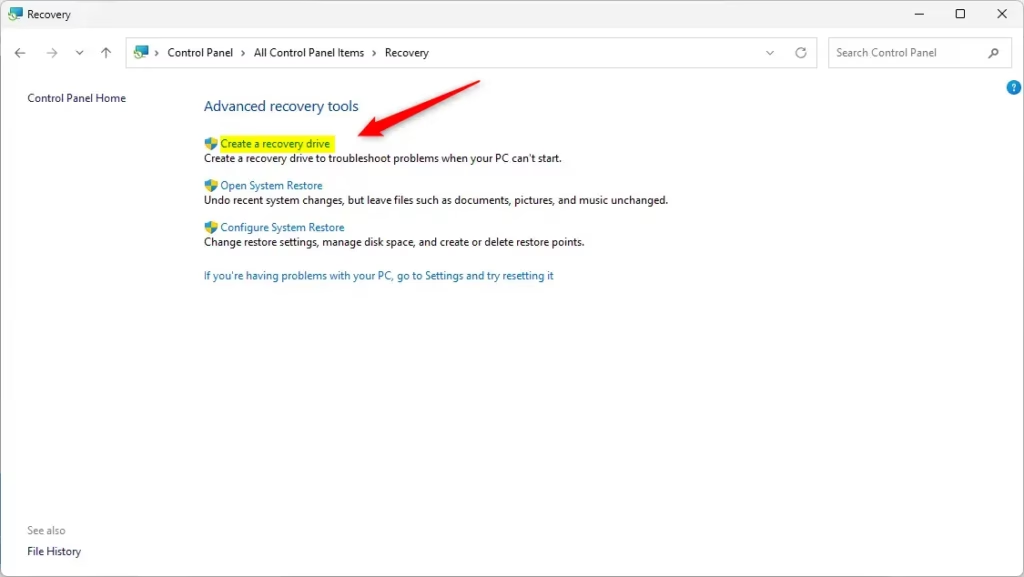
- Find and click Recovery. The Recovery page lists the advanced recovery tools.
- Click Create a recovery drive. This opens the Recovery Drive tool. If a User Account Control prompt appears, click Yes. Without administrator approval, the tool won’t open.
- Check Back up system files to the recovery drive if you want to reinstall Windows from the drive. (This needs a bigger USB, usually 32-64 GB.) Then click Next. If you leave the box unchecked, the drive can still start the PC and open the repair tools, but it can’t reinstall Windows. If the option is missing or greyed out, the PC has no recovery files for the tool to copy. This can happen on a custom-built PC or after some clean installs.
- Select your USB drive and click Next. Check the drive letter and size carefully, because everything on the selected drive will be deleted. The next screen warns you about this.
- Click Create to start making the recovery drive. This can take some time as Windows copies files. With system files included, it can take a long while. Leave the PC plugged in and don’t remove the USB until the progress finishes.
- When done, click Finish. Your recovery drive is ready! Safely eject the USB, label it, and store it somewhere you can find it. To undo all this later, you can reformat the stick in File Explorer and use it as a normal drive again.
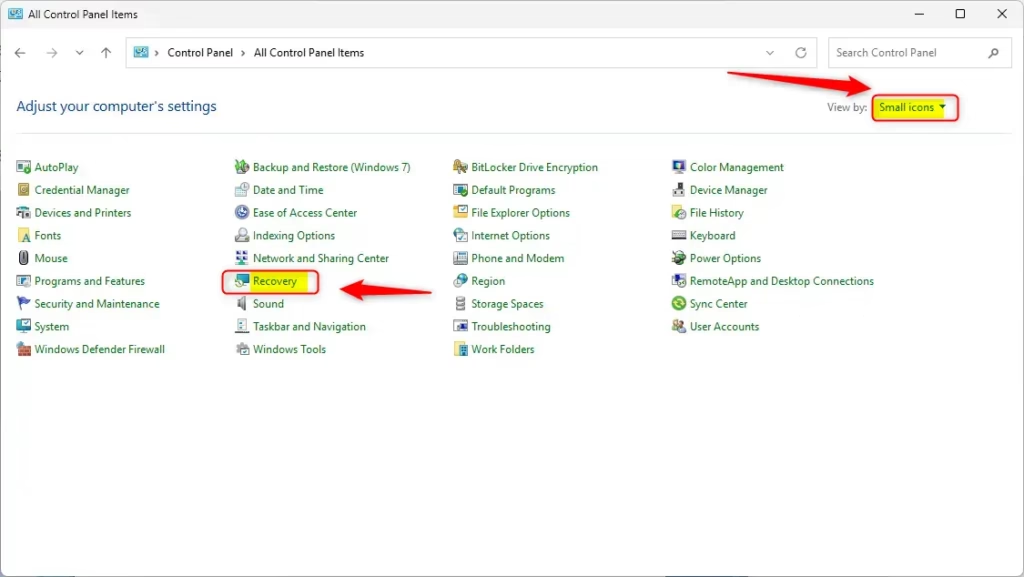
Creating a Windows 11 recovery drive requires a blank USB thumb drive and the built-in Control Panel tool. You open the tool by searching for Control Panel from the Start menu , clicking Recovery, and then selecting Create a recovery drive. The process copies essential system files, so you can repair your computer if Windows stops working properly.
Nothing needs to be installed. Control Panel and the tool come with Windows 11, so you don’t have to download anything.
Save important files from the USB stick beforehand because the creation process erases all data on it. Press the Windows key, type Control Panel, and select the application to begin.
If you plan to include system files, aim for a 32GB or larger stick. A USB 3.0 drive will also finish the job faster than an old, slow one.
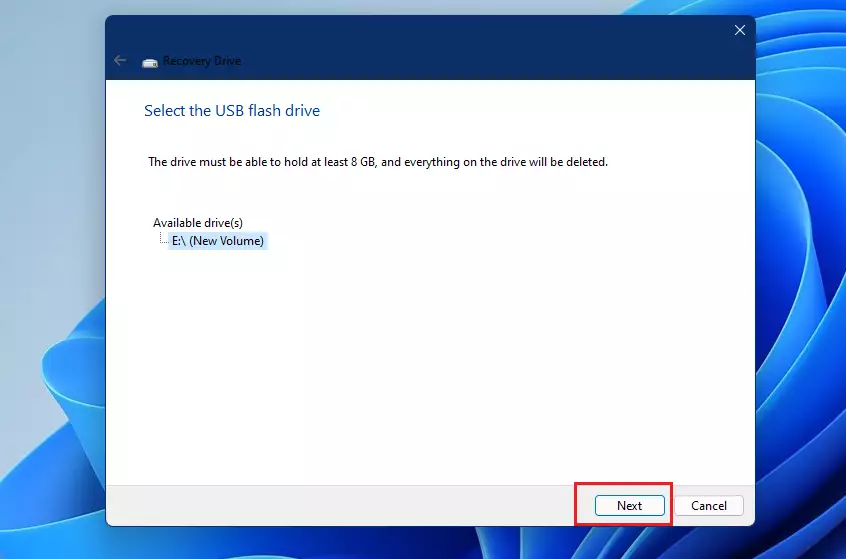
Creating a recovery drive requires a USB stick with at least 16GB of storage. Save all important files from the USB stick prior to proceeding, as the creation process will erase everything on it. Press the Windows key, type Control Panel, and select the application to begin.
Once Control Panel is open, switch the view to Small icons or Large icons, click Recovery, and then click Create a recovery drive. The wizard walks you through the rest.
Example: Booting Your PC With the Recovery Drive
Start your PC with the recovery drive to boot the computer from the USB drive if the PC fails to start. This launches Windows' built-in repair tools, known as the Windows Recovery Environment (WinRE), to help fix startup problems.
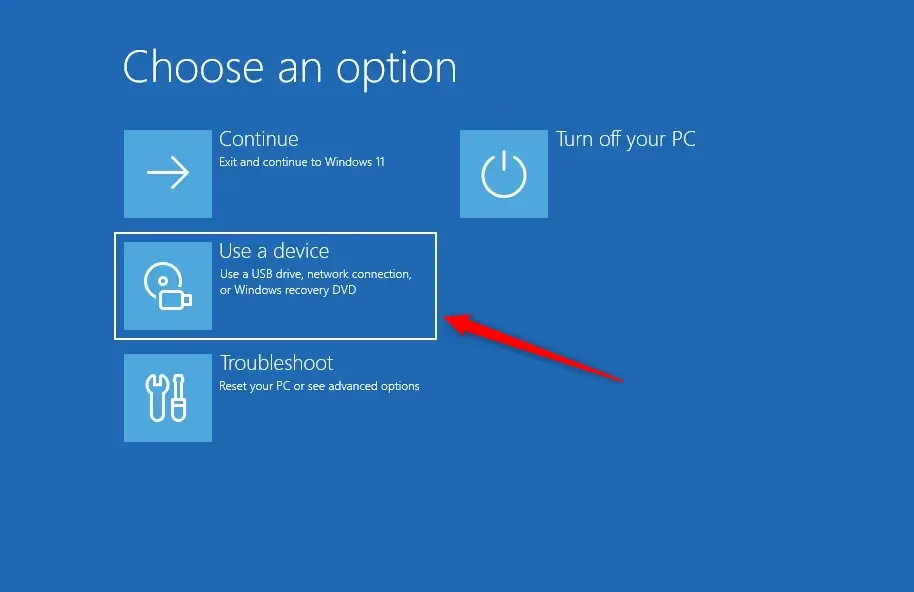
The exact keys depend on your PC's maker, so check its manual or support page if the steps below don't match.
- Plug the recovery drive into the PC that won't start.
- Turn the PC on and press the boot menu key as it starts. Common keys are F12, F2, Esc and Del, but it varies by manufacturer. You should see a list of boot devices.
- Select the USB drive from the list. If the PC goes straight to the failed Windows startup instead, restart and try again.
- Choose your keyboard layout when asked. The recovery menu should now appear.
- Click Troubleshoot. From there you can pick Reset this PC, or open Advanced options for tools such as Startup Repair and System Restore.
If the drive was made with system files backed up, you will also see an option to recover from the drive and reinstall Windows. If your drive is encrypted with BitLocker, you may be asked for the recovery key, so have it ready.
Important Tips
- USB size: Use a USB drive with at least 16 GB. For backing up system files, use 32-64 GB.
- Data loss: Creating the recovery drive erases everything on the USB, so save your files first. Double-check that you picked the right drive in the wizard.
- Update yearly: Make a new recovery drive every year to keep it up-to-date. Reuse the same stick. The tool wipes it and starts again.
- Personal files not saved: Your photos, documents, and apps won't be copied to the recovery drive. Keep a separate backup of those.
- Recovery options: This drive lets you reset Windows, restore from a backup, or fix startup problems.
A Windows 11 recovery drive requires a USB thumb drive with at least 16 GB of space, though 32 GB or more is better if you want to back up your system files. You must back up any important files on the USB first because the tool completely erases everything on the drive. Keep in mind that this process does not save your personal photos, documents, or apps.
The drive is a repair tool, not a backup of your data. Pair it with a regular file backup so you can recover both Windows and your files.
More Help from Microsoft
- Create a Recovery Drive - Microsoft Support Official guide on creating a recovery drive.
- Recovery options in Windows - Microsoft Support Learn about all the ways to recover your Windows PC.
- USB Recovery Drive for Surface Devices
Summary
A recovery drive is a USB stick containing tools to fix a failing PC, and you build one through the Control Panel. Make it while Windows still works, keep it somewhere safe, and refresh it about once a year.
Was this guide helpful?

About the Author
Richard
Tech Writer, IT Professional
Richard is a writer at Geek Rewind who turns complex IT tasks into clear, step-by-step guides. He draws on years of hands-on experience in system administration and enterprise IT operations, focusing on Windows, Linux and WordPress: the problems people actually run into, and the fixes that work. His server and WordPress guides come from systems he runs himself. Richard builds and maintains the platform behind Geek Rewind, from its Ubuntu servers and Nginx configuration to its custom WordPress plugins. Many new tutorials start with readers' questions, and he's always glad to answer them in the comments.



No comments yet — be the first to share your thoughts!