How to Use Screen Mirroring in Windows 11

- 34 steps
- Needs administrator rights
Screen mirroring in Windows 11 shows your PC’s display on a TV, projector or second PC, either wirelessly or over a cable. The quickest wireless route is to press Win+K, pick the display from the Cast list, and wait for the connection.
Wireless mirroring in Windows 11 uses Miracast (a standard that sends your screen over a direct Wi-Fi link, with no router or cables). Most recent TVs, projectors and wireless adapters support it, and so do many PCs. This guide covers casting to a display, casting to another Windows PC, mirroring over HDMI, and fixing the common failures.
Press Win+K to open the Cast pane, select your TV, projector or adapter from the list, and enter any PIN it shows. Turn on the display’s screen mirroring input and Wi-Fi on your PC first. Once connected, press Win+P and choose Duplicate to show the same picture on both screens.
What You Need Before You Start
Your PC needs a Wi-Fi adapter and driver that support it, and the TV, projector or receiving PC must accept Miracast connections. Chromecast and Apple AirPlay devices use different standards, so they do not appear in the Windows Cast list.
The two devices do not need to share a network. Miracast connects them directly, so keep them in the same room and turn Wi-Fi on at the PC.
Check That Your PC Supports Miracast
Check whether your PC can send its screen wirelessly before you start. The steps below run the DirectX Diagnostic Tool and show the result in a saved report. It takes under a minute.
- Press Win+R. The Run box opens.
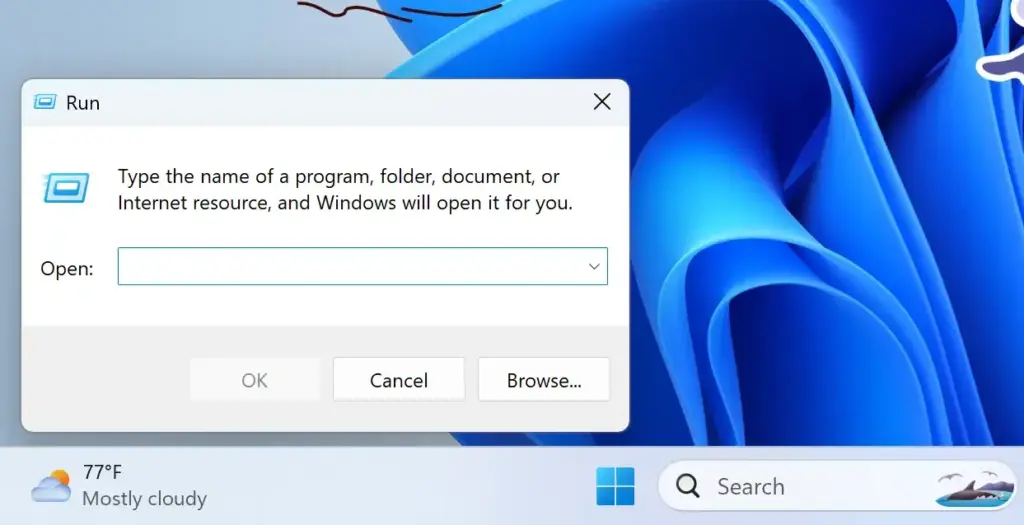
Run dialog - Type
dxdiagand press Enter. The DirectX Diagnostic Tool opens. If it asks about checking for signed drivers, choose either answer. - Click Save All Information. Save the file to your desktop as DxDiag.txt.
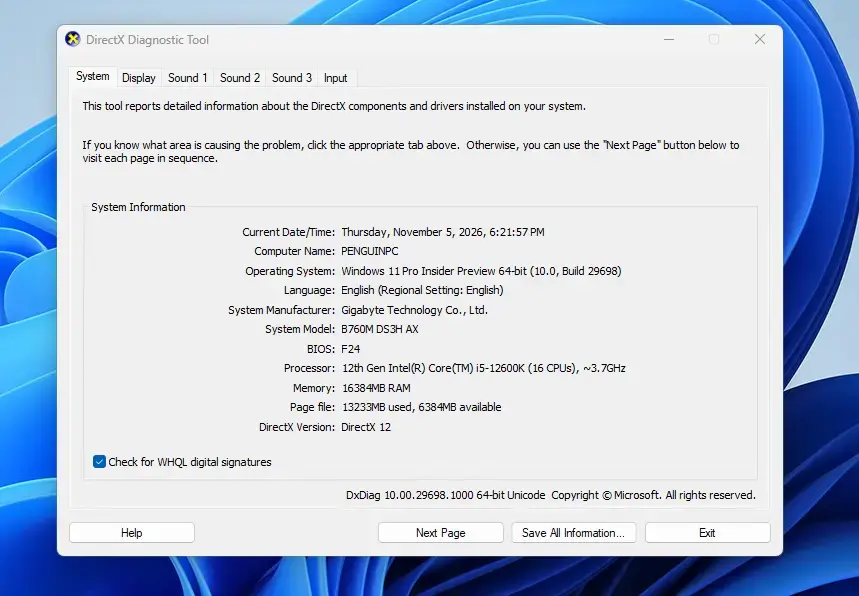
- Open DxDiag.txt in Notepad. Find the line that starts with Miracast.
- Read the result. “Available” or “Available, with HDCP” means your PC supports it. “Not Available” means the Wi-Fi adapter or its driver does not support Miracast.
HDCP (a copy-protection system) matters for protected video. Without it, some streaming apps show a black screen on the receiving display.
How to Use Screen Mirroring in 🪟 Windows 11
Follow these steps to start mirroring from your PC to a wireless display, such as a Miracast-capable TV, projector or adapter. They run from turning the display on to disconnecting at the end.
- Turn on the TV, projector or wireless adapter. Switch its input to the screen mirroring option. The name varies by brand, and common labels include Screen Mirroring, Screen Share, Smart View and Miracast. Many TVs show a waiting screen once this is on.
- Turn on Wi-Fi on your PC. If Airplane mode is on, go to Settings Network & internet Airplane mode and switch it off. Miracast needs the Wi-Fi radio active.
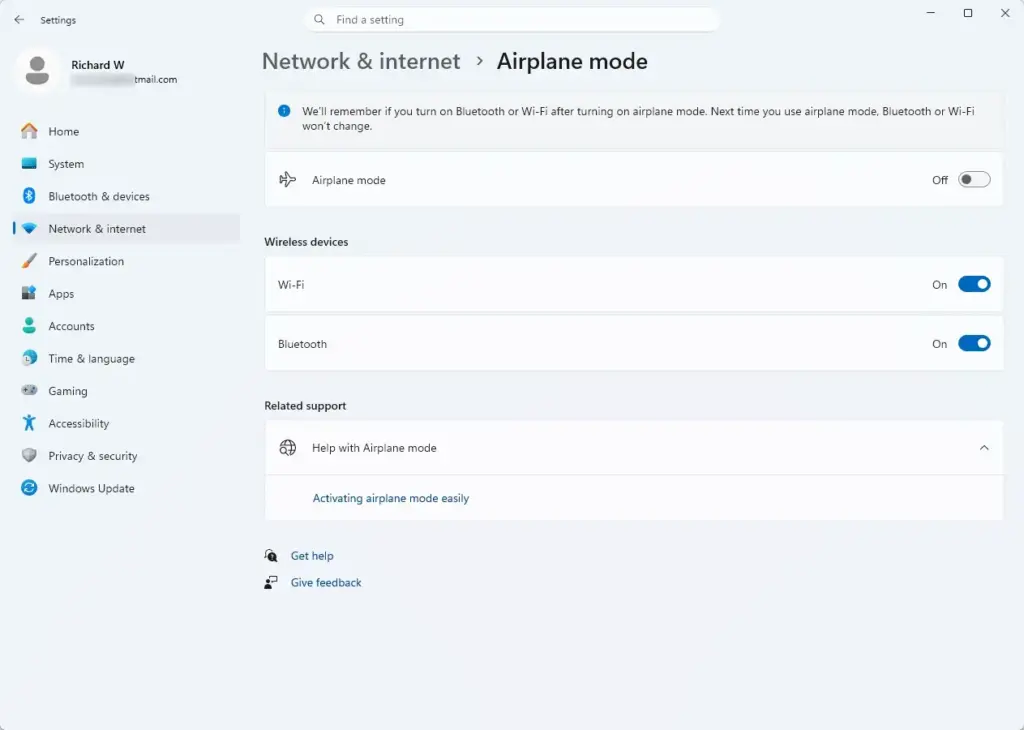
Settings › Network & internet › Airplane mode - Press Win+K. The Cast pane opens at the bottom right of the screen and starts searching for displays. The same pane is available from Quick settings (the panel that opens when you click the network, volume and battery icons on the taskbar).
- Wait for your display to appear. Searching takes a few seconds. If the list stays empty, see the troubleshooting section below.
- Select the name of your display. The name matches what the TV or adapter shows on its own screen.
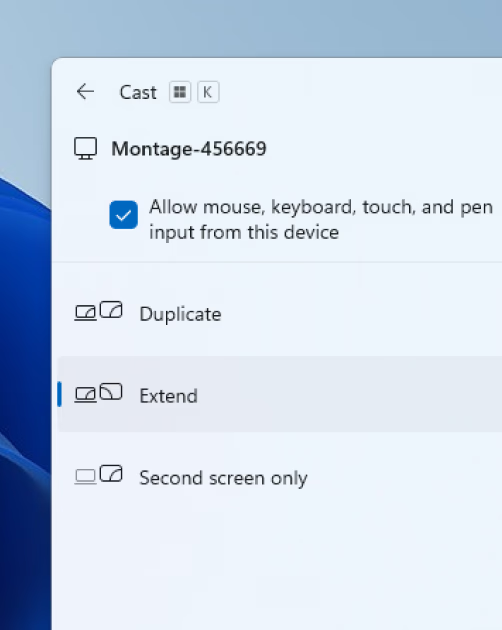
- Enter the PIN if the display asks for one. Some TVs show a code on screen, and you type it into the box on your PC.
- Wait for the connection. Your PC screen appears on the display after a few seconds, and the Cast pane shows the display as connected. Windows uses the mode you chose last time, which is usually Duplicate.
- Press Win+P to change the mode. The Project panel opens with four choices.
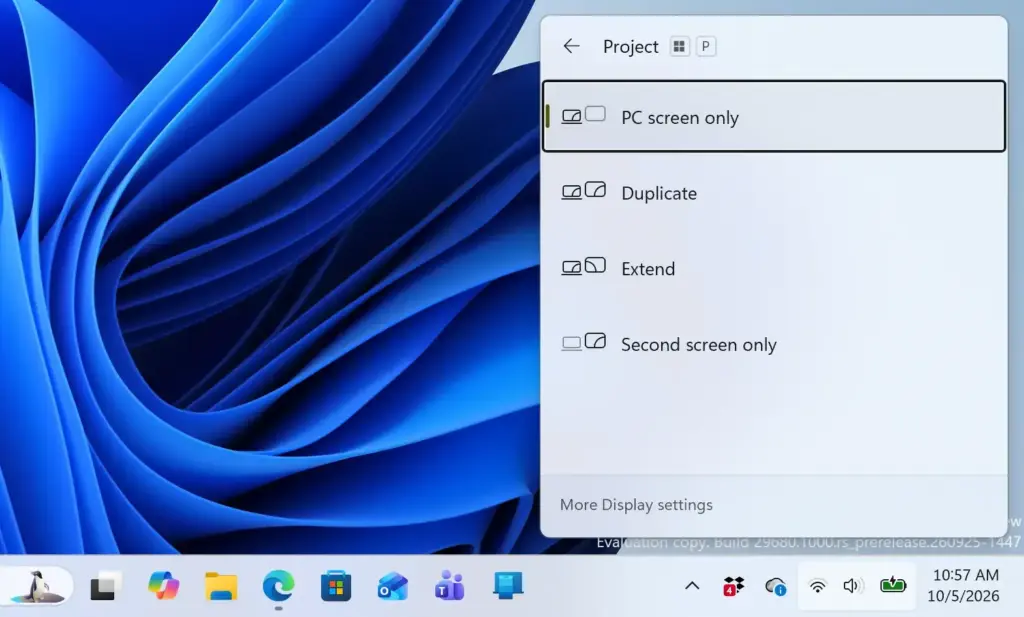
- Select Duplicate to show the same picture on both screens. This is the mode people mean by screen mirroring.
- Press Win+K and select Disconnect when you finish. The display returns to its normal input.
How to Choose a Display Mode
The display mode controls what each screen shows once the connection is up. Press Win+P to open the Project panel at any time, whether the second display is wireless or wired.
- PC screen only shows everything on your PC and nothing on the second display. Choosing this disconnects a wireless display.
- Duplicate shows the same picture on both screens. Use it for presentations and for watching a video on a TV.
- Extend treats the second display as extra desktop space. You drag windows across to it.
- Second screen only turns off your PC screen and uses only the second display. This suits a laptop connected to a TV with the lid closed.
If the picture looks stretched or has black borders, adjust the resolution.
- Open Settings System Display.
- Select the second display at the top.
- Set Display resolution to the value marked as recommended.
Set the Mode from Settings Instead
The same choice is in Settings if the keyboard shortcut does not respond. Go to Settings System Display, expand Multiple displays, and use the dropdown to choose Duplicate these displays or Extend these displays. The dropdown only appears when Windows detects a second display.
How to Mirror Your Screen to Another Windows PC
You can use a second Windows 11 PC as the wireless display. This helps when you want to show a laptop screen on a desktop PC’s monitor. The receiving PC needs an optional feature installed before it appears in the Cast list.
The first set of steps runs on the receiving PC, the one that will show the picture. Installing an optional feature requires administrator privileges.
- Open Settings on the receiving PC. Press Win+I.
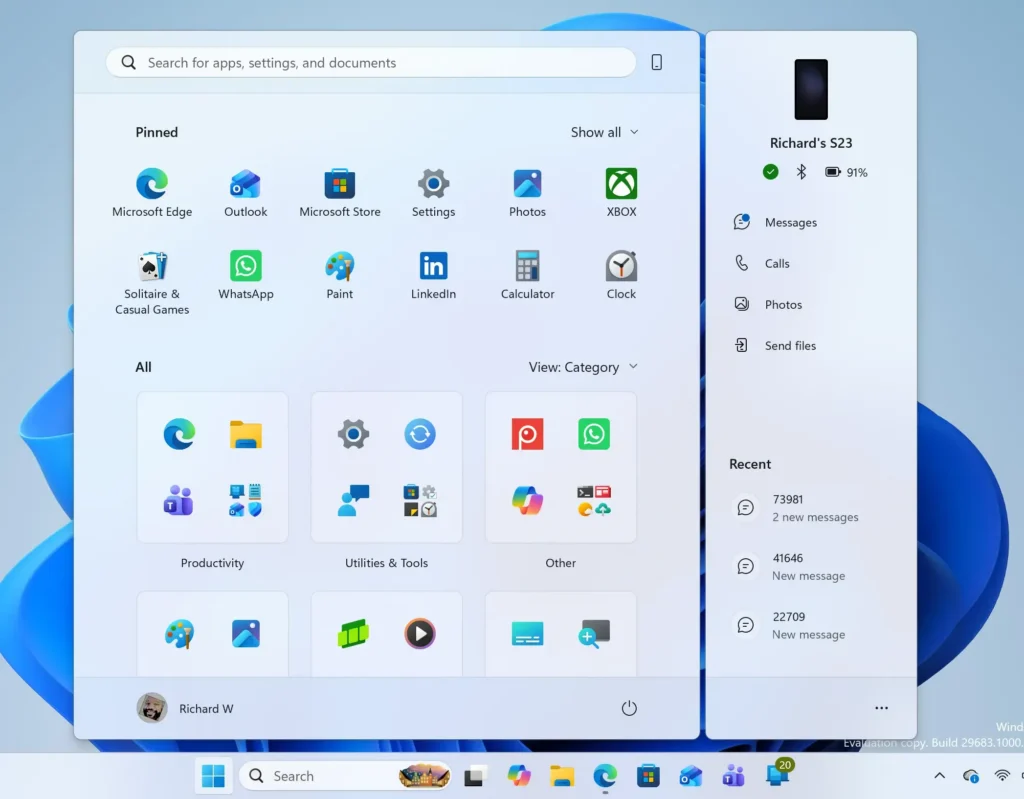
Windows 11 Start menu search panel for opening OpenSSH Client settings - Go to System Optional features. The page lists features already installed.
- Click View features. This button sits next to Add an optional feature. Administrator privileges required.
- Search for Wireless Display and tick its checkbox. The search box is at the top of the window.
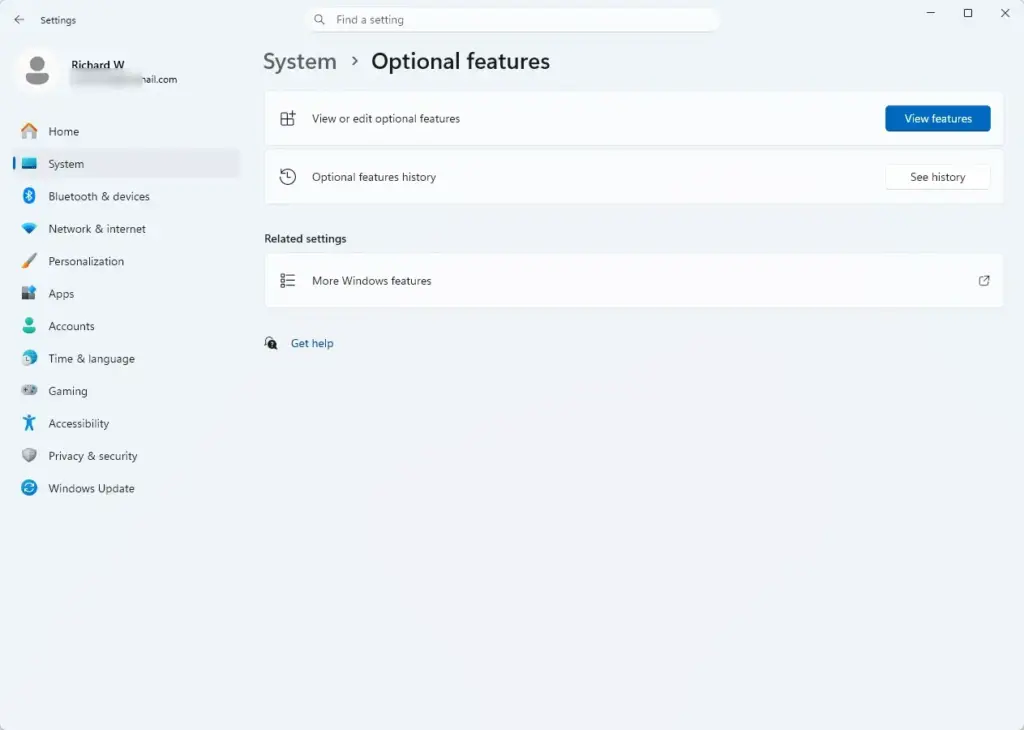
Settings › System › Optional features - Click Next, then click Install. Wait until the feature shows as installed. A restart is not normally required, but restart if Windows asks.
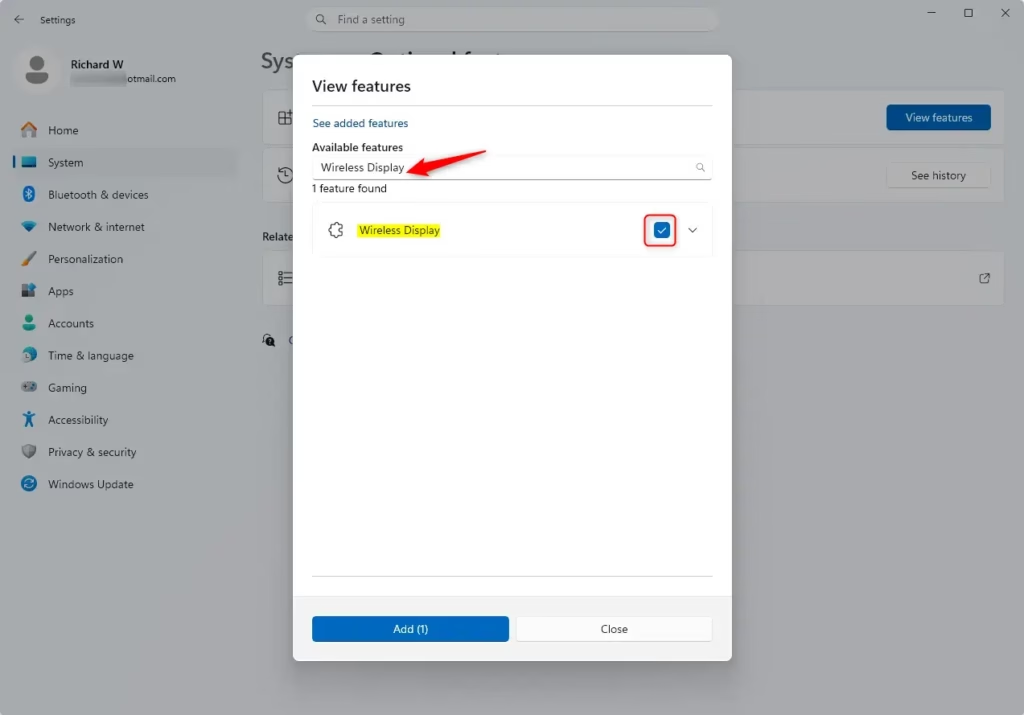
Windows 11 settings showing the Wireless Display optional feature installation process for phone screen projection - Go to Settings System Projecting to this PC. The page controls who can send their screen to this PC.
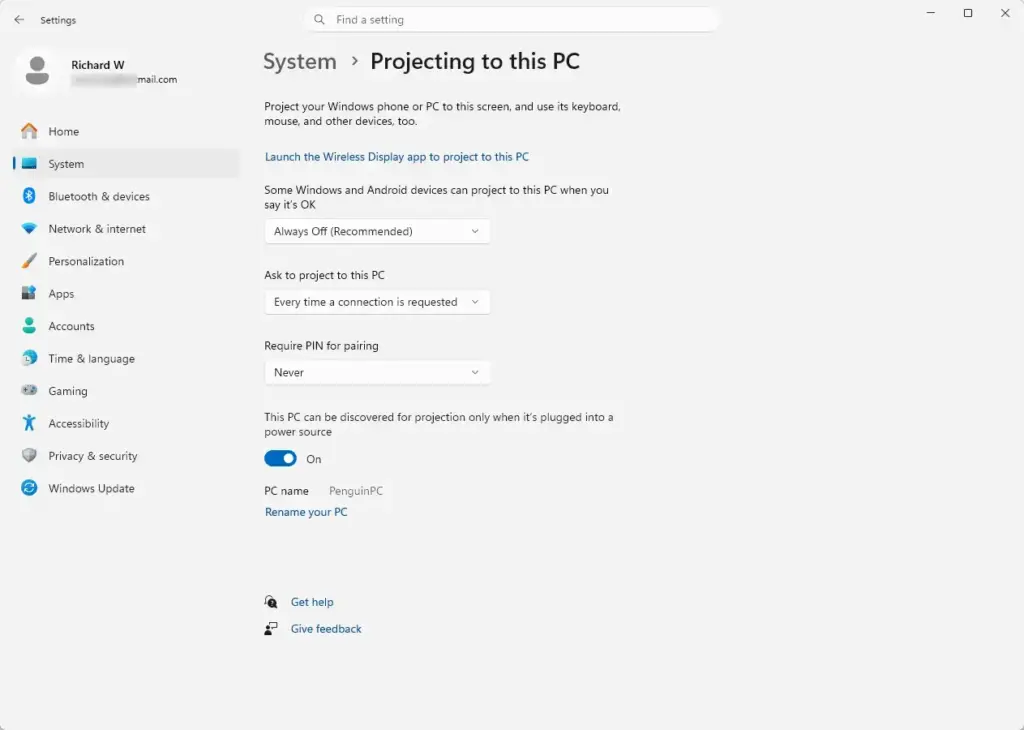
Settings › System › Projecting to this PC - Choose Available everywhere in the first dropdown. If your list also offers a secure-network option, choose that on shared or public networks.
- Set Ask to project to this PC and Require PIN for pairing to the level you want. A PIN stops other people from sending a screen to your PC without you noticing.
- Note the PC name shown on the same page. The sending PC lists this name in the Cast pane.
The second set of steps runs on the sending PC, the one whose screen you want to show.
- Press Win+K on the sending PC. The Cast pane opens.
- Select the receiving PC by name. Wait while the PCs connect.
- Accept the prompt on the receiving PC if one appears. Enter the PIN if one is required.
The Wireless Display app opens on the receiving PC and shows the sender’s screen. Press Win+P on the sending PC to switch between Duplicate and Extend, or select Disconnect in the Cast pane to stop.
To undo the setup, return to Settings System Projecting to this PC and set the first dropdown back to Always off. The wording of the off option can vary between Windows 11 versions. Pick the first option in the dropdown, which is the off setting. You can also remove the Wireless Display feature from Settings System Optional features.
How to Mirror Your Screen with an HDMI Cable
A cable skips the pairing step and avoids lag, and it works on any PC with a video output. Use this when Miracast is unavailable or the connection keeps dropping.
- Connect an HDMI cable from your PC to the TV or monitor. Use an adapter if your PC has USB-C or DisplayPort instead.
- Switch the TV or monitor to the matching HDMI input. Use the input or source button on its remote.
- Press Win+P on your PC. The Project panel opens.
- Select Duplicate. Both screens now show the same picture.
If the display stays blank, press Win+Ctrl+Shift+B. This restarts the graphics driver and often wakes a second display that Windows detected but did not light up.
Fix Screen Mirroring Problems
Most failures have one of three causes: the Wi-Fi adapter driver for Miracast is missing, the display is not in mirroring mode, or Wi-Fi is turned off. Work through these in order.
Your Display Does Not Appear in the Cast List
Confirm that the TV or adapter is still on its screen mirroring input, because many sleep after a minute or two. Press Win+K again to search again. Move the PC within a few metres of the display, and check that Airplane mode is off.
Windows Says Your PC Does Not Support Miracast
Run the dxdiag check from the Miracast section above. If you have not run it yet, open Run, type dxdiag, press Enter, and save the report.
If it reports “Not Available”, update the Wi-Fi adapter driver. Go to Settings Windows Update Advanced options Optional updates and install any driver listed for the wireless adapter. Failing that, download the driver from the PC manufacturer’s support page. If the result is still “Not Available”, use an HDMI cable or a USB wireless display adapter that works with HDMI.
The Picture Lags or Drops
Wireless mirroring is fine for slides, documents and web pages, but fast video and games can stutter. Close other apps that use Wi-Fi heavily and move the PC closer to the display. Choose Duplicate instead of Extend, since extending adds work for the graphics driver. For games, a cable gives a steadier picture.
The Screen Is Black When You Play Video
Some streaming apps block protected video from being sent to another display. The video area turns black while the rest of the screen mirrors normally.
Check the Miracast section of the DirectX Diagnostic report (DxDiag.txt) for HDCP support. HDCP is the copy-protection system that some streaming apps need. If the Miracast line says “Available” without HDCP, protected video may stay blocked. Playing the video on a TV’s own streaming app avoids the problem.
The Receiving PC Does Not Show Up
Confirm the Wireless Display feature is installed on the receiving PC and that Settings System Projecting to this PC is not set to Always off. Open the Projecting to this PC page after a restart if the PC name does not appear.
Mirror a Phone Instead
You can also mirror a phone to your PC, or the other way round. To show an Android phone’s screen on your PC, read how to project your phone screen to your PC in Windows 11. That guide uses the receiving-PC setup covered above. The Phone Link app is a second route, and mirroring your phone screen with Phone Link explains it.
Phone Link can open some Android apps in their own windows on your PC. To make those windows open at full size, follow Always opening Phone Link apps in expanded screen.
If your PC has a touch screen and you use it with a larger mirrored display, touch screen gestures for Windows 11 lists the swipes that still work.
What to Do Next
If the wireless connection stays unreliable, use the HDMI method or a wireless display adapter with its own receiver. Win+P and Win+K work in every Windows 11 version, so you can reconnect to the same display in seconds next time. Once a TV pairs successfully, Windows remembers it, and later connections go through the Cast pane without another PIN unless you set Require PIN for pairing to Always.
Have a question about this guide?
Answered by AI from this guide. Good questions may be added to this page — please don't include personal details.
Did this guide fix your problem?

About the Author
Richard
Tech Writer, IT Professional
Richard is a writer at Geek Rewind who turns complex IT tasks into clear, step-by-step guides. He draws on years of hands-on experience in system administration and enterprise IT operations, focusing on Windows, Linux and WordPress: the problems people actually run into, and the fixes that work. His server and WordPress guides come from systems he runs himself. Richard builds and maintains the platform behind Geek Rewind, from its Ubuntu servers and Nginx configuration to its custom WordPress plugins. Many new tutorials start with readers' questions, and he's always glad to answer them in the comments.
No comments yet — be the first to share your thoughts!