How to Screen Record in Windows 11

- 3 ways to do it
- Needs administrator rights
Windows 11 has two built-in screen recorders, Snipping Tool and Xbox Game Bar. Clipchamp, Microsoft’s video editor, can also record your screen. Snipping Tool records the full screen or any area you draw, and Xbox Game Bar records one app window.
Both save MP4 video files, a common format that plays on most phones and computers. Neither needs a download or an account.
The quickest way to record on a PC is to press Win+Shift+R, drag a box around the area you want, and select Start. The steps below show how to record with Snipping Tool and Xbox Game Bar. They also explain where recordings go and what to do when recording fails.
Press Win+Shift+R to start a screen recording on your PC, then drag a box around the area you want and select Start. This opens Snipping Tool’s recording mode, and Windows saves the finished video as an MP4 file. You need no download or account. Xbox Game Bar records only one app window, so use Snipping Tool for the desktop or File Explorer.
Which built-in screen recorder to use
Pick the tool based on what you need to capture. The two main tools work differently, and choosing the wrong one is the most common reason a recording fails.
- Snipping Tool records any part of the screen, including the desktop and File Explorer. Use it for tutorials, bug reports and anything that involves more than one app.
- Xbox Game Bar records a single app window. Use it for gameplay or when you want a recording that follows one app. It cannot record the desktop or File Explorer.
- Clipchamp is Microsoft’s video editor, and it includes a screen recorder. Use it when you want to trim the recording straight away.
All three are included in Windows 11 Home and Pro. Nothing in this guide needs administrator rights. Use a currently supported Windows 11 version (25H2 or 26H2) so your menus match the ones described here.
Method 1Record your screen with Snipping Tool
Snipping Tool is best known for screenshots, but it also records video. Its recording mode lets you choose exactly which part of the screen to capture. If you want a deeper walkthrough of the app, see how to record your screen with Snipping Tool in Windows 11.
These steps show how to screen record on PC with Snipping Tool, from opening the app to saving the finished video.
- Open Snipping Tool. Select Start, type Snipping Tool, and press Enter. The app window opens with a small toolbar at the top.
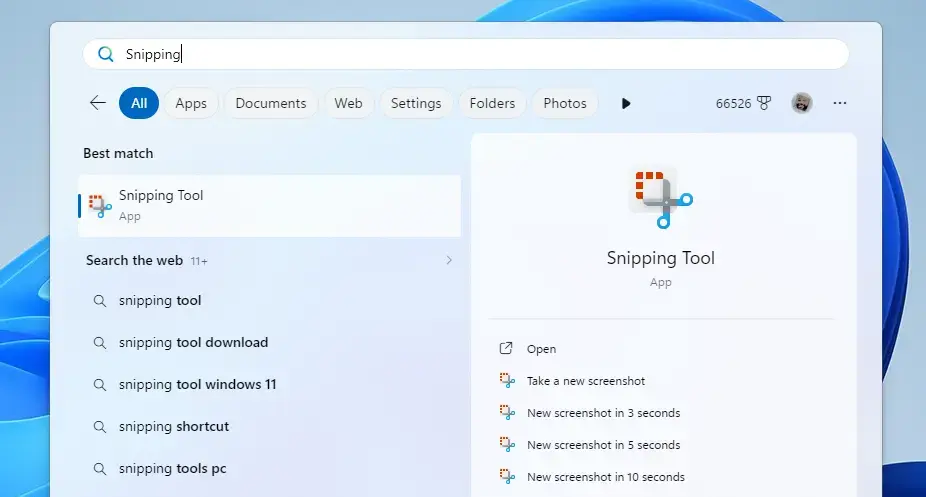
Start Menu - Select the Record button. It shows a video camera icon and sits next to the camera icon used for screenshots. The toolbar switches from screenshot mode to recording mode.
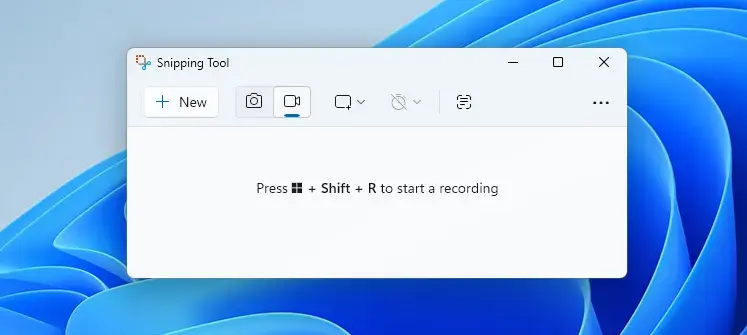
- Select New. The screen dims and the pointer turns into a crosshair, which is a thin cross used for selecting an area.
- Drag across the area you want to record. Release the mouse button when the box covers the right area. To capture the whole screen, drag from one corner to the opposite corner.
- Select Start. A short countdown appears, then recording begins. A thin border marks the recorded area.
- Carry out the actions you want to capture. Anything that happens inside the border appears in the video. Select Pause on the recording toolbar if you need a break.
- Select Stop. The recording ends and a preview opens in the Snipping Tool window.
- Select Play to review the video. Check that the right area was captured and that nothing private appeared on screen.
- Select Save. Choose a folder, type a file name, and select Save again. Windows saves the recording as an MP4 file.
Start a recording with a keyboard shortcut
Win+Shift+R starts a Snipping Tool recording without opening the app window first. On current Windows 11 versions, the screen dims, and you drag to select the area, just as you do in the drag-to-select steps earlier in this section. If the shortcut does nothing, open Snipping Tool from the Start menu and use the Record button instead.
If the Record button is missing
Older builds of Snipping Tool only take screenshots. Snipping Tool updates through the Microsoft Store, so the fix is to update the app. Open the Microsoft Store, select Library, and select Get updates. Reopen Snipping Tool when the update finishes.
A note on sound
Method 2Record an app with Xbox Game Bar
Xbox Game Bar (a built-in overlay for capturing gameplay and apps) records the app you are using, along with its sound. The Game Bar steps below are the full process for recording a single window on your PC.
- Open the app you want to record. Wait until it is fully loaded.
- Select the app window. Game Bar records whichever window has focus, so click once inside it.
- Press Win+G. The Game Bar overlay appears over your screen with several small panels, called widgets.
- Find the Capture widget. If you do not see it, select the Widget menu icon in the Game Bar toolbar and select Capture.
- Select Start recording. It is the round button in the Capture widget. A small status bar appears with a timer and a microphone button.
- Turn the microphone on or off as needed. Select the microphone button in the status bar, or press Win+Alt+M.
- Click inside the app and carry on working. The overlay hides, and the status bar stays visible while recording.
- Press Win+Alt+R to stop. You can also select the Stop recording button in the status bar. A notification confirms the clip was saved.
- Select See my captures in the Capture widget to find the file. Windows saves Game Bar recordings as MP4 files in the Videos\Captures folder by default.
Win+Alt+R also starts a recording without opening the overlay. Use it once the app window is active, which means you have clicked into it.
If Game Bar says it cannot record
If Win+G does nothing, open Settings Gaming Game Bar and make sure Game Bar is turned on. Then try the shortcut again with an app window selected.
Record what just happened
Game Bar can also save a clip of what happened just before you start a recording. Windows calls this background recording. It is off by default, so turn it on in the Captures page before you need it. Check the Captures page in Settings Gaming for the option to record what happened.
When it is on, Win+Alt+G saves the recent clip. Background recording keeps the recorder running, so leave it off if you do not need it.
Method 3Record your screen with Clipchamp
Clipchamp is the video editor that comes with Windows 11. Open it from the Start menu, select Record & create, and choose the screen recording option. Clipchamp asks which screen or window to capture and whether to include your microphone.
The recording lands in the editor, where you can trim the start and end before exporting. Use this method if you plan to edit the video anyway. For a quick capture, Snipping Tool is faster.
Change where recordings are saved and how Game Bar records
Game Bar has its own capture settings. Open Settings Gaming Captures. The page shows the captures folder and recording options such as audio and maximum recording length.
Select Open folder to see your saved recordings. The exact options on this page vary between Windows 11 versions, so read the labels on your screen.
Snipping Tool does not use this page. It asks where to save each recording when you select Save, so you choose the folder each time.
Prepare your screen before you record
A few minutes of setup saves you from re-recording. Close apps you do not need, especially email and chat windows that can show a notification mid-recording. Notifications appear in the video if they land inside the recorded area.
If you want two windows visible at once, arrange them first. Split the screen in Windows 11 so both apps sit side by side, then drag the Snipping Tool selection around both. Game Bar cannot record two windows at once, so use Snipping Tool for this.
Why screen recording does not work
Most failures come from a few causes. Work through the ones that match what you see on screen.
- Game Bar will not record the desktop or File Explorer. This is by design. Use Snipping Tool.
- Win+G does nothing. Check that Game Bar is turned on in Settings Gaming Game Bar. Also select an app window before pressing the shortcut.
- Snipping Tool has no Record button. Update the app through the Microsoft Store, as described above.
- The recording has no sound. If the recording has no sound, check that the microphone is switched on in Game Bar. If your Snipping Tool version records video only, use Game Bar instead.
- Recording is blocked on a work or school PC. Some organizations block screen recording on the computers they manage, such as work or school laptops. If the recording options are missing, or the buttons do nothing, ask the IT team that looks after your computer.
Windows also has a privacy setting that controls whether apps can take screenshots and record the screen. If an app cannot capture your screen, see how to enable or disable Let apps take screenshots and record screen in Windows 11.
Screen recording and screenshots are different shortcuts
The Print Screen key takes a still image, not a video. If you only need a screenshot and the key does nothing, read what to do when the Print Screen key does nothing in Windows 11. For video, use the methods above.
What to do next
Open the saved MP4 in the Videos\Captures folder or the folder you chose in Snipping Tool, and confirm it plays with the audio you expected. To show your screen live on a TV or another display instead of saving a file, see how to use screen mirroring in Windows 11. To remove a recording you no longer need, delete the file from its folder.
Frequently asked questions
How to screen record on laptop?
Press Win+Shift+R to open the screen recorder in Snipping Tool. Drag a box around the area you want to capture, then select Start. Select Stop when you finish. The MP4 video saves to Videos, in the Captures folder. To record a single app window, press Win+G to open Xbox Game Bar instead.
How to screen record on hp laptop?
HP laptops running Windows 11 use the same built-in tools, so you don't need HP software. Press Win+Shift+R, drag a box around the area you want, and select Start. Select Stop when you finish. The MP4 file saves to Videos, in the Captures folder.
How do I screen record?
Press Win+Shift+R to start recording with Snipping Tool. Drag a box around the part of the screen you want to capture, then select Start. Select Stop when you are done. Your MP4 recording saves to Videos, in the Captures folder. To record one app window, use Xbox Game Bar, opened with Win+G.
Can you screen record on Windows?
Yes. Windows 11 includes two free screen recorders that need no download or account: Snipping Tool, which records any area of the screen, and Xbox Game Bar, which records one app window. Both save MP4 video files. Press Win+Shift+R to start with Snipping Tool.
Can I screen record on my laptop?
Yes, any laptop running Windows 11 can screen record without extra software. Press Win+Shift+R to open Snipping Tool, drag a box around the area you want, and select Start. Select Stop when you finish. Your recording saves as an MP4 file in the Videos folder, under Captures.
How do you screen record on PC?
Press Win+Shift+R, drag a box around the area you want to record, and select Start. Snipping Tool then records that area until you select Stop. The MP4 file saves to Videos, in the Captures folder. To record one app window instead, press Win+G and use Xbox Game Bar.
Still have a question?
Answered by AI from this guide. Good questions may be added to this page — please don't include personal details.
Did this guide fix your problem?

About the Author
Richard
Tech Writer, IT Professional
Richard is a writer at Geek Rewind who turns complex IT tasks into clear, step-by-step guides. He draws on years of hands-on experience in system administration and enterprise IT operations, focusing on Windows, Linux and WordPress: the problems people actually run into, and the fixes that work. His server and WordPress guides come from systems he runs himself. Richard builds and maintains the platform behind Geek Rewind, from its Ubuntu servers and Nginx configuration to its custom WordPress plugins. Many new tutorials start with readers' questions, and he's always glad to answer them in the comments.
No comments yet — be the first to share your thoughts!