Verify Whether Your Windows 11 Drive Is Encrypted

- 4 ways to do it
- Needs administrator rights
To verify whether your Windows 11 drive is encrypted, check Settings Privacy & security Device encryption, or run manage-bde -status in Command Prompt as administrator. The first method takes seconds, and the second shows the exact state of every drive.
Encryption scrambles the data on a drive so that nobody can read it without the right key. Windows 11 uses BitLocker (the built-in drive encryption feature) for this, and Home editions use a simplified version called Device encryption.
The four checks below show what each result means. They also explain why the answer can seem unclear. A drive can be fully encrypted and still not protected, which the later sections explain.
To verify whether your Windows 11 drive is encrypted, open Settings, select Privacy & security, then Device encryption, and read the toggle: On means the operating system drive is encrypted. For every drive, including data drives, open Command Prompt as administrator and run manage-bde -status, which shows each drive’s protection state.
Device Encryption vs BitLocker: Which One Applies to Your PC
Windows 11 has two names for what is essentially the same technology, and the one you see depends on your edition and hardware.
- Device encryption is a simplified version. It appears in Settings on PCs that meet its hardware requirements, including a TPM (Trusted Platform Module, a security chip on the motherboard). Home and Pro both offer it, and it covers the operating system drive.
- BitLocker Drive Encryption is the full version. Windows 11 Pro, Enterprise and Education let you manage it, including encrypting data drives and removable drives.
Both write the same kind of encryption to the drive. A drive encrypted by one shows up as encrypted in the other’s tools, so you can use any method below on any edition that has the tool. If you are not sure your PC supports Device encryption, read How to Verify Device Encryption Support in Windows 11 first.
Method 1Check Device Encryption in Settings
This is the quickest route to verify whether your Windows 11 drive is encrypted, because it needs no administrator rights. It reports only on the operating system drive, normally C:.
- Press
Windows key + I. The Settings app opens, with a list of categories on the left.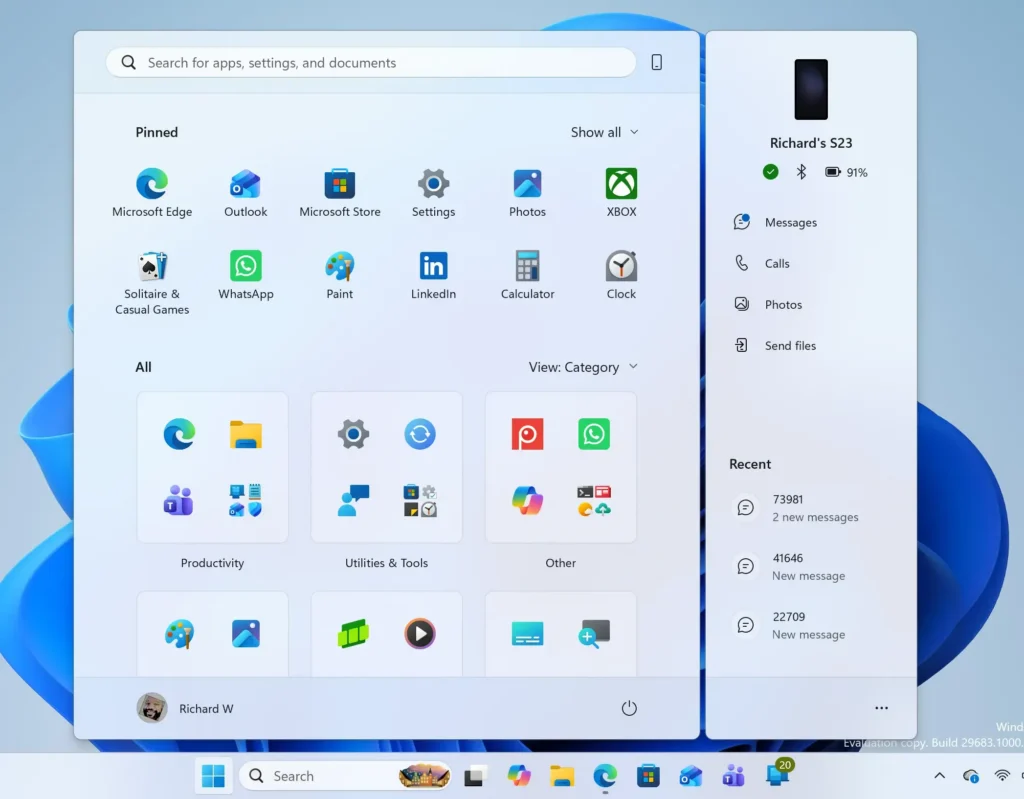
Windows 11 Start menu search panel for opening OpenSSH Client settings - Select Privacy & security. The page lists privacy and security options.

- Scroll down and select Device encryption. The page opens and shows a toggle.
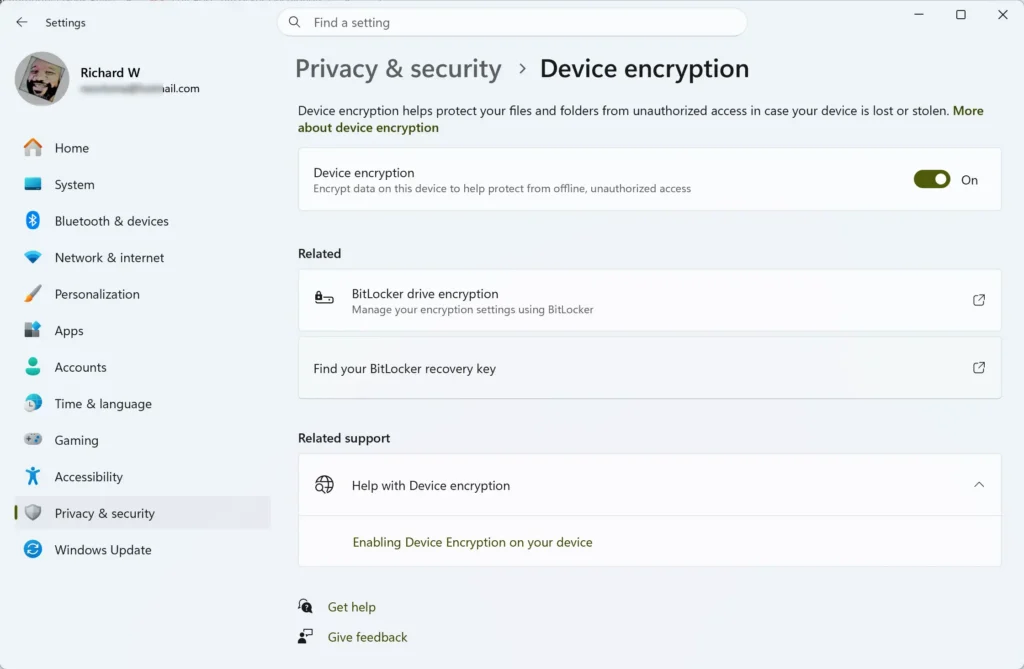
Settings > Privacy & security > Device encryption - Read the toggle. If it says On, the operating system drive is encrypted. If it says Off, it is not.
If Device encryption is missing from the list, your PC does not offer that feature. That does not mean the drive is unencrypted. A Pro PC can be encrypted with BitLocker and still hide this page, so move on to Method 2 or Method 3.
On some PCs, the page shows a link to BitLocker settings instead of a toggle. Select it to land on the Control Panel page described next.
Method 2Check BitLocker Drive Encryption in Control Panel
Control Panel lists every drive on the PC with its BitLocker state. This is the best graphical view if you have several drives, including USB drives. It works on Windows 11 Pro, Enterprise and Education.
- Press the Start button and type “Control Panel”. The search results show Control Panel at the top.
- Open Control Panel. The Control Panel window opens.
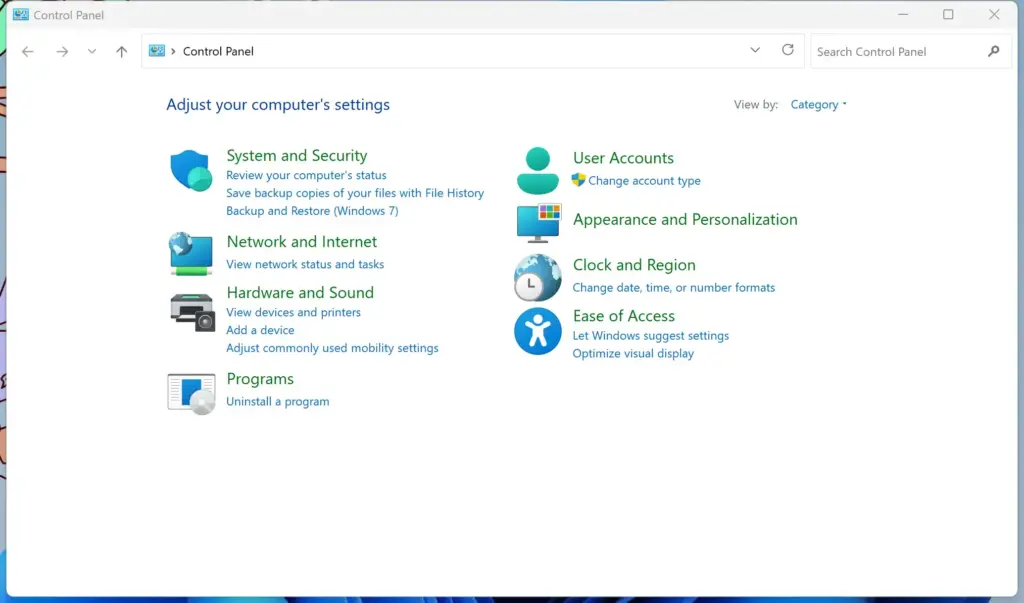
Control Panel - Select System and Security. If your view is set to icons instead of categories, skip this step and go to the next one.
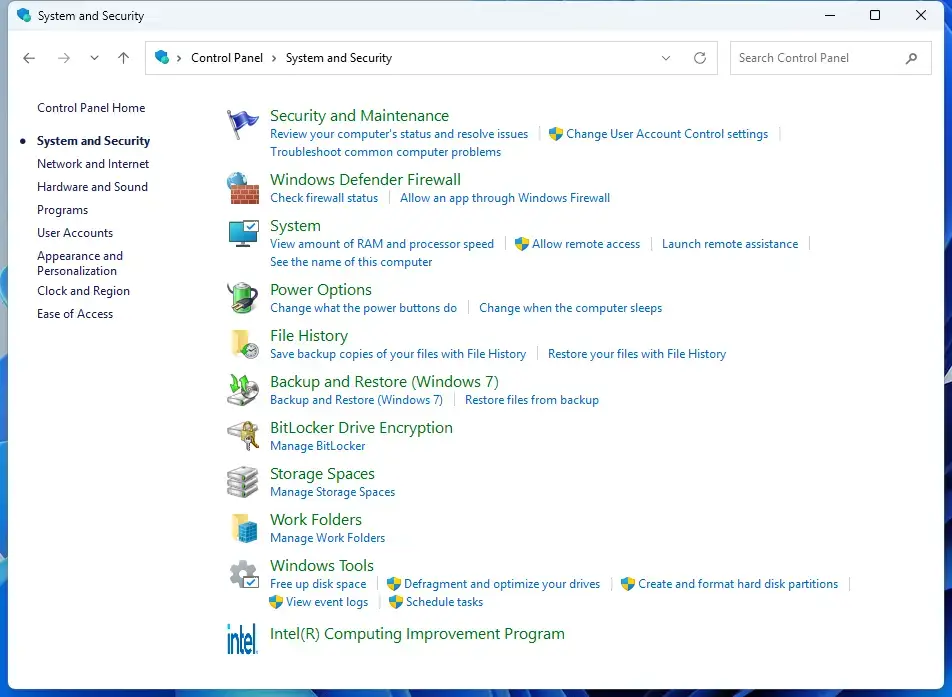
Control Panel › System and Security - Select BitLocker Drive Encryption. The page opens with up to three sections: Operating system drive, Fixed data drives, and Removable data drives – BitLocker To Go.
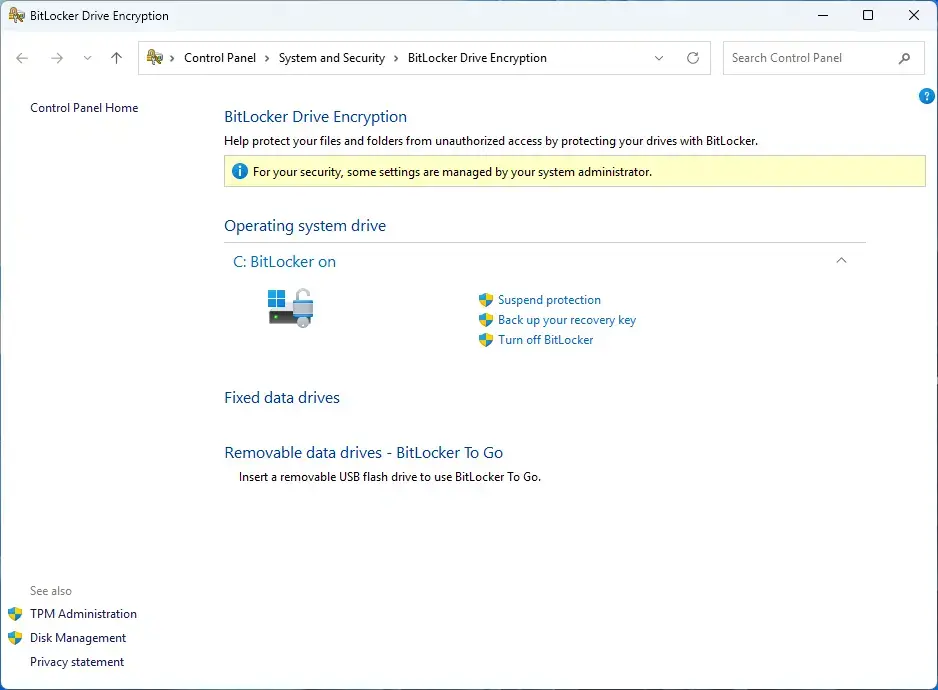
Control Panel > System and Security - Read the status beside each drive. BitLocker on means the drive is encrypted and protected. BitLocker off means it is not encrypted.
A third state, Suspended, means encryption is still on the drive but BitLocker has paused its protection. The section on reading results explains why this matters.
If the page is empty or says BitLocker is unavailable, your edition or hardware does not support managing BitLocker here. Check with Method 3 to be sure. For a closer look at the status each drive reports, see How to Check BitLocker Drive Status on Windows 11.
Method 3Check with manage-bde in Command Prompt
The manage-bde tool (a command-line program for BitLocker) gives the most detail, including the encryption percentage and the method used. This step requires administrator privileges.
- Press the Start button and type
cmd. Command Prompt appears in the results. - Right-click Command Prompt and select Run as administrator. A User Account Control prompt (the Windows permission dialog) appears.
- Select Yes. A black Command Prompt window opens, and its title bar starts with “Administrator”.
- Type the command below and press
Enter. It reports on every drive on the PC.manage-bde -status - Find the line starting with Conversion Status for each volume. Fully Encrypted means the whole drive is encrypted. Fully Decrypted means it is not.
- Check the line starting with Protection Status. Protection On means BitLocker is guarding the drive. Protection Off means it is not.
To check one drive only, add its letter. This example checks C:.
manage-bde -status C:
If you do not run the window as administrator, Windows prints an error saying you must be an administrator to run this tool. Close the window and repeat steps 1 to 3.
A few other lines in the output are worth reading:
- Percentage Encrypted shows how far encryption has progressed. A value below 100% means encryption is still running.
- Encryption Method names the scrambling method (the algorithm), such as XTS-AES 128.
- Lock Status says whether the drive is currently open or locked.
- Key Protectors lists what can open the drive, such as a TPM, a numerical password (the recovery key), or a PIN.
Method 4Check with PowerShell
PowerShell (a more modern command-line shell) returns the same information as a compact table. This also requires administrator privileges.
- Right-click the Start button. A menu of admin tools appears.
- Select Terminal (Admin). If you see Windows PowerShell (Admin) instead, select that. A User Account Control prompt appears.
- Select Yes. A Terminal or PowerShell window opens.
- Type the command below and press
Enter. A block of details appears for each drive.Get-BitLockerVolume - Read the VolumeStatus line. FullyEncrypted means the drive is encrypted, and FullyDecrypted means it is not.
- Next, check the ProtectionStatus line. On means BitLocker is protecting the drive, and Off means it is not.
The EncryptionPercentage line shows progress, and MountPoint names the drive letter. If PowerShell reports that the term is not recognized, BitLocker tools are not installed on this edition. Use Method 3 instead.
Use File Explorer as a Quick Visual Hint
File Explorer gives a rough clue without opening anything else. Press Windows key + E, then select This PC in the left pane. Drives protected by BitLocker can show a padlock on the drive icon.
A locked drive shows a closed padlock, and an open drive shows an open padlock. Treat this as a hint only. The operating system drive does not always show a padlock when it is encrypted, so a missing padlock proves nothing. Confirm with one of the methods above.
To see the status of a single drive, right-click it in This PC. If BitLocker is on, the menu includes entries such as Manage BitLocker. The exact entries vary by edition and drive state.
How to Read the Results
The status wording differs between tools, but the combinations mean the same few things.
- Encrypted and protected (Fully Encrypted with Protection On, or BitLocker on): The drive is secure. Someone who removes it from the PC cannot read it without a key.
- Encrypted but protection off (Fully Encrypted with Protection Off, or Suspended): The data is scrambled, but BitLocker stores the key unprotected on the drive. Anyone with the drive can read it. Windows does this on purpose during some updates and changes to the PC’s firmware (the built-in software that starts the hardware). Protection normally resumes after a restart.
- Encryption in progress (Percentage Encrypted below 100): The drive is being encrypted. It is usable during this time, and the drive is not fully protected until the process ends.
- Not encrypted (Fully Decrypted, or BitLocker off): The drive has no encryption at all.
Also note that a drive in the output may show Used Space Only Encrypted. This means BitLocker encrypted only the portion of the drive that holds data, which is a normal, supported choice and is faster to set up. New data written afterward is encrypted too.
Check External and Secondary Drives
Everything above also applies to secondary internal drives and USB drives, with a few differences.
- Plug in the external drive first. Windows cannot report on a drive it cannot see.
- Device encryption in Settings covers only the operating system drive. For other drives, use Control Panel, manage-bde or PowerShell.
- A locked BitLocker drive still reports its status. The Lock Status line in manage-bde output shows that it is locked, even before you enter the password.
If a drive turns out to be unencrypted and holds anything sensitive, Should You Encrypt Your Secondary Drive with BitLocker helps you decide whether it is worth doing. To close an encrypted drive again, see How to Lock a BitLocker Drive in Windows 11.
Why the Encryption Options Are Missing or Show Nothing
If none of the tools show what you expect, one of these causes is usually responsible.
- Device encryption is missing in Settings. The PC does not meet the hardware requirements for it, or the feature is not offered on that device. A BitLocker-encrypted drive can still exist.
- Control Panel shows no BitLocker options. Windows 11 Home does not include full BitLocker management. Use Settings or manage-bde to check status instead.
- The commands fail with an access error. The window is not running as administrator. Reopen it with Run as administrator.
- The TPM is off or absent. Without a TPM, you need a policy change or a startup key before BitLocker can protect the operating system drive. Read How to Verify and Enable TPM 2.0 on Your PC to check the chip.
- The drive is not listed. Check that it is connected, powered on and visible in Disk Management (the Windows disk tool) or File Explorer.
Some new PCs can also turn on encryption without asking you first. If you sign in to Windows 11 with a Microsoft account on supported hardware, Device encryption may start by itself, and Windows backs up the recovery key to that account. That is why a PC you never configured can already show as encrypted.
Find Your Recovery Key While You Are Here
Windows can store it in your Microsoft account, in a file, on paper, or with your organization. For a personal PC, sign in at account.microsoft.com and look for the recovery key under your devices. On a work or school PC, your IT department usually holds it.
What to Do Next
If the check shows a drive is not encrypted and you want it protected, follow How to Turn On BitLocker for Your Windows 11 Operating System Drive. For other drives, follow How to Turn On BitLocker to Protect a Data Drive in Windows 11. If a drive is encrypted and you no longer want that, BitLocker Decryption: How to Turn Off BitLocker on a Windows 11 Drive covers the process. Run one of the checks again afterward to confirm the new status.
Have a question about this guide?
Answered by AI from this guide. Good questions may be added to this page — please don't include personal details.
Did this guide fix your problem?

About the Author
Richard
Tech Writer, IT Professional
Richard is a writer at Geek Rewind who turns complex IT tasks into clear, step-by-step guides. He draws on years of hands-on experience in system administration and enterprise IT operations, focusing on Windows, Linux and WordPress: the problems people actually run into, and the fixes that work. His server and WordPress guides come from systems he runs himself. Richard builds and maintains the platform behind Geek Rewind, from its Ubuntu servers and Nginx configuration to its custom WordPress plugins. Many new tutorials start with readers' questions, and he's always glad to answer them in the comments.
No comments yet — be the first to share your thoughts!