BitLocker Decryption: How to Turn Off BitLocker on a Windows 11 Drive

- 19 steps
- Needs administrator rights
- Includes a restart or sign-out
BitLocker decryption removes the encryption from a drive, so Windows reads and writes its files as plain data again. On Windows 11 Pro, Enterprise and Education, the quickest way to turn off BitLocker is Control Panel System and Security BitLocker Drive Encryption, then Turn off BitLocker next to the drive.
Windows 11 Home has no BitLocker Drive Encryption page. It uses a feature called Device encryption (a simpler version of BitLocker) in Settings instead. Both routes are covered below, along with a command-line method.
Decryption takes time because Windows rewrites the data on the drive. You can keep using the PC while it runs, and your files stay in place.
To turn off BitLocker on Windows 11 Pro, Enterprise or Education, open Control Panel, select System and Security, then BitLocker Drive Encryption. Click Turn off BitLocker next to the drive and confirm. Windows 11 Home has no BitLocker Drive Encryption page, so use Device encryption in Settings instead. Decryption rewrites the drive, so keep the laptop plugged in and do not cut power.
What Happens When You Turn Off BitLocker
Turning off BitLocker decrypts the whole drive. Windows reads each encrypted section, writes it back as plain data, and then removes the BitLocker protection. Your files, apps and settings are not deleted.
The drive no longer asks for a password, PIN or recovery key (a 48-digit code that opens a drive when the normal method fails). Any copy of the old recovery key becomes useless. If you turn BitLocker on again later, Windows creates a new key.
Turning off BitLocker is not the same as locking a drive. Locking keeps the encryption and hides the contents until someone enters the password. If that is what you want, see how to lock a BitLocker drive in Windows 11.
Before You Start
Check these points first. They explain most failed attempts.
- Use an administrator account. Windows asks for administrator approval before it decrypts a drive. A standard account (a user account without administrator rights) cannot finish the task unless you know the administrator password.
- Open the drive first. A BitLocker drive that is locked cannot be decrypted. Open it in File Explorer and enter its password or recovery key when Windows asks.
- Plug in a laptop. Decryption reads and writes the full drive, which uses a lot of battery.
- Back up important files first. A power cut during decryption carries some risk, even though decryption rarely fails.
- Know your edition. Windows 11 Pro, Enterprise and Education include the BitLocker Drive Encryption page. Windows 11 Home uses Device encryption in Settings.
To see which drives are encrypted right now, read how to check BitLocker drive status on Windows 11. A drive that shows a lock icon in File Explorer, or “BitLocker on” in the BitLocker page, is a candidate for decryption.
How to Turn Off BitLocker in Control Panel
This method works for the Windows drive, internal data drives and USB drives on Windows 11 Pro, Enterprise and Education. Each step below completes BitLocker decryption, and you need administrator rights for every one.
- Open Control Panel. Press the Win, type Control Panel, and press Enter. The Control Panel window opens.
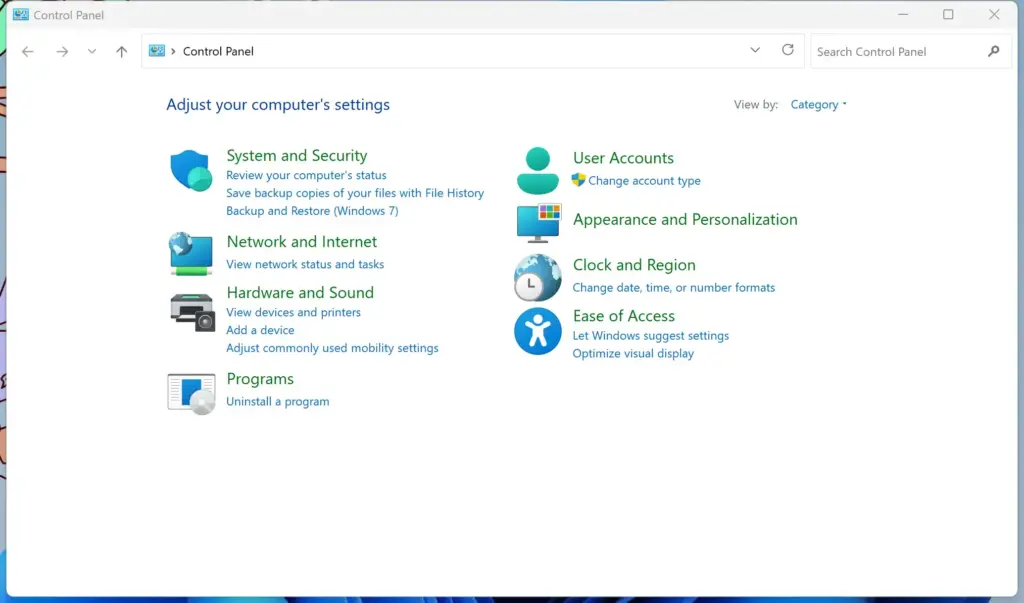
Control Panel - Select System and Security. If you do not see it, set View by in the top-right corner to Category.
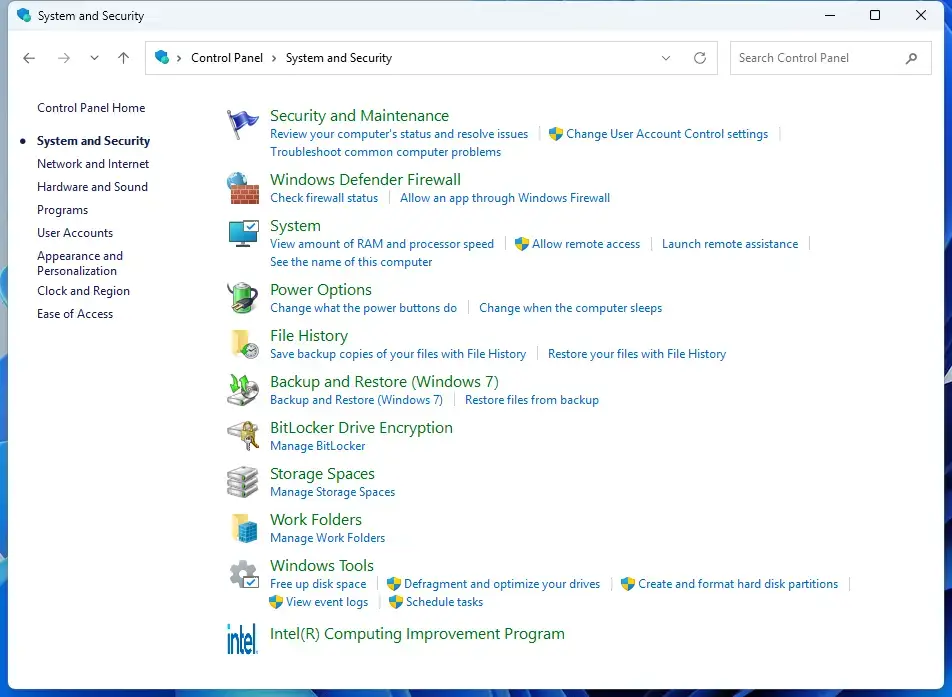
Control Panel › System and Security - Select BitLocker Drive Encryption. This page lists every drive that BitLocker can manage. Drives are grouped as Operating system drive, Fixed data drives and Removable data drives – BitLocker To Go.
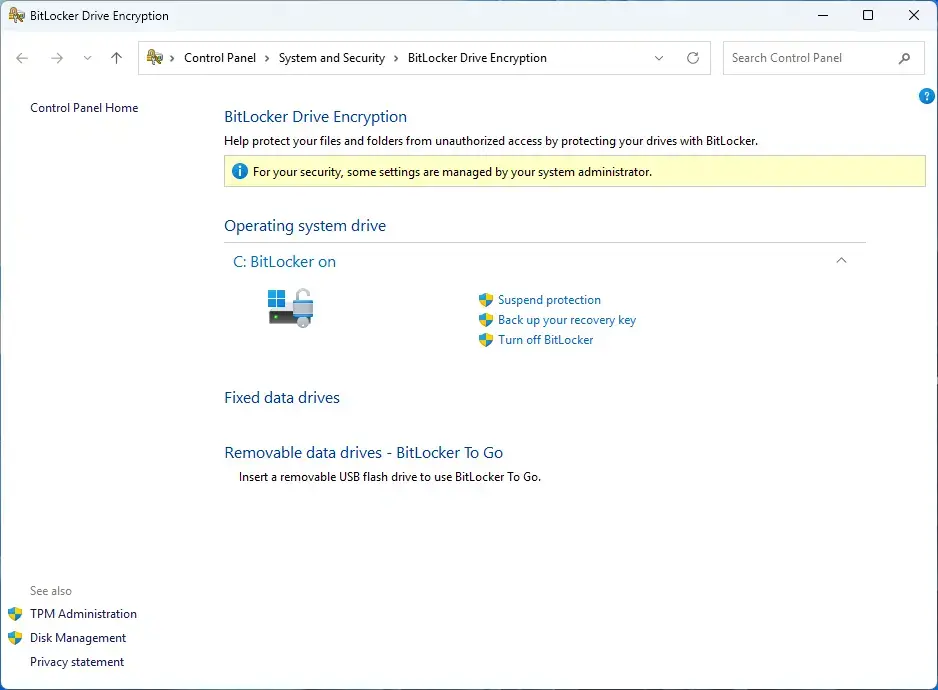
Control Panel > System and Security - Find the drive you want to decrypt. Each drive shows its status, such as BitLocker on. If a drive shows as locked, open it in File Explorer first, then return to this page.
- Click Turn off BitLocker. The link sits under the drive name, next to options such as Back up your recovery key or Suspend protection. Windows may ask for administrator approval at this point. Click Yes, or enter an administrator password. (Administrator required.)
- Read the confirmation box. It warns that the drive will be decrypted and that the process can take a while.
- Click Turn off BitLocker again. This confirms the choice. The drive entry changes to show that decryption is in progress.
- Wait for decryption to reach 100 percent. The page shows a progress message. Select the BitLocker Drive Encryption page again to refresh it. You can keep working while it runs.
- Confirm the final status. When decryption finishes, the drive shows BitLocker off and the link changes to Turn on BitLocker.
What to Expect While the Drive Decrypts
Decryption time depends on the size of the drive, how much data it holds and how fast it is. A large hard disk takes much longer than a small solid-state drive. Expect the PC to feel slower while it works.
You can restart or shut down the PC during decryption. Windows continues the process afterwards, but check the status page to confirm that it resumed.
If the page still shows BitLocker on after you click Turn off BitLocker, the process has not started. Open the page again and repeat the steps above from the Turn off BitLocker click. If the link is missing, go to the section on missing or greyed-out options below.
How to Turn Off Device Encryption on 🪟 Windows 11 Home
Device encryption is the Windows 11 Home version of BitLocker, and Settings has a single switch to turn it off. The steps below decrypt the Windows drive and apply only to PCs that support the feature.
- Open Settings. Press Win+I.
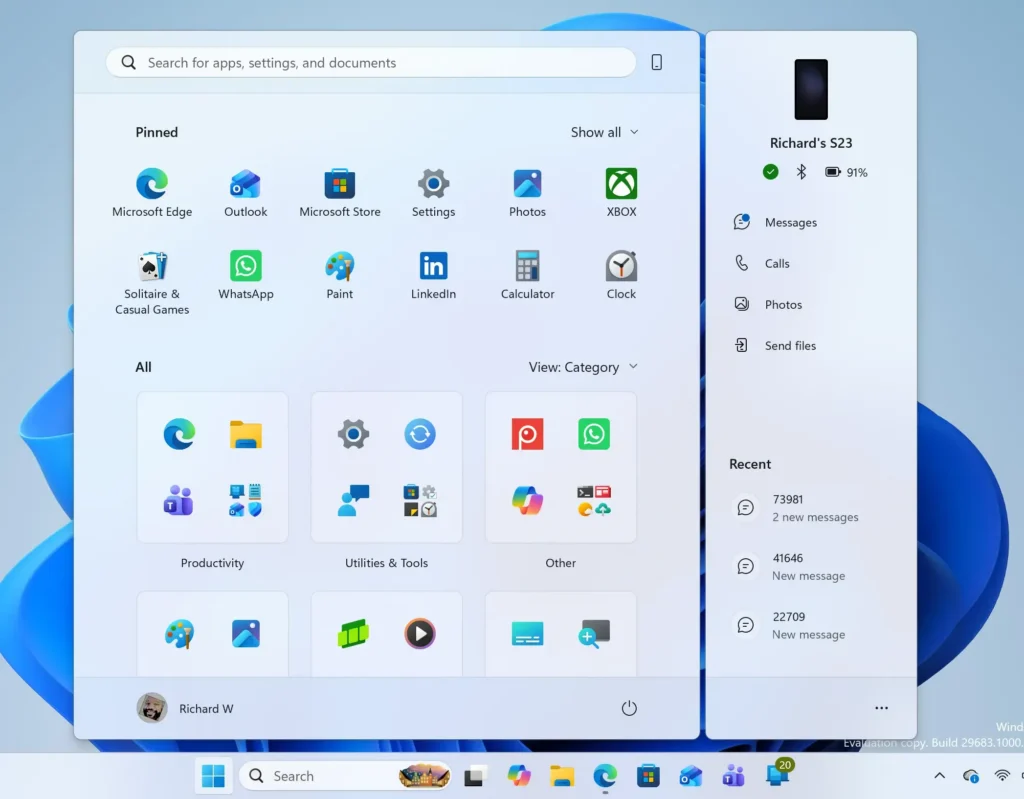
Start Menu - Select Privacy & security. It is in the left pane.
- Select Device encryption. Settings Privacy & security Device encryption opens a page with one toggle. If the entry is missing, your PC does not support Device encryption or it is managed by an organization.
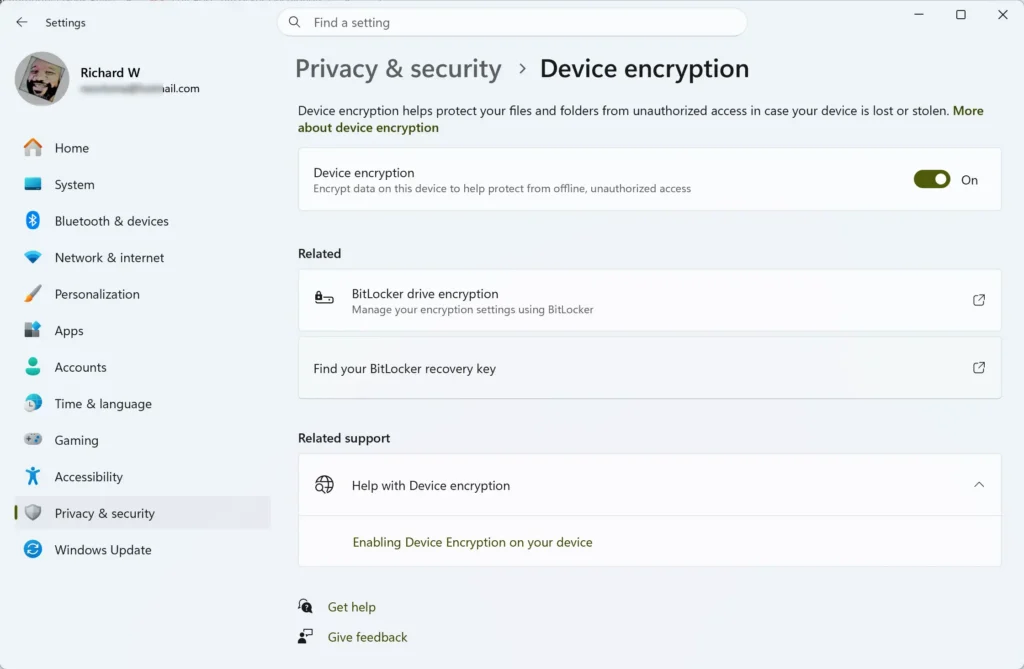
Settings > Privacy & security > Device encryption - Set the Device encryption toggle to Off. Windows asks you to confirm and may ask for administrator approval. (Administrator required.)
- Click Turn off. Windows begins decrypting the drive in the background.
- Return to the page later to check progress. When it finishes, the toggle stays Off.
Some new Windows 11 PCs turn on Device encryption when you sign in with a Microsoft account, and Windows saves the recovery key to that account. After you turn it off, you can leave the saved key in your Microsoft account or remove it from there.
How to Turn Off BitLocker with Command Prompt or PowerShell
The command line decrypts a drive without opening Control Panel. It is useful on a PC where you cannot reach the BitLocker page, or when you manage several drives. These steps need an elevated window, meaning one that runs with administrator rights.
- Open Terminal as administrator. Right-click the Start button and choose Terminal (Admin). Click Yes on the prompt. (Administrator required.)
- Check the drive status. Type the command below and press Enter. Replace D: with your drive letter. The output lists the conversion status and the percentage encrypted.
manage-bde -status D:- Start decryption. Type the command below and press Enter. Windows reports that decryption is in progress.
manage-bde -off D:- Run the status command again. Repeat the status command from step 2 to follow the progress. The drive is done when the conversion status reads fully decrypted and the percentage encrypted reads 0.0%.
PowerShell offers the same result with its own command. In an elevated PowerShell window, run Disable-BitLocker -MountPoint "D:". Replace the drive letter in quotes with the drive you want to decrypt. For more PowerShell commands (called cmdlets), see managing BitLocker with PowerShell in Windows 11.
If either command reports that the drive is locked, open the drive in File Explorer with its password or recovery key, then run the command again.
If Turn Off BitLocker Is Missing or Greyed Out
Several causes explain a missing or unavailable option. Work through them in this order.
- The drive is locked. Windows hides management options for a locked drive. Open the drive in File Explorer first, then reload the BitLocker page.
- You are not an administrator. A standard account can open the page but cannot finish the change. Sign in with an administrator account, or enter an administrator password when prompted.
- The PC is managed by work or school. An organization can enforce BitLocker with policy, which removes your ability to turn it off. In that case, contact your IT department. Leave the setting alone on a company device, because changing it may break your organization’s security rules.
- You are on Windows 11 Home. The BitLocker Drive Encryption page does not manage drives on Home. Use Device encryption in Settings, as described above.
- The drive is not encrypted. Control Panel then offers Turn on BitLocker instead. Nothing needs to be decrypted.
If decryption starts but never seems to progress, restart the PC and check the status again with manage-bde -status. If the percentage is falling, decryption is working. If it is stuck, run the status command from an elevated window and read the message it returns.
You can also reach the same page from Start. Search for Manage BitLocker and open the result. For other ways in, see how to open BitLocker settings in Windows 11.
Suspend Protection Instead of Turning BitLocker Off
If you only need BitLocker out of the way briefly, suspend it instead of decrypting the drive. Suspend protection keeps the data encrypted. It stops BitLocker checking the startup files for a while. It is the usual choice before a firmware update, which is the low-level software that starts the PC (often called BIOS or UEFI). Those changes can trigger a recovery key prompt at the next start.
Suspension is quick, and nothing is rewritten on the drive. Windows resumes protection after a restart. On the BitLocker Drive Encryption page, select Suspend protection under the drive and confirm.
Microsoft also documents a known issue where some PCs ask for the BitLocker recovery key on the first restart after an update. It affects devices that use a Group Policy setting (an administrator control for Windows settings) called “Configure TPM platform validation profile for native UEFI firmware configurations”. That setting is under Computer Configuration Administrative Templates Windows Components BitLocker Drive Encryption Operating System Drives.
Microsoft recommends removing the policy before installing the update. Microsoft lists the issue against the KB5083631 optional preview update. If your PC is managed, ask your administrator before changing the policy. Do not decrypt a managed drive to avoid the prompt.
How to Turn BitLocker Back On
You can re-encrypt a drive at any time. Return to Control Panel System and Security BitLocker Drive Encryption and select Turn on BitLocker next to the drive. Windows asks you to choose how to open the drive, then to save a new recovery key, and then starts encryption.
The steps differ by drive type. For a data drive, follow how to turn on BitLocker to protect a data drive in Windows 11. For the Windows drive, follow how to turn on BitLocker for your Windows 11 operating system drive.
What to Do Next
Open the BitLocker Drive Encryption page once decryption ends. Every drive you decrypted should now read BitLocker off. To confirm the state of all your drives at once, use the steps in how to check BitLocker drive status on Windows 11. If you decrypted a drive to fix a startup prompt rather than to stop using encryption, you can turn BitLocker back on once the cause is removed.
Have a question about this guide?
Answered by AI from this guide. Good questions may be added to this page — please don't include personal details.
Did this guide fix your problem?

About the Author
Richard
Tech Writer, IT Professional
Richard is a writer at Geek Rewind who turns complex IT tasks into clear, step-by-step guides. He draws on years of hands-on experience in system administration and enterprise IT operations, focusing on Windows, Linux and WordPress: the problems people actually run into, and the fixes that work. His server and WordPress guides come from systems he runs himself. Richard builds and maintains the platform behind Geek Rewind, from its Ubuntu servers and Nginx configuration to its custom WordPress plugins. Many new tutorials start with readers' questions, and he's always glad to answer them in the comments.
No comments yet — be the first to share your thoughts!