Shorten the Display Turn-Off Time in Windows 11

- 17 steps
- Needs administrator rights
- Includes a restart or sign-out
The display turn-off time in Windows 11 controls how long the screen stays on after your last keystroke or mouse movement. To shorten it, open Settings System Power & battery and pick a lower value under the screen timeout list.
The setting changes the screen only. It does not put the PC to sleep, so your apps and downloads keep running. The shortest value Windows 11 offers in Settings is 1 minute.
You can shorten the display turn-off time in three ways: the Settings app, Power Options in Control Panel, or the powercfg command. It then explains what to check when the screen still turns off at the wrong time, or the options are missing.
To shorten the display turn-off time in Windows 11, open Settings, go to System Power & battery, and choose a lower time in the screen timeout drop-down lists. On a laptop, change both “On battery power, turn off my screen after” and “When plugged in, turn off my screen after”. The change affects only the screen, not sleep, so apps and downloads keep running.
What the Display Turn-Off Timer Controls
Windows 11 keeps two separate timers for power. The first turns off the display (the screen goes black, but the PC stays awake). The second puts the whole PC to sleep, which pauses your apps and stops network activity.
Windows saves these values inside the active power plan (a named bundle of power settings). The change you make applies to the plan currently in use. If you switch plans later, that plan has its own timers.
Two things work independently of this timer. A screen saver, if you have one turned on, starts before the display turns off. The lock screen also has its own short timer, which is covered in the troubleshooting section below.
Shorten the Display Turn-Off Time in Settings
The Settings app is the fastest way to shorten the display turn-off duration in Windows 11. Follow the numbered steps below to open Settings and save the change. Standard user accounts can normally do this without administrator rights, unless your work or school has locked power settings.
- Open Settings. Press Win+I, or right-click the Start button and choose Settings. The Settings window opens with the System page selected.
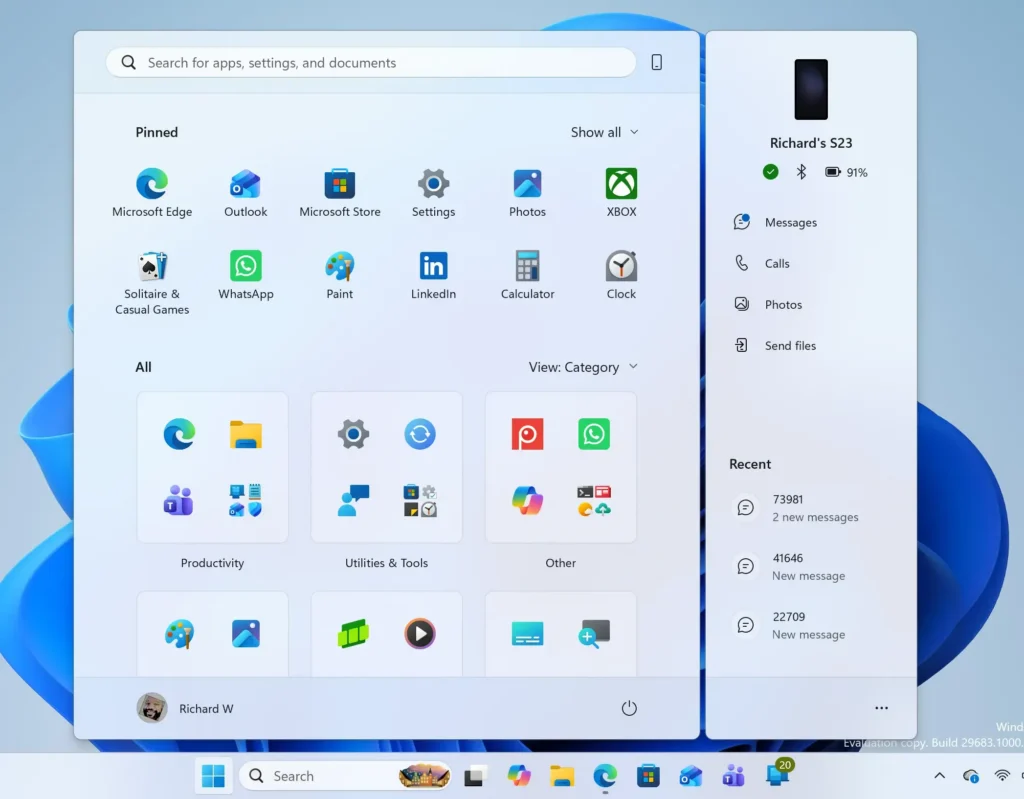
Start Menu - Click System. If you are already on the System page, the left pane shows it highlighted. Skip this step in that case.
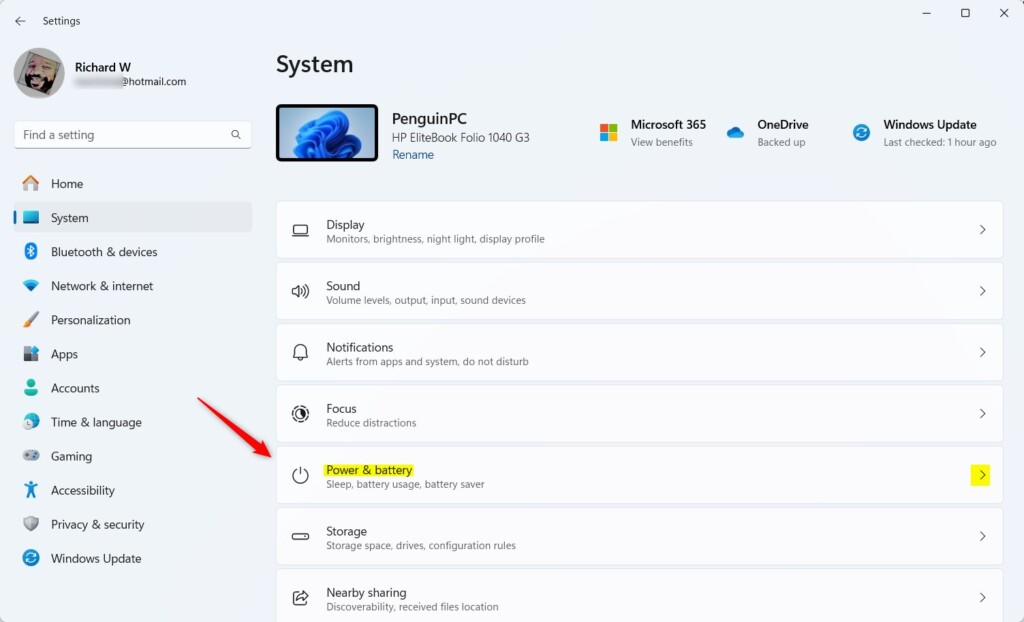
- Click Power & battery. On a desktop PC, the page is named Power instead. The page shows battery information at the top on laptops, followed by the power options.
Settings > System > Power - Expand the screen timeout section. Click Screen, sleep, & hibernate timeouts. Older Windows 11 builds label this section Screen and sleep. Four drop-down lists appear, or two on a desktop.
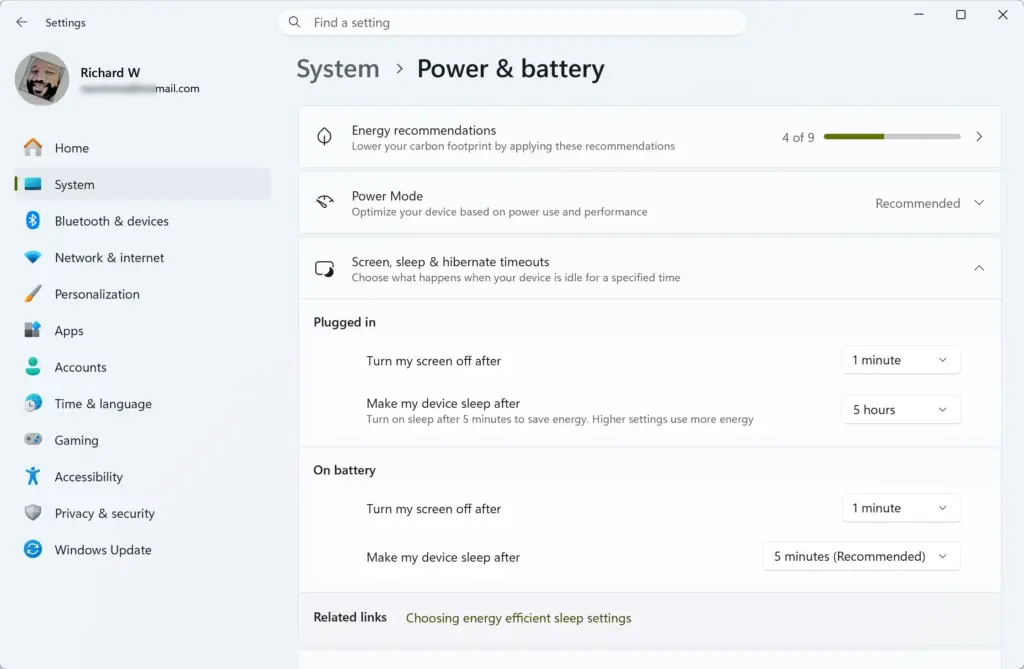
- Open the screen list for battery power. Click the drop-down next to On battery power, turn off my screen after. A list of times appears. Laptops and tablets only show this option.
- Choose a shorter time. Pick a lower value such as 2 minutes or 5 minutes. Windows applies the change as soon as you select it, and the drop-down shows the new value.
- Open the screen list for plugged-in use. Click the drop-down next to When plugged in, turn off my screen after. This is the only screen option on a desktop PC.
- Choose a shorter time here too. Select the value you want. Many people use a longer time when plugged in and a shorter one on battery to save charge.
- Close Settings. No Save button exists on this page, and you do not need to restart. Leave the PC idle for the time you chose to confirm the screen goes black.
The sleep timers sit directly below the screen timers. Check that the sleep value is not shorter than the screen value. If sleep is set to 3 minutes and the screen to 5, the PC sleeps first and the screen setting never matters.
If the Drop-Down Lists Are Greyed Out
Greyed-out lists usually mean a policy (a rule set by an administrator) controls the value. This is common on work or school PCs that are managed by an organization’s IT system, such as a domain (a central network that controls the PC) or a device-management tool. Check whether a banner at the top of Settings reads Some settings are managed by your organization.
On a personal PC, a third-party utility from the PC maker can also manage power settings. Open the maker’s power or battery app, if one is installed, and check whether it overrides Windows. If neither applies, try the Control Panel method below, which reads the same plan from a different screen.
Change the Time in Power Options (Control Panel)
Power Options is the older Control Panel page for the same setting. Use it if the Settings page is greyed out, hides a plan you want to edit, or you manage several power plans. It writes to the same plan Settings uses.
- Open Power Options. Press Win+R to open the Run box, type
powercfg.cpl, and press Enter. The Power Options window opens.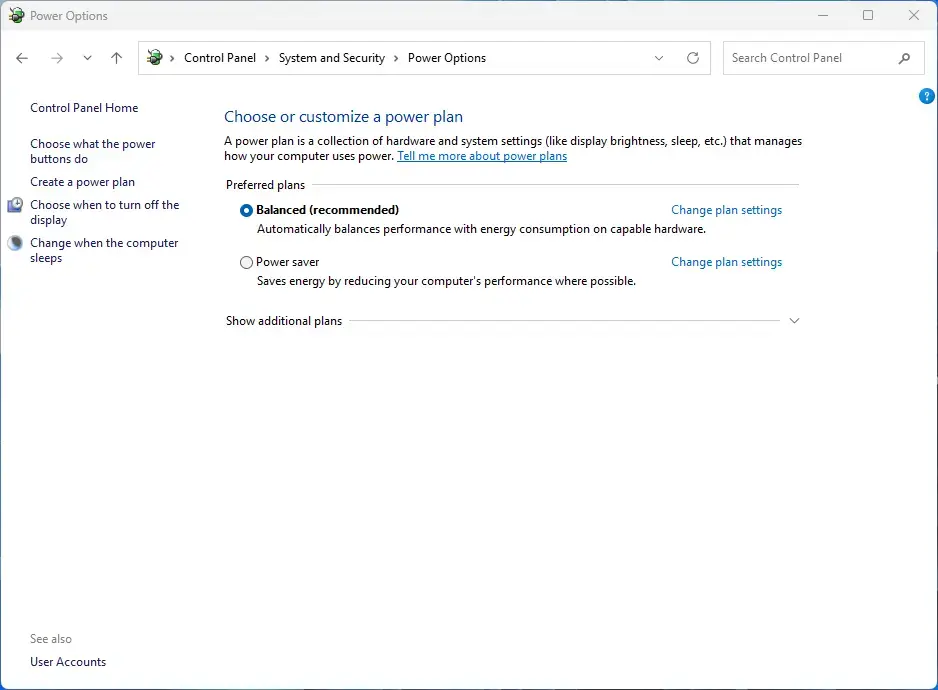
Control Panel › System and Security › Power Options - Click Choose when to turn off the display. The link sits in the left pane. A page opens with the settings for your current plan.
- Set Turn off the display. Use the drop-down in the On battery column, then the one in the Plugged in column. Choose a shorter time in each. A desktop PC shows only the plugged-in column.
- Click Save changes. The button is at the bottom of the window. Windows applies the new times immediately.
If you use more than one plan, go back to the main Power Options page and click Change plan settings next to the other plan. That page shows the same two drop-downs for that plan.
The Power Options page also has a Change advanced power settings link. Under Display there, the entry Turn off display after shows the same value in minutes. Use it only if you need to compare several settings in one place.
Set the Time With the powercfg Command
The powercfg command sets the screen timeout from a terminal. It suits a quick change, or a setup you repeat on several PCs. The command changes the active power plan, and the value is in minutes.
- Open Terminal. Right-click the Start button and choose Terminal. If you see an “Access is denied” message in the next steps, close Terminal and reopen it as Terminal (Admin). That needs administrator rights.
- Set the plugged-in time. Type the command below and press Enter. It turns off the display after 5 minutes when plugged in. Replace 5 with your number.Code
powercfg /change monitor-timeout-ac 5 - Set the battery time. Type the command below and press Enter. It turns off the display after 3 minutes on battery.Code
powercfg /change monitor-timeout-dc 3 - Check the result. Open Settings System Power & battery and expand the screen timeout section. The drop-downs show your new values.
The command returns no message when it works. A value of 0 means the screen never turns off, so avoid it if your goal is a shorter time. The command accepts whole minutes only, so 1 minute is the practical minimum.
When the Screen Still Turns Off at the Wrong Time
If the screen stays on longer than your setting, or goes dark sooner, one of the causes below is usually responsible. Work through them in order.
An App Is Keeping the Screen Awake
Video players, web browsers playing video, presentation tools and some remote-desktop apps ask Windows to keep the display on. Windows honors that request and ignores your timer while it lasts. Close the app or pause the video, then wait for the timer again.
To see which program is asking, first open Terminal (Admin), because the command needs administrator rights. Then run this command.
powercfg /requestsLook under DISPLAY in the output. If a program is listed, that program is keeping the screen on. None. under that heading means no app is holding it awake.
A Screen Saver Starts First
A screen saver replaces the desktop with an animation, and Windows turns the display off only after its own timer. If you see a screen saver before the screen goes black, open Settings Personalization Lock screen Screen saver. Set Screen saver to (None) or shorten its wait time.
The Lock Screen Has Its Own Timer
Once Windows locks the PC, the screen goes dark on a short timer of its own. That timer is separate from the one you changed above. That is why a screen set to Never still goes black on the sign-in screen. Moving the mouse or pressing a key wakes the display again.
The Setting Is Per Power Plan
Windows may switch to a different plan when you change the power mode or install a manufacturer’s utility. If your change appears to vanish, open Power Options with powercfg.cpl and check which plan has the dot next to it. Then repeat the change on that plan.
You Use More Than One Monitor
The screen timeout applies to all connected displays together. You cannot give one monitor a different value. If a second monitor stays on, confirm which one is which with Identify Which Monitor Is Which in Windows 11 Display Settings. Then check that the monitor’s own power-saving menu is not set to ignore the signal loss.
Your display mode can also matter. If you show your screen on a TV (projecting or duplicating), the display mode decides which screens show the desktop. See How to Choose a Display Mode on Your Windows 11 PC for the available options.
Undo the Change or Restore the Defaults
To undo a shorter timeout, repeat the steps in Settings or Power Options and pick the longer time. You can reverse this at any time, and you do not need to restart the PC.
powercfg.cpl. Click Change plan settings next to the plan, then Change advanced power settings. Click Restore plan defaults, then OK. This resets every value in that plan, not only the screen timeout, so use it only if you want a full reset.For a wider look at the same setting, including the lock screen and sleep, read How to Change Screen Timeout to Turn Off Display After in Windows 11.
What to Do Next
Feature updates and manufacturer power utilities can reset or override power plans, so recheck the timeout after a major update if the screen behaves differently. If the screen now turns off too quickly while you watch video, raise only the plugged-in value and leave the battery value short.
Next, you could lower your display refresh rate. How to Change Your Display Refresh Rate in Windows 11 shows how, and it also reduces power use on a laptop.
Frequently asked questions
How to calibrate display color in 🪟 Windows 11?
Open the Start menu, type Calibrate display color, and press Enter. The Display Color Calibration wizard opens and walks you through gamma, brightness, contrast, and color balance. Click Next to move through each screen, then Finish to save the profile. Compare the sample images with your screen as you go, since results vary by monitor.
How to adjust display settings in 🪟 Windows 11?
Open Settings System Display to change how your screen looks. Use the Scale list to make text and apps larger or smaller, and the Display resolution list to sharpen or soften the image. Drag the Brightness slider to adjust light levels, and turn on Night light to reduce blue light in the evening. Changing resolution can blur some apps, so test a new setting before you keep it.
How to change time in 🪟 Windows 11?
Open Settings Time & language Date & time. Turn on Set time automatically to sync the clock with the internet. To set the time yourself, turn that toggle off, then click Change under Set the date and time manually. Use the Time zone list if the clock is correct but shows the wrong hour.
How to increase screen time in 🪟 Windows 11?
Open Settings System Power & battery and expand Screen and sleep. Pick a longer time next to On battery power, turn off my screen after and next to When plugged in, turn off my screen after. This keeps the display on longer before it turns off. It does not change when the PC goes to sleep, which has its own setting.
How to change date and time in 🪟 Windows 11?
Open Settings Time & language Date & time to set the date and time. Turn on Set time zone automatically to match your location, or choose your zone from the Time zone list. To enter the clock yourself, turn off Set time automatically, click Change under Set the date and time manually, enter the values, and click Change again to save.
Still have a question?
Answered by AI from this guide. Good questions may be added to this page — please don't include personal details.
Did this guide fix your problem?

About the Author
Richard
Tech Writer, IT Professional
Richard is a writer at Geek Rewind who turns complex IT tasks into clear, step-by-step guides. He draws on years of hands-on experience in system administration and enterprise IT operations, focusing on Windows, Linux and WordPress: the problems people actually run into, and the fixes that work. His server and WordPress guides come from systems he runs himself. Richard builds and maintains the platform behind Geek Rewind, from its Ubuntu servers and Nginx configuration to its custom WordPress plugins. Many new tutorials start with readers' questions, and he's always glad to answer them in the comments.
No comments yet — be the first to share your thoughts!