Protect Windows 11 from Malware Without Installing Extra Software

- 44 steps
- Needs administrator rights
- Includes a restart or sign-out
The best ways to protect Windows 11 from malware are already built in: Windows Update, Microsoft Defender Antivirus, SmartScreen, the firewall and a standard user account. Each is a setting in the Windows Security app or Settings, and none needs a download or subscription.
Malware is software built to damage your PC, steal data or lock your files for ransom. Microsoft Defender Antivirus (the built-in scanner that checks files as you open them) is on by default. Other protections ship off, or get switched off by other software or a work policy.
This post checks each protection in order, shows what a healthy screen looks like, and explains why an option may be missing or greyed out. Windows 10 reached end of support on October 14, 2025, so every step here assumes Windows 11.
The best ways to protect Windows 11 from malware are already built in: Windows Update, Microsoft Defender Antivirus, SmartScreen, Windows Firewall, memory integrity, a standard user account with User Account Control, and ransomware protection. Each is a setting in the Windows Security app or Settings, so you need no download or subscription.
What Are the Best Ways to Protect 🪟 Windows 11 from Malware?
These seven protections cover most of what malware does: arriving through a flaw, running as a file, spreading over a network, or damaging your data. The sections below show where each one lives.
- Windows Update: installs the security fixes that close the flaws malware uses to get in.
- Microsoft Defender Antivirus: scans files and running programs in real time and removes known threats.
- SmartScreen and Smart App Control: warn about or block downloads and apps that Microsoft’s cloud service does not recognise as safe.
- Windows Firewall: blocks unwanted incoming network connections on every network profile.
- Memory integrity: stops unsafe drivers and code from running in the most protected part of Windows.
- Standard user account with User Account Control: limits what malware can change if you run it by mistake.
- Ransomware protection and backups: block unknown apps from changing your folders and give you a clean copy to restore.
Check Your Windows Security Status First
The Windows Security app shows every built-in protection on one page. Start here, because it also tells you if another antivirus has taken over.
- Press the Start button, type Windows Security, and press Enter. The app opens on the Home page with tiles such as Virus & threat protection, Firewall & network protection and Device security.
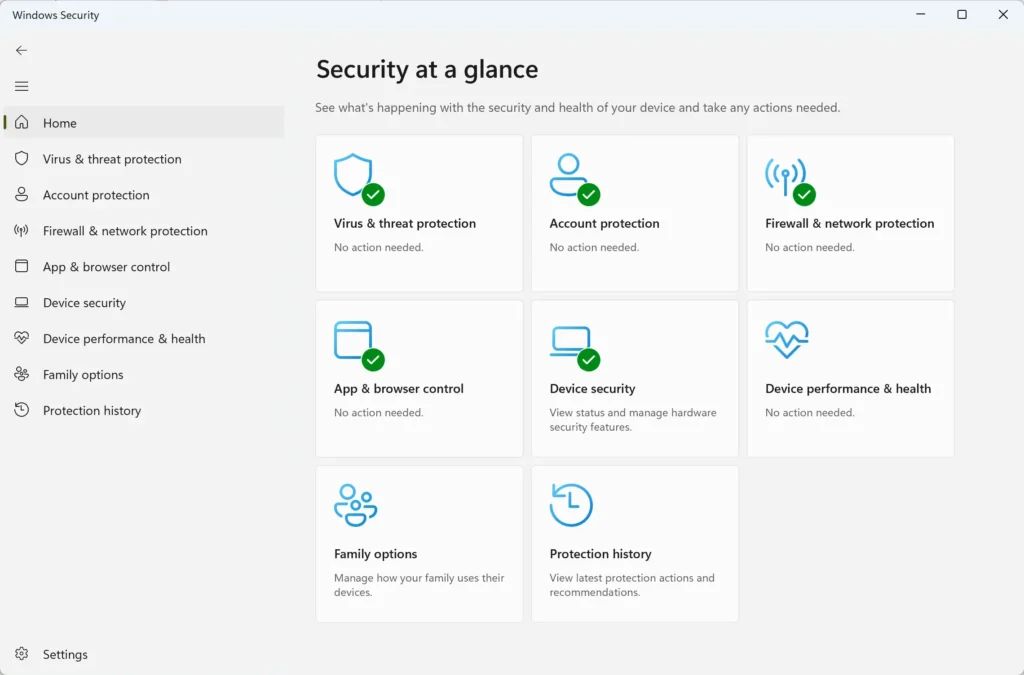
Windows Security - Read the icon on each tile. A green check mark means no action is needed. A yellow exclamation mark is a recommendation. A red X means a protection is off or needs attention.
- Click any tile with a yellow or red icon. Windows Security shows the problem and usually a button such as Turn on that fixes it.
If the Virus & threat protection tile names another security product, that product is the active antivirus. Windows then runs Microsoft Defender Antivirus in a limited mode, and several toggles in this post will not appear. To use the built-in tool, uninstall the other product under Settings Apps Installed apps, then restart the PC.
Keep 🪟 Windows 11 and Your Apps Updated
Most malware gets in through a known flaw that an update already fixes. Checking for updates is the single most useful habit on this list.
- Open Settings Windows Update.
- Click Check for updates. Windows downloads and installs what it finds. A status line such as “You’re up to date” confirms there is nothing waiting.
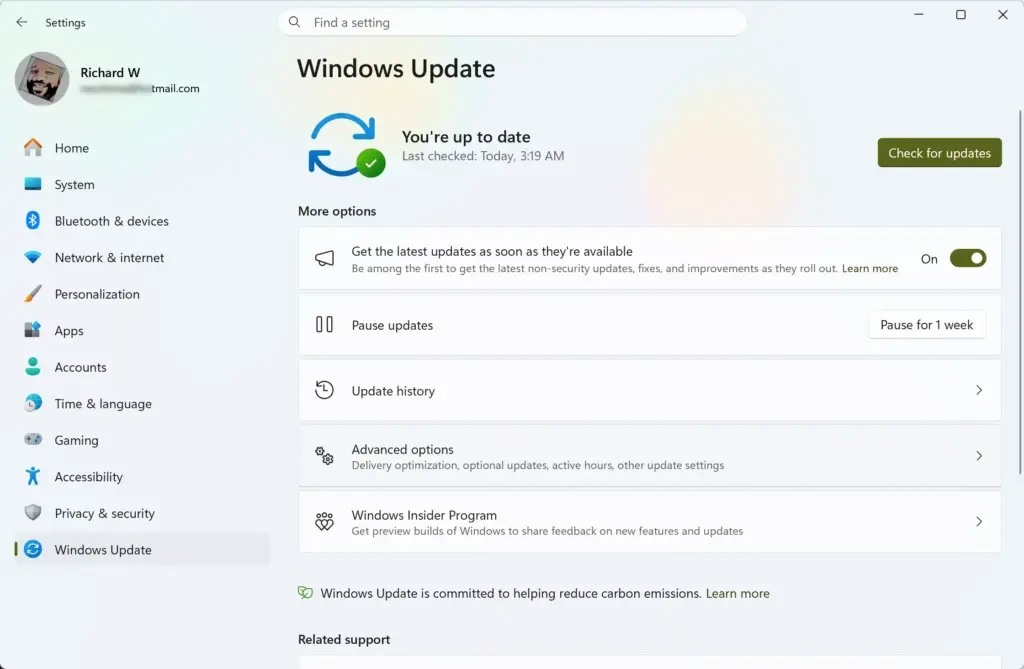
Settings › Windows Update - Click Restart now if the page asks for a restart. Many security fixes do not take effect until the PC restarts.
- Click Resume updates if the page says updates are paused. Paused updates also pause security fixes.
If an update fails, Windows lists it under Update history with an error code. If an update still fails, restart the PC, then run Check for updates again. Search for the error code only if the retry fails.
Apps need updates too. Open the Microsoft Store, click Library, then click Get updates. For apps you installed from other sources, such as your browser, open the app’s own About or Update page.
Confirm Microsoft Defender Antivirus Is Protecting You
Microsoft Defender Antivirus is the main defence against malware on Windows 11. These settings confirm it is watching in real time and reaching Microsoft’s cloud for new threat information. For a wider look at the tool, see how to protect your Windows 11 PC from viruses.
Check Real-Time Protection, Cloud Protection and Tamper Protection
Real-time protection scans files the moment they are opened or downloaded. Tamper Protection stops other apps, including malware, from changing Defender’s settings.
- Open Windows Security Virus & threat protection.
- Administrator required. Under Virus & threat protection settings, click Manage settings. Approve the User Account Control prompt if one appears.
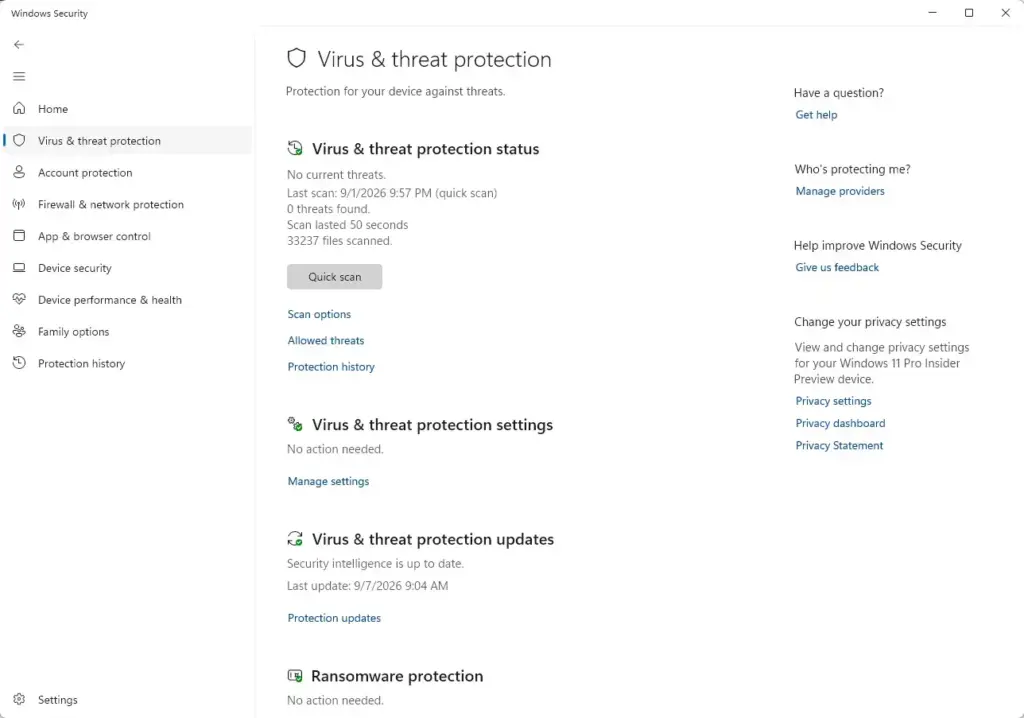
Windows Security › Virus & threat protection - Switch Real-time protection to On. If you turned it off to install something, Windows switches it back on after a short time, but do not rely on that.
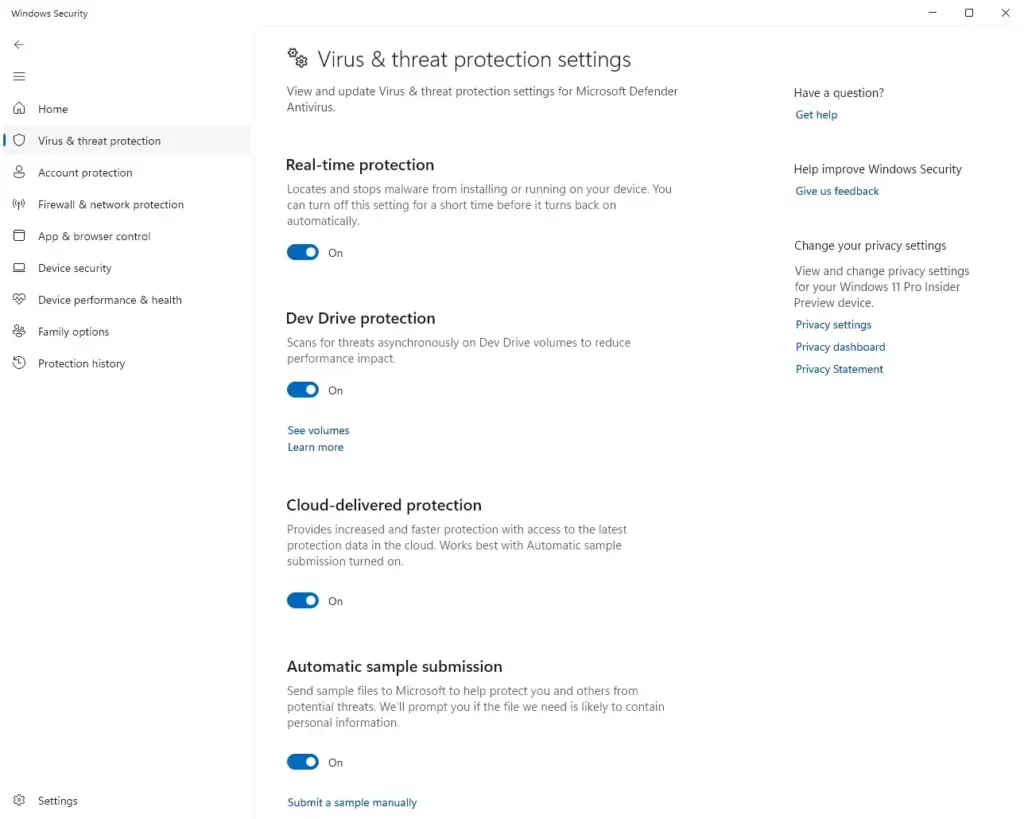
Windows Security - Switch Cloud-delivered protection to On. This lets Defender check unfamiliar files against Microsoft’s online threat data.
- Decide on Automatic sample submission. It sends suspicious files to Microsoft for analysis. Leave it off if you do not want files leaving your PC.
- Scroll down and switch Tamper Protection to On.
If a toggle is greyed out, look at the top of the page. A line reading “Some of these settings are managed by your organization” means a work or school policy controls it, and only your administrator can change it. On a home PC, a greyed-out Tamper Protection usually means a work policy or another antivirus product is in control.
Run a Quick Scan and a Microsoft Defender Offline Scan
A Quick scan checks the places malware usually hides. A Microsoft Defender Offline scan restarts the PC and scans before Windows loads, which catches malware that hides while Windows runs. The full process, including removing what it finds, is in how to scan for malware in Windows 11 with Defender.
- Open Windows Security Virus & threat protection and click Quick scan. The page shows a progress bar and then “No current threats” or a list of detections.
- Click Scan options to run a deeper scan.
- Select Microsoft Defender Antivirus (offline scan).
- Save your open work, because the next step restarts the PC. Then click Scan now.
The PC restarts into a blue scanning screen and returns to Windows when it finishes. The result appears under Protection history in the same section.
Turn On SmartScreen and Smart App Control
SmartScreen checks downloads, websites and apps against Microsoft’s records of which software is known to be safe and which is not, and warns you before you run something unknown. Most malware reaches a PC because someone ran a file they should not have, so this layer matters.
- Open Windows Security App & browser control.
- Click Reputation-based protection settings.
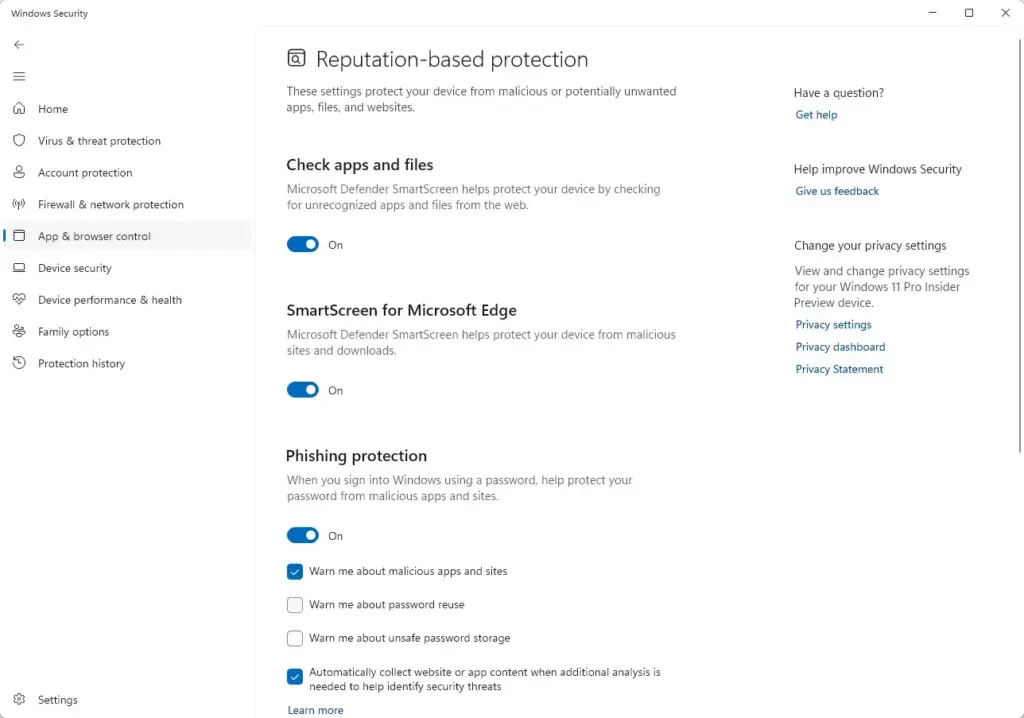
Windows Security - Switch Check apps and files to On. This is the SmartScreen check for files you download and run.
- Switch SmartScreen for Microsoft Edge to On. It warns you about dangerous sites and downloads in Edge.
- Switch Potentially unwanted app blocking to On, then select Block apps and Block downloads. Potentially unwanted apps are bundled adware and similar software that is not quite malware but still harmful.
- Switch SmartScreen for Microsoft Store apps to On.
When SmartScreen stops a file, a blue window titled “Windows protected your PC” appears. Click More info to see the file name and publisher. The Run anyway button appears after that. Use it only for software you downloaded from the publisher’s own site and expected to see.
Check Smart App Control
Smart App Control (a Windows 11 feature that blocks apps Microsoft’s cloud service cannot vouch for) is on the same App & browser control page, under Smart App Control settings. It requires Windows 11 version 22H2 or later.
The setting shows On, Evaluation or Off. In Evaluation mode, Windows watches how you use the PC for a while, then decides whether to turn Smart App Control on or off. Smart App Control is meant for new Windows 11 installs. If you upgraded from an older setup, it often shows as off and unavailable.
Check That Windows Firewall Is On
Windows Firewall filters network traffic and blocks unrequested incoming connections. Windows keeps a separate firewall setting for each network type, and all three should be on.
- Open Windows Security Firewall & network protection.
- Check Domain network, Private network and Public network. Each should say “Firewall is on.”
- Administrator required. Click any network that shows the firewall as off, then click Turn on under Microsoft Defender Firewall.
Restoring the defaults removes any rules that apps have added, so some programs may ask for network access again. If the firewall behaves oddly after you change settings, click Restore firewalls to default at the bottom of the page, then confirm. Use it only as a last step.
Turn On Memory Integrity
Memory integrity (also called Hypervisor-protected code integrity, after the virtualisation layer it uses) runs code checks in a separate area that malware cannot reach. It stops malicious or unsafe drivers from loading into the core of Windows. Many newer PCs already have it on.
- Open Windows Security Device security.
- Under Core isolation, click Core isolation details. If you do not see a Core isolation section, the hardware may not support it, or virtualization may be turned off in the PC’s firmware settings.
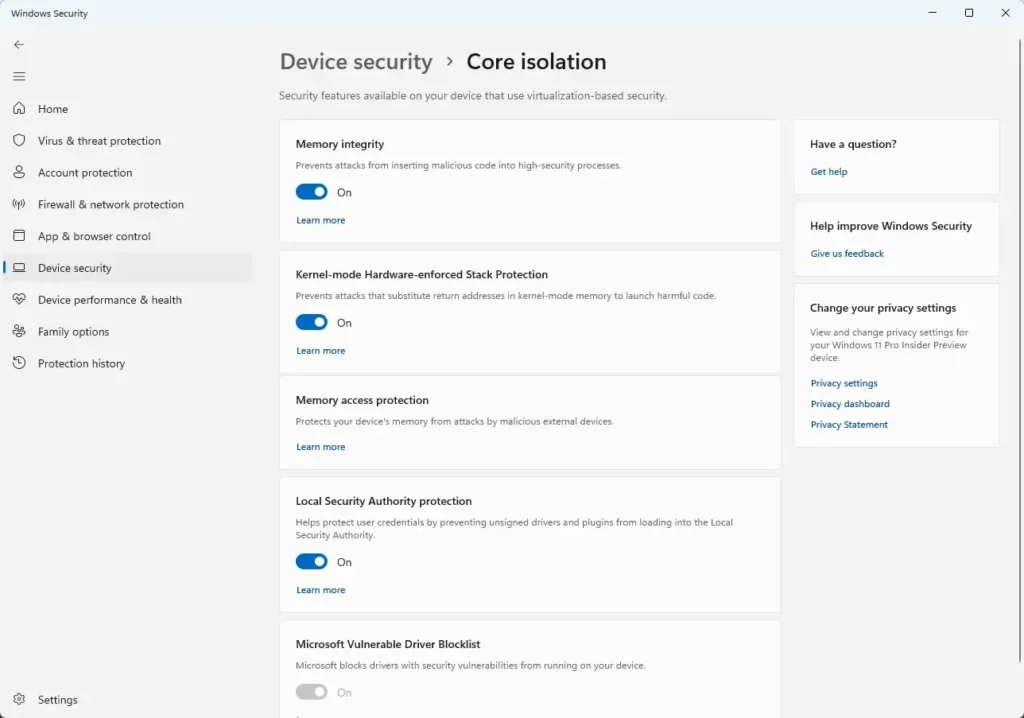
Windows Security Core isolation page showing Kernel-mode Hardware-enforced Stack Protection toggle - Administrator required. Switch Memory integrity to On.
- Restart the PC when Windows prompts you. The setting takes effect after the restart.
If Windows reports that an incompatible driver blocks the change, click Review incompatible drivers. The list names each driver. Update the software for that device, or uninstall it if you no longer use the device, then try the switch again. To undo the change, set the same toggle to Off and restart.
Use a Standard Account for Daily Work
An administrator account can change anything on the PC, so malware you run in one gets the same power. A standard user account blocks system-wide changes until someone approves them with an administrator password. This one change limits the damage from a bad download more than most settings do.
Switch Your Daily Account to Standard
- Administrator required. Open Settings Accounts Other users.
- Click Add account next to Add other user and follow the prompts to create a new account.
- Select the new account, click Change account type, choose Administrator in the drop-down, and click OK.
- Sign out, then sign in to the new administrator account to confirm that it works.
- Open Settings Accounts Other users again. Select your everyday account and click Change account type.
- Choose Standard User and click OK. Sign back in to your everyday account.
From now on, installing software or changing system settings brings up a prompt asking for the administrator’s password. That prompt is User Account Control (UAC), the feature that asks for approval before changes are made. To reverse this, sign in as the administrator and use Change account type to set the account back to Administrator.
Confirm User Account Control Is at the Default Level
User Account Control (UAC) is the prompt that asks for approval before a program makes system changes. Some programs and tweaks lower it, so check that it has not been turned down.
- Press the Start button, type Change User Account Control settings, and press Enter.
- Administrator required. Check the slider. The default position reads Notify me only when apps try to make changes to my computer (default).
- Drag the slider up to that position if it sits lower, then click OK.
Never set the slider to Never notify. At that level, malware can make system changes with no prompt at all.
Protect Your Files from Ransomware
Ransomware locks or encrypts your files and demands payment. Two layers help: Controlled folder access, which blocks unknown apps from changing protected folders, and backups that ransomware cannot reach. The ransomware protection guide covers the first layer in more depth.
- Open Windows Security Virus & threat protection.
- Under Ransomware protection, click Manage ransomware protection.
- Switch Controlled folder access to On. Documents, Pictures, Videos, Music and Favorites are protected by default.
Controlled folder access can block a trusted app that saves into those folders. When that happens, the app shows a save error or Windows Security shows a notification. Click Allow an app through Controlled folder access on the same page and add the app.
Keep a Backup That Malware Cannot Reach
A backup is the most reliable way to get back files that ransomware has already encrypted. OneDrive folder backup keeps copies of Desktop, Documents and Pictures online, and you manage it under Settings Accounts Windows backup. Microsoft 365 subscribers also get ransomware detection and file recovery in OneDrive.
If you back up File History to a network share over SMB (the Windows file-sharing protocol), a false “invalid credentials” error could stop automatic backups. Microsoft fixed this in KB5101684 (the number Microsoft gives each update), an optional preview update released on October 28, 2026. Install it from Settings Windows Update Advanced options Optional updates if you see that error.
Close the Gaps That Settings Cannot Cover
Windows cannot stop you from running a file you chose to open. A few habits fill that gap.
Download software only from the publisher’s own site or the Microsoft Store. Treat unexpected email attachments, especially invoices and shipping notices, as suspect until you confirm the sender another way. Do not use Run anyway on a SmartScreen warning for a file you did not expect.
Show file extensions (the letters after the final dot, such as .pdf) so that a file named invoice.pdf.exe cannot pass as a PDF. Windows hides extensions by default.
- Open File Explorer.
- Click View in the toolbar, point to Show, and click File name extensions. A check mark appears next to it, and every file name now ends with its extension, such as .pdf or .exe.
For privacy settings that overlap with malware defence, such as app permissions and location access, see the Windows 11 security and privacy guide. For a broader tour of Windows Security itself, read protect your Windows 11 with Microsoft Security.
Why an Option May Be Missing or Greyed Out
Another Antivirus Is Installed
When a third-party antivirus is active, Windows Security hands over most antivirus controls. The Real-time protection toggle and scan buttons then disappear or do nothing. Uninstall the other product and restart to bring them back.
A Work or School Policy Controls the PC
The message “Some of these settings are managed by your organization” means an administrator has locked the setting. Changing it on a managed PC needs that administrator. This also applies to a personal PC that was once joined to a work account.
🪟 Windows 11 Home Versus Pro
Every protection covered in this post exists in both Windows 11 Home and Windows 11 Pro. The differences show up in management tools, not in these settings. If a toggle is missing on Home, the cause is more likely another antivirus, a policy or unsupported hardware.
What to Do Next
Windows Security should now show green check marks on every tile, and each protection above can be switched back from the same page it was turned on. If a scan finds a threat that Defender cannot remove, follow the removal steps in how to scan for malware in Windows 11 with Defender. Recheck the Windows Security Home page after each feature update, because updates can reset settings such as Smart App Control or Controlled folder access.
Have a question about this guide?
Answered by AI from this guide. Good questions may be added to this page — please don't include personal details.
Did this guide fix your problem?

About the Author
Richard
Tech Writer, IT Professional
Richard is a writer at Geek Rewind who turns complex IT tasks into clear, step-by-step guides. He draws on years of hands-on experience in system administration and enterprise IT operations, focusing on Windows, Linux and WordPress: the problems people actually run into, and the fixes that work. His server and WordPress guides come from systems he runs himself. Richard builds and maintains the platform behind Geek Rewind, from its Ubuntu servers and Nginx configuration to its custom WordPress plugins. Many new tutorials start with readers' questions, and he's always glad to answer them in the comments.
No comments yet — be the first to share your thoughts!