How to Use Windows 11’s Built-in Antivirus (Microsoft Defender)

Microsoft Defender is the built-in antivirus in Windows 11. It runs in the background and stops viruses, spyware and other threats when you download a bad file or visit a risky website. It is free, and you don’t need to install anything extra. You manage it through the Windows Security app, which you can open from the system tray at any time. From there you can check your PC’s health, run a quick scan or change your safety settings. This guide covers where everything is, how to run each type of scan, and which settings are worth changing.
Open Windows Security by clicking Start, typing “Windows Security” and pressing Enter, then select Virus & threat protection. Microsoft Defender Antivirus is already on in Windows 11 and runs in the background, so you only need to confirm it is active and check for warnings. You can run a Quick scan from the same page at any time.
What is Microsoft Defender Antivirus?
Microsoft Defender Antivirus is the security program that ships with Windows 11. It protects your computer from viruses, spyware and other online threats. It needs no separate download or subscription. It scans files automatically and removes dangerous software to keep your personal information safe.
It works the same on Windows 11 Home and Pro, so you don’t need a particular edition to get the protection described here. A few extras, such as managed settings in a company environment, only matter if your PC is controlled by an organization.
Why Use Built-in Antivirus?
Defender gives you strong, free protection that is already part of Windows 11. Microsoft makes it, so it updates automatically through Windows Update and picks up new threats quickly. It runs without noticeably slowing your computer, and there are no monthly fees.
Because the updates come through Windows Update , keep Windows Update working. If updates are blocked or paused for a long time, Defender’s threat definitions fall behind.
What Happens When Microsoft Defender is Active?
Defender watches your computer in the background and blocks threats before they can harm your files. It scans every file you download or open as it happens. It checks running apps for suspicious behavior. It also runs scheduled system checks to catch anything that slipped past the first line of defense.
- Real-time Protection: It scans files as you open them. It checks downloads before they save. It monitors applications as they run. If it finds anything suspicious, it stops it immediately.
- Scheduled Scans: Defender can be set to scan your entire computer regularly. This catches anything that might have slipped through. Windows also runs its own background scans when the PC is idle.
- Virus & Threat Protection: This is the core. It identifies and removes viruses, malware, ransomware, spyware, and other malicious software.
- Firewall Protection: Defender works with the Windows Firewall. This controls network traffic. It blocks unauthorized access to your computer.
- Account Protection: It helps secure your Microsoft account login and shows your sign-in options, such as Windows Hello.
- Device Security: It can check for hardware security features, such as the TPM chip and core isolation.
- App & Browser Control: It adds an extra layer of security for apps and your web browsing.
Active protection means a dedicated security system guards your computer all the time while you work or browse. You don't have to start it or remember to run it. Your main job is to make sure it stays turned on and that Windows Security doesn't show any warnings.
Accessing Microsoft Defender Antivirus
You manage all of Defender's settings in the Windows Security app. It is already installed on every Windows 11 PC, and there are three easy ways to open it, covered below.
Opening Windows Security
Windows Security is the central app for checking your computer's health and managing antivirus settings. The quickest way to open it is to click the Start button, type "Windows Security" into the search bar, and click the app in the results. Two other routes are listed here in case you prefer them.
- From the Start Menu: Click the Start button. Type "Windows Security" in the search bar. Click the Windows Security app when it appears in the results. The app window opens with the security dashboard.
- From Settings: Click the Start button, then click Settings. In the Settings window, click Privacy & security in the left-hand menu, then click Windows Security. The page has an Open Windows Security button that launches the app.
- Using the System Tray: Look for a shield icon in the system tray (the area near the clock on your taskbar). If you see it, click it. If you don't see it, click the small upward arrow to show hidden icons. A small colored mark on the shield, such as a yellow warning or red X, means something needs attention.
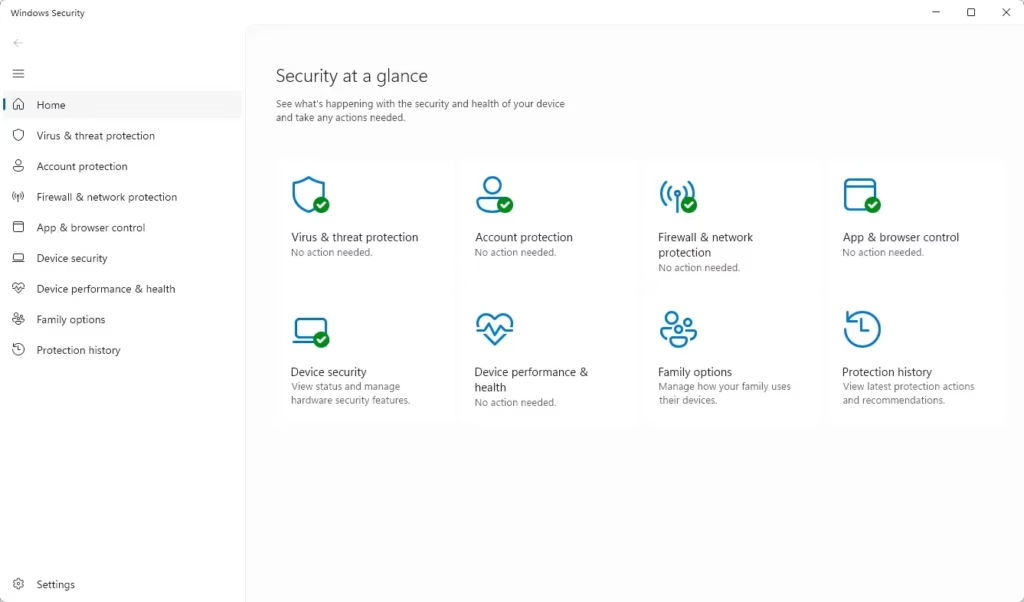
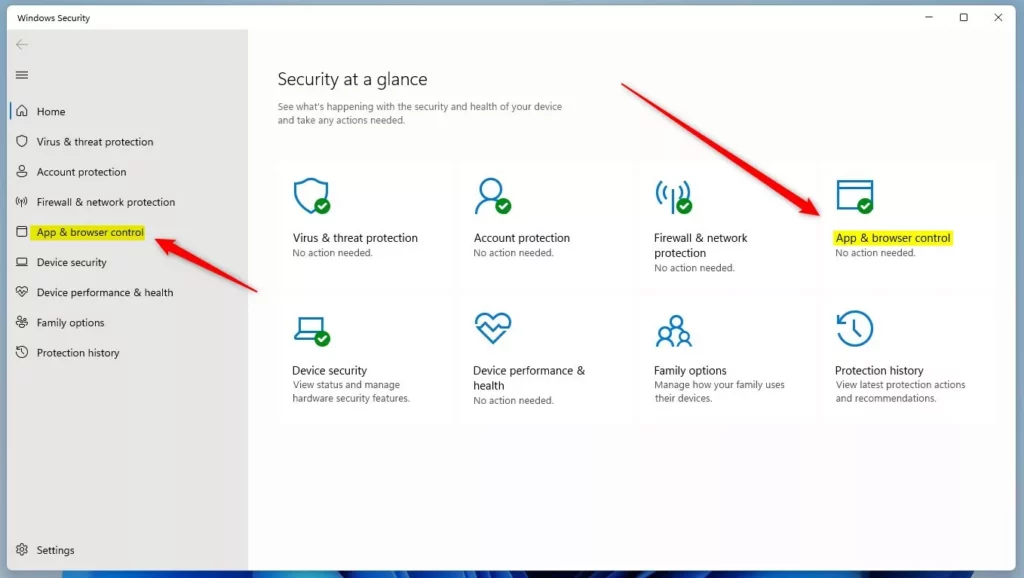
Once Windows Security opens, a dashboard appears. It gives you an overview of your PC's security status. Sections such as "Virus & threat protection" and "Firewall & network protection" are shown as tiles. If the dashboard shows a "Security at a glance" screen with all green checkmarks, nothing needs your attention.
Understanding the Windows Security Dashboard
The dashboard is your main control center for checking your computer's health and safety. A green checkmark means that area is working properly. A yellow triangle means a recommendation, and a red circle with an X means a problem you should fix soon. Click the tile with the warning and Windows Security will usually offer a button to fix it.
- Virus & threat protection: This is the most important section for antivirus. Scans, threat history and protection settings all live here.
- Firewall & network protection: Manages your network security.
- Account protection: Helps secure your sign-in options.
- App & browser control: Protects against potentially unwanted apps and malicious sites.
- Device security: Checks for advanced security hardware.
- Device performance & health: Looks for issues with your PC's performance and storage.
- Family options: Links to Microsoft Family Safety features.
For antivirus work, you will spend most of your time in the "Virus & threat protection" area. The rest of this guide starts there.
Using Microsoft Defender's Virus & Threat Protection
This is where the real action happens. Microsoft Defender Antivirus scans for and removes threats from here. The sections below show how to check its status, change its settings and run each kind of scan.
Checking Your Protection Status
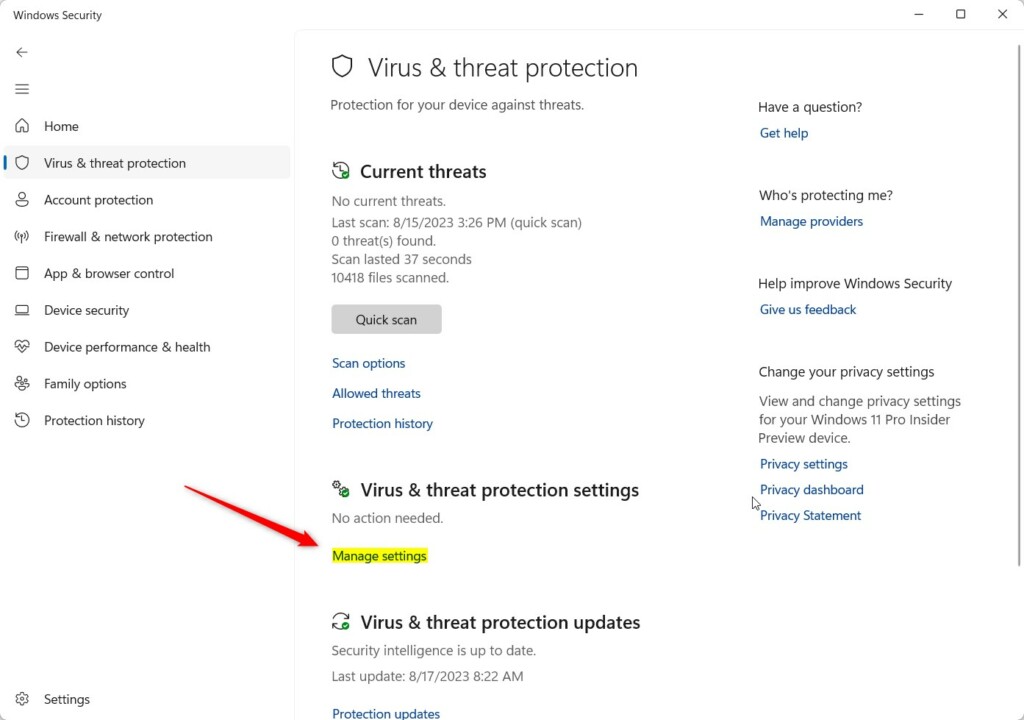
The "Virus & threat protection" page shows the status of your antivirus: whether there are current threats, when the last scan ran, and whether your protection is up to date.
- Open Windows Security.
- Click Virus & threat protection. The page opens and shows "Current threats" at the top.
On this page you will see "Current threats" (with a note if there are none) and, further down, "Virus & threat protection settings" with a Manage settings link. If a threat is waiting, it is listed under "Current threats" with options for dealing with it.
Managing Protection Settings
These settings let you turn core protection features, such as real-time scanning and cloud protection, on or off. To reach them, follow the steps below.
- Go to Virus & threat protection.
- Under "Virus & threat protection settings," click Manage settings. A list of toggles appears.
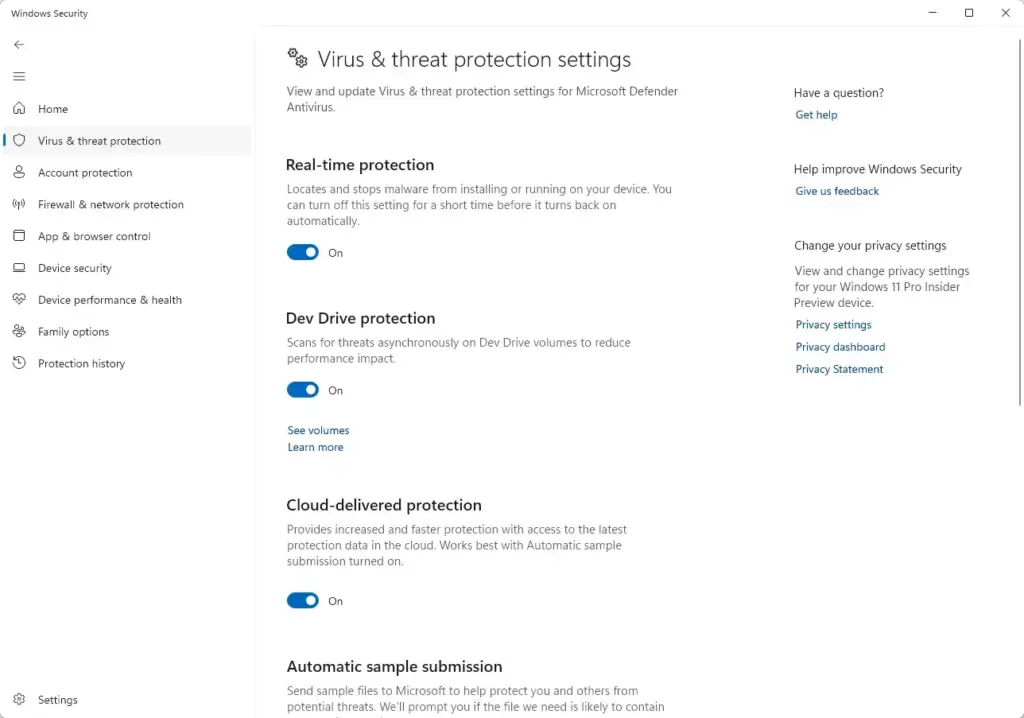
Each protection feature has its own toggle here. If you turn one off, Windows may ask you to confirm with a User Account Control prompt, which needs an administrator account. These settings include:
- Real-time protection: This is crucial. It scans files as they are accessed. Keep this ON. If you turn it off for a short task, Windows switches it back on by itself after a while.
- Cloud-delivered protection: This sends threat information to Microsoft's cloud. It helps Defender identify new threats faster. Keep this ON.
- Automatic sample submission: If Defender finds a suspicious file, it can send a copy to Microsoft for analysis. This helps improve Defender for everyone. You can choose to turn this ON or OFF. If you handle private documents, you may prefer OFF or the option that asks you first.
- Tamper protection: This prevents malware from changing or disabling your security settings. It's highly recommended to keep this ON. If the toggle is greyed out, your PC is probably managed by an organization that controls the setting.
You may need to uninstall the other antivirus software first if you want to use Defender. After you remove it, restart the PC and check that real-time protection is back ON.
Performing Scans
You can run a manual scan whenever you want to check for hidden threats. A Quick Scan checks the common malware hiding spots fast. A Full Scan checks every file and running program on your system. Custom and Offline scans cover special cases. Scans keep running if you close the Windows Security window, and you can keep working while they run.
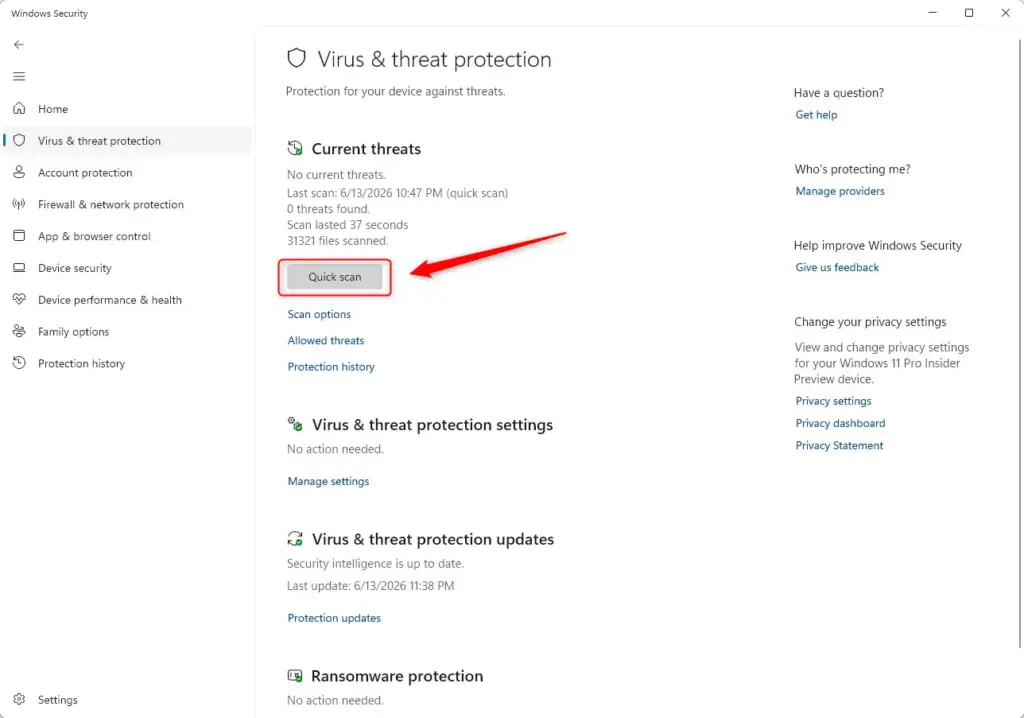
Quick Scan
A Quick Scan checks the most common areas where malware hides. It runs fast and catches most immediate threats, so it is a good first check if something feels wrong.
- Open Windows Security.
- Click Virus & threat protection.
- Under "Current threats," click Quick scan. A progress bar and a time estimate appear. When it finishes, the page tells you whether any threats were found.
Full Scan
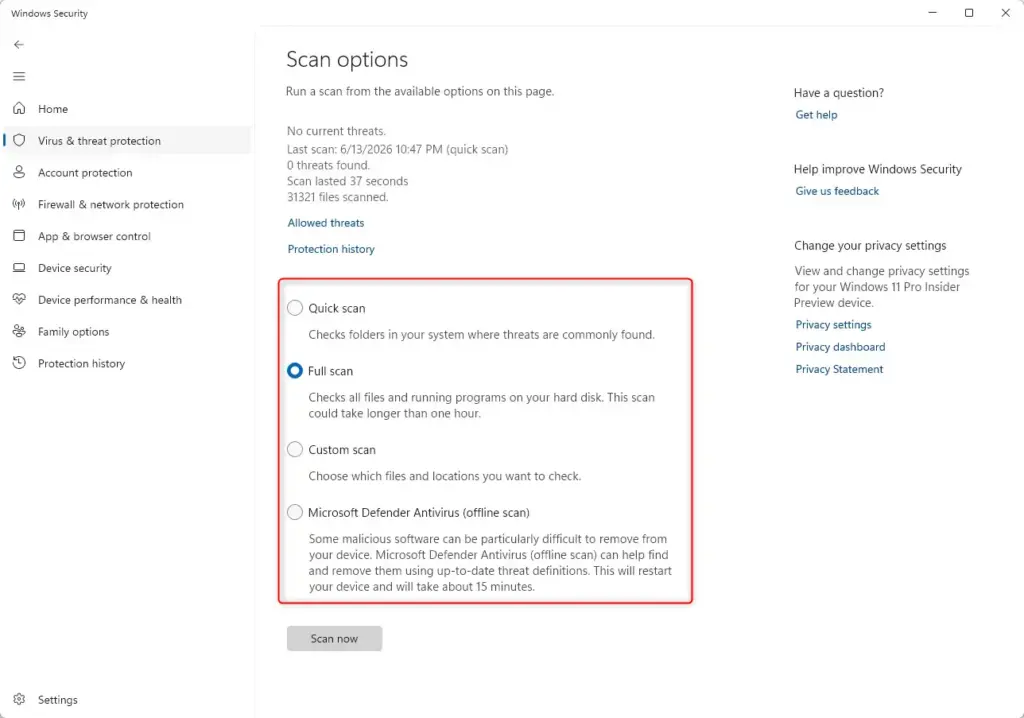
A Full Scan checks every file on your hard drive. It takes much longer, sometimes an hour or more depending on how much data you have, but it is more thorough. Running it periodically, perhaps once a week or month, helps maintain system health. A laptop should be plugged in for this.
- Open Windows Security.
- Click Virus & threat protection.
- Under "Current threats," click Scan options. On some builds this appears as a dropdown arrow next to Scan now. Either way, a list of scan types appears.
- Select Full scan.
- Click Scan now. The scan starts and shows its progress on the same page.
Custom Scan
A Custom Scan lets you choose specific files or folders to scan. It is useful when a particular download, USB drive or external disk might be infected, and you don't want to wait for a Full Scan.
- Open Windows Security.
- Click Virus & threat protection.
- Under "Current threats," click Scan options (or the dropdown arrow next to Scan now on some builds).
- Select Custom scan.
- Click Scan now. A folder picker window opens.
In the window that appears, browse to the folder you want to scan. Click 'Select folder' to choose individual folders, or click 'This PC' to select entire drives.
Click Select Folder or OK to start the scan. The results appear on the Virus & threat protection page when it finishes.
Microsoft Defender Offline Scan
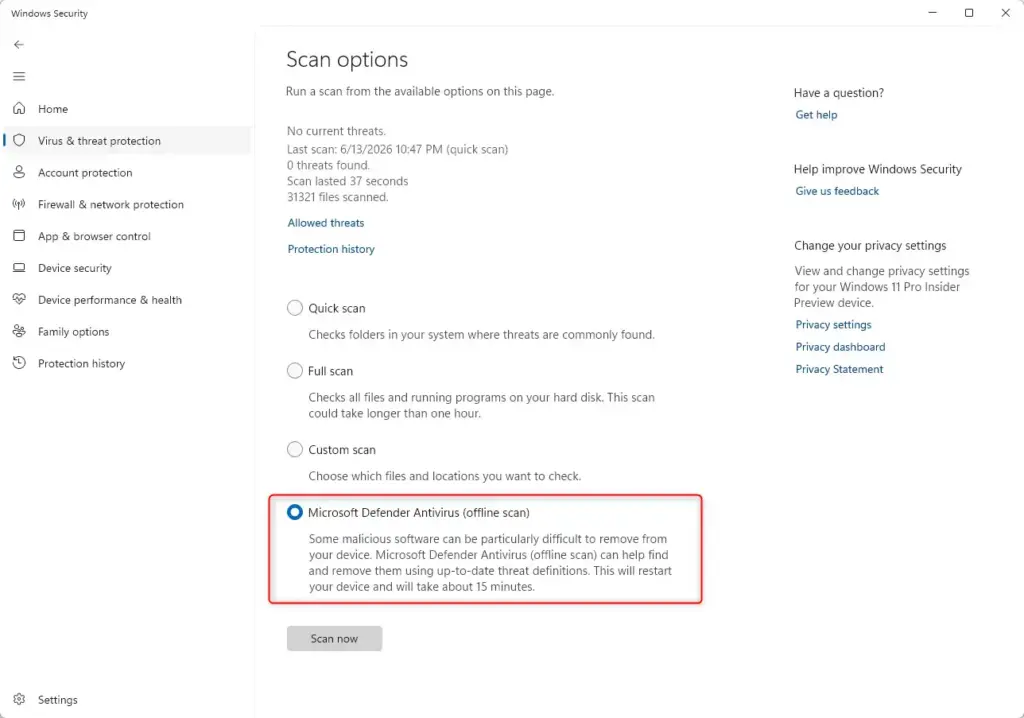
It runs outside of Windows, which means it can find and remove threats that regular scans might miss. It is especially useful when a PC is already infected and Defender struggles to run normally. A system restart is required, so save your work and close your apps before you start.
- Open Windows Security.
- Click Virus & threat protection.
- Under "Current threats," click Scan options (or the dropdown arrow next to Scan now on some builds).
- Select Microsoft Defender Antivirus (offline scan). On some builds it is labeled Microsoft Defender Offline scan.
- Click Scan now. Windows warns that you will be signed out and the PC will restart. Confirm to continue.
Microsoft Defender's scan begins automatically after your PC restarts. It typically takes about 15 minutes to complete, so don't turn the PC off while it runs.
Your PC will restart again when the scan is complete. After you sign in, open Protection history to see what the scan found.
What to Do If a Threat is Found
When Defender finds something, it shows a notification and gives you options to quarantine or remove the threat. Quarantining moves the dangerous file to a safe, isolated folder where it cannot harm your computer. Removing deletes it permanently.
- Quarantine: This moves the threat to a safe, isolated location on your PC. It can't harm your system while it's quarantined. You can choose to restore it later if you believe it was a false alarm.
- Remove: This deletes the threat from your computer. Choose it when you are sure the file is not something you need.
Defender usually handles threats automatically by quarantining them. Click the notification to open "Protection history" inside Virus & threat protection. There you can see what was detected and what action was taken. If several threats are found, manual actions such as "Quarantine all" or "Remove all" are also available.
Some Defender tasks need administrator privileges in Windows 11. You need them, for example, to delete stubborn malware or change fundamental security settings. If you are signed in with a standard account, Windows asks for an administrator's password. This protects your computer from unauthorized changes.
Viewing Protection History
Protection history shows a detailed list of past threats that Defender has detected and blocked on your computer. It is the place to check when you want to know what happened and what was done about it.
- Open Windows Security.
- Click Virus & threat protection.
- Scroll down if needed and click Protection history. The list of events opens.
A list of detected threats appears. Click Filters to narrow it by actions such as "All," "Quarantined," "Detected," or "Cleaned." Click any entry to see its details, including the file location and the actions available. If a file you trust was quarantined, you can restore it from here.
Advanced Microsoft Defender Settings
Defender offers more than basic scanning. The options below let you fine-tune its behavior. Most are safe to leave alone, so change them only when you have a specific reason.
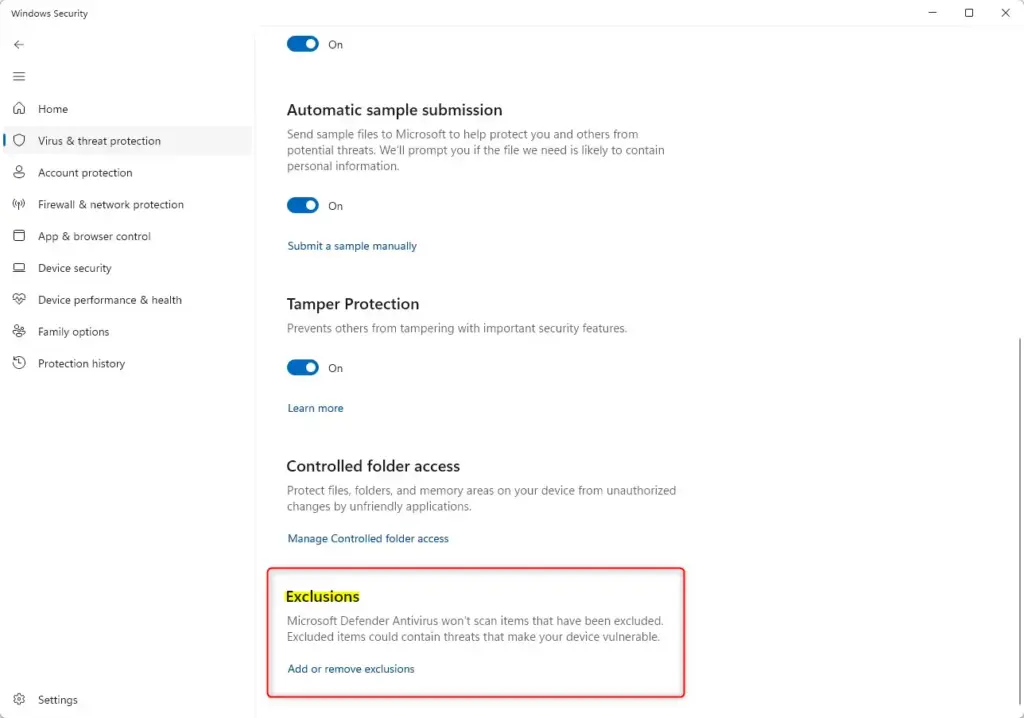
Exclusions
Developers and gamers run into this most often. Only add items to the exclusion list if you are completely certain they will not harm your computer.
Adding important system files to exclusions can compromise your security.
- Open Windows Security.
- Click Virus & threat protection.
- Under "Virus & threat protection settings," click Manage settings.
- Scroll down to the bottom. Click Add or remove exclusions. Approve the User Account Control prompt if it appears.
- Click the + Add an exclusion button. A short menu opens.
- Choose whether to exclude a File, Folder, File type, or Process.
- Browse to and select the item you want to exclude. It now appears in the exclusions list. To undo it later, return to this page, click the item and click Remove.
Admin Privileges Needed: Adding or removing exclusions requires administrator privileges.
Ransomware Protection (Controlled Folder Access)
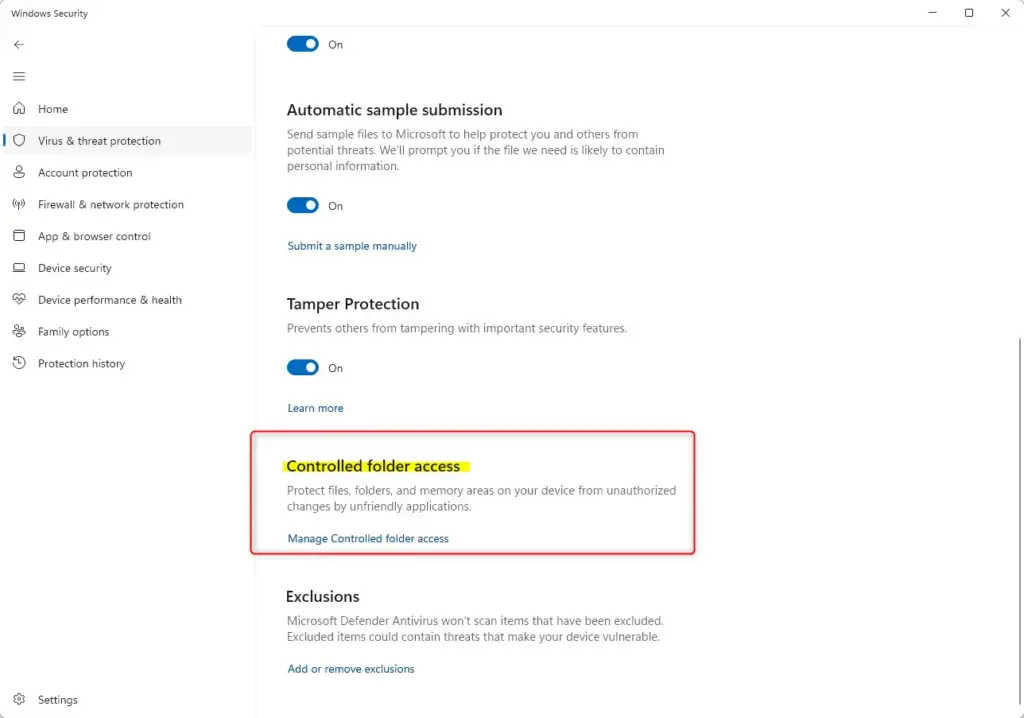
Controlled Folder Access is a ransomware protection feature. It blocks unauthorized apps from changing files in your important folders. With it turned on, only trusted programs can modify your documents, pictures and videos, which keeps your files safe from extortion software. It is off by default, and it needs real-time protection to be ON.
- Open Windows Security.
- Click Virus & threat protection.
- Under "Ransomware protection," click Manage ransomware protection.
- Toggle Controlled folder access to On. Approve the User Account Control prompt if it appears. To undo the change, switch the toggle back to Off.
Once it is on, you will see prompts when an app tries to change files in the protected folders. If a program you trust gets blocked, click "Allow an app through Controlled folder access" to add it to a safe list. Expect a few blocked prompts at first from older software and backup tools.
Admin Privilege Required: Turning on Controlled Folder Access and managing its exceptions requires administrator privileges.
Scheduling Scans
Task Scheduler lets you set up automated virus scans so Defender checks your computer on a regular schedule. This is an advanced option. You don't need it for normal protection, but it is handy if you want a Full Scan at a set time, such as overnight.
Automated scans run through Task Scheduler, a built-in Windows utility that runs programs at times you choose. The steps below add a scan trigger and action to Defender's existing task. Windows updates may reset Defender's built-in tasks, so check now and then that your schedule is still there.
- Press the Windows key + R to open the Run dialog.
- Type
taskschd.mscand press Enter. This opens the Task Scheduler. - In the Task Scheduler library, look for a folder named Microsoft. Expand it.
- Expand Windows.
- Expand Microsoft Defender. On some builds this folder is still named Windows Defender. Its tasks appear in the middle pane.
- Right-click Microsoft Defender Antivirus and select Properties. The Properties window opens.
- In the Properties window, go to the Triggers tab.
- Click New... to create a new trigger.
- Set a schedule (for example, "On a schedule," then choose daily, weekly and so on), then click OK.
- Go to the Actions tab.
- Click New.... The New Action window opens.
- In the "Program/script" box, type
MpCmdRun.exe. - In the "Add arguments (optional)" box, type
-Scan -ScanType 1. (-Scan -ScanType 2is for a full scan). - Click OK on all windows to save the scheduled task. To undo it later, reopen the task's Properties and delete the trigger and action you added.
Admin Privilege Required: Accessing and modifying the Task Scheduler requires administrator privileges.
Additional Security Features in Windows Security
Microsoft Defender is one part of the larger security suite in Windows Security. The other features cover your network, sign-in, apps and hardware, and they add to your overall protection.
Firewall & Network Protection
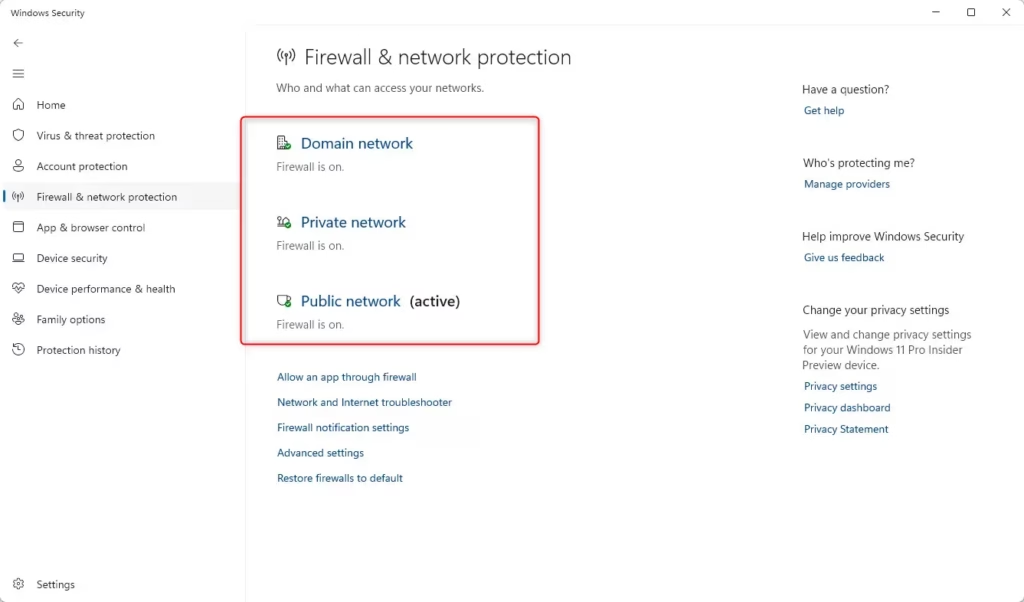
Firewall & network protection controls what internet and network traffic is allowed to enter or leave your Windows 11 computer. You can manage settings separately for domain networks at work, private networks at home, and public Wi-Fi hotspots.
- Open Windows Security.
- Click Firewall & network protection. The three network profiles are listed, and the one you are connected to is marked "active."
Settings appear for Domain network (for work networks), Private network (for home networks), and Public network (for Wi-Fi hotspots). Click each type to see its status and manage specific settings, such as turning the firewall on or off or allowing an app through the firewall. Keep the firewall on for every profile unless you are troubleshooting.
Allowing an app through the firewall fixes programs that network security is blocking. Click "Allow an app through firewall," then click "Change settings." Find the application in the list and tick the boxes for Private and/or Public networks to grant access. Only tick Public for apps you trust, because public networks are the riskiest. This is a common troubleshooting step for software that can't connect, such as games and remote tools.
Admin Privilege Required: Changing firewall settings requires administrator privileges.
Account Protection
Account protection helps secure your Microsoft account and Windows login by encouraging safer sign-in methods. You can set up Windows Hello for face or fingerprint sign-in, or create a PIN instead of using a standard password. Face and fingerprint options only show up if your PC has a compatible camera or fingerprint reader.
- Open Windows Security.
- Click Account protection. Your Microsoft account and Windows Hello status are shown.
- Follow the prompts to set up or review your sign-in options. Some of these open the Settings app to finish the setup.
App & Browser Control
App & browser control protects your computer from dangerous websites, downloads and malicious applications using built-in filters. It uses reputation-based protection and SmartScreen to check links in Microsoft Edge and block harmful software before it downloads.
- Reputation-based protection: This checks apps, files and Microsoft Edge links for suspicious behavior. It includes SmartScreen for apps and devices, and SmartScreen for Microsoft Edge.
- Exploit protection: This helps protect against attacks that exploit vulnerabilities in software. The defaults suit most people, so leave them alone unless a support guide tells you otherwise.
Defender uses "Reputation-based protection settings" and "Exploit protection settings" to control these features. Click either link on the App & browser control page to manage how Defender blocks threats based on their reputation, or how programs try to exploit weaknesses. If a site or download you trust is blocked, check these settings before turning anything off.
Device Security
Device security displays the status of your computer's built-in hardware security features, such as the Trusted Platform Module (TPM) security chip. It also lets you manage core isolation settings, which add an extra layer of defense against advanced malware.
- Open Windows Security.
- Click Device security.
- If available, click Core isolation details to manage settings like Memory integrity. If Memory integrity won't turn on, Windows usually lists the incompatible driver that is blocking it. Update or remove that driver and try again. A restart is needed after you change it.
Admin Privilege Required: Accessing and enabling core security features might require administrator privileges.
When Does Microsoft Defender Automatically Disable?
Defender turns off its real-time protection when it detects that you have installed a third-party antivirus program. Windows does this to prevent software conflicts and instability, which can happen when two security programs try to scan your computer at the same time.
- When another antivirus is installed: Windows automatically disables Microsoft Defender Antivirus if it detects that you have installed another antivirus program. This is to prevent conflicts, as running two antivirus programs simultaneously can cause system instability and performance issues. While the other product is active, the Virus & threat protection page may offer a periodic scanning option for extra checks. To go back to Defender, uninstall the other antivirus, restart, and confirm in Windows Security that real-time protection is ON.
Conclusion
Microsoft Defender Antivirus gives you reliable, free protection that keeps your Windows 11 computer safe from malware without extra software. The routine is short: check the Windows Security dashboard for warnings, run a Full Scan now and then, review Protection history, and consider turning on ransomware protection with Controlled folder access.
Staying alert to new threats matters as much as the software. Keep Windows up to date, be careful with email attachments and downloads, and don't turn protection off without a good reason. With Defender running, you can browse, work and play online with confidence.
Have a question about this guide?
Answered by AI from this guide. Good questions may be added to this page — please don't include personal details.
Did this guide fix your problem?

About the Author
Richard
Tech Writer, IT Professional
Richard is a writer at Geek Rewind who turns complex IT tasks into clear, step-by-step guides. He draws on years of hands-on experience in system administration and enterprise IT operations, focusing on Windows, Linux and WordPress: the problems people actually run into, and the fixes that work. His server and WordPress guides come from systems he runs himself. Richard builds and maintains the platform behind Geek Rewind, from its Ubuntu servers and Nginx configuration to its custom WordPress plugins. Many new tutorials start with readers' questions, and he's always glad to answer them in the comments.
No comments yet — be the first to share your thoughts!