How to Enable Fast Startup in Windows 11 Easily

When Fast Startup is Helpful
Fast Startup is helpful when you want your Windows 11 computer to boot up much quicker after a regular shutdown. It works by saving a core set of system files to your hard drive instead of closing everything out completely, which saves time when you turn your PC back on the next day.- Faster Start Times: This is the main advantage. If you feel like you’re waiting too long for your PC to start each morning, Fast Startup can make a big difference.
- Less Wear and Tear: While not a major concern for most people, a faster startup process means the system is actively powering up and loading components for less time.
When You Might Want to Turn Fast Startup Off
You might want to turn off Fast Startup when your computer has trouble installing major Windows updates or when hardware drivers fail to load properly after a reboot. Because Fast Startup does not shut down your system entirely, it can sometimes trap your PC in a loop of strange bugs or device errors.- Driver Problems: Sometimes, drivers (which are like small programs that help your hardware work with Windows) might not start up correctly after a Fast Startup. This can cause devices to not work right.
- System Updates: Some Windows updates need a full shutdown and restart to install correctly. Fast Startup might get in the way of this.
- Dual Booting: If you have more than one operating system on your computer (like Windows and Linux), Fast Startup can sometimes stop the other OS from accessing your Windows files correctly. This happens because Windows might consider the drive “locked.”
- Troubleshooting: If your system is acting strangely or crashing, doing a full shutdown (by turning off Fast Startup) can help you figure out if Fast Startup is causing the problem.
Option 1Turning Fast Startup On or Off Through Power Options (The Easiest Way)
This is the most common method for toggling the feature. You need to be logged in as an administrator to make this change.
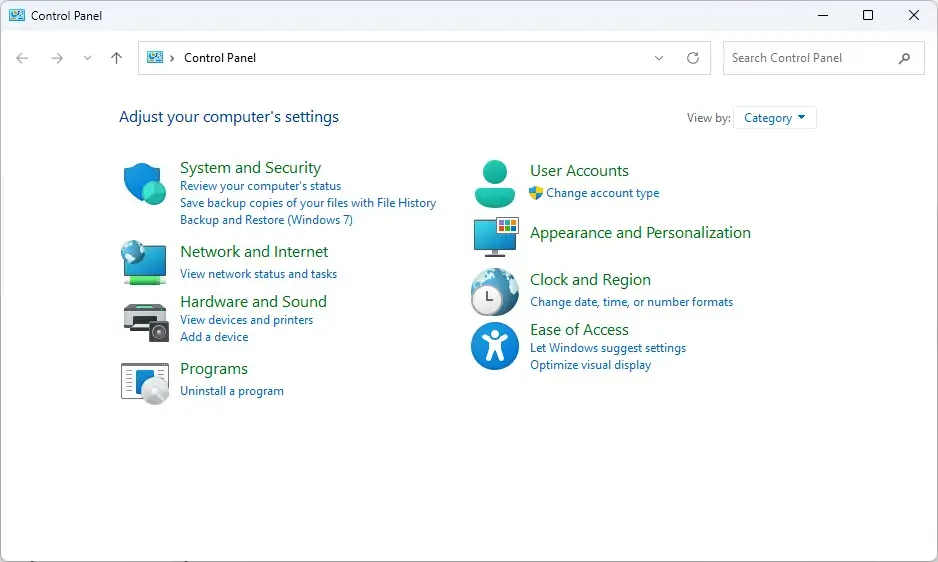
Step 1Open Control Panel
The next step is to access the settings that control power. Searching for the setting is a good approach.
- Click the Start button on your taskbar .
- Type Control Panel and click on the Control Panel app when it appears in the search results.
Step 2Go to Power Options
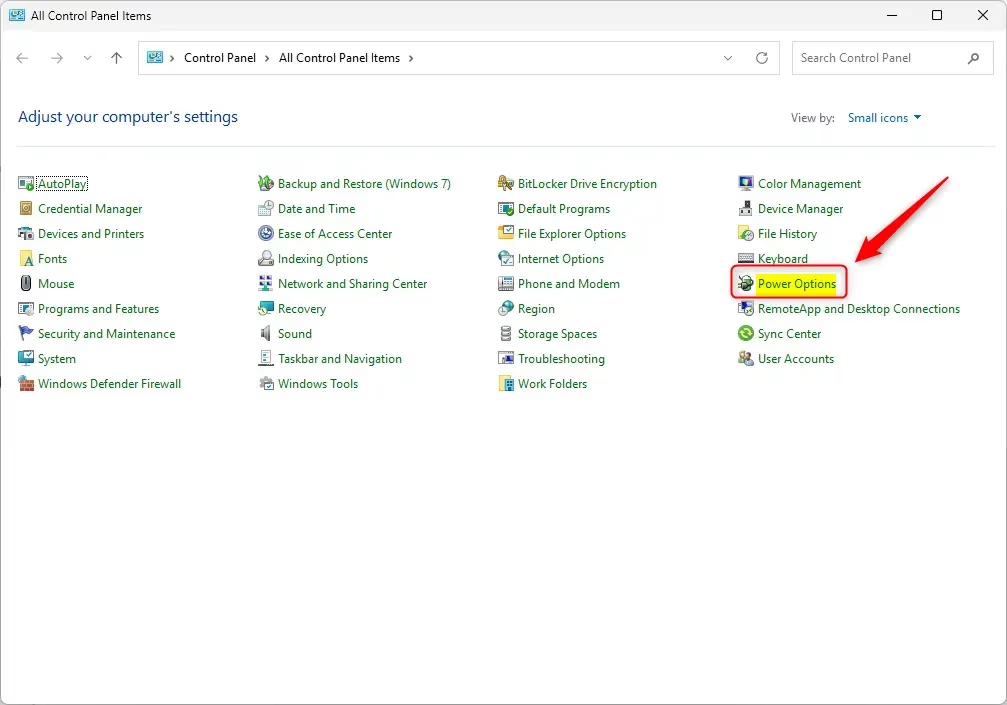
Click Hardware and Sound if your Control Panel uses Category view, then click Power Options. If you use icon view, click Power Options directly. This menu holds the settings you need to change how your computer handles the shutdown process.
- If your Control Panel is set to “Category” view, click on Hardware and Sound, then click on Power Options.
- If your Control Panel is set to “Large icons” or “Small icons” view, just click on Power Options directly.
Step 3Choose What the Power Buttons Do
In the Power Options window, look for a link on the left side.
- Click on Choose what the power buttons do.
Step 4Unlock Shutdown Settings
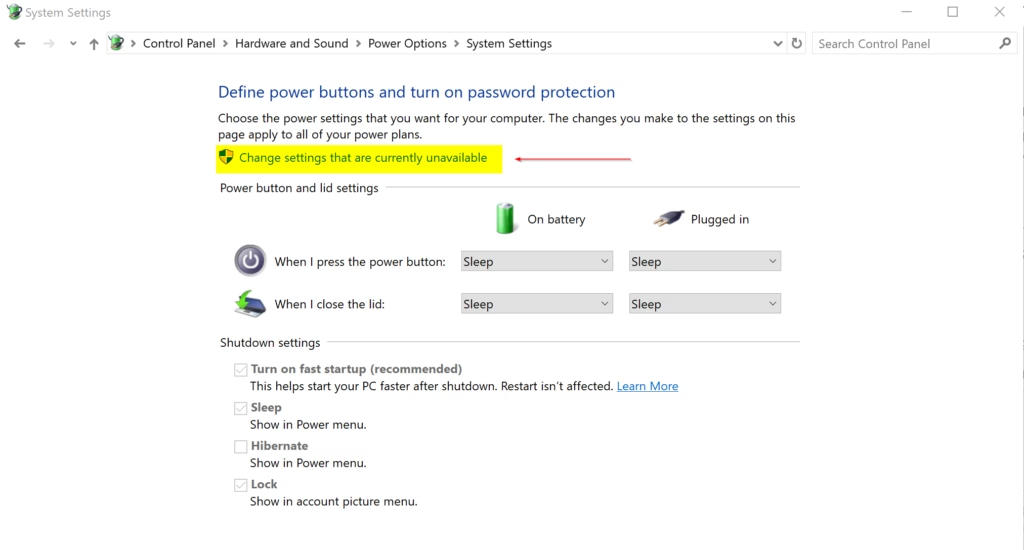
Unlock grayed-out shutdown settings by clicking the link that says Change settings that are currently unavailable near the top of the window. You need administrator rights to click this, and Windows might pop up a confirmation box asking if you want to allow the app to make changes.
- Click on Change settings that are currently unavailable. You might see a User Account Control (UAC) window asking for permission; click Yes.
Step 5Enable or Disable Fast Startup
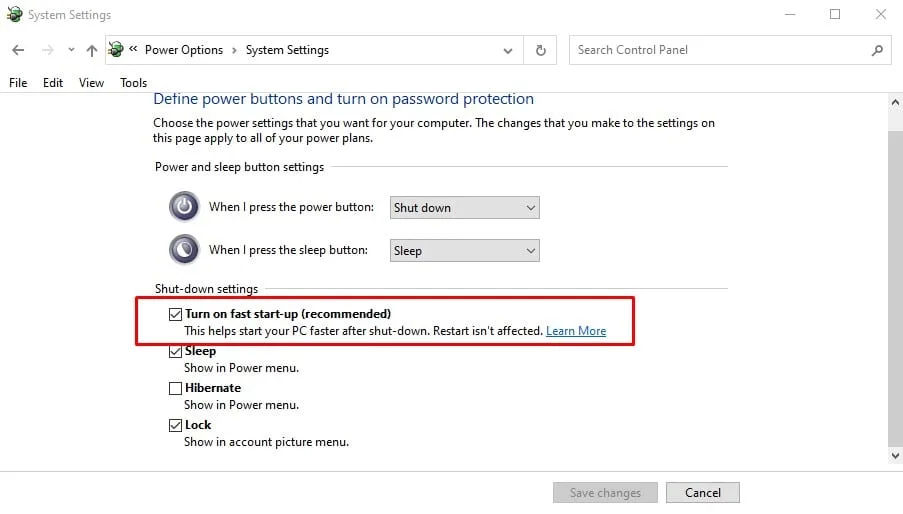
Enable or disable Fast Startup by checking or unchecking the box next to Turn on fast startup (recommended) at the bottom of the shutdown settings window. Click the Save changes button afterward so Windows applies your new preference permanently.
- To turn Fast Startup ON: Make sure the box next to "Turn on fast startup" is checked.
- To turn Fast Startup OFF: Uncheck the box next to "Turn on fast startup."
Step 6Save Your Changes
Don't forget this important step!
- Click the Save changes button at the bottom.
Option 2Checking Fast Startup Status with PowerShell
If you prefer using commands, you can quickly check if Fast Startup is on or off using Windows PowerShell. This method is only for checking, not for changing the setting.
Step 1Open Windows Terminal as Administrator
We need a command prompt that has the right permissions.
- Click the Start button.
- Type Windows Terminal.
- Right-click on Windows Terminal in the search results and select Run as administrator.
- If a User Account Control (UAC) window appears, click Yes.
Step 2Paste the Command
Now, copy and paste the following command into the PowerShell window:
(Get-CimInstance -ClassName Win32_PowerSystem -Namespace root\cimv2\power).HiberbootEnabledStep 3Understand the Result
Read the command prompt output to check your current status, where True means Fast Startup is turned on and False means it is turned off. If your computer has hibernation disabled, the command will show False because Fast Startup relies on hibernation to work.
- If you see True, Fast Startup is currently turned ON.
- If you see False, Fast Startup is currently turned OFF.
Option 3Using Registry Editor to Control Fast Startup
This method requires caution, as making wrong changes to the registry can cause your system to become unstable.
Step 1Open Registry Editor
Let's access the registry.
- Click the Start button.
- Type regedit and click on Registry Editor when it appears.
- If a User Account Control (UAC) window appears, click Yes.
Step 2Go to the Correct Key
Navigate to the correct registry folder by pasting HKEY_LOCAL_MACHINE\SOFTWARE\Microsoft\Windows\CurrentVersion\Policies\System into the address bar at the top of the Registry Editor window and pressing Enter. This jumps straight to the directory where startup rules are stored.
Registry Editor's address bar accepts a specific path to change Windows 11 startup. To adjust Fast Startup, copy and paste `HKEY_LOCAL_MACHINE\SOFTWARE\Microsoft\Windows\CurrentVersion\Policies\System` into the address bar and press Enter. This action opens the correct location for modifying the setting.
HKEY_LOCAL_MACHINE\SYSTEM\CurrentControlSet\Control\Session Manager\PowerStep 3Find or Create the "HiberbootEnabled" Value
Find the HiberbootEnabled entry on the right side of the window, or create it yourself by right-clicking empty space, choosing New, and selecting DWORD (32-bit) Value if it is missing. This specific registry key controls whether your PC uses the quick boot feature.
- If "HiberbootEnabled" is there: Double-click on it to change its value.
- If "HiberbootEnabled" is not there: Right-click in the empty space in the right-hand section, select New, and then select DWORD (32-bit) Value. Name the new value exactly HiberbootEnabled. Then, double-click on this new value.
Step 4Set the Value Data
A small window will open to edit the value.
- To turn Fast Startup ON: In the "Value data" field, type 1.
- To turn Fast Startup OFF: In the "Value data" field, type 0.
Make sure the "Base" is set to Hexadecimal (it usually is by default).
Step 5Confirm and Close
Save your registry changes by clicking OK and then close the Registry Editor window to finish the setup. Always export a backup copy of your registry using the File menu before editing keys, in case a mistake causes system instability.
You can now close the Registry Editor.
Important Warning: Always make a backup of your registry before making changes. You can do this by going to File Export in the Registry Editor and saving a copy of your registry. If something goes wrong, you can import this backup to restore your registry.
Summary
Check your system behavior after rebooting to confirm the new power state takes effect. If startup problems persist, test your hardware drivers or check for pending Windows updates next.
Fast Startup in Windows 11 cuts your computer boot time by saving system kernel data to a hibernation file (`hiberfil.sys`) when you shut down. This built-in feature bypasses standard startup steps so you reach your login screen up to 30% faster than a normal shutdown.
Instead of starting completely from scratch every time, Windows loads your saved system state right back into memory. You get straight to work without waiting around for your computer to boot up.
Enable or disable Fast Startup in Windows 11 via Control Panel Hardware and Sound Power Options Change what the power button does. Click "Change settings that are currently unavailable," then check or uncheck "Turn on fast startup.
When Fast Startup is Helpful
Fast Startup is helpful when you want your Windows 11 computer to boot up much quicker after a regular shutdown. It works by saving a core set of system files to your hard drive instead of closing everything out completely, which saves time when you turn your PC back on the next day.- Faster Start Times: This is the main advantage. If you feel like you're waiting too long for your PC to start each morning, Fast Startup can make a big difference.
- Less Wear and Tear: While not a major concern for most people, a faster startup process means the system is actively powering up and loading components for less time.
When You Might Want to Turn Fast Startup Off
You might want to turn off Fast Startup when your computer has trouble installing major Windows updates or when hardware drivers fail to load properly after a reboot. Because Fast Startup does not shut down your system entirely, it can sometimes trap your PC in a loop of strange bugs or device errors.- Driver Problems: Sometimes, drivers (which are like small programs that help your hardware work with Windows) might not start up correctly after a Fast Startup. This can cause devices to not work right.
- System Updates: Some Windows updates need a full shutdown and restart to install correctly. Fast Startup might get in the way of this.
- Dual Booting: If you have more than one operating system on your computer (like Windows and Linux), Fast Startup can sometimes stop the other OS from accessing your Windows files correctly. This happens because Windows might consider the drive "locked."
- Troubleshooting: If your system is acting strangely or crashing, doing a full shutdown (by turning off Fast Startup) can help you figure out if Fast Startup is causing the problem.
Option 1Turning Fast Startup On or Off Through Power Options (The Easiest Way)
This is the most common method for toggling the feature. You need to be logged in as an administrator to make this change.
Step 1Open Control Panel
The next step is to access the settings that control power. Searching for the setting is a good approach.
- Click the Start button on your taskbar.
- Type Control Panel and click on the Control Panel app when it appears in the search results.
Step 2Go to Power Options
Click Hardware and Sound if your Control Panel uses Category view, then click Power Options. If you use icon view, click Power Options directly. This menu holds the settings you need to change how your computer handles the shutdown process.
- If your Control Panel is set to "Category" view, click on Hardware and Sound, then click on Power Options.
- If your Control Panel is set to "Large icons" or "Small icons" view, just click on Power Options directly.
Step 3Choose What the Power Buttons Do
In the Power Options window, look for a link on the left side.
- Click on Choose what the power buttons do.
Step 4Unlock Shutdown Settings
Unlock grayed-out shutdown settings by clicking the link that says Change settings that are currently unavailable near the top of the window. You need administrator rights to click this, and Windows might pop up a confirmation box asking if you want to allow the app to make changes.
- Click on Change settings that are currently unavailable. You might see a User Account Control (UAC) window asking for permission; click Yes.
Step 5Enable or Disable Fast Startup
Enable or disable Fast Startup by checking or unchecking the box next to Turn on fast startup (recommended) at the bottom of the shutdown settings window. Click the Save changes button afterward so Windows applies your new preference permanently.
- To turn Fast Startup ON: Make sure the box next to "Turn on fast startup" is checked.
- To turn Fast Startup OFF: Uncheck the box next to "Turn on fast startup."
Step 6Save Your Changes
Don't forget this important step!
- Click the Save changes button at the bottom.
Option 2Checking Fast Startup Status with PowerShell
If you prefer using commands, you can quickly check if Fast Startup is on or off using Windows PowerShell. This method is only for checking, not for changing the setting.
Step 1Open Windows Terminal as Administrator
We need a command prompt that has the right permissions.
- Click the Start button.
- Type Windows Terminal.
- Right-click on Windows Terminal in the search results and select Run as administrator.
- If a User Account Control (UAC) window appears, click Yes.
Step 2Paste the Command
Now, copy and paste the following command into the PowerShell window:
(Get-CimInstance -ClassName Win32_PowerSystem -Namespace root\cimv2\power).HiberbootEnabledStep 3Understand the Result
Read the command prompt output to check your current status, where True means Fast Startup is turned on and False means it is turned off. If your computer has hibernation disabled, the command will show False because Fast Startup relies on hibernation to work.
- If you see True, Fast Startup is currently turned ON.
- If you see False, Fast Startup is currently turned OFF.
Option 3Using Registry Editor to Control Fast Startup
For those who like to work directly with the system's core settings, you can use the Registry Editor. This method requires caution, as making wrong changes to the registry can cause your system to become unstable.
Step 1Open Registry Editor
Let's access the registry.
- Click the Start button.
- Type regedit and click on Registry Editor when it appears.
- If a User Account Control (UAC) window appears, click Yes.
Step 2Go to the Correct Key
Navigate to the correct registry folder by pasting HKEY_LOCAL_MACHINE\SOFTWARE\Microsoft\Windows\CurrentVersion\Policies\System into the address bar at the top of the Registry Editor window and pressing Enter. This jumps straight to the directory where startup rules are stored.
Registry Editor's address bar accepts a specific path to change Windows 11 startup. To adjust Fast Startup, copy and paste `HKEY_LOCAL_MACHINE\SOFTWARE\Microsoft\Windows\CurrentVersion\Policies\System` into the address bar and press Enter. This action opens the correct location for modifying the setting.
HKEY_LOCAL_MACHINE\SYSTEM\CurrentControlSet\Control\Session Manager\PowerStep 3Find or Create the "HiberbootEnabled" Value
Find the HiberbootEnabled entry on the right side of the window, or create it yourself by right-clicking empty space, choosing New, and selecting DWORD (32-bit) Value if it is missing. This specific registry key controls whether your PC uses the quick boot feature.
- If "HiberbootEnabled" is there: Double-click on it to change its value.
- If "HiberbootEnabled" is not there: Right-click in the empty space in the right-hand section, select New, and then select DWORD (32-bit) Value. Name the new value exactly HiberbootEnabled. Then, double-click on this new value.
Step 4Set the Value Data
A small window will open to edit the value.
- To turn Fast Startup ON: In the "Value data" field, type 1.
- To turn Fast Startup OFF: In the "Value data" field, type 0.
Make sure the "Base" is set to Hexadecimal (it usually is by default).
Step 5Confirm and Close
Save your registry changes by clicking OK and then close the Registry Editor window to finish the setup. Always export a backup copy of your registry using the File menu before editing keys, in case a mistake causes system instability.
You can now close the Registry Editor.
Important Warning: Always make a backup of your registry before making changes. You can do this by going to File Export in the Registry Editor and saving a copy of your registry. If something goes wrong, you can import this backup to restore your registry.
Summary
Check your system behavior after rebooting to confirm the new power state takes effect. If startup problems persist, test your hardware drivers or check for pending Windows updates next.
Was this guide helpful?

About the Author
Richard
Tech Writer, IT Professional
Richard is a writer at Geek Rewind who turns complex IT tasks into clear, step-by-step guides. He draws on years of hands-on experience in system administration and enterprise IT operations, focusing on Windows, Linux and WordPress: the problems people actually run into, and the fixes that work. His server and WordPress guides come from systems he runs himself. Richard builds and maintains the platform behind Geek Rewind, from its Ubuntu servers and Nginx configuration to its custom WordPress plugins. Many new tutorials start with readers' questions, and he's always glad to answer them in the comments.
This is for Windows 10, not 11.
Surprise! They are the same.
No, they’re not. These options are not shown in Windows 11.
I’m on Windows 11, they are the same.
I’m on 11. Fast startup is gone for me as well. Was there on 10
Have to turn “hibernate” on from command prompt and the fast boot option will then start appearing as shown above. Make sure the command prompt is run as an admin or it won’t work.