How to Enable or Disable Copilot Actions in Windows 11

Copilot Actions are automated tasks in Windows 11. You describe what you want in plain text, and Copilot carries out commands on web pages and in desktop programs for you. Windows 11 builds these triggers into the operating system to speed up everyday jobs, such as repetitive clicking, filling in forms or moving between apps.
Turning off Copilot Actions stops the tool from running tasks inside your apps without your permission. You can enable or disable the feature from your system settings, so you decide what Copilot may do on your PC. The steps below are in the sections that follow. Read the notes first so you know what to expect before you change anything.
Copilot features are rolled out in stages. Some of them first appear in preview builds, and Microsoft changes where the settings sit from one update to the next. If the option on your PC looks different from the one in this guide, or is missing, it is usually because of your Windows build and not because you did something wrong.
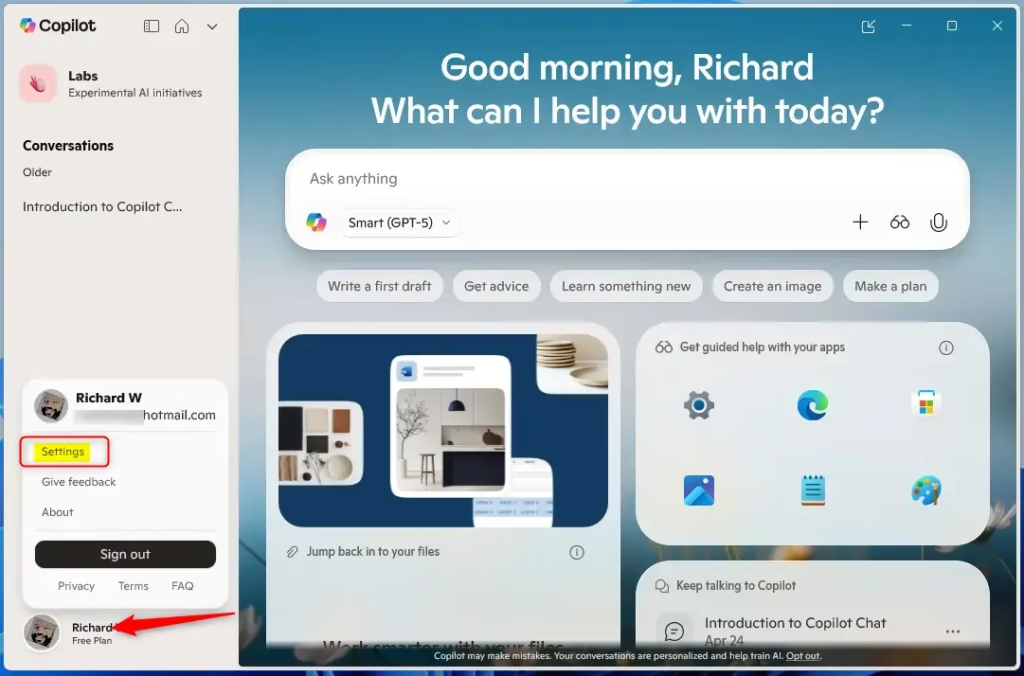
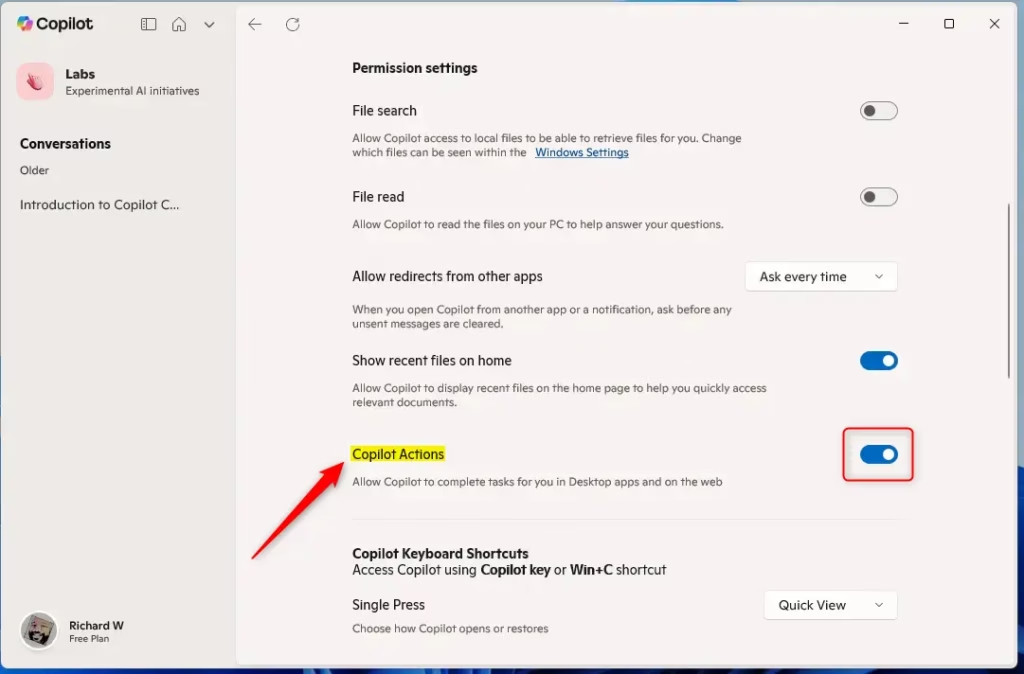
Open the Copilot app and sign in. Navigate to Settings by clicking your account icon, then select Settings. Use the toggle under Permission settings to turn Copilot Actions on or off.
What is Copilot Actions?
Copilot Actions reads everyday language and finishes the task without you clicking through each step. It works across apps and websites, which saves a few minutes on repetitive workflows. Your settings stay synced through your Microsoft account, and you can switch the feature off whenever you want.
Because it can act inside your apps, it is worth knowing what it is doing on your machine. Check what a prompt will do before you approve it. If you share the PC with others, or the PC holds sensitive data, turning the feature off is the safer default.
Why Use Copilot Actions?
If you cannot find the setting, or it is greyed out, check these things:
- Install the latest Windows 11 updates. Newer Copilot features often arrive only on recent builds.
- Update the Copilot app from the Microsoft Store, because some of its options come from the app and not from Windows itself.
- Sign in with your Microsoft account. Synced settings and some Copilot features need one.
- Check whether the PC is managed by a work or school organization. Administrators can lock these options with policy, and you cannot change a locked option yourself. Ask your IT team in that case.
Home and Pro editions generally show the same Copilot settings. The main difference is on managed devices, where Pro, Enterprise and Education editions can be controlled by organization policy. A restart is not usually required, but if the change does not seem to apply, sign out and back in or restart the PC. To undo the change, go back to the same setting and switch it the other way.
Here is what you get when the feature is on:
- Easy to use: Copilot understands your words and helps you finish tasks, so you do not need to learn menus or shortcuts.
- Save time: It works with apps and websites automatically, which helps most with repetitive jobs.
- Customize your experience: You can turn it on or off anytime, so a change you make now is not permanent.
- Works with your Microsoft account: Your settings stay synced, so your choices carry over when you sign in on another PC.
Steps to Turn Copilot Actions On or Off
You can easily enable Copilot Actions through the settings menu inside the Copilot app on your Windows 11 PC. This control panel manages how the assistant interacts with your files and other installed applications. To change this setting, open the Copilot application from your taskbar, sign in with your Microsoft account, and locate the feature toggles in your account preferences.- Open the Copilot app: Click on the Copilot icon in your taskbar. If you don't see it, search for "Copilot" in the Start menu. For more details, see this guide.
- Sign in to your Microsoft account: If you aren't signed in yet, log in with your Microsoft account to save your settings. Need an account? Learn how to create one here.
- Go to Settings: In the Copilot app, click the Account button (usually your profile picture or initials). Then select Settings.
- Turn Copilot Actions on or off: In Settings, look for Permission settings. Find the Copilot Actions option. Use the toggle button to switch the feature on (blue) or off (gray).
- Close Settings: When you're done, exit the Settings page. Your choice saves automatically.
Visual Guide
Here are pictures to help you find the settings:
More Helpful Links
Summary
Toggling Copilot Actions on Windows 11 gives precise control over AI automation. Open the app, check the profile settings, and flip the switch to adjust behavior.
Have a question about this guide?
Answered by AI from this guide. Good questions may be added to this page — please don't include personal details.
Did this guide fix your problem?

About the Author
Richard
Tech Writer, IT Professional
Richard is a writer at Geek Rewind who turns complex IT tasks into clear, step-by-step guides. He draws on years of hands-on experience in system administration and enterprise IT operations, focusing on Windows, Linux and WordPress: the problems people actually run into, and the fixes that work. His server and WordPress guides come from systems he runs himself. Richard builds and maintains the platform behind Geek Rewind, from its Ubuntu servers and Nginx configuration to its custom WordPress plugins. Many new tutorials start with readers' questions, and he's always glad to answer them in the comments.
No comments yet — be the first to share your thoughts!