How to Change Drive Letter in Windows 11

Change Drive Letter using “diskpart” Command
You can change drive letter using diskpart command tools by opening an administrator terminal, selecting your target volume, and running a quick assignment command. This command-line method works well if you prefer text-based tools or need to fix storage issues from a recovery environment.- Open Windows Terminal (Admin), and select either Windows PowerShell or Command Prompt. [Admin Required]
- Copy and paste the following into Windows Terminal (Admin), and press Enter:
diskpart
- Copy and paste the following into Windows Terminal (Admin), and press Enter:
list volume
- Make note of the volume number (ex: “1”) for the current drive letter (ex: “D”) of the drive (volume) you want to change.
- Type the command below into Windows Terminal (Admin), and press Enter:
select volume <volume number>- Substitute
<volume number>in the command above with the actual volume number (ex: “1”) from step 3 above for the drive you want to change the drive letter of. - For example:
select volume 16
- Type the command below into Windows Terminal (Admin), and press Enter:
assign letter=<new drive letter>- Substitute
<new drive letter>in the command above with the actual new drive letter (ex: “F”) you want to assign to this drive. - For example:
assign letter=F - If the new drive letter you assigned is not available, you will get an error message in Windows Terminal (Admin). You will just need to repeat this step to assign an available drive letter.
- You can now close Windows Terminal (Admin) if you like.
Option Four
Change Drive Letter using “Set-Partition” Command
You can change drive letter using Set-Partition command in PowerShell by running a quick cmdlet with your current and new drive letters. This script-friendly method is ideal if you want to manage storage partitions quickly using modern Windows PowerShell commands.- Open Windows Terminal (Admin), and select Windows PowerShell. [Admin Required]
- Copy and paste the following into Windows Terminal (Admin), and press Enter:
Get-Partition
- Make note of the current drive letter (ex: “D”) of the drive you want to change.
- Type the command below into Windows Terminal (Admin), and press Enter:
Get-Partition -DriveLetter <current drive letter> | Set-Partition -NewDriveLetter <new drive letter>- Substitute
<current drive letter>in the command above with the actual current drive letter (ex: “D”) from step 2 above of the drive you want to change. - Substitute
<new drive letter>in the command above with the actual new drive letter (ex: “F”) you want to assign to the drive. - For example:
Get-Partition -DriveLetter D | Set-Partition -NewDriveLetter F - If the new drive letter you assign is not available, you will get an error message in Windows Terminal (Admin). You will just need to repeat this step to assign an available drive letter.
- You can now close Windows Terminal (Admin) if you like.
Option Five
Change Drive Letter in Registry Editor
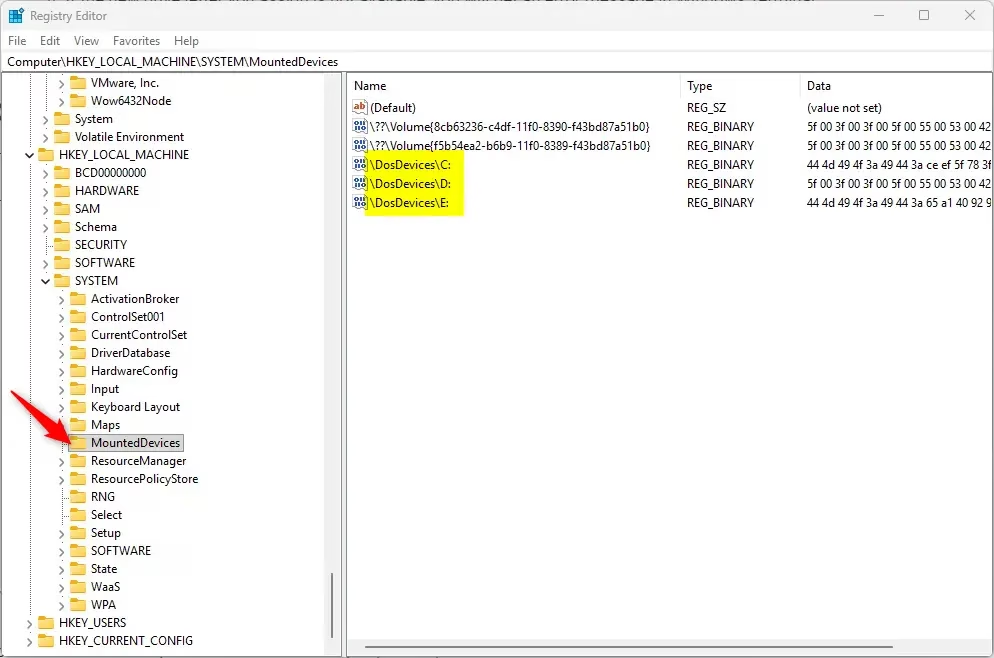
You can change drive letter in Registry Editor by locating the mounted devices key and renaming the binary value for your specific drive. This advanced method should only be used if standard tools fail, as making mistakes in the registry can cause system errors.- Open Registry Editor (
regedit.exe). [Admin Required] - Navigate to the key below in the left pane of Registry Editor:
HKEY_LOCAL_MACHINE\SYSTEM\MountedDevices
- In the right pane of the MountedDevices key, right click or press and hold on the binary (REG_BINARY) value (ex: “\DosDevices\D:”) for the drive letter (ex: “D”) of the drive you want to change, and click/tap on Rename.
- Rename only the drive letter part of the binary (REG_BINARY) value (ex: “\DosDevices\D:”) name with an available drive letter (ex: “\DosDevices\F:”) you want for the drive instead, and press Enter to apply.
- If another drive is currently assigned the drive letter you want to assign to this drive, then you will need to change the drive letter of the other drive first.
- When finished, close Registry Editor.
Summary
Each method lets you rename partitions to keep your files organised, but you should always avoid changing the letter of your main system drive.
Change Drive Letter in Settings
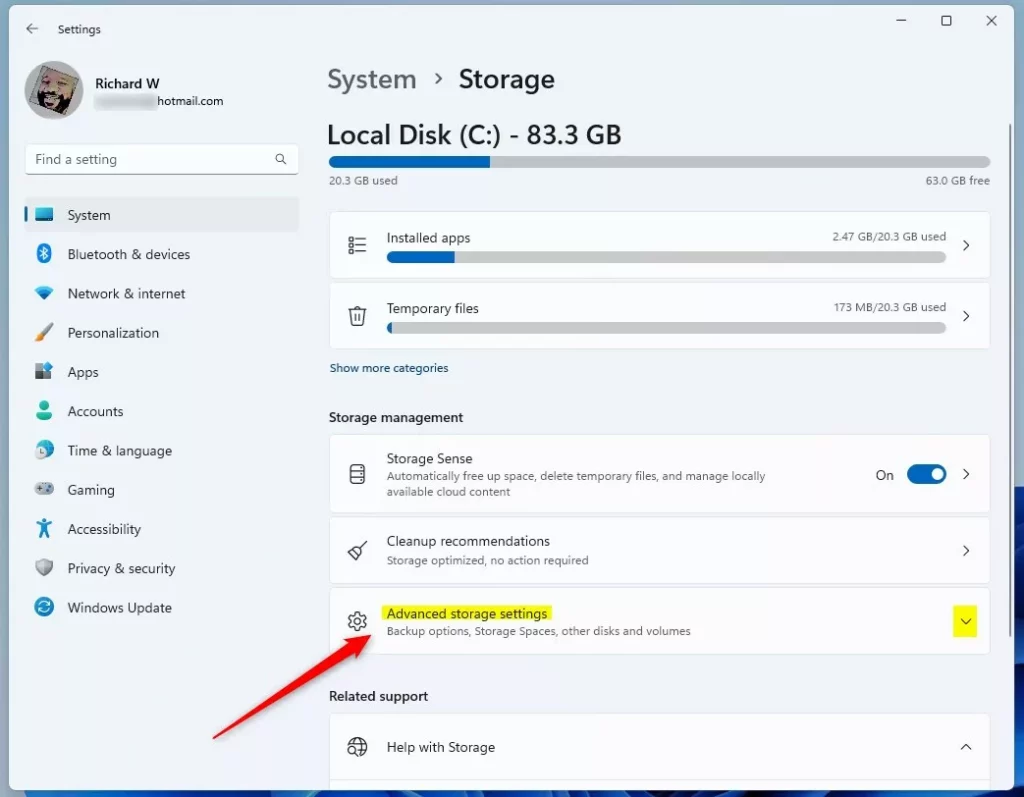
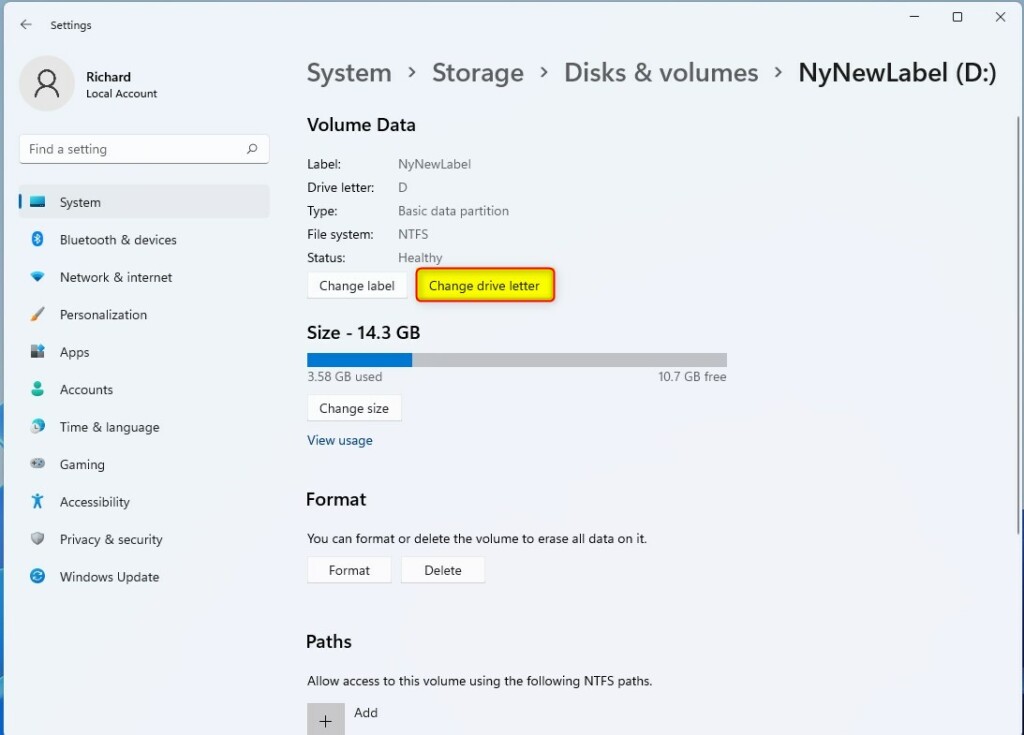
You can change drive letter in Settings by opening the main system menu, going to storage options, and updating the volume properties for your connected drives. This modern Windows 11 menu lets you manage your storage devices without needing to open older administrator tools.- Open Settings (Win+I).
- Click/tap on System on the left side, and click/tap on Storage on the right side.
- Click/tap on Yes if prompted by UAC. [Admin Required]
- Starting with Windows 11 build 26100.7705 (24H2) and build 26200.7705 (25H2), to help ensure that only authorized Windows users can access system files, Windows now displays a User Account Control (UAC) prompt when you open Storage settings (Settings System Storage).
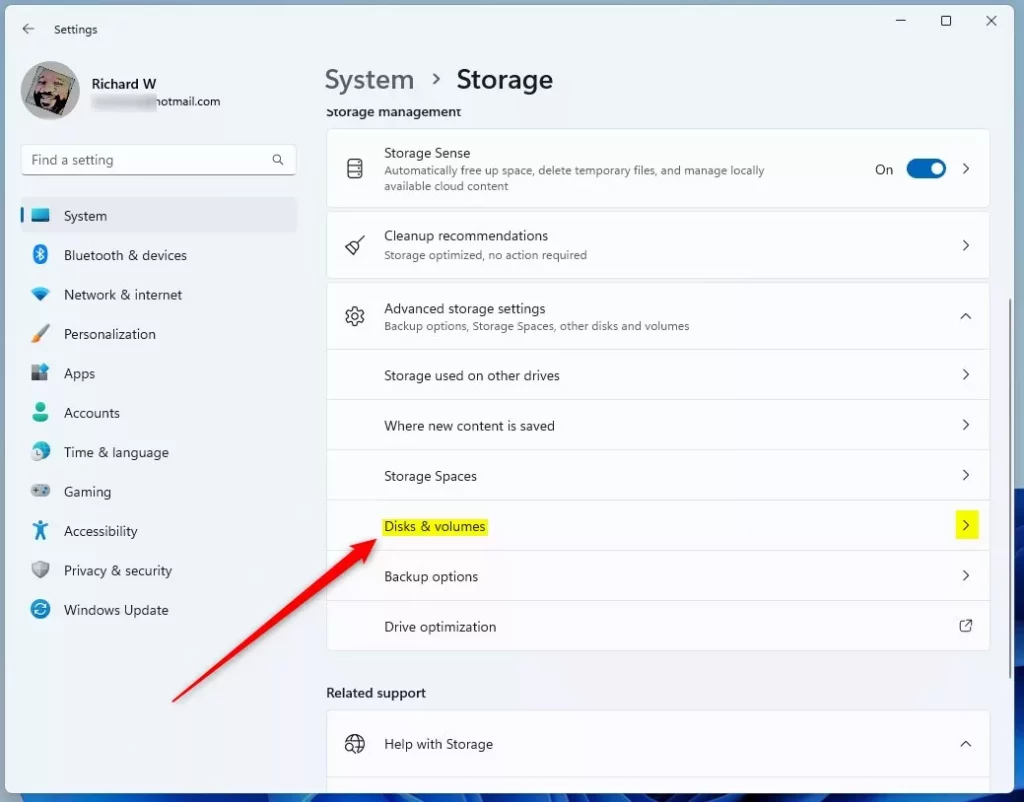
- Click/tap on Advanced storage settings to expand it open, and click/tap on Disks & volumes.
- Click/tap on Properties for the drive (partition or volume) you want to change the drive letter for.
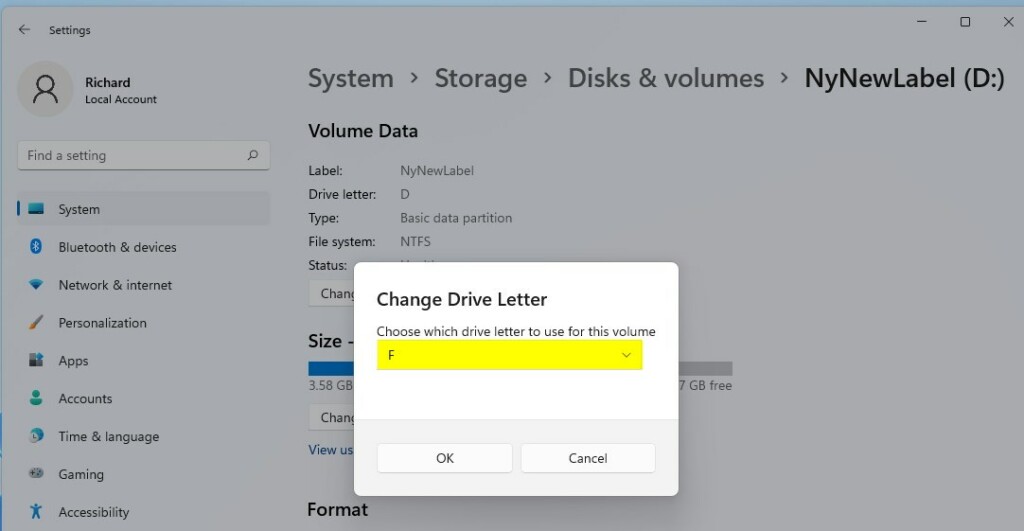
- Click/tap on the Change drive letter button.
- Select an available drive letter you want to assign to this drive in the drop menu, and click/tap on OK.
- You can now close Settings if you like.
Option Three
Change Drive Letter using “diskpart” Command
You can change drive letter using diskpart command tools by opening an administrator terminal, selecting your target volume, and running a quick assignment command. This command-line method works well if you prefer text-based tools or need to fix storage issues from a recovery environment.- Open Windows Terminal (Admin), and select either Windows PowerShell or Command Prompt. [Admin Required]
- Copy and paste the following into Windows Terminal (Admin), and press Enter:
diskpart
- Copy and paste the following into Windows Terminal (Admin), and press Enter:
list volume
- Make note of the volume number (ex: “1”) for the current drive letter (ex: “D”) of the drive (volume) you want to change.
- Type the command below into Windows Terminal (Admin), and press Enter:
select volume <volume number>- Substitute
<volume number>in the command above with the actual volume number (ex: “1”) from step 3 above for the drive you want to change the drive letter of. - For example:
select volume 16
- Type the command below into Windows Terminal (Admin), and press Enter:
assign letter=<new drive letter>- Substitute
<new drive letter>in the command above with the actual new drive letter (ex: “F”) you want to assign to this drive. - For example:
assign letter=F - If the new drive letter you assigned is not available, you will get an error message in Windows Terminal (Admin). You will just need to repeat this step to assign an available drive letter.
- You can now close Windows Terminal (Admin) if you like.
Option Four
Change Drive Letter using “Set-Partition” Command
You can change drive letter using Set-Partition command in PowerShell by running a quick cmdlet with your current and new drive letters. This script-friendly method is ideal if you want to manage storage partitions quickly using modern Windows PowerShell commands.- Open Windows Terminal (Admin), and select Windows PowerShell. [Admin Required]
- Copy and paste the following into Windows Terminal (Admin), and press Enter:
Get-Partition
- Make note of the current drive letter (ex: “D”) of the drive you want to change.
- Type the command below into Windows Terminal (Admin), and press Enter:
Get-Partition -DriveLetter <current drive letter> | Set-Partition -NewDriveLetter <new drive letter>- Substitute
<current drive letter>in the command above with the actual current drive letter (ex: “D”) from step 2 above of the drive you want to change. - Substitute
<new drive letter>in the command above with the actual new drive letter (ex: “F”) you want to assign to the drive. - For example:
Get-Partition -DriveLetter D | Set-Partition -NewDriveLetter F - If the new drive letter you assign is not available, you will get an error message in Windows Terminal (Admin). You will just need to repeat this step to assign an available drive letter.
- You can now close Windows Terminal (Admin) if you like.
Option Five
Change Drive Letter in Registry Editor
You can change drive letter in Registry Editor by locating the mounted devices key and renaming the binary value for your specific drive. This advanced method should only be used if standard tools fail, as making mistakes in the registry can cause system errors.- Open Registry Editor (
regedit.exe). [Admin Required] - Navigate to the key below in the left pane of Registry Editor:
HKEY_LOCAL_MACHINE\SYSTEM\MountedDevices
- In the right pane of the MountedDevices key, right click or press and hold on the binary (REG_BINARY) value (ex: “\DosDevices\D:”) for the drive letter (ex: “D”) of the drive you want to change, and click/tap on Rename.
- Rename only the drive letter part of the binary (REG_BINARY) value (ex: “\DosDevices\D:”) name with an available drive letter (ex: “\DosDevices\F:”) you want for the drive instead, and press Enter to apply.
- If another drive is currently assigned the drive letter you want to assign to this drive, then you will need to change the drive letter of the other drive first.
- When finished, close Registry Editor.
Summary
Each method lets you rename partitions to keep your files organised, but you should always avoid changing the letter of your main system drive.
Change Drive Letter in Disk Management
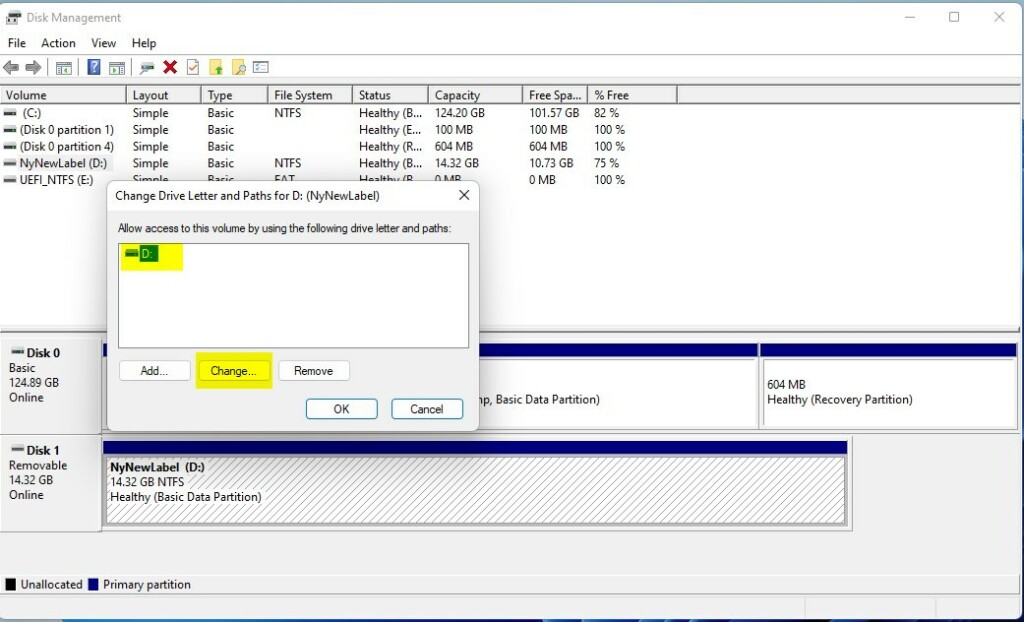
You can change drive letter in Disk Management by opening the built-in tool, right-clicking the drive you want to update, and choosing the change option. This graphical method is the safest and most straightforward way to assign a new letter to any connected hard drive or partition on your Windows 11 computer.- Open Disk Management (
diskmgmt.msc). [Admin Required] - Right click or press and hold on the drive you want to change the drive letter for, and click/tap on Change Drive Letter and Paths.
- Click/tap on Change.
- Click/tap on the Add button instead if the drive doesn’t currently have a drive letter assigned to it.
- Select an available drive letter you want to assign to this drive in the drop menu, and click/tap on OK.
- Click/tap on Yes to confirm.
- If prompted the drive is in use, click/tap on Yes to confirm.
- You can now close Disk Management if you like.

Option Two
Change Drive Letter in Settings
You can change drive letter in Settings by opening the main system menu, going to storage options, and updating the volume properties for your connected drives. This modern Windows 11 menu lets you manage your storage devices without needing to open older administrator tools.- Open Settings (Win+I).
- Click/tap on System on the left side, and click/tap on Storage on the right side.
- Click/tap on Yes if prompted by UAC. [Admin Required]
- Starting with Windows 11 build 26100.7705 (24H2) and build 26200.7705 (25H2), to help ensure that only authorized Windows users can access system files, Windows now displays a User Account Control (UAC) prompt when you open Storage settings (Settings System Storage).
- Click/tap on Advanced storage settings to expand it open, and click/tap on Disks & volumes.
- Click/tap on Properties for the drive (partition or volume) you want to change the drive letter for.
- Click/tap on the Change drive letter button.
- Select an available drive letter you want to assign to this drive in the drop menu, and click/tap on OK.
- You can now close Settings if you like.
Option Three
Change Drive Letter using “diskpart” Command
You can change drive letter using diskpart command tools by opening an administrator terminal, selecting your target volume, and running a quick assignment command. This command-line method works well if you prefer text-based tools or need to fix storage issues from a recovery environment.- Open Windows Terminal (Admin), and select either Windows PowerShell or Command Prompt. [Admin Required]
- Copy and paste the following into Windows Terminal (Admin), and press Enter:
diskpart
- Copy and paste the following into Windows Terminal (Admin), and press Enter:
list volume
- Make note of the volume number (ex: “1”) for the current drive letter (ex: “D”) of the drive (volume) you want to change.
- Type the command below into Windows Terminal (Admin), and press Enter:
select volume <volume number>- Substitute
<volume number>in the command above with the actual volume number (ex: “1”) from step 3 above for the drive you want to change the drive letter of. - For example:
select volume 16
- Type the command below into Windows Terminal (Admin), and press Enter:
assign letter=<new drive letter>- Substitute
<new drive letter>in the command above with the actual new drive letter (ex: “F”) you want to assign to this drive. - For example:
assign letter=F - If the new drive letter you assigned is not available, you will get an error message in Windows Terminal (Admin). You will just need to repeat this step to assign an available drive letter.
- You can now close Windows Terminal (Admin) if you like.
Option Four
Change Drive Letter using “Set-Partition” Command
You can change drive letter using Set-Partition command in PowerShell by running a quick cmdlet with your current and new drive letters. This script-friendly method is ideal if you want to manage storage partitions quickly using modern Windows PowerShell commands.- Open Windows Terminal (Admin), and select Windows PowerShell. [Admin Required]
- Copy and paste the following into Windows Terminal (Admin), and press Enter:
Get-Partition
- Make note of the current drive letter (ex: “D”) of the drive you want to change.
- Type the command below into Windows Terminal (Admin), and press Enter:
Get-Partition -DriveLetter <current drive letter> | Set-Partition -NewDriveLetter <new drive letter>- Substitute
<current drive letter>in the command above with the actual current drive letter (ex: “D”) from step 2 above of the drive you want to change. - Substitute
<new drive letter>in the command above with the actual new drive letter (ex: “F”) you want to assign to the drive. - For example:
Get-Partition -DriveLetter D | Set-Partition -NewDriveLetter F - If the new drive letter you assign is not available, you will get an error message in Windows Terminal (Admin). You will just need to repeat this step to assign an available drive letter.
- You can now close Windows Terminal (Admin) if you like.
Option Five
Change Drive Letter in Registry Editor
You can change drive letter in Registry Editor by locating the mounted devices key and renaming the binary value for your specific drive. This advanced method should only be used if standard tools fail, as making mistakes in the registry can cause system errors.- Open Registry Editor (
regedit.exe). [Admin Required] - Navigate to the key below in the left pane of Registry Editor:
HKEY_LOCAL_MACHINE\SYSTEM\MountedDevices
- In the right pane of the MountedDevices key, right click or press and hold on the binary (REG_BINARY) value (ex: “\DosDevices\D:”) for the drive letter (ex: “D”) of the drive you want to change, and click/tap on Rename.
- Rename only the drive letter part of the binary (REG_BINARY) value (ex: “\DosDevices\D:”) name with an available drive letter (ex: “\DosDevices\F:”) you want for the drive instead, and press Enter to apply.
- If another drive is currently assigned the drive letter you want to assign to this drive, then you will need to change the drive letter of the other drive first.
- When finished, close Registry Editor.
Summary
Each method lets you rename partitions to keep your files organised, but you should always avoid changing the letter of your main system drive.
Change Drive Letter using “Set-Partition” Command
You can change drive letter using Set-Partition command in PowerShell by running a quick cmdlet with your current and new drive letters. This script-friendly method is ideal if you want to manage storage partitions quickly using modern Windows PowerShell commands.- Open Windows Terminal (Admin), and select Windows PowerShell. [Admin Required]
- Copy and paste the following into Windows Terminal (Admin), and press Enter:
Get-Partition
- Make note of the current drive letter (ex: “D”) of the drive you want to change.
- Type the command below into Windows Terminal (Admin), and press Enter:
Get-Partition -DriveLetter <current drive letter> | Set-Partition -NewDriveLetter <new drive letter>- Substitute
<current drive letter>in the command above with the actual current drive letter (ex: “D”) from step 2 above of the drive you want to change. - Substitute
<new drive letter>in the command above with the actual new drive letter (ex: “F”) you want to assign to the drive. - For example:
Get-Partition -DriveLetter D | Set-Partition -NewDriveLetter F - If the new drive letter you assign is not available, you will get an error message in Windows Terminal (Admin). You will just need to repeat this step to assign an available drive letter.
- You can now close Windows Terminal (Admin) if you like.
Option Five
Change Drive Letter in Registry Editor
You can change drive letter in Registry Editor by locating the mounted devices key and renaming the binary value for your specific drive. This advanced method should only be used if standard tools fail, as making mistakes in the registry can cause system errors.- Open Registry Editor (
regedit.exe). [Admin Required] - Navigate to the key below in the left pane of Registry Editor:
HKEY_LOCAL_MACHINE\SYSTEM\MountedDevices
- In the right pane of the MountedDevices key, right click or press and hold on the binary (REG_BINARY) value (ex: “\DosDevices\D:”) for the drive letter (ex: “D”) of the drive you want to change, and click/tap on Rename.
- Rename only the drive letter part of the binary (REG_BINARY) value (ex: “\DosDevices\D:”) name with an available drive letter (ex: “\DosDevices\F:”) you want for the drive instead, and press Enter to apply.
- If another drive is currently assigned the drive letter you want to assign to this drive, then you will need to change the drive letter of the other drive first.
- When finished, close Registry Editor.
Summary
Each method lets you rename partitions to keep your files organised, but you should always avoid changing the letter of your main system drive.
Change Drive Letter in Disk Management
You can change drive letter in Disk Management by opening the built-in tool, right-clicking the drive you want to update, and choosing the change option. This graphical method is the safest and most straightforward way to assign a new letter to any connected hard drive or partition on your Windows 11 computer.- Open Disk Management (
diskmgmt.msc). [Admin Required] - Right click or press and hold on the drive you want to change the drive letter for, and click/tap on Change Drive Letter and Paths.
- Click/tap on Change.
- Click/tap on the Add button instead if the drive doesn’t currently have a drive letter assigned to it.
- Select an available drive letter you want to assign to this drive in the drop menu, and click/tap on OK.
- Click/tap on Yes to confirm.
- If prompted the drive is in use, click/tap on Yes to confirm.
- You can now close Disk Management if you like.
Option Two
Change Drive Letter in Settings
You can change drive letter in Settings by opening the main system menu, going to storage options, and updating the volume properties for your connected drives. This modern Windows 11 menu lets you manage your storage devices without needing to open older administrator tools.- Open Settings (Win+I).
- Click/tap on System on the left side, and click/tap on Storage on the right side.
- Click/tap on Yes if prompted by UAC. [Admin Required]
- Starting with Windows 11 build 26100.7705 (24H2) and build 26200.7705 (25H2), to help ensure that only authorized Windows users can access system files, Windows now displays a User Account Control (UAC) prompt when you open Storage settings (Settings System Storage).
- Click/tap on Advanced storage settings to expand it open, and click/tap on Disks & volumes.
- Click/tap on Properties for the drive (partition or volume) you want to change the drive letter for.
- Click/tap on the Change drive letter button.
- Select an available drive letter you want to assign to this drive in the drop menu, and click/tap on OK.
- You can now close Settings if you like.
Option Three
Change Drive Letter using “diskpart” Command
You can change drive letter using diskpart command tools by opening an administrator terminal, selecting your target volume, and running a quick assignment command. This command-line method works well if you prefer text-based tools or need to fix storage issues from a recovery environment.- Open Windows Terminal (Admin), and select either Windows PowerShell or Command Prompt. [Admin Required]
- Copy and paste the following into Windows Terminal (Admin), and press Enter:
diskpart
- Copy and paste the following into Windows Terminal (Admin), and press Enter:
list volume
- Make note of the volume number (ex: “1”) for the current drive letter (ex: “D”) of the drive (volume) you want to change.
- Type the command below into Windows Terminal (Admin), and press Enter:
select volume <volume number>- Substitute
<volume number>in the command above with the actual volume number (ex: “1”) from step 3 above for the drive you want to change the drive letter of. - For example:
select volume 16
- Type the command below into Windows Terminal (Admin), and press Enter:
assign letter=<new drive letter>- Substitute
<new drive letter>in the command above with the actual new drive letter (ex: “F”) you want to assign to this drive. - For example:
assign letter=F - If the new drive letter you assigned is not available, you will get an error message in Windows Terminal (Admin). You will just need to repeat this step to assign an available drive letter.
- You can now close Windows Terminal (Admin) if you like.
Option Four
Change Drive Letter using “Set-Partition” Command
You can change drive letter using Set-Partition command in PowerShell by running a quick cmdlet with your current and new drive letters. This script-friendly method is ideal if you want to manage storage partitions quickly using modern Windows PowerShell commands.- Open Windows Terminal (Admin), and select Windows PowerShell. [Admin Required]
- Copy and paste the following into Windows Terminal (Admin), and press Enter:
Get-Partition
- Make note of the current drive letter (ex: “D”) of the drive you want to change.
- Type the command below into Windows Terminal (Admin), and press Enter:
Get-Partition -DriveLetter <current drive letter> | Set-Partition -NewDriveLetter <new drive letter>- Substitute
<current drive letter>in the command above with the actual current drive letter (ex: “D”) from step 2 above of the drive you want to change. - Substitute
<new drive letter>in the command above with the actual new drive letter (ex: “F”) you want to assign to the drive. - For example:
Get-Partition -DriveLetter D | Set-Partition -NewDriveLetter F - If the new drive letter you assign is not available, you will get an error message in Windows Terminal (Admin). You will just need to repeat this step to assign an available drive letter.
- You can now close Windows Terminal (Admin) if you like.
Option Five
Change Drive Letter in Registry Editor
You can change drive letter in Registry Editor by locating the mounted devices key and renaming the binary value for your specific drive. This advanced method should only be used if standard tools fail, as making mistakes in the registry can cause system errors.- Open Registry Editor (
regedit.exe). [Admin Required] - Navigate to the key below in the left pane of Registry Editor:
HKEY_LOCAL_MACHINE\SYSTEM\MountedDevices
- In the right pane of the MountedDevices key, right click or press and hold on the binary (REG_BINARY) value (ex: “\DosDevices\D:”) for the drive letter (ex: “D”) of the drive you want to change, and click/tap on Rename.
- Rename only the drive letter part of the binary (REG_BINARY) value (ex: “\DosDevices\D:”) name with an available drive letter (ex: “\DosDevices\F:”) you want for the drive instead, and press Enter to apply.
- If another drive is currently assigned the drive letter you want to assign to this drive, then you will need to change the drive letter of the other drive first.
- When finished, close Registry Editor.
Summary
Each method lets you rename partitions to keep your files organised, but you should always avoid changing the letter of your main system drive.
Change Drive Letter using "diskpart" Command
You can change drive letter using diskpart command tools by opening an administrator terminal, selecting your target volume, and running a quick assignment command. This command-line method works well if you prefer text-based tools or need to fix storage issues from a recovery environment.- Open Windows Terminal (Admin), and select either Windows PowerShell or Command Prompt. [Admin Required]
- Copy and paste the following into Windows Terminal (Admin), and press Enter:
diskpart
- Copy and paste the following into Windows Terminal (Admin), and press Enter:
list volume
- Make note of the volume number (ex: "1") for the current drive letter (ex: "D") of the drive (volume) you want to change.
- Type the command below into Windows Terminal (Admin), and press Enter:
select volume <volume number>- Substitute
<volume number>in the command above with the actual volume number (ex: "1") from step 3 above for the drive you want to change the drive letter of. - For example:
select volume 16
- Type the command below into Windows Terminal (Admin), and press Enter:
assign letter=<new drive letter>- Substitute
<new drive letter>in the command above with the actual new drive letter (ex: "F") you want to assign to this drive. - For example:
assign letter=F - If the new drive letter you assigned is not available, you will get an error message in Windows Terminal (Admin). You will just need to repeat this step to assign an available drive letter.
- You can now close Windows Terminal (Admin) if you like.
Option Four
Change Drive Letter using "Set-Partition" Command
You can change drive letter using Set-Partition command in PowerShell by running a quick cmdlet with your current and new drive letters. This script-friendly method is ideal if you want to manage storage partitions quickly using modern Windows PowerShell commands.- Open Windows Terminal (Admin), and select Windows PowerShell. [Admin Required]
- Copy and paste the following into Windows Terminal (Admin), and press Enter:
Get-Partition
- Make note of the current drive letter (ex: "D") of the drive you want to change.
- Type the command below into Windows Terminal (Admin), and press Enter:
Get-Partition -DriveLetter <current drive letter> | Set-Partition -NewDriveLetter <new drive letter>- Substitute
<current drive letter>in the command above with the actual current drive letter (ex: "D") from step 2 above of the drive you want to change. - Substitute
<new drive letter>in the command above with the actual new drive letter (ex: "F") you want to assign to the drive. - For example:
Get-Partition -DriveLetter D | Set-Partition -NewDriveLetter F - If the new drive letter you assign is not available, you will get an error message in Windows Terminal (Admin). You will just need to repeat this step to assign an available drive letter.
- You can now close Windows Terminal (Admin) if you like.
Option Five
Change Drive Letter in Registry Editor
You can change drive letter in Registry Editor by locating the mounted devices key and renaming the binary value for your specific drive. This advanced method should only be used if standard tools fail, as making mistakes in the registry can cause system errors.- Open Registry Editor (
regedit.exe). [Admin Required] - Navigate to the key below in the left pane of Registry Editor:
HKEY_LOCAL_MACHINE\SYSTEM\MountedDevices
- In the right pane of the MountedDevices key, right click or press and hold on the binary (REG_BINARY) value (ex: "\DosDevices\D:") for the drive letter (ex: "D") of the drive you want to change, and click/tap on Rename.
- Rename only the drive letter part of the binary (REG_BINARY) value (ex: "\DosDevices\D:") name with an available drive letter (ex: "\DosDevices\F:") you want for the drive instead, and press Enter to apply.
- If another drive is currently assigned the drive letter you want to assign to this drive, then you will need to change the drive letter of the other drive first.
- When finished, close Registry Editor.
Summary
Changing a drive letter in Windows 11 can be done using Disk Management, the Settings app, command-line tools like diskpart and PowerShell, or the Registry Editor. Each method lets you rename partitions to keep your files organised, but you should always avoid changing the letter of your main system drive.
Change Drive Letter in Disk Management
You can change drive letter in Disk Management by opening the built-in tool, right-clicking the drive you want to update, and choosing the change option. This graphical method is the safest and most straightforward way to assign a new letter to any connected hard drive or partition on your Windows 11 computer.- Open Disk Management (
diskmgmt.msc). [Admin Required] - Right click or press and hold on the drive you want to change the drive letter for, and click/tap on Change Drive Letter and Paths.
- Click/tap on Change.
- Click/tap on the Add button instead if the drive doesn't currently have a drive letter assigned to it.
- Select an available drive letter you want to assign to this drive in the drop menu, and click/tap on OK.
- Click/tap on Yes to confirm.
- If prompted the drive is in use, click/tap on Yes to confirm.
- You can now close Disk Management if you like.
Option Two
Change Drive Letter in Settings
You can change drive letter in Settings by opening the main system menu, going to storage options, and updating the volume properties for your connected drives. This modern Windows 11 menu lets you manage your storage devices without needing to open older administrator tools.- Open Settings (Win+I).
- Click/tap on System on the left side, and click/tap on Storage on the right side.
- Click/tap on Yes if prompted by UAC. [Admin Required]
- Starting with Windows 11 build 26100.7705 (24H2) and build 26200.7705 (25H2), to help ensure that only authorized Windows users can access system files, Windows now displays a User Account Control (UAC) prompt when you open Storage settings (Settings System Storage).
- Click/tap on Advanced storage settings to expand it open, and click/tap on Disks & volumes.
- Click/tap on Properties for the drive (partition or volume) you want to change the drive letter for.
- Click/tap on the Change drive letter button.
- Select an available drive letter you want to assign to this drive in the drop menu, and click/tap on OK.
- You can now close Settings if you like.
Option Three
Change Drive Letter using "diskpart" Command
You can change drive letter using diskpart command tools by opening an administrator terminal, selecting your target volume, and running a quick assignment command. This command-line method works well if you prefer text-based tools or need to fix storage issues from a recovery environment.- Open Windows Terminal (Admin), and select either Windows PowerShell or Command Prompt. [Admin Required]
- Copy and paste the following into Windows Terminal (Admin), and press Enter:
diskpart
- Copy and paste the following into Windows Terminal (Admin), and press Enter:
list volume
- Make note of the volume number (ex: "1") for the current drive letter (ex: "D") of the drive (volume) you want to change.
- Type the command below into Windows Terminal (Admin), and press Enter:
select volume <volume number>- Substitute
<volume number>in the command above with the actual volume number (ex: "1") from step 3 above for the drive you want to change the drive letter of. - For example:
select volume 16
- Type the command below into Windows Terminal (Admin), and press Enter:
assign letter=<new drive letter>- Substitute
<new drive letter>in the command above with the actual new drive letter (ex: "F") you want to assign to this drive. - For example:
assign letter=F - If the new drive letter you assigned is not available, you will get an error message in Windows Terminal (Admin). You will just need to repeat this step to assign an available drive letter.
- You can now close Windows Terminal (Admin) if you like.
Option Four
Change Drive Letter using "Set-Partition" Command
You can change drive letter using Set-Partition command in PowerShell by running a quick cmdlet with your current and new drive letters. This script-friendly method is ideal if you want to manage storage partitions quickly using modern Windows PowerShell commands.- Open Windows Terminal (Admin), and select Windows PowerShell. [Admin Required]
- Copy and paste the following into Windows Terminal (Admin), and press Enter:
Get-Partition
- Make note of the current drive letter (ex: "D") of the drive you want to change.
- Type the command below into Windows Terminal (Admin), and press Enter:
Get-Partition -DriveLetter <current drive letter> | Set-Partition -NewDriveLetter <new drive letter>- Substitute
<current drive letter>in the command above with the actual current drive letter (ex: "D") from step 2 above of the drive you want to change. - Substitute
<new drive letter>in the command above with the actual new drive letter (ex: "F") you want to assign to the drive. - For example:
Get-Partition -DriveLetter D | Set-Partition -NewDriveLetter F - If the new drive letter you assign is not available, you will get an error message in Windows Terminal (Admin). You will just need to repeat this step to assign an available drive letter.
- You can now close Windows Terminal (Admin) if you like.
Option Five
Change Drive Letter in Registry Editor
You can change drive letter in Registry Editor by locating the mounted devices key and renaming the binary value for your specific drive. This advanced method should only be used if standard tools fail, as making mistakes in the registry can cause system errors.- Open Registry Editor (
regedit.exe). [Admin Required] - Navigate to the key below in the left pane of Registry Editor:
HKEY_LOCAL_MACHINE\SYSTEM\MountedDevices
- In the right pane of the MountedDevices key, right click or press and hold on the binary (REG_BINARY) value (ex: "\DosDevices\D:") for the drive letter (ex: "D") of the drive you want to change, and click/tap on Rename.
- Rename only the drive letter part of the binary (REG_BINARY) value (ex: "\DosDevices\D:") name with an available drive letter (ex: "\DosDevices\F:") you want for the drive instead, and press Enter to apply.
- If another drive is currently assigned the drive letter you want to assign to this drive, then you will need to change the drive letter of the other drive first.
- When finished, close Registry Editor.
Summary
Changing a drive letter in Windows 11 can be done using Disk Management, the Settings app, command-line tools like diskpart and PowerShell, or the Registry Editor. Each method lets you rename partitions to keep your files organised, but you should always avoid changing the letter of your main system drive.
Change Drive Letter in Settings
You can change drive letter in Settings by opening the main system menu, going to storage options, and updating the volume properties for your connected drives. This modern Windows 11 menu lets you manage your storage devices without needing to open older administrator tools.- Open Settings (Win+I).
- Click/tap on System on the left side, and click/tap on Storage on the right side.
- Click/tap on Yes if prompted by UAC. [Admin Required]
- Starting with Windows 11 build 26100.7705 (24H2) and build 26200.7705 (25H2), to help ensure that only authorized Windows users can access system files, Windows now displays a User Account Control (UAC) prompt when you open Storage settings (Settings System Storage).
- Click/tap on Advanced storage settings to expand it open, and click/tap on Disks & volumes.
- Click/tap on Properties for the drive (partition or volume) you want to change the drive letter for.
- Click/tap on the Change drive letter button.
- Select an available drive letter you want to assign to this drive in the drop menu, and click/tap on OK.
- You can now close Settings if you like.
Option Three
Change Drive Letter using "diskpart" Command
You can change drive letter using diskpart command tools by opening an administrator terminal, selecting your target volume, and running a quick assignment command. This command-line method works well if you prefer text-based tools or need to fix storage issues from a recovery environment.- Open Windows Terminal (Admin), and select either Windows PowerShell or Command Prompt. [Admin Required]
- Copy and paste the following into Windows Terminal (Admin), and press Enter:
diskpart
- Copy and paste the following into Windows Terminal (Admin), and press Enter:
list volume
- Make note of the volume number (ex: "1") for the current drive letter (ex: "D") of the drive (volume) you want to change.
- Type the command below into Windows Terminal (Admin), and press Enter:
select volume <volume number>- Substitute
<volume number>in the command above with the actual volume number (ex: "1") from step 3 above for the drive you want to change the drive letter of. - For example:
select volume 16
- Type the command below into Windows Terminal (Admin), and press Enter:
assign letter=<new drive letter>- Substitute
<new drive letter>in the command above with the actual new drive letter (ex: "F") you want to assign to this drive. - For example:
assign letter=F - If the new drive letter you assigned is not available, you will get an error message in Windows Terminal (Admin). You will just need to repeat this step to assign an available drive letter.
- You can now close Windows Terminal (Admin) if you like.
Option Four
Change Drive Letter using "Set-Partition" Command
You can change drive letter using Set-Partition command in PowerShell by running a quick cmdlet with your current and new drive letters. This script-friendly method is ideal if you want to manage storage partitions quickly using modern Windows PowerShell commands.- Open Windows Terminal (Admin), and select Windows PowerShell. [Admin Required]
- Copy and paste the following into Windows Terminal (Admin), and press Enter:
Get-Partition
- Make note of the current drive letter (ex: "D") of the drive you want to change.
- Type the command below into Windows Terminal (Admin), and press Enter:
Get-Partition -DriveLetter <current drive letter> | Set-Partition -NewDriveLetter <new drive letter>- Substitute
<current drive letter>in the command above with the actual current drive letter (ex: "D") from step 2 above of the drive you want to change. - Substitute
<new drive letter>in the command above with the actual new drive letter (ex: "F") you want to assign to the drive. - For example:
Get-Partition -DriveLetter D | Set-Partition -NewDriveLetter F - If the new drive letter you assign is not available, you will get an error message in Windows Terminal (Admin). You will just need to repeat this step to assign an available drive letter.
- You can now close Windows Terminal (Admin) if you like.
Option Five
Change Drive Letter in Registry Editor
You can change drive letter in Registry Editor by locating the mounted devices key and renaming the binary value for your specific drive. This advanced method should only be used if standard tools fail, as making mistakes in the registry can cause system errors.- Open Registry Editor (
regedit.exe). [Admin Required] - Navigate to the key below in the left pane of Registry Editor:
HKEY_LOCAL_MACHINE\SYSTEM\MountedDevices
- In the right pane of the MountedDevices key, right click or press and hold on the binary (REG_BINARY) value (ex: "\DosDevices\D:") for the drive letter (ex: "D") of the drive you want to change, and click/tap on Rename.
- Rename only the drive letter part of the binary (REG_BINARY) value (ex: "\DosDevices\D:") name with an available drive letter (ex: "\DosDevices\F:") you want for the drive instead, and press Enter to apply.
- If another drive is currently assigned the drive letter you want to assign to this drive, then you will need to change the drive letter of the other drive first.
- When finished, close Registry Editor.
Summary
Changing a drive letter in Windows 11 can be done using Disk Management, the Settings app, command-line tools like diskpart and PowerShell, or the Registry Editor. Each method lets you rename partitions to keep your files organised, but you should always avoid changing the letter of your main system drive.
Change Drive Letter in Disk Management
You can change drive letter in Disk Management by opening the built-in tool, right-clicking the drive you want to update, and choosing the change option. This graphical method is the safest and most straightforward way to assign a new letter to any connected hard drive or partition on your Windows 11 computer.- Open Disk Management (
diskmgmt.msc). [Admin Required] - Right click or press and hold on the drive you want to change the drive letter for, and click/tap on Change Drive Letter and Paths.
- Click/tap on Change.
- Click/tap on the Add button instead if the drive doesn't currently have a drive letter assigned to it.
- Select an available drive letter you want to assign to this drive in the drop menu, and click/tap on OK.
- Click/tap on Yes to confirm.
- If prompted the drive is in use, click/tap on Yes to confirm.
- You can now close Disk Management if you like.
Option Two
Change Drive Letter in Settings
You can change drive letter in Settings by opening the main system menu, going to storage options, and updating the volume properties for your connected drives. This modern Windows 11 menu lets you manage your storage devices without needing to open older administrator tools.- Open Settings (Win+I).
- Click/tap on System on the left side, and click/tap on Storage on the right side.
- Click/tap on Yes if prompted by UAC. [Admin Required]
- Starting with Windows 11 build 26100.7705 (24H2) and build 26200.7705 (25H2), to help ensure that only authorized Windows users can access system files, Windows now displays a User Account Control (UAC) prompt when you open Storage settings (Settings System Storage).
- Click/tap on Advanced storage settings to expand it open, and click/tap on Disks & volumes.
- Click/tap on Properties for the drive (partition or volume) you want to change the drive letter for.
- Click/tap on the Change drive letter button.
- Select an available drive letter you want to assign to this drive in the drop menu, and click/tap on OK.
- You can now close Settings if you like.
Option Three
Change Drive Letter using "diskpart" Command
You can change drive letter using diskpart command tools by opening an administrator terminal, selecting your target volume, and running a quick assignment command. This command-line method works well if you prefer text-based tools or need to fix storage issues from a recovery environment.- Open Windows Terminal (Admin), and select either Windows PowerShell or Command Prompt. [Admin Required]
- Copy and paste the following into Windows Terminal (Admin), and press Enter:
diskpart
- Copy and paste the following into Windows Terminal (Admin), and press Enter:
list volume
- Make note of the volume number (ex: "1") for the current drive letter (ex: "D") of the drive (volume) you want to change.
- Type the command below into Windows Terminal (Admin), and press Enter:
select volume <volume number>- Substitute
<volume number>in the command above with the actual volume number (ex: "1") from step 3 above for the drive you want to change the drive letter of. - For example:
select volume 16
- Type the command below into Windows Terminal (Admin), and press Enter:
assign letter=<new drive letter>- Substitute
<new drive letter>in the command above with the actual new drive letter (ex: "F") you want to assign to this drive. - For example:
assign letter=F - If the new drive letter you assigned is not available, you will get an error message in Windows Terminal (Admin). You will just need to repeat this step to assign an available drive letter.
- You can now close Windows Terminal (Admin) if you like.
Option Four
Change Drive Letter using "Set-Partition" Command
You can change drive letter using Set-Partition command in PowerShell by running a quick cmdlet with your current and new drive letters. This script-friendly method is ideal if you want to manage storage partitions quickly using modern Windows PowerShell commands.- Open Windows Terminal (Admin), and select Windows PowerShell. [Admin Required]
- Copy and paste the following into Windows Terminal (Admin), and press Enter:
Get-Partition
- Make note of the current drive letter (ex: "D") of the drive you want to change.
- Type the command below into Windows Terminal (Admin), and press Enter:
Get-Partition -DriveLetter <current drive letter> | Set-Partition -NewDriveLetter <new drive letter>- Substitute
<current drive letter>in the command above with the actual current drive letter (ex: "D") from step 2 above of the drive you want to change. - Substitute
<new drive letter>in the command above with the actual new drive letter (ex: "F") you want to assign to the drive. - For example:
Get-Partition -DriveLetter D | Set-Partition -NewDriveLetter F - If the new drive letter you assign is not available, you will get an error message in Windows Terminal (Admin). You will just need to repeat this step to assign an available drive letter.
- You can now close Windows Terminal (Admin) if you like.
Option Five
Change Drive Letter in Registry Editor
You can change drive letter in Registry Editor by locating the mounted devices key and renaming the binary value for your specific drive. This advanced method should only be used if standard tools fail, as making mistakes in the registry can cause system errors.- Open Registry Editor (
regedit.exe). [Admin Required] - Navigate to the key below in the left pane of Registry Editor:
HKEY_LOCAL_MACHINE\SYSTEM\MountedDevices
- In the right pane of the MountedDevices key, right click or press and hold on the binary (REG_BINARY) value (ex: "\DosDevices\D:") for the drive letter (ex: "D") of the drive you want to change, and click/tap on Rename.
- Rename only the drive letter part of the binary (REG_BINARY) value (ex: "\DosDevices\D:") name with an available drive letter (ex: "\DosDevices\F:") you want for the drive instead, and press Enter to apply.
- If another drive is currently assigned the drive letter you want to assign to this drive, then you will need to change the drive letter of the other drive first.
- When finished, close Registry Editor.
Summary
Changing a drive letter in Windows 11 can be done using Disk Management, the Settings app, command-line tools like diskpart and PowerShell, or the Registry Editor. Each method lets you rename partitions to keep your files organised, but you should always avoid changing the letter of your main system drive.
Change Drive Letter using "Set-Partition" Command
You can change drive letter using Set-Partition command in PowerShell by running a quick cmdlet with your current and new drive letters. This script-friendly method is ideal if you want to manage storage partitions quickly using modern Windows PowerShell commands.- Open Windows Terminal (Admin), and select Windows PowerShell. [Admin Required]
- Copy and paste the following into Windows Terminal (Admin), and press Enter:
Get-Partition
- Make note of the current drive letter (ex: "D") of the drive you want to change.
- Type the command below into Windows Terminal (Admin), and press Enter:
Get-Partition -DriveLetter <current drive letter> | Set-Partition -NewDriveLetter <new drive letter>- Substitute
<current drive letter>in the command above with the actual current drive letter (ex: "D") from step 2 above of the drive you want to change. - Substitute
<new drive letter>in the command above with the actual new drive letter (ex: "F") you want to assign to the drive. - For example:
Get-Partition -DriveLetter D | Set-Partition -NewDriveLetter F - If the new drive letter you assign is not available, you will get an error message in Windows Terminal (Admin). You will just need to repeat this step to assign an available drive letter.
- You can now close Windows Terminal (Admin) if you like.
Option Five
Change Drive Letter in Registry Editor
You can change drive letter in Registry Editor by locating the mounted devices key and renaming the binary value for your specific drive. This advanced method should only be used if standard tools fail, as making mistakes in the registry can cause system errors.- Open Registry Editor (
regedit.exe). [Admin Required] - Navigate to the key below in the left pane of Registry Editor:
HKEY_LOCAL_MACHINE\SYSTEM\MountedDevices
- In the right pane of the MountedDevices key, right click or press and hold on the binary (REG_BINARY) value (ex: "\DosDevices\D:") for the drive letter (ex: "D") of the drive you want to change, and click/tap on Rename.
- Rename only the drive letter part of the binary (REG_BINARY) value (ex: "\DosDevices\D:") name with an available drive letter (ex: "\DosDevices\F:") you want for the drive instead, and press Enter to apply.
- If another drive is currently assigned the drive letter you want to assign to this drive, then you will need to change the drive letter of the other drive first.
- When finished, close Registry Editor.
Summary
Changing a drive letter in Windows 11 can be done using Disk Management, the Settings app, command-line tools like diskpart and PowerShell, or the Registry Editor. Each method lets you rename partitions to keep your files organised, but you should always avoid changing the letter of your main system drive.
Change Drive Letter in Settings
You can change drive letter in Settings by opening the main system menu, going to storage options, and updating the volume properties for your connected drives. This modern Windows 11 menu lets you manage your storage devices without needing to open older administrator tools.- Open Settings (Win+I).
- Click/tap on System on the left side, and click/tap on Storage on the right side.
- Click/tap on Yes if prompted by UAC. [Admin Required]
- Starting with Windows 11 build 26100.7705 (24H2) and build 26200.7705 (25H2), to help ensure that only authorized Windows users can access system files, Windows now displays a User Account Control (UAC) prompt when you open Storage settings (Settings System Storage).
- Click/tap on Advanced storage settings to expand it open, and click/tap on Disks & volumes.
- Click/tap on Properties for the drive (partition or volume) you want to change the drive letter for.
- Click/tap on the Change drive letter button.
- Select an available drive letter you want to assign to this drive in the drop menu, and click/tap on OK.
- You can now close Settings if you like.
Option Three
Change Drive Letter using "diskpart" Command
You can change drive letter using diskpart command tools by opening an administrator terminal, selecting your target volume, and running a quick assignment command. This command-line method works well if you prefer text-based tools or need to fix storage issues from a recovery environment.- Open Windows Terminal (Admin), and select either Windows PowerShell or Command Prompt. [Admin Required]
- Copy and paste the following into Windows Terminal (Admin), and press Enter:
diskpart
- Copy and paste the following into Windows Terminal (Admin), and press Enter:
list volume
- Make note of the volume number (ex: "1") for the current drive letter (ex: "D") of the drive (volume) you want to change.
- Type the command below into Windows Terminal (Admin), and press Enter:
select volume <volume number>- Substitute
<volume number>in the command above with the actual volume number (ex: "1") from step 3 above for the drive you want to change the drive letter of. - For example:
select volume 16
- Type the command below into Windows Terminal (Admin), and press Enter:
assign letter=<new drive letter>- Substitute
<new drive letter>in the command above with the actual new drive letter (ex: "F") you want to assign to this drive. - For example:
assign letter=F - If the new drive letter you assigned is not available, you will get an error message in Windows Terminal (Admin). You will just need to repeat this step to assign an available drive letter.
- You can now close Windows Terminal (Admin) if you like.
Option Four
Change Drive Letter using "Set-Partition" Command
You can change drive letter using Set-Partition command in PowerShell by running a quick cmdlet with your current and new drive letters. This script-friendly method is ideal if you want to manage storage partitions quickly using modern Windows PowerShell commands.- Open Windows Terminal (Admin), and select Windows PowerShell. [Admin Required]
- Copy and paste the following into Windows Terminal (Admin), and press Enter:
Get-Partition
- Make note of the current drive letter (ex: "D") of the drive you want to change.
- Type the command below into Windows Terminal (Admin), and press Enter:
Get-Partition -DriveLetter <current drive letter> | Set-Partition -NewDriveLetter <new drive letter>- Substitute
<current drive letter>in the command above with the actual current drive letter (ex: "D") from step 2 above of the drive you want to change. - Substitute
<new drive letter>in the command above with the actual new drive letter (ex: "F") you want to assign to the drive. - For example:
Get-Partition -DriveLetter D | Set-Partition -NewDriveLetter F - If the new drive letter you assign is not available, you will get an error message in Windows Terminal (Admin). You will just need to repeat this step to assign an available drive letter.
- You can now close Windows Terminal (Admin) if you like.
Option Five
Change Drive Letter in Registry Editor
You can change drive letter in Registry Editor by locating the mounted devices key and renaming the binary value for your specific drive. This advanced method should only be used if standard tools fail, as making mistakes in the registry can cause system errors.- Open Registry Editor (
regedit.exe). [Admin Required] - Navigate to the key below in the left pane of Registry Editor:
HKEY_LOCAL_MACHINE\SYSTEM\MountedDevices
- In the right pane of the MountedDevices key, right click or press and hold on the binary (REG_BINARY) value (ex: "\DosDevices\D:") for the drive letter (ex: "D") of the drive you want to change, and click/tap on Rename.
- Rename only the drive letter part of the binary (REG_BINARY) value (ex: "\DosDevices\D:") name with an available drive letter (ex: "\DosDevices\F:") you want for the drive instead, and press Enter to apply.
- If another drive is currently assigned the drive letter you want to assign to this drive, then you will need to change the drive letter of the other drive first.
- When finished, close Registry Editor.
Summary
Changing a drive letter in Windows 11 can be done using Disk Management, the Settings app, command-line tools like diskpart and PowerShell, or the Registry Editor. Each method lets you rename partitions to keep your files organised, but you should always avoid changing the letter of your main system drive.
Change Drive Letter in Disk Management
You can change drive letter in Disk Management by opening the built-in tool, right-clicking the drive you want to update, and choosing the change option. This graphical method is the safest and most straightforward way to assign a new letter to any connected hard drive or partition on your Windows 11 computer.- Open Disk Management (
diskmgmt.msc). [Admin Required] - Right click or press and hold on the drive you want to change the drive letter for, and click/tap on Change Drive Letter and Paths.
- Click/tap on Change.
- Click/tap on the Add button instead if the drive doesn't currently have a drive letter assigned to it.
- Select an available drive letter you want to assign to this drive in the drop menu, and click/tap on OK.
- Click/tap on Yes to confirm.
- If prompted the drive is in use, click/tap on Yes to confirm.
- You can now close Disk Management if you like.
Option Two
Change Drive Letter in Settings
You can change drive letter in Settings by opening the main system menu, going to storage options, and updating the volume properties for your connected drives. This modern Windows 11 menu lets you manage your storage devices without needing to open older administrator tools.- Open Settings (Win+I).
- Click/tap on System on the left side, and click/tap on Storage on the right side.
- Click/tap on Yes if prompted by UAC. [Admin Required]
- Starting with Windows 11 build 26100.7705 (24H2) and build 26200.7705 (25H2), to help ensure that only authorized Windows users can access system files, Windows now displays a User Account Control (UAC) prompt when you open Storage settings (Settings System Storage).
- Click/tap on Advanced storage settings to expand it open, and click/tap on Disks & volumes.
- Click/tap on Properties for the drive (partition or volume) you want to change the drive letter for.
- Click/tap on the Change drive letter button.
- Select an available drive letter you want to assign to this drive in the drop menu, and click/tap on OK.
- You can now close Settings if you like.
Option Three
Change Drive Letter using "diskpart" Command
You can change drive letter using diskpart command tools by opening an administrator terminal, selecting your target volume, and running a quick assignment command. This command-line method works well if you prefer text-based tools or need to fix storage issues from a recovery environment.- Open Windows Terminal (Admin), and select either Windows PowerShell or Command Prompt. [Admin Required]
- Copy and paste the following into Windows Terminal (Admin), and press Enter:
diskpart
- Copy and paste the following into Windows Terminal (Admin), and press Enter:
list volume
- Make note of the volume number (ex: "1") for the current drive letter (ex: "D") of the drive (volume) you want to change.
- Type the command below into Windows Terminal (Admin), and press Enter:
select volume <volume number>- Substitute
<volume number>in the command above with the actual volume number (ex: "1") from step 3 above for the drive you want to change the drive letter of. - For example:
select volume 16
- Type the command below into Windows Terminal (Admin), and press Enter:
assign letter=<new drive letter>- Substitute
<new drive letter>in the command above with the actual new drive letter (ex: "F") you want to assign to this drive. - For example:
assign letter=F - If the new drive letter you assigned is not available, you will get an error message in Windows Terminal (Admin). You will just need to repeat this step to assign an available drive letter.
- You can now close Windows Terminal (Admin) if you like.
Option Four
Change Drive Letter using "Set-Partition" Command
You can change drive letter using Set-Partition command in PowerShell by running a quick cmdlet with your current and new drive letters. This script-friendly method is ideal if you want to manage storage partitions quickly using modern Windows PowerShell commands.- Open Windows Terminal (Admin), and select Windows PowerShell. [Admin Required]
- Copy and paste the following into Windows Terminal (Admin), and press Enter:
Get-Partition
- Make note of the current drive letter (ex: "D") of the drive you want to change.
- Type the command below into Windows Terminal (Admin), and press Enter:
Get-Partition -DriveLetter <current drive letter> | Set-Partition -NewDriveLetter <new drive letter>- Substitute
<current drive letter>in the command above with the actual current drive letter (ex: "D") from step 2 above of the drive you want to change. - Substitute
<new drive letter>in the command above with the actual new drive letter (ex: "F") you want to assign to the drive. - For example:
Get-Partition -DriveLetter D | Set-Partition -NewDriveLetter F - If the new drive letter you assign is not available, you will get an error message in Windows Terminal (Admin). You will just need to repeat this step to assign an available drive letter.
- You can now close Windows Terminal (Admin) if you like.
Option Five
Change Drive Letter in Registry Editor
You can change drive letter in Registry Editor by locating the mounted devices key and renaming the binary value for your specific drive. This advanced method should only be used if standard tools fail, as making mistakes in the registry can cause system errors.- Open Registry Editor (
regedit.exe). [Admin Required] - Navigate to the key below in the left pane of Registry Editor:
HKEY_LOCAL_MACHINE\SYSTEM\MountedDevices
- In the right pane of the MountedDevices key, right click or press and hold on the binary (REG_BINARY) value (ex: "\DosDevices\D:") for the drive letter (ex: "D") of the drive you want to change, and click/tap on Rename.
- Rename only the drive letter part of the binary (REG_BINARY) value (ex: "\DosDevices\D:") name with an available drive letter (ex: "\DosDevices\F:") you want for the drive instead, and press Enter to apply.
- If another drive is currently assigned the drive letter you want to assign to this drive, then you will need to change the drive letter of the other drive first.
- When finished, close Registry Editor.
Summary
Changing a drive letter in Windows 11 can be done using Disk Management, the Settings app, command-line tools like diskpart and PowerShell, or the Registry Editor. Each method lets you rename partitions to keep your files organised, but you should always avoid changing the letter of your main system drive.
Change Drive Letter using "diskpart" Command
You can change drive letter using diskpart command tools by opening an administrator terminal, selecting your target volume, and running a quick assignment command. This command-line method works well if you prefer text-based tools or need to fix storage issues from a recovery environment.- Open Windows Terminal (Admin), and select either Windows PowerShell or Command Prompt. [Admin Required]
- Copy and paste the following into Windows Terminal (Admin), and press Enter:
diskpart
- Copy and paste the following into Windows Terminal (Admin), and press Enter:
list volume
- Make note of the volume number (ex: "1") for the current drive letter (ex: "D") of the drive (volume) you want to change.
- Type the command below into Windows Terminal (Admin), and press Enter:
select volume <volume number>- Substitute
<volume number>in the command above with the actual volume number (ex: "1") from step 3 above for the drive you want to change the drive letter of. - For example:
select volume 16
- Type the command below into Windows Terminal (Admin), and press Enter:
assign letter=<new drive letter>- Substitute
<new drive letter>in the command above with the actual new drive letter (ex: "F") you want to assign to this drive. - For example:
assign letter=F - If the new drive letter you assigned is not available, you will get an error message in Windows Terminal (Admin). You will just need to repeat this step to assign an available drive letter.
- You can now close Windows Terminal (Admin) if you like.
Option Four
Change Drive Letter using "Set-Partition" Command
You can change drive letter using Set-Partition command in PowerShell by running a quick cmdlet with your current and new drive letters. This script-friendly method is ideal if you want to manage storage partitions quickly using modern Windows PowerShell commands.- Open Windows Terminal (Admin), and select Windows PowerShell. [Admin Required]
- Copy and paste the following into Windows Terminal (Admin), and press Enter:
Get-Partition
- Make note of the current drive letter (ex: "D") of the drive you want to change.
- Type the command below into Windows Terminal (Admin), and press Enter:
Get-Partition -DriveLetter <current drive letter> | Set-Partition -NewDriveLetter <new drive letter>- Substitute
<current drive letter>in the command above with the actual current drive letter (ex: "D") from step 2 above of the drive you want to change. - Substitute
<new drive letter>in the command above with the actual new drive letter (ex: "F") you want to assign to the drive. - For example:
Get-Partition -DriveLetter D | Set-Partition -NewDriveLetter F - If the new drive letter you assign is not available, you will get an error message in Windows Terminal (Admin). You will just need to repeat this step to assign an available drive letter.
- You can now close Windows Terminal (Admin) if you like.
Option Five
Change Drive Letter in Registry Editor
You can change drive letter in Registry Editor by locating the mounted devices key and renaming the binary value for your specific drive. This advanced method should only be used if standard tools fail, as making mistakes in the registry can cause system errors.- Open Registry Editor (
regedit.exe). [Admin Required] - Navigate to the key below in the left pane of Registry Editor:
HKEY_LOCAL_MACHINE\SYSTEM\MountedDevices
- In the right pane of the MountedDevices key, right click or press and hold on the binary (REG_BINARY) value (ex: "\DosDevices\D:") for the drive letter (ex: "D") of the drive you want to change, and click/tap on Rename.
- Rename only the drive letter part of the binary (REG_BINARY) value (ex: "\DosDevices\D:") name with an available drive letter (ex: "\DosDevices\F:") you want for the drive instead, and press Enter to apply.
- If another drive is currently assigned the drive letter you want to assign to this drive, then you will need to change the drive letter of the other drive first.
- When finished, close Registry Editor.
Summary
Changing a drive letter in Windows 11 can be done using Disk Management, the Settings app, command-line tools like diskpart and PowerShell, or the Registry Editor. Each method lets you rename partitions to keep your files organised, but you should always avoid changing the letter of your main system drive.
Change Drive Letter in Settings
You can change drive letter in Settings by opening the main system menu, going to storage options, and updating the volume properties for your connected drives. This modern Windows 11 menu lets you manage your storage devices without needing to open older administrator tools.- Open Settings (Win+I).
- Click/tap on System on the left side, and click/tap on Storage on the right side.
- Click/tap on Yes if prompted by UAC. [Admin Required]
- Starting with Windows 11 build 26100.7705 (24H2) and build 26200.7705 (25H2), to help ensure that only authorized Windows users can access system files, Windows now displays a User Account Control (UAC) prompt when you open Storage settings (Settings System Storage).
- Click/tap on Advanced storage settings to expand it open, and click/tap on Disks & volumes.
- Click/tap on Properties for the drive (partition or volume) you want to change the drive letter for.
- Click/tap on the Change drive letter button.
- Select an available drive letter you want to assign to this drive in the drop menu, and click/tap on OK.
- You can now close Settings if you like.
Option Three
Change Drive Letter using "diskpart" Command
You can change drive letter using diskpart command tools by opening an administrator terminal, selecting your target volume, and running a quick assignment command. This command-line method works well if you prefer text-based tools or need to fix storage issues from a recovery environment.- Open Windows Terminal (Admin), and select either Windows PowerShell or Command Prompt. [Admin Required]
- Copy and paste the following into Windows Terminal (Admin), and press Enter:
diskpart
- Copy and paste the following into Windows Terminal (Admin), and press Enter:
list volume
- Make note of the volume number (ex: "1") for the current drive letter (ex: "D") of the drive (volume) you want to change.
- Type the command below into Windows Terminal (Admin), and press Enter:
select volume <volume number>- Substitute
<volume number>in the command above with the actual volume number (ex: "1") from step 3 above for the drive you want to change the drive letter of. - For example:
select volume 16
- Type the command below into Windows Terminal (Admin), and press Enter:
assign letter=<new drive letter>- Substitute
<new drive letter>in the command above with the actual new drive letter (ex: "F") you want to assign to this drive. - For example:
assign letter=F - If the new drive letter you assigned is not available, you will get an error message in Windows Terminal (Admin). You will just need to repeat this step to assign an available drive letter.
- You can now close Windows Terminal (Admin) if you like.
Option Four
Change Drive Letter using "Set-Partition" Command
You can change drive letter using Set-Partition command in PowerShell by running a quick cmdlet with your current and new drive letters. This script-friendly method is ideal if you want to manage storage partitions quickly using modern Windows PowerShell commands.- Open Windows Terminal (Admin), and select Windows PowerShell. [Admin Required]
- Copy and paste the following into Windows Terminal (Admin), and press Enter:
Get-Partition
- Make note of the current drive letter (ex: "D") of the drive you want to change.
- Type the command below into Windows Terminal (Admin), and press Enter:
Get-Partition -DriveLetter <current drive letter> | Set-Partition -NewDriveLetter <new drive letter>- Substitute
<current drive letter>in the command above with the actual current drive letter (ex: "D") from step 2 above of the drive you want to change. - Substitute
<new drive letter>in the command above with the actual new drive letter (ex: "F") you want to assign to the drive. - For example:
Get-Partition -DriveLetter D | Set-Partition -NewDriveLetter F - If the new drive letter you assign is not available, you will get an error message in Windows Terminal (Admin). You will just need to repeat this step to assign an available drive letter.
- You can now close Windows Terminal (Admin) if you like.
Option Five
Change Drive Letter in Registry Editor
You can change drive letter in Registry Editor by locating the mounted devices key and renaming the binary value for your specific drive. This advanced method should only be used if standard tools fail, as making mistakes in the registry can cause system errors.- Open Registry Editor (
regedit.exe). [Admin Required] - Navigate to the key below in the left pane of Registry Editor:
HKEY_LOCAL_MACHINE\SYSTEM\MountedDevices
- In the right pane of the MountedDevices key, right click or press and hold on the binary (REG_BINARY) value (ex: "\DosDevices\D:") for the drive letter (ex: "D") of the drive you want to change, and click/tap on Rename.
- Rename only the drive letter part of the binary (REG_BINARY) value (ex: "\DosDevices\D:") name with an available drive letter (ex: "\DosDevices\F:") you want for the drive instead, and press Enter to apply.
- If another drive is currently assigned the drive letter you want to assign to this drive, then you will need to change the drive letter of the other drive first.
- When finished, close Registry Editor.
Summary
Changing a drive letter in Windows 11 can be done using Disk Management, the Settings app, command-line tools like diskpart and PowerShell, or the Registry Editor. Each method lets you rename partitions to keep your files organised, but you should always avoid changing the letter of your main system drive.
Change Drive Letter in Disk Management
You can change drive letter in Disk Management by opening the built-in tool, right-clicking the drive you want to update, and choosing the change option. This graphical method is the safest and most straightforward way to assign a new letter to any connected hard drive or partition on your Windows 11 computer.- Open Disk Management (
diskmgmt.msc). [Admin Required] - Right click or press and hold on the drive you want to change the drive letter for, and click/tap on Change Drive Letter and Paths.
- Click/tap on Change.
- Click/tap on the Add button instead if the drive doesn't currently have a drive letter assigned to it.
- Select an available drive letter you want to assign to this drive in the drop menu, and click/tap on OK.
- Click/tap on Yes to confirm.
- If prompted the drive is in use, click/tap on Yes to confirm.
- You can now close Disk Management if you like.
Option Two
Change Drive Letter in Settings
You can change drive letter in Settings by opening the main system menu, going to storage options, and updating the volume properties for your connected drives. This modern Windows 11 menu lets you manage your storage devices without needing to open older administrator tools.- Open Settings (Win+I).
- Click/tap on System on the left side, and click/tap on Storage on the right side.
- Click/tap on Yes if prompted by UAC. [Admin Required]
- Starting with Windows 11 build 26100.7705 (24H2) and build 26200.7705 (25H2), to help ensure that only authorized Windows users can access system files, Windows now displays a User Account Control (UAC) prompt when you open Storage settings (Settings System Storage).
- Click/tap on Advanced storage settings to expand it open, and click/tap on Disks & volumes.
- Click/tap on Properties for the drive (partition or volume) you want to change the drive letter for.
- Click/tap on the Change drive letter button.
- Select an available drive letter you want to assign to this drive in the drop menu, and click/tap on OK.
- You can now close Settings if you like.
Option Three
Change Drive Letter using "diskpart" Command
You can change drive letter using diskpart command tools by opening an administrator terminal, selecting your target volume, and running a quick assignment command. This command-line method works well if you prefer text-based tools or need to fix storage issues from a recovery environment.- Open Windows Terminal (Admin), and select either Windows PowerShell or Command Prompt. [Admin Required]
- Copy and paste the following into Windows Terminal (Admin), and press Enter:
diskpart
- Copy and paste the following into Windows Terminal (Admin), and press Enter:
list volume
- Make note of the volume number (ex: "1") for the current drive letter (ex: "D") of the drive (volume) you want to change.
- Type the command below into Windows Terminal (Admin), and press Enter:
select volume <volume number>- Substitute
<volume number>in the command above with the actual volume number (ex: "1") from step 3 above for the drive you want to change the drive letter of. - For example:
select volume 16
- Type the command below into Windows Terminal (Admin), and press Enter:
assign letter=<new drive letter>- Substitute
<new drive letter>in the command above with the actual new drive letter (ex: "F") you want to assign to this drive. - For example:
assign letter=F - If the new drive letter you assigned is not available, you will get an error message in Windows Terminal (Admin). You will just need to repeat this step to assign an available drive letter.
- You can now close Windows Terminal (Admin) if you like.
Option Four
Change Drive Letter using "Set-Partition" Command
You can change drive letter using Set-Partition command in PowerShell by running a quick cmdlet with your current and new drive letters. This script-friendly method is ideal if you want to manage storage partitions quickly using modern Windows PowerShell commands.- Open Windows Terminal (Admin), and select Windows PowerShell. [Admin Required]
- Copy and paste the following into Windows Terminal (Admin), and press Enter:
Get-Partition
- Make note of the current drive letter (ex: "D") of the drive you want to change.
- Type the command below into Windows Terminal (Admin), and press Enter:
Get-Partition -DriveLetter <current drive letter> | Set-Partition -NewDriveLetter <new drive letter>- Substitute
<current drive letter>in the command above with the actual current drive letter (ex: "D") from step 2 above of the drive you want to change. - Substitute
<new drive letter>in the command above with the actual new drive letter (ex: "F") you want to assign to the drive. - For example:
Get-Partition -DriveLetter D | Set-Partition -NewDriveLetter F - If the new drive letter you assign is not available, you will get an error message in Windows Terminal (Admin). You will just need to repeat this step to assign an available drive letter.
- You can now close Windows Terminal (Admin) if you like.
Option Five
Change Drive Letter in Registry Editor
You can change drive letter in Registry Editor by locating the mounted devices key and renaming the binary value for your specific drive. This advanced method should only be used if standard tools fail, as making mistakes in the registry can cause system errors.- Open Registry Editor (
regedit.exe). [Admin Required] - Navigate to the key below in the left pane of Registry Editor:
HKEY_LOCAL_MACHINE\SYSTEM\MountedDevices
- In the right pane of the MountedDevices key, right click or press and hold on the binary (REG_BINARY) value (ex: "\DosDevices\D:") for the drive letter (ex: "D") of the drive you want to change, and click/tap on Rename.
- Rename only the drive letter part of the binary (REG_BINARY) value (ex: "\DosDevices\D:") name with an available drive letter (ex: "\DosDevices\F:") you want for the drive instead, and press Enter to apply.
- If another drive is currently assigned the drive letter you want to assign to this drive, then you will need to change the drive letter of the other drive first.
- When finished, close Registry Editor.
Summary
Changing a drive letter in Windows 11 can be done using Disk Management, the Settings app, command-line tools like diskpart and PowerShell, or the Registry Editor. Each method lets you rename partitions to keep your files organised, but you should always avoid changing the letter of your main system drive.
Change Drive Letter using "Set-Partition" Command
You can change drive letter using Set-Partition command in PowerShell by running a quick cmdlet with your current and new drive letters. This script-friendly method is ideal if you want to manage storage partitions quickly using modern Windows PowerShell commands.- Open Windows Terminal (Admin), and select Windows PowerShell. [Admin Required]
- Copy and paste the following into Windows Terminal (Admin), and press Enter:
Get-Partition
- Make note of the current drive letter (ex: "D") of the drive you want to change.
- Type the command below into Windows Terminal (Admin), and press Enter:
Get-Partition -DriveLetter <current drive letter> | Set-Partition -NewDriveLetter <new drive letter>- Substitute
<current drive letter>in the command above with the actual current drive letter (ex: "D") from step 2 above of the drive you want to change. - Substitute
<new drive letter>in the command above with the actual new drive letter (ex: "F") you want to assign to the drive. - For example:
Get-Partition -DriveLetter D | Set-Partition -NewDriveLetter F - If the new drive letter you assign is not available, you will get an error message in Windows Terminal (Admin). You will just need to repeat this step to assign an available drive letter.
- You can now close Windows Terminal (Admin) if you like.
Option Five
Change Drive Letter in Registry Editor
You can change drive letter in Registry Editor by locating the mounted devices key and renaming the binary value for your specific drive. This advanced method should only be used if standard tools fail, as making mistakes in the registry can cause system errors.- Open Registry Editor (
regedit.exe). [Admin Required] - Navigate to the key below in the left pane of Registry Editor:
HKEY_LOCAL_MACHINE\SYSTEM\MountedDevices
- In the right pane of the MountedDevices key, right click or press and hold on the binary (REG_BINARY) value (ex: "\DosDevices\D:") for the drive letter (ex: "D") of the drive you want to change, and click/tap on Rename.
- Rename only the drive letter part of the binary (REG_BINARY) value (ex: "\DosDevices\D:") name with an available drive letter (ex: "\DosDevices\F:") you want for the drive instead, and press Enter to apply.
- If another drive is currently assigned the drive letter you want to assign to this drive, then you will need to change the drive letter of the other drive first.
- When finished, close Registry Editor.
Summary
Changing a drive letter in Windows 11 can be done using Disk Management, the Settings app, command-line tools like diskpart and PowerShell, or the Registry Editor. Each method lets you rename partitions to keep your files organised, but you should always avoid changing the letter of your main system drive.
Change Drive Letter using "diskpart" Command
You can change drive letter using diskpart command tools by opening an administrator terminal, selecting your target volume, and running a quick assignment command. This command-line method works well if you prefer text-based tools or need to fix storage issues from a recovery environment.- Open Windows Terminal (Admin), and select either Windows PowerShell or Command Prompt. [Admin Required]
- Copy and paste the following into Windows Terminal (Admin), and press Enter:
diskpart
- Copy and paste the following into Windows Terminal (Admin), and press Enter:
list volume
- Make note of the volume number (ex: "1") for the current drive letter (ex: "D") of the drive (volume) you want to change.
- Type the command below into Windows Terminal (Admin), and press Enter:
select volume <volume number>- Substitute
<volume number>in the command above with the actual volume number (ex: "1") from step 3 above for the drive you want to change the drive letter of. - For example:
select volume 16
- Type the command below into Windows Terminal (Admin), and press Enter:
assign letter=<new drive letter>- Substitute
<new drive letter>in the command above with the actual new drive letter (ex: "F") you want to assign to this drive. - For example:
assign letter=F - If the new drive letter you assigned is not available, you will get an error message in Windows Terminal (Admin). You will just need to repeat this step to assign an available drive letter.
- You can now close Windows Terminal (Admin) if you like.
Option Four
Change Drive Letter using "Set-Partition" Command
You can change drive letter using Set-Partition command in PowerShell by running a quick cmdlet with your current and new drive letters. This script-friendly method is ideal if you want to manage storage partitions quickly using modern Windows PowerShell commands.- Open Windows Terminal (Admin), and select Windows PowerShell. [Admin Required]
- Copy and paste the following into Windows Terminal (Admin), and press Enter:
Get-Partition
- Make note of the current drive letter (ex: "D") of the drive you want to change.
- Type the command below into Windows Terminal (Admin), and press Enter:
Get-Partition -DriveLetter <current drive letter> | Set-Partition -NewDriveLetter <new drive letter>- Substitute
<current drive letter>in the command above with the actual current drive letter (ex: "D") from step 2 above of the drive you want to change. - Substitute
<new drive letter>in the command above with the actual new drive letter (ex: "F") you want to assign to the drive. - For example:
Get-Partition -DriveLetter D | Set-Partition -NewDriveLetter F - If the new drive letter you assign is not available, you will get an error message in Windows Terminal (Admin). You will just need to repeat this step to assign an available drive letter.
- You can now close Windows Terminal (Admin) if you like.
Option Five
Change Drive Letter in Registry Editor
You can change drive letter in Registry Editor by locating the mounted devices key and renaming the binary value for your specific drive. This advanced method should only be used if standard tools fail, as making mistakes in the registry can cause system errors.- Open Registry Editor (
regedit.exe). [Admin Required] - Navigate to the key below in the left pane of Registry Editor:
HKEY_LOCAL_MACHINE\SYSTEM\MountedDevices
- In the right pane of the MountedDevices key, right click or press and hold on the binary (REG_BINARY) value (ex: "\DosDevices\D:") for the drive letter (ex: "D") of the drive you want to change, and click/tap on Rename.
- Rename only the drive letter part of the binary (REG_BINARY) value (ex: "\DosDevices\D:") name with an available drive letter (ex: "\DosDevices\F:") you want for the drive instead, and press Enter to apply.
- If another drive is currently assigned the drive letter you want to assign to this drive, then you will need to change the drive letter of the other drive first.
- When finished, close Registry Editor.
Summary
Changing a drive letter in Windows 11 can be done using Disk Management, the Settings app, command-line tools like diskpart and PowerShell, or the Registry Editor. Each method lets you rename partitions to keep your files organised, but you should always avoid changing the letter of your main system drive.
Change Drive Letter in Settings
You can change drive letter in Settings by opening the main system menu, going to storage options, and updating the volume properties for your connected drives. This modern Windows 11 menu lets you manage your storage devices without needing to open older administrator tools.- Open Settings (Win+I).
- Click/tap on System on the left side, and click/tap on Storage on the right side.
- Click/tap on Yes if prompted by UAC. [Admin Required]
- Starting with Windows 11 build 26100.7705 (24H2) and build 26200.7705 (25H2), to help ensure that only authorized Windows users can access system files, Windows now displays a User Account Control (UAC) prompt when you open Storage settings (Settings System Storage).
- Click/tap on Advanced storage settings to expand it open, and click/tap on Disks & volumes.
- Click/tap on Properties for the drive (partition or volume) you want to change the drive letter for.
- Click/tap on the Change drive letter button.
- Select an available drive letter you want to assign to this drive in the drop menu, and click/tap on OK.
- You can now close Settings if you like.
Option Three
Change Drive Letter using "diskpart" Command
You can change drive letter using diskpart command tools by opening an administrator terminal, selecting your target volume, and running a quick assignment command. This command-line method works well if you prefer text-based tools or need to fix storage issues from a recovery environment.- Open Windows Terminal (Admin), and select either Windows PowerShell or Command Prompt. [Admin Required]
- Copy and paste the following into Windows Terminal (Admin), and press Enter:
diskpart
- Copy and paste the following into Windows Terminal (Admin), and press Enter:
list volume
- Make note of the volume number (ex: "1") for the current drive letter (ex: "D") of the drive (volume) you want to change.
- Type the command below into Windows Terminal (Admin), and press Enter:
select volume <volume number>- Substitute
<volume number>in the command above with the actual volume number (ex: "1") from step 3 above for the drive you want to change the drive letter of. - For example:
select volume 16
- Type the command below into Windows Terminal (Admin), and press Enter:
assign letter=<new drive letter>- Substitute
<new drive letter>in the command above with the actual new drive letter (ex: "F") you want to assign to this drive. - For example:
assign letter=F - If the new drive letter you assigned is not available, you will get an error message in Windows Terminal (Admin). You will just need to repeat this step to assign an available drive letter.
- You can now close Windows Terminal (Admin) if you like.
Option Four
Change Drive Letter using "Set-Partition" Command
You can change drive letter using Set-Partition command in PowerShell by running a quick cmdlet with your current and new drive letters. This script-friendly method is ideal if you want to manage storage partitions quickly using modern Windows PowerShell commands.- Open Windows Terminal (Admin), and select Windows PowerShell. [Admin Required]
- Copy and paste the following into Windows Terminal (Admin), and press Enter:
Get-Partition
- Make note of the current drive letter (ex: "D") of the drive you want to change.
- Type the command below into Windows Terminal (Admin), and press Enter:
Get-Partition -DriveLetter <current drive letter> | Set-Partition -NewDriveLetter <new drive letter>- Substitute
<current drive letter>in the command above with the actual current drive letter (ex: "D") from step 2 above of the drive you want to change. - Substitute
<new drive letter>in the command above with the actual new drive letter (ex: "F") you want to assign to the drive. - For example:
Get-Partition -DriveLetter D | Set-Partition -NewDriveLetter F - If the new drive letter you assign is not available, you will get an error message in Windows Terminal (Admin). You will just need to repeat this step to assign an available drive letter.
- You can now close Windows Terminal (Admin) if you like.
Option Five
Change Drive Letter in Registry Editor
You can change drive letter in Registry Editor by locating the mounted devices key and renaming the binary value for your specific drive. This advanced method should only be used if standard tools fail, as making mistakes in the registry can cause system errors.- Open Registry Editor (
regedit.exe). [Admin Required] - Navigate to the key below in the left pane of Registry Editor:
HKEY_LOCAL_MACHINE\SYSTEM\MountedDevices
- In the right pane of the MountedDevices key, right click or press and hold on the binary (REG_BINARY) value (ex: "\DosDevices\D:") for the drive letter (ex: "D") of the drive you want to change, and click/tap on Rename.
- Rename only the drive letter part of the binary (REG_BINARY) value (ex: "\DosDevices\D:") name with an available drive letter (ex: "\DosDevices\F:") you want for the drive instead, and press Enter to apply.
- If another drive is currently assigned the drive letter you want to assign to this drive, then you will need to change the drive letter of the other drive first.
- When finished, close Registry Editor.
Summary
Changing a drive letter in Windows 11 can be done using Disk Management, the Settings app, command-line tools like diskpart and PowerShell, or the Registry Editor. Each method lets you rename partitions to keep your files organised, but you should always avoid changing the letter of your main system drive.
Change Drive Letter in Disk Management
You can change drive letter in Disk Management by opening the built-in tool, right-clicking the drive you want to update, and choosing the change option. This graphical method is the safest and most straightforward way to assign a new letter to any connected hard drive or partition on your Windows 11 computer.- Open Disk Management (
diskmgmt.msc). [Admin Required] - Right click or press and hold on the drive you want to change the drive letter for, and click/tap on Change Drive Letter and Paths.
- Click/tap on Change.
- Click/tap on the Add button instead if the drive doesn't currently have a drive letter assigned to it.
- Select an available drive letter you want to assign to this drive in the drop menu, and click/tap on OK.
- Click/tap on Yes to confirm.
- If prompted the drive is in use, click/tap on Yes to confirm.
- You can now close Disk Management if you like.
Option Two
Change Drive Letter in Settings
You can change drive letter in Settings by opening the main system menu, going to storage options, and updating the volume properties for your connected drives. This modern Windows 11 menu lets you manage your storage devices without needing to open older administrator tools.- Open Settings (Win+I).
- Click/tap on System on the left side, and click/tap on Storage on the right side.
- Click/tap on Yes if prompted by UAC. [Admin Required]
- Starting with Windows 11 build 26100.7705 (24H2) and build 26200.7705 (25H2), to help ensure that only authorized Windows users can access system files, Windows now displays a User Account Control (UAC) prompt when you open Storage settings (Settings System Storage).
- Click/tap on Advanced storage settings to expand it open, and click/tap on Disks & volumes.
- Click/tap on Properties for the drive (partition or volume) you want to change the drive letter for.
- Click/tap on the Change drive letter button.
- Select an available drive letter you want to assign to this drive in the drop menu, and click/tap on OK.
- You can now close Settings if you like.
Option Three
Change Drive Letter using "diskpart" Command
You can change drive letter using diskpart command tools by opening an administrator terminal, selecting your target volume, and running a quick assignment command. This command-line method works well if you prefer text-based tools or need to fix storage issues from a recovery environment.- Open Windows Terminal (Admin), and select either Windows PowerShell or Command Prompt. [Admin Required]
- Copy and paste the following into Windows Terminal (Admin), and press Enter:
diskpart
- Copy and paste the following into Windows Terminal (Admin), and press Enter:
list volume
- Make note of the volume number (ex: "1") for the current drive letter (ex: "D") of the drive (volume) you want to change.
- Type the command below into Windows Terminal (Admin), and press Enter:
select volume <volume number>- Substitute
<volume number>in the command above with the actual volume number (ex: "1") from step 3 above for the drive you want to change the drive letter of. - For example:
select volume 16
- Type the command below into Windows Terminal (Admin), and press Enter:
assign letter=<new drive letter>- Substitute
<new drive letter>in the command above with the actual new drive letter (ex: "F") you want to assign to this drive. - For example:
assign letter=F - If the new drive letter you assigned is not available, you will get an error message in Windows Terminal (Admin). You will just need to repeat this step to assign an available drive letter.
- You can now close Windows Terminal (Admin) if you like.
Option Four
Change Drive Letter using "Set-Partition" Command
You can change drive letter using Set-Partition command in PowerShell by running a quick cmdlet with your current and new drive letters. This script-friendly method is ideal if you want to manage storage partitions quickly using modern Windows PowerShell commands.- Open Windows Terminal (Admin), and select Windows PowerShell. [Admin Required]
- Copy and paste the following into Windows Terminal (Admin), and press Enter:
Get-Partition
- Make note of the current drive letter (ex: "D") of the drive you want to change.
- Type the command below into Windows Terminal (Admin), and press Enter:
Get-Partition -DriveLetter <current drive letter> | Set-Partition -NewDriveLetter <new drive letter>- Substitute
<current drive letter>in the command above with the actual current drive letter (ex: "D") from step 2 above of the drive you want to change. - Substitute
<new drive letter>in the command above with the actual new drive letter (ex: "F") you want to assign to the drive. - For example:
Get-Partition -DriveLetter D | Set-Partition -NewDriveLetter F - If the new drive letter you assign is not available, you will get an error message in Windows Terminal (Admin). You will just need to repeat this step to assign an available drive letter.
- You can now close Windows Terminal (Admin) if you like.
Option Five
Change Drive Letter in Registry Editor
You can change drive letter in Registry Editor by locating the mounted devices key and renaming the binary value for your specific drive. This advanced method should only be used if standard tools fail, as making mistakes in the registry can cause system errors.- Open Registry Editor (
regedit.exe). [Admin Required] - Navigate to the key below in the left pane of Registry Editor:
HKEY_LOCAL_MACHINE\SYSTEM\MountedDevices
- In the right pane of the MountedDevices key, right click or press and hold on the binary (REG_BINARY) value (ex: "\DosDevices\D:") for the drive letter (ex: "D") of the drive you want to change, and click/tap on Rename.
- Rename only the drive letter part of the binary (REG_BINARY) value (ex: "\DosDevices\D:") name with an available drive letter (ex: "\DosDevices\F:") you want for the drive instead, and press Enter to apply.
- If another drive is currently assigned the drive letter you want to assign to this drive, then you will need to change the drive letter of the other drive first.
- When finished, close Registry Editor.
Summary
Changing a drive letter in Windows 11 can be done using Disk Management, the Settings app, command-line tools like diskpart and PowerShell, or the Registry Editor. Each method lets you rename partitions to keep your files organised, but you should always avoid changing the letter of your main system drive.
A drive letter in Windows 11 is a single letter from A through Z assigned to a hard drive, USB stick, SD card, or partition so the system can find and open your files. Windows hands these out automatically. C: is normally the system drive, and the rest are given out in order as drives are connected. Sometimes you want something different. You may want your backup drive to always be E:, or two external drives may have swapped letters, or an old shortcut may expect a certain letter.
Open Disk Management, right-click the drive you want to change, select Rename, and type a new letter. The change takes effect immediately. Avoid changing your C: drive or any drive with Windows installed, as programs and shortcuts depend on the original letter.
You can change any drive letter with the built-in Disk Management tool. It is included in both Windows 11 Home and Pro, so there is nothing extra to install. You need to be signed in with an administrator account. On a standard account, Windows will ask for an administrator password or the change will be blocked.
Before you start:
- Do not change the letter of your C:\ drive or of any drive where Windows or your apps are installed. Programs, shortcuts, and settings store the full path to their files. If the letter changes, they stop working properly, and Windows itself may fail to start.
- Close any files or programs that are using the drive you plan to change. If something is still open, Windows may refuse the change or warn you that the drive is in use.
- Think about what depends on the drive. Backup jobs, sync tools, game libraries, and shortcuts that point to the old letter will need to be updated to the new one.
- Pick a letter that is not already taken. Disk Management only offers letters that are free. If the one you want is in use, change the other drive first to free it up.
The change takes effect right away and normally does not need a restart. It is also easy to undo. Repeat the same process and assign the original letter back, as long as no other drive has taken it in the meantime.
Option One
Change Drive Letter in Registry Editor
You can change drive letter in Registry Editor by locating the mounted devices key and renaming the binary value for your specific drive. This advanced method should only be used if standard tools fail, as making mistakes in the registry can cause system errors.- Open Registry Editor (
regedit.exe). [Admin Required] - Navigate to the key below in the left pane of Registry Editor:
HKEY_LOCAL_MACHINE\SYSTEM\MountedDevices
- In the right pane of the MountedDevices key, right click or press and hold on the binary (REG_BINARY) value (ex: "\DosDevices\D:") for the drive letter (ex: "D") of the drive you want to change, and click/tap on Rename.
- Rename only the drive letter part of the binary (REG_BINARY) value (ex: "\DosDevices\D:") name with an available drive letter (ex: "\DosDevices\F:") you want for the drive instead, and press Enter to apply.
- If another drive is currently assigned the drive letter you want to assign to this drive, then you will need to change the drive letter of the other drive first.
- When finished, close Registry Editor.
Summary
Changing a drive letter in Windows 11 can be done using Disk Management, the Settings app, command-line tools like diskpart and PowerShell, or the Registry Editor. Each method lets you rename partitions to keep your files organised, but you should always avoid changing the letter of your main system drive.
Change Drive Letter using "Set-Partition" Command
You can change drive letter using Set-Partition command in PowerShell by running a quick cmdlet with your current and new drive letters. This script-friendly method is ideal if you want to manage storage partitions quickly using modern Windows PowerShell commands.- Open Windows Terminal (Admin), and select Windows PowerShell. [Admin Required]
- Copy and paste the following into Windows Terminal (Admin), and press Enter:
Get-Partition
- Make note of the current drive letter (ex: "D") of the drive you want to change.
- Type the command below into Windows Terminal (Admin), and press Enter:
Get-Partition -DriveLetter <current drive letter> | Set-Partition -NewDriveLetter <new drive letter>- Substitute
<current drive letter>in the command above with the actual current drive letter (ex: "D") from step 2 above of the drive you want to change. - Substitute
<new drive letter>in the command above with the actual new drive letter (ex: "F") you want to assign to the drive. - For example:
Get-Partition -DriveLetter D | Set-Partition -NewDriveLetter F - If the new drive letter you assign is not available, you will get an error message in Windows Terminal (Admin). You will just need to repeat this step to assign an available drive letter.
- You can now close Windows Terminal (Admin) if you like.
Option Five
Change Drive Letter in Registry Editor
You can change drive letter in Registry Editor by locating the mounted devices key and renaming the binary value for your specific drive. This advanced method should only be used if standard tools fail, as making mistakes in the registry can cause system errors.- Open Registry Editor (
regedit.exe). [Admin Required] - Navigate to the key below in the left pane of Registry Editor:
HKEY_LOCAL_MACHINE\SYSTEM\MountedDevices
- In the right pane of the MountedDevices key, right click or press and hold on the binary (REG_BINARY) value (ex: "\DosDevices\D:") for the drive letter (ex: "D") of the drive you want to change, and click/tap on Rename.
- Rename only the drive letter part of the binary (REG_BINARY) value (ex: "\DosDevices\D:") name with an available drive letter (ex: "\DosDevices\F:") you want for the drive instead, and press Enter to apply.
- If another drive is currently assigned the drive letter you want to assign to this drive, then you will need to change the drive letter of the other drive first.
- When finished, close Registry Editor.
Summary
Changing a drive letter in Windows 11 can be done using Disk Management, the Settings app, command-line tools like diskpart and PowerShell, or the Registry Editor. Each method lets you rename partitions to keep your files organised, but you should always avoid changing the letter of your main system drive.
Change Drive Letter using "diskpart" Command
You can change drive letter using diskpart command tools by opening an administrator terminal, selecting your target volume, and running a quick assignment command. This command-line method works well if you prefer text-based tools or need to fix storage issues from a recovery environment.- Open Windows Terminal (Admin), and select either Windows PowerShell or Command Prompt. [Admin Required]
- Copy and paste the following into Windows Terminal (Admin), and press Enter:
diskpart
- Copy and paste the following into Windows Terminal (Admin), and press Enter:
list volume
- Make note of the volume number (ex: "1") for the current drive letter (ex: "D") of the drive (volume) you want to change.
- Type the command below into Windows Terminal (Admin), and press Enter:
select volume <volume number>- Substitute
<volume number>in the command above with the actual volume number (ex: "1") from step 3 above for the drive you want to change the drive letter of. - For example:
select volume 16
- Type the command below into Windows Terminal (Admin), and press Enter:
assign letter=<new drive letter>- Substitute
<new drive letter>in the command above with the actual new drive letter (ex: "F") you want to assign to this drive. - For example:
assign letter=F - If the new drive letter you assigned is not available, you will get an error message in Windows Terminal (Admin). You will just need to repeat this step to assign an available drive letter.
- You can now close Windows Terminal (Admin) if you like.
Option Four
Change Drive Letter using "Set-Partition" Command
You can change drive letter using Set-Partition command in PowerShell by running a quick cmdlet with your current and new drive letters. This script-friendly method is ideal if you want to manage storage partitions quickly using modern Windows PowerShell commands.- Open Windows Terminal (Admin), and select Windows PowerShell. [Admin Required]
- Copy and paste the following into Windows Terminal (Admin), and press Enter:
Get-Partition
- Make note of the current drive letter (ex: "D") of the drive you want to change.
- Type the command below into Windows Terminal (Admin), and press Enter:
Get-Partition -DriveLetter <current drive letter> | Set-Partition -NewDriveLetter <new drive letter>- Substitute
<current drive letter>in the command above with the actual current drive letter (ex: "D") from step 2 above of the drive you want to change. - Substitute
<new drive letter>in the command above with the actual new drive letter (ex: "F") you want to assign to the drive. - For example:
Get-Partition -DriveLetter D | Set-Partition -NewDriveLetter F - If the new drive letter you assign is not available, you will get an error message in Windows Terminal (Admin). You will just need to repeat this step to assign an available drive letter.
- You can now close Windows Terminal (Admin) if you like.
Option Five
Change Drive Letter in Registry Editor
You can change drive letter in Registry Editor by locating the mounted devices key and renaming the binary value for your specific drive. This advanced method should only be used if standard tools fail, as making mistakes in the registry can cause system errors.- Open Registry Editor (
regedit.exe). [Admin Required] - Navigate to the key below in the left pane of Registry Editor:
HKEY_LOCAL_MACHINE\SYSTEM\MountedDevices
- In the right pane of the MountedDevices key, right click or press and hold on the binary (REG_BINARY) value (ex: "\DosDevices\D:") for the drive letter (ex: "D") of the drive you want to change, and click/tap on Rename.
- Rename only the drive letter part of the binary (REG_BINARY) value (ex: "\DosDevices\D:") name with an available drive letter (ex: "\DosDevices\F:") you want for the drive instead, and press Enter to apply.
- If another drive is currently assigned the drive letter you want to assign to this drive, then you will need to change the drive letter of the other drive first.
- When finished, close Registry Editor.
Summary
Changing a drive letter in Windows 11 can be done using Disk Management, the Settings app, command-line tools like diskpart and PowerShell, or the Registry Editor. Each method lets you rename partitions to keep your files organised, but you should always avoid changing the letter of your main system drive.
Change Drive Letter in Settings
You can change drive letter in Settings by opening the main system menu, going to storage options, and updating the volume properties for your connected drives. This modern Windows 11 menu lets you manage your storage devices without needing to open older administrator tools.- Open Settings (Win+I).
- Click/tap on System on the left side, and click/tap on Storage on the right side.
- Click/tap on Yes if prompted by UAC. [Admin Required]
- Starting with Windows 11 build 26100.7705 (24H2) and build 26200.7705 (25H2), to help ensure that only authorized Windows users can access system files, Windows now displays a User Account Control (UAC) prompt when you open Storage settings (Settings System Storage).
- Click/tap on Advanced storage settings to expand it open, and click/tap on Disks & volumes.
- Click/tap on Properties for the drive (partition or volume) you want to change the drive letter for.
- Click/tap on the Change drive letter button.
- Select an available drive letter you want to assign to this drive in the drop menu, and click/tap on OK.
- You can now close Settings if you like.
Option Three
Change Drive Letter using "diskpart" Command
You can change drive letter using diskpart command tools by opening an administrator terminal, selecting your target volume, and running a quick assignment command. This command-line method works well if you prefer text-based tools or need to fix storage issues from a recovery environment.- Open Windows Terminal (Admin), and select either Windows PowerShell or Command Prompt. [Admin Required]
- Copy and paste the following into Windows Terminal (Admin), and press Enter:
diskpart
- Copy and paste the following into Windows Terminal (Admin), and press Enter:
list volume
- Make note of the volume number (ex: "1") for the current drive letter (ex: "D") of the drive (volume) you want to change.
- Type the command below into Windows Terminal (Admin), and press Enter:
select volume <volume number>- Substitute
<volume number>in the command above with the actual volume number (ex: "1") from step 3 above for the drive you want to change the drive letter of. - For example:
select volume 16
- Type the command below into Windows Terminal (Admin), and press Enter:
assign letter=<new drive letter>- Substitute
<new drive letter>in the command above with the actual new drive letter (ex: "F") you want to assign to this drive. - For example:
assign letter=F - If the new drive letter you assigned is not available, you will get an error message in Windows Terminal (Admin). You will just need to repeat this step to assign an available drive letter.
- You can now close Windows Terminal (Admin) if you like.
Option Four
Change Drive Letter using "Set-Partition" Command
You can change drive letter using Set-Partition command in PowerShell by running a quick cmdlet with your current and new drive letters. This script-friendly method is ideal if you want to manage storage partitions quickly using modern Windows PowerShell commands.- Open Windows Terminal (Admin), and select Windows PowerShell. [Admin Required]
- Copy and paste the following into Windows Terminal (Admin), and press Enter:
Get-Partition
- Make note of the current drive letter (ex: "D") of the drive you want to change.
- Type the command below into Windows Terminal (Admin), and press Enter:
Get-Partition -DriveLetter <current drive letter> | Set-Partition -NewDriveLetter <new drive letter>- Substitute
<current drive letter>in the command above with the actual current drive letter (ex: "D") from step 2 above of the drive you want to change. - Substitute
<new drive letter>in the command above with the actual new drive letter (ex: "F") you want to assign to the drive. - For example:
Get-Partition -DriveLetter D | Set-Partition -NewDriveLetter F - If the new drive letter you assign is not available, you will get an error message in Windows Terminal (Admin). You will just need to repeat this step to assign an available drive letter.
- You can now close Windows Terminal (Admin) if you like.
Option Five
Change Drive Letter in Registry Editor
You can change drive letter in Registry Editor by locating the mounted devices key and renaming the binary value for your specific drive. This advanced method should only be used if standard tools fail, as making mistakes in the registry can cause system errors.- Open Registry Editor (
regedit.exe). [Admin Required] - Navigate to the key below in the left pane of Registry Editor:
HKEY_LOCAL_MACHINE\SYSTEM\MountedDevices
- In the right pane of the MountedDevices key, right click or press and hold on the binary (REG_BINARY) value (ex: "\DosDevices\D:") for the drive letter (ex: "D") of the drive you want to change, and click/tap on Rename.
- Rename only the drive letter part of the binary (REG_BINARY) value (ex: "\DosDevices\D:") name with an available drive letter (ex: "\DosDevices\F:") you want for the drive instead, and press Enter to apply.
- If another drive is currently assigned the drive letter you want to assign to this drive, then you will need to change the drive letter of the other drive first.
- When finished, close Registry Editor.
Summary
Changing a drive letter in Windows 11 can be done using Disk Management, the Settings app, command-line tools like diskpart and PowerShell, or the Registry Editor. Each method lets you rename partitions to keep your files organised, but you should always avoid changing the letter of your main system drive.
Change Drive Letter in Disk Management
You can change drive letter in Disk Management by opening the built-in tool, right-clicking the drive you want to update, and choosing the change option. This graphical method is the safest and most straightforward way to assign a new letter to any connected hard drive or partition on your Windows 11 computer.- Open Disk Management (
diskmgmt.msc). [Admin Required] - Right click or press and hold on the drive you want to change the drive letter for, and click/tap on Change Drive Letter and Paths.
- Click/tap on Change.
- Click/tap on the Add button instead if the drive doesn't currently have a drive letter assigned to it.
- Select an available drive letter you want to assign to this drive in the drop menu, and click/tap on OK.
- Click/tap on Yes to confirm.
- If prompted the drive is in use, click/tap on Yes to confirm.
- You can now close Disk Management if you like.
Option Two
Change Drive Letter in Settings
You can change drive letter in Settings by opening the main system menu, going to storage options, and updating the volume properties for your connected drives. This modern Windows 11 menu lets you manage your storage devices without needing to open older administrator tools.- Open Settings (Win+I).
- Click/tap on System on the left side, and click/tap on Storage on the right side.
- Click/tap on Yes if prompted by UAC. [Admin Required]
- Starting with Windows 11 build 26100.7705 (24H2) and build 26200.7705 (25H2), to help ensure that only authorized Windows users can access system files, Windows now displays a User Account Control (UAC) prompt when you open Storage settings (Settings System Storage).
- Click/tap on Advanced storage settings to expand it open, and click/tap on Disks & volumes.
- Click/tap on Properties for the drive (partition or volume) you want to change the drive letter for.
- Click/tap on the Change drive letter button.
- Select an available drive letter you want to assign to this drive in the drop menu, and click/tap on OK.
- You can now close Settings if you like.
Option Three
Change Drive Letter using "diskpart" Command
You can change drive letter using diskpart command tools by opening an administrator terminal, selecting your target volume, and running a quick assignment command. This command-line method works well if you prefer text-based tools or need to fix storage issues from a recovery environment.- Open Windows Terminal (Admin), and select either Windows PowerShell or Command Prompt. [Admin Required]
- Copy and paste the following into Windows Terminal (Admin), and press Enter:
diskpart
- Copy and paste the following into Windows Terminal (Admin), and press Enter:
list volume
- Make note of the volume number (ex: "1") for the current drive letter (ex: "D") of the drive (volume) you want to change.
- Type the command below into Windows Terminal (Admin), and press Enter:
select volume <volume number>- Substitute
<volume number>in the command above with the actual volume number (ex: "1") from step 3 above for the drive you want to change the drive letter of. - For example:
select volume 16
- Type the command below into Windows Terminal (Admin), and press Enter:
assign letter=<new drive letter>- Substitute
<new drive letter>in the command above with the actual new drive letter (ex: "F") you want to assign to this drive. - For example:
assign letter=F - If the new drive letter you assigned is not available, you will get an error message in Windows Terminal (Admin). You will just need to repeat this step to assign an available drive letter.
- You can now close Windows Terminal (Admin) if you like.
Option Four
Change Drive Letter using "Set-Partition" Command
You can change drive letter using Set-Partition command in PowerShell by running a quick cmdlet with your current and new drive letters. This script-friendly method is ideal if you want to manage storage partitions quickly using modern Windows PowerShell commands.- Open Windows Terminal (Admin), and select Windows PowerShell. [Admin Required]
- Copy and paste the following into Windows Terminal (Admin), and press Enter:
Get-Partition
- Make note of the current drive letter (ex: "D") of the drive you want to change.
- Type the command below into Windows Terminal (Admin), and press Enter:
Get-Partition -DriveLetter <current drive letter> | Set-Partition -NewDriveLetter <new drive letter>- Substitute
<current drive letter>in the command above with the actual current drive letter (ex: "D") from step 2 above of the drive you want to change. - Substitute
<new drive letter>in the command above with the actual new drive letter (ex: "F") you want to assign to the drive. - For example:
Get-Partition -DriveLetter D | Set-Partition -NewDriveLetter F - If the new drive letter you assign is not available, you will get an error message in Windows Terminal (Admin). You will just need to repeat this step to assign an available drive letter.
- You can now close Windows Terminal (Admin) if you like.
Option Five
Change Drive Letter in Registry Editor
You can change drive letter in Registry Editor by locating the mounted devices key and renaming the binary value for your specific drive. This advanced method should only be used if standard tools fail, as making mistakes in the registry can cause system errors.- Open Registry Editor (
regedit.exe). [Admin Required] - Navigate to the key below in the left pane of Registry Editor:
HKEY_LOCAL_MACHINE\SYSTEM\MountedDevices
- In the right pane of the MountedDevices key, right click or press and hold on the binary (REG_BINARY) value (ex: "\DosDevices\D:") for the drive letter (ex: "D") of the drive you want to change, and click/tap on Rename.
- Rename only the drive letter part of the binary (REG_BINARY) value (ex: "\DosDevices\D:") name with an available drive letter (ex: "\DosDevices\F:") you want for the drive instead, and press Enter to apply.
- If another drive is currently assigned the drive letter you want to assign to this drive, then you will need to change the drive letter of the other drive first.
- When finished, close Registry Editor.
Summary
Changing a drive letter in Windows 11 can be done using Disk Management, the Settings app, command-line tools like diskpart and PowerShell, or the Registry Editor. Each method lets you rename partitions to keep your files organised, but you should always avoid changing the letter of your main system drive.
Was this guide helpful?

About the Author
Richard
Tech Writer, IT Professional
Richard is a writer at Geek Rewind who turns complex IT tasks into clear, step-by-step guides. He draws on years of hands-on experience in system administration and enterprise IT operations, focusing on Windows, Linux and WordPress: the problems people actually run into, and the fixes that work. His server and WordPress guides come from systems he runs himself. Richard builds and maintains the platform behind Geek Rewind, from its Ubuntu servers and Nginx configuration to its custom WordPress plugins. Many new tutorials start with readers' questions, and he's always glad to answer them in the comments.

No comments yet — be the first to share your thoughts!