How to Rename Drive Labels in Windows 11

Renaming drive labels in Windows 11 helps you easily identify your storage devices with custom names.
A drive label is simply a nickname for your disk drives, separate from their usual letters like C: or D:. This makes it much quicker to tell your hard drives, SSDs, or USB drives apart.
For example, you might label your D: drive “Projects” so you immediately know where to find your work files.
This simple change makes managing your storage much clearer without affecting any of your files or programs.
To rename a drive label in Windows 11, open File Explorer, right-click the desired drive, select Rename, type the new name, and press Enter. Administrator privileges may be required.
Renaming a drive using File Explorer
Renaming a drive label in Windows 11 using File Explorer is quite simple. Locate the drive you wish to rename. Right-click it and choose ‘Rename,’ or press F2. Enter your new name and press Enter. If a permission window appears, click ‘Continue.’
- Open File Explorer by pressing the ⊞ Win+E keys on your keyboard.
- Find the drive you want to rename.
- Right-click the drive and select Rename, or press F2.
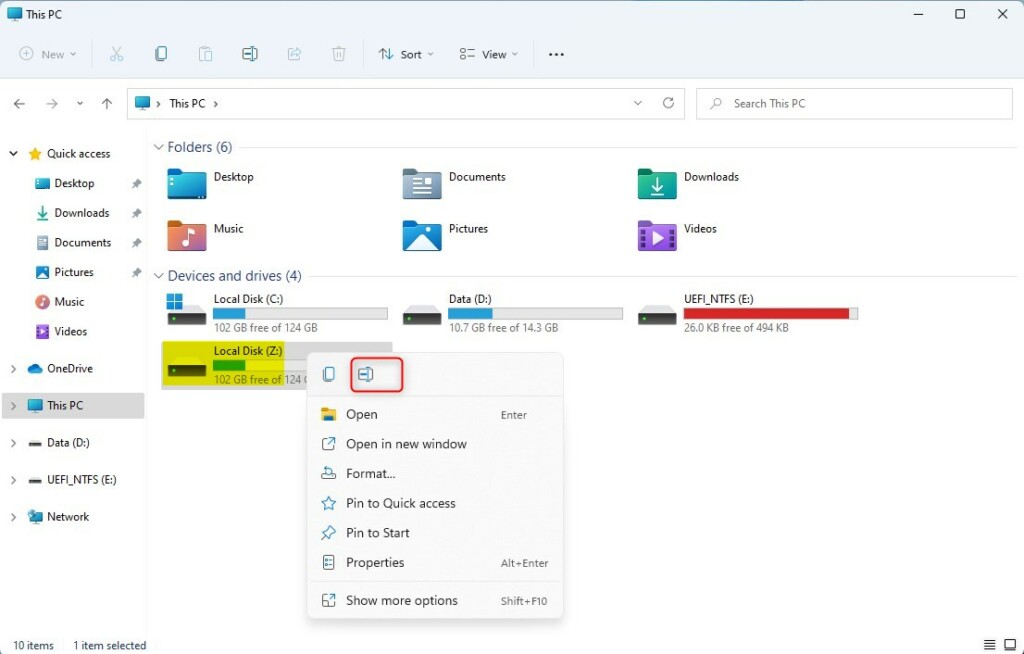
- Type your new name and press Enter.

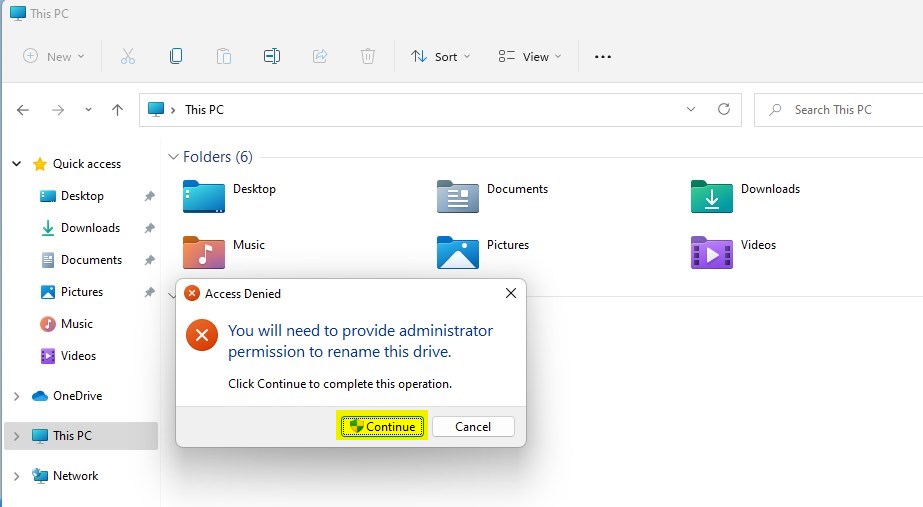
- If a window pops up asking for permission, click Continue. Note: This step requires administrator privileges.
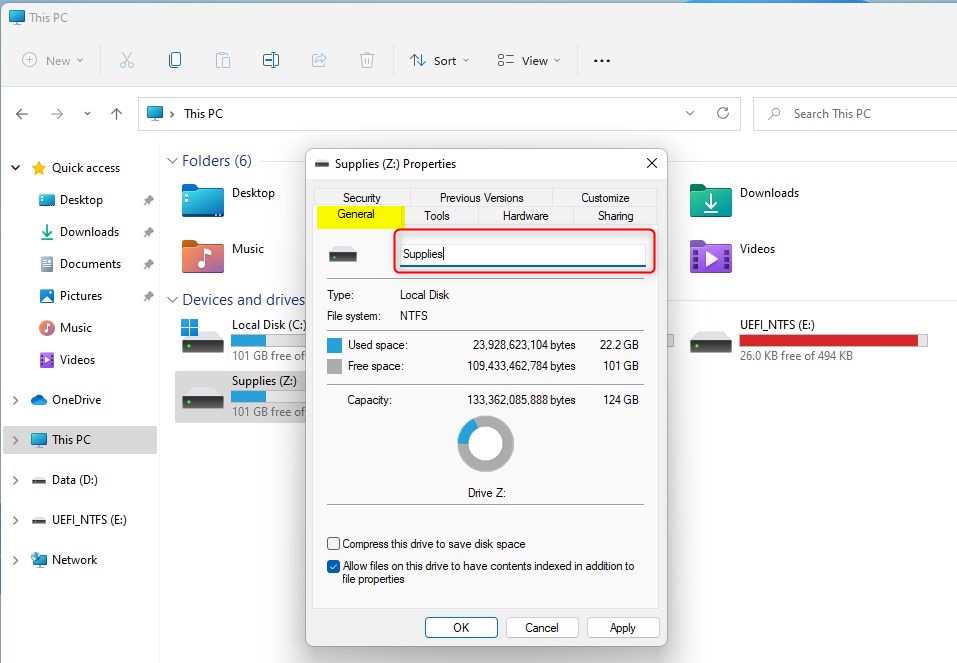
Alternatively, right-click the drive and select Properties. Type a new name under the General tab and click OK.
Renaming a drive using Disk Management
For more granular control, use the Disk Management tool.
- Right-click the Start button and select Disk Management.
- Right-click the volume you wish to rename.
- Select Properties.
- Under the General tab, type the new name in the box.
- Click Apply and then OK.
Renaming a drive using Command Prompt
For those comfortable with advanced tools, the `label` command offers another way to rename drives.
- Press ⊞ Win+S, type cmd, and select Run as administrator. (Requires administrator privileges)
- Type the following command and press Enter:
label D: NewName(Replace D: with your drive letter and NewName with your desired label).
Troubleshooting
If you cannot rename a drive, check these items: 1. Do you have administrator privileges? 2. Is the drive read-only or write-protected? 3. Is the drive currently in use by another program? If you receive an ‘Access Denied’ error, ensure you are running your tools as an administrator.
Summary
Renaming drive labels in Windows 11 helps keep your files organized. You can accomplish this using File Explorer, Disk Management, or Command Prompt.
Can I rename my C: drive?
Yes, you can rename your C: drive label. However, be careful not to change the drive letter itself. Renaming the label is purely cosmetic and will not affect your operating system or installed applications. Always ensure you have administrator privileges before making changes to system drives.
What is the character limit for a drive label?
The limit depends on your file system. NTFS drives support up to 32 characters. Older FAT32 drives are limited to 11 characters. If you go over these limits, Windows will either shorten the name automatically or stop you from saving it. Stick to simple alphanumeric characters for the best compatibility.
Was this guide helpful?

About the Author
Richard
Tech Writer, IT Professional
Richard, a writer for Geek Rewind, is a tech enthusiast who loves breaking down complex IT topics into simple, easy-to-understand ideas. With years of hands-on experience in system administration and enterprise IT operations, he’s developed a knack for offering practical tips and solutions. Richard aims to make technology more accessible and actionable. He's deeply committed to the Geek Rewind community, always ready to answer questions and engage in discussions.


[…] the next window, type in a Label (what you want to call the partition), choose a Drive letter, File System, and click the Format […]
[…] the drive a name name (label) you like (example: “My […]