How to Turn On or off AutoPlay in Windows 11

AutoPlay in Windows 11 opens folders or starts apps automatically the moment you plug in a USB drive, phone, or camera. It tells your PC what to do with new removable devices, so you do not have to pick an app every time.
You can turn AutoPlay on or off in under a minute from the Settings app. The Control Panel and the Registry Editor also work, and this guide covers all three. Turning it off stops pop-ups every time you plug in a thumb drive. Turning it on makes it quick to see photos as soon as you connect a camera or memory card. The steps are the same on Windows 11 Home and Pro.
Open Settings , click Bluetooth & devices, scroll down and click AutoPlay, then set the switch next to Use AutoPlay for all media and devices to On or Off. The change applies immediately with no restart.
What is AutoPlay?
AutoPlay is the feature that handles removable drives and media the moment you plug them in. It decides what your Windows 11 PC does when you connect a USB flash drive, phone, camera, or memory card. Depending on how you set it up, it can open a folder to view files, launch an app, ask you what to do, or do nothing at all.
Here is what AutoPlay can do when you connect a device:
- Play media automatically (like music or videos), using your default player.
- Show a menu asking what you want to do, so you choose each time.
- Show a list of apps you can use if the device has mixed files, such as photos and documents on the same card.
- Open the device folder in File Explorer so you can see all files.
- Do nothing, if you told it not to. The drive still appears in File Explorer , so you can open it yourself.
Nothing is broken when this happens. The device is still mounted and ready to use from File Explorer .
Tip: Holding the Shift key while you connect a device (or insert a disc) tells Windows to skip AutoPlay for that one connection. This is handy when you want a quick exception without changing your settings. Release Shift once the device has been recognized. Correction to the earlier wording: Shift suppresses the AutoPlay action. It does not force the menu to appear.
How to Turn On or Off AutoPlay in 🪟 Windows 11
Option 1Using Settings
- Press Win + I to open Settings. The Settings window opens with a list of categories on the left.
- Click Bluetooth & devices in the left menu. The device options for your PC appear on the right.
- Scroll down on the right side and click AutoPlay. The AutoPlay page opens.
- Set the switch next to Use AutoPlay for all media and devices to On or Off. The change applies right away, with no Save button and no restart.
- If you turned it on, use the options under Choose AutoPlay defaults to pick what happens for each device and media type, such as Removable drive and Memory card. Typical choices are to open the folder to view files, take no action, or ask you every time. To undo any of this, flip the switch back.
The Settings app is the simplest way to turn AutoPlay on or off in Windows 11. It lets you control whether your computer reacts to new hardware by itself or waits for you to choose an action. If you turn the main switch off, the per-device options below it are hidden or greyed out, because they no longer apply.
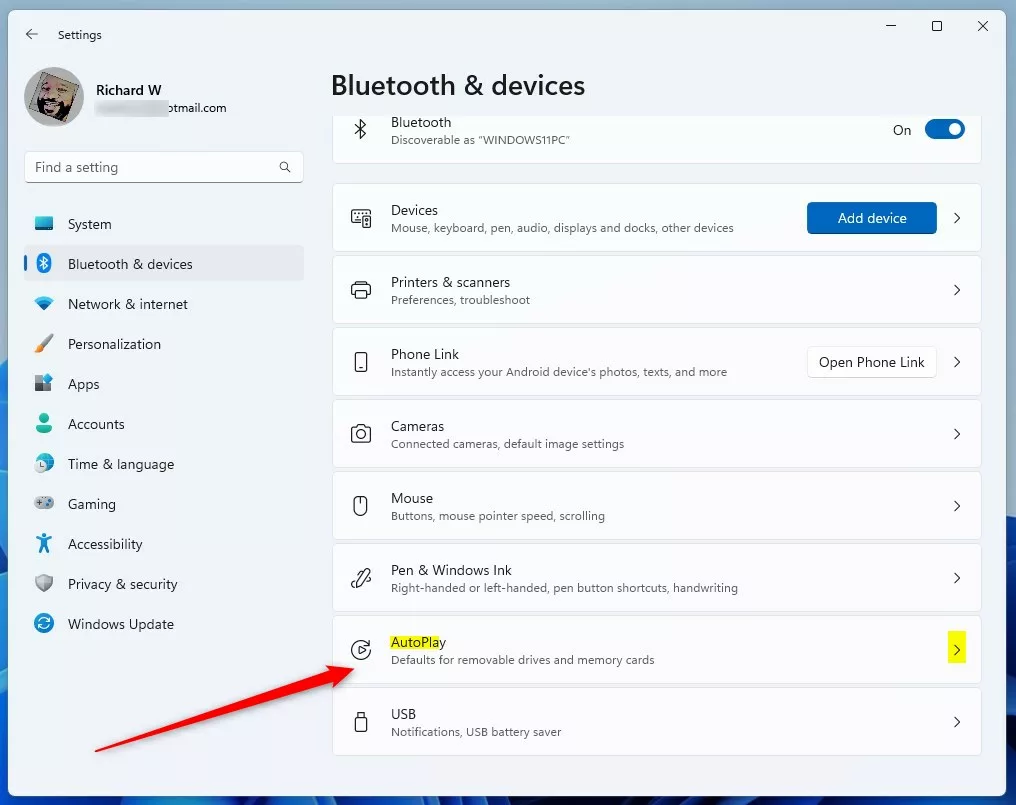
After you open the AutoPlay page, you should see a single switch at the top of the page, with the default choices for each device type underneath it.
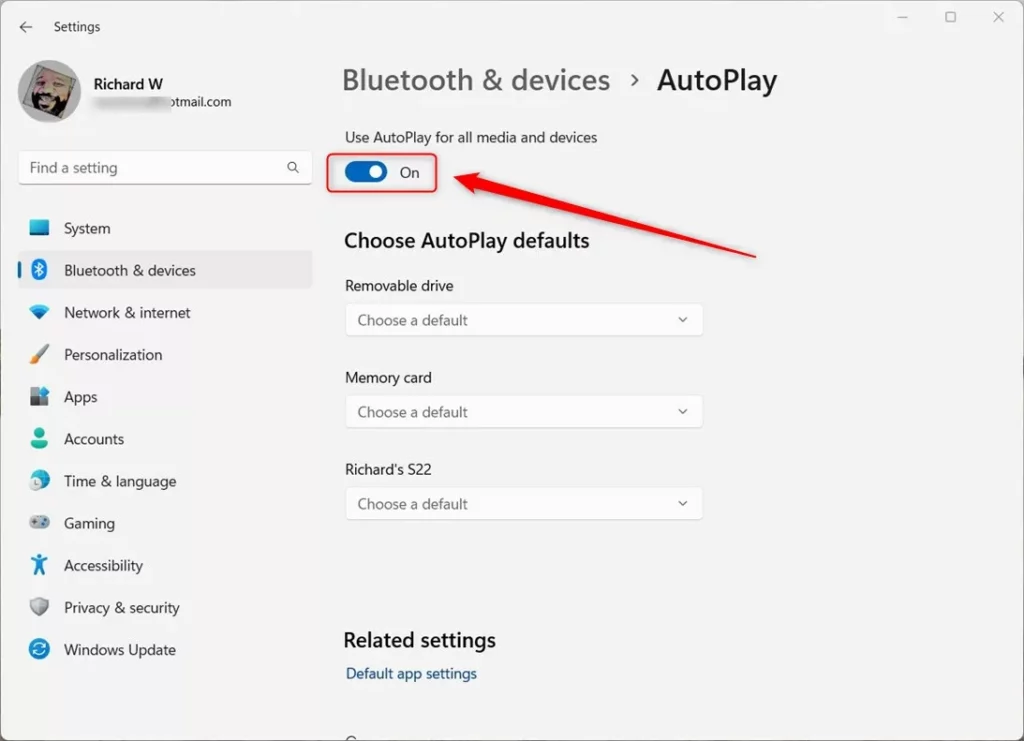
Once the switch is set the way you want, close Settings. To test it, plug in a USB drive. With AutoPlay off, nothing should pop up and the drive just appears in File Explorer.
Option 2Using Control Panel
- Open the Control Panel. Click Start, type "Control Panel", and select it from the results.
- Set View by (top right) to Large icons or Small icons. In the default Category view, AutoPlay is tucked under Hardware and Sound, so the icon view is quicker.
- Click AutoPlay. The AutoPlay window opens.
- Select the Use AutoPlay for all media and devices checkbox to turn AutoPlay on, or clear it to turn it off.
- If AutoPlay is on, use the drop-down list next to each device or media type to select a default action. If the lists are greyed out, the main checkbox is cleared.
- Click Save at the bottom of the window when you finish. Nothing is applied until you do. To undo your choices later, open this window again and change them, or use the Reset all defaults button.
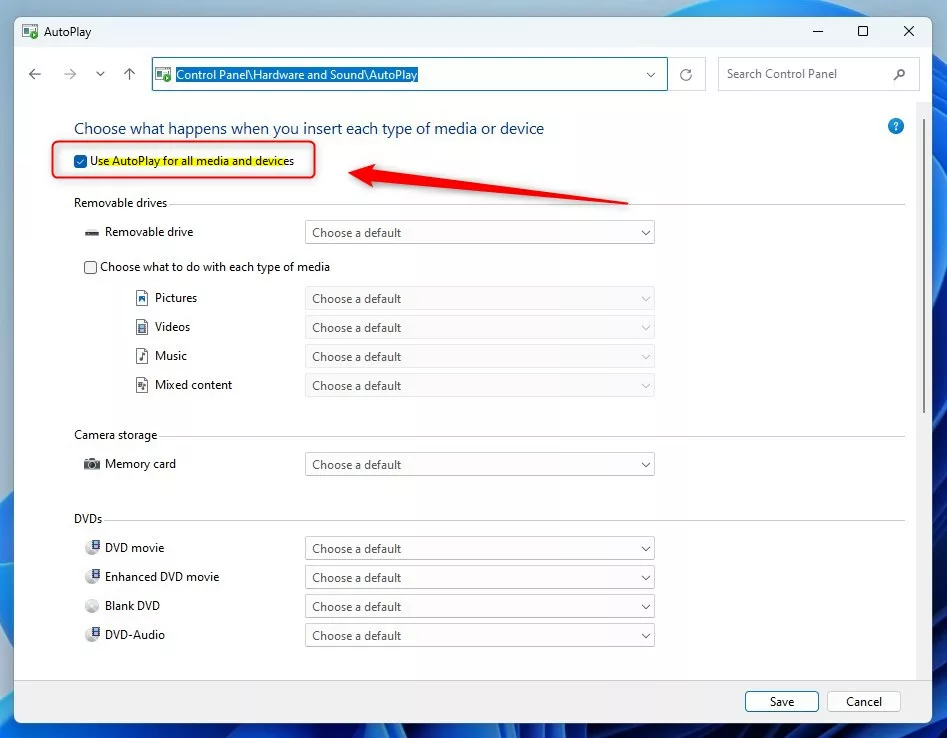
The classic Control Panel is useful if you prefer traditional system menus over the modern Settings app. It gives you a full checklist for every type of media and connected device, so you can set a different action for each one in a single window. Both methods control the same feature, so a change made in one is normally reflected in the other.
Option 3Using Registry (For Advanced Users)
Use it if the normal menus do not work, for example when a policy or a cleanup tool has left the AutoPlay page broken, or when you want to apply the change on several PCs. This advanced method forces the feature on or off using ready-made registry code. Before you start, create a restore point or export the relevant key, because a wrong registry edit can cause problems. You also need to be signed in with an administrator account.
Turn On AutoPlay (default):
reg delete "HKCU\Software\Microsoft\Windows\CurrentVersion\Explorer\AutoplayHandlers" /v DisableAutoplay /fTurn Off AutoPlay:
reg add "HKCU\Software\Microsoft\Windows\CurrentVersion\Explorer\AutoplayHandlers" /v DisableAutoplay /t REG_DWORD /d 1 /fOnce you have run these commands and the change is merged, the source .reg file can be safely deleted afterward. Sign out and back in, or restart, if the new behavior does not show up straight away. To reverse the change, run the "Turn On AutoPlay (default)" version.
Summary
- Easy to customize: Pick what happens when you connect different devices, such as drives, memory cards, and phones.
- Multiple ways to change settings: Use Settings, Control Panel, or the Registry, depending on what is available to you.
- Full control: Turn AutoPlay on or off anytime to suit your needs, and reverse it just as easily.
- Save time: AutoPlay can open your favorite apps automatically, so you skip a few clicks every time you connect a device.
Managing AutoPlay in Windows 11 is a simple way to control how your computer handles new hardware and removable media. You can switch the feature on or off at any time using whichever method you find easiest. For most people the Settings app is the quickest. Keep the Control Panel and Registry methods in mind for the times when Settings is not an option.
Was this guide helpful?

About the Author
Richard
Tech Writer, IT Professional
Richard is a writer at Geek Rewind who turns complex IT tasks into clear, step-by-step guides. He draws on years of hands-on experience in system administration and enterprise IT operations, focusing on Windows, Linux and WordPress: the problems people actually run into, and the fixes that work. His server and WordPress guides come from systems he runs himself. Richard builds and maintains the platform behind Geek Rewind, from its Ubuntu servers and Nginx configuration to its custom WordPress plugins. Many new tutorials start with readers' questions, and he's always glad to answer them in the comments.




No comments yet — be the first to share your thoughts!