Manage Recent Media Settings in Windows 11 Media Player


This tutorial shows how to stop Media Player in Windows 11 from remembering what you played. The app keeps a list of recently played songs and videos and shows it on the Home screen, so you can pick up where you left off. By default it stores up to 20 recent items.
That list is handy on a PC only you use. If other people share your computer, it also shows them what you have been watching and listening to. Turning off the history stops Media Player from saving new items. The setting takes a minute to change, and you can switch it back on whenever you like.
To manage recent media in Windows 11 Media Player, open the app, click the Settings icon on the left sidebar, scroll down to the Privacy section, and turn off the Remember recent media toggle. Media Player then stops saving new items to the recent list on the Home screen. The change takes effect straight away, and you can switch the toggle back on at any time.
How to hide your recent media history
The quickest way to hide your recent media is the privacy option in the app’s settings. Once you turn it off, Media Player stops showing recently played songs and videos on the Home screen. Anyone else who opens the app on your PC will not see your playback activity.
The setting applies to your own Windows user account.
- Click the Settings button located on the left sidebar of the app.
- Open Media Player from the Start menu . You should see the Home screen, with your recent items listed if you have played anything lately.
- Click the Settings icon on the left sidebar. The Settings page opens in the main window.
- Scroll down to the Privacy section.
- Turn off the toggle next to Remember recent media. The toggle should now read Off.
You do not need to restart the app or the PC. If you cannot find the Privacy section or the toggle, your version of the app may be out of date. Open the Microsoft Store, check for updates to Media Player, and try again.

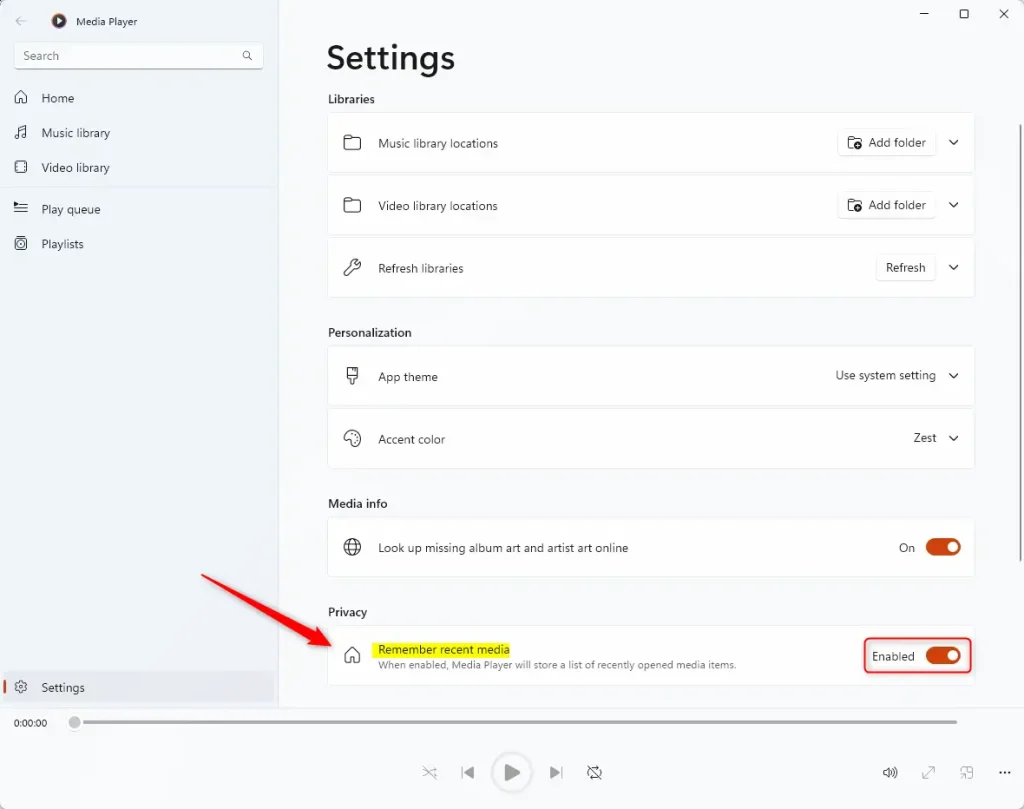
The Privacy section sits near the bottom of the Settings page, so you have to scroll down to reach it. The toggle labeled Remember recent media must be set to Off for the app to stop tracking what you play.
That is all you need to do to hide your recently opened items. Go back to the Home screen to check. Items you play from now on should no longer be added to the recent list.
To undo the change, return to the same Settings page and switch the toggle back to On. Media Player will then start saving your recent items again.
Summary
Turning off Remember recent media is a simple way to keep your viewing and listening habits private. Your past files stop appearing on the Home page, and you decide whether the history is kept at all. The setting only affects the recent list. It does not delete the songs or videos themselves from your PC.
How to hide your recent media history
Have a question about this guide?
Answered by AI from this guide. Good questions may be added to this page — please don't include personal details.
Did this guide fix your problem?

About the Author
Richard
Tech Writer, IT Professional
Richard is a writer at Geek Rewind who turns complex IT tasks into clear, step-by-step guides. He draws on years of hands-on experience in system administration and enterprise IT operations, focusing on Windows, Linux and WordPress: the problems people actually run into, and the fixes that work. His server and WordPress guides come from systems he runs himself. Richard builds and maintains the platform behind Geek Rewind, from its Ubuntu servers and Nginx configuration to its custom WordPress plugins. Many new tutorials start with readers' questions, and he's always glad to answer them in the comments.
No comments yet — be the first to share your thoughts!