How to Reset AutoPlay Settings in Windows 11
You reset your AutoPlay settings in Windows 11 by going to Settings > Bluetooth & devices > AutoPlay and clicking “Reset all AutoPlay settings to default.” AutoPlay is a Windows feature that automatically determines what happens when you connect a storage device like a USB drive or SD card to your PC.
This setting lets you decide whether your PC should open a folder, import photos, play media, or do nothing at all when you plug something in. It’s particularly useful for managing how your computer interacts with removable media.
Resetting AutoPlay settings to original defaults fixes device recognition problems and unwanted app openings. This quick process, under 5 minutes, ensures AutoPlay works correctly in Windows 11.
Open Control Panel, go to Hardware and Sound, then click AutoPlay. Select “Reset all defaults” at the bottom and click Save. This restores AutoPlay to its original settings.
Why reset AutoPlay?
You should reset AutoPlay in Windows 11 if your devices aren’t working correctly or if you want to choose different apps to open them. Resetting clears out old choices, letting you start fresh with how Windows handles things like USB drives and cameras.
What happens when done?
How to reset AutoPlay in 🪟 Windows 11
Resetting AutoPlay in Windows 11 to its default settings is simple and done through the Control Panel. You can find the AutoPlay option under Hardware and Sound to select new default actions for your devices like cameras and music players.
- Open the Control Panel by searching for it in the Start menu.
- Select the Hardware and Sound group.
- Click on AutoPlay.
- At the bottom of the window, click the Reset all defaults button.
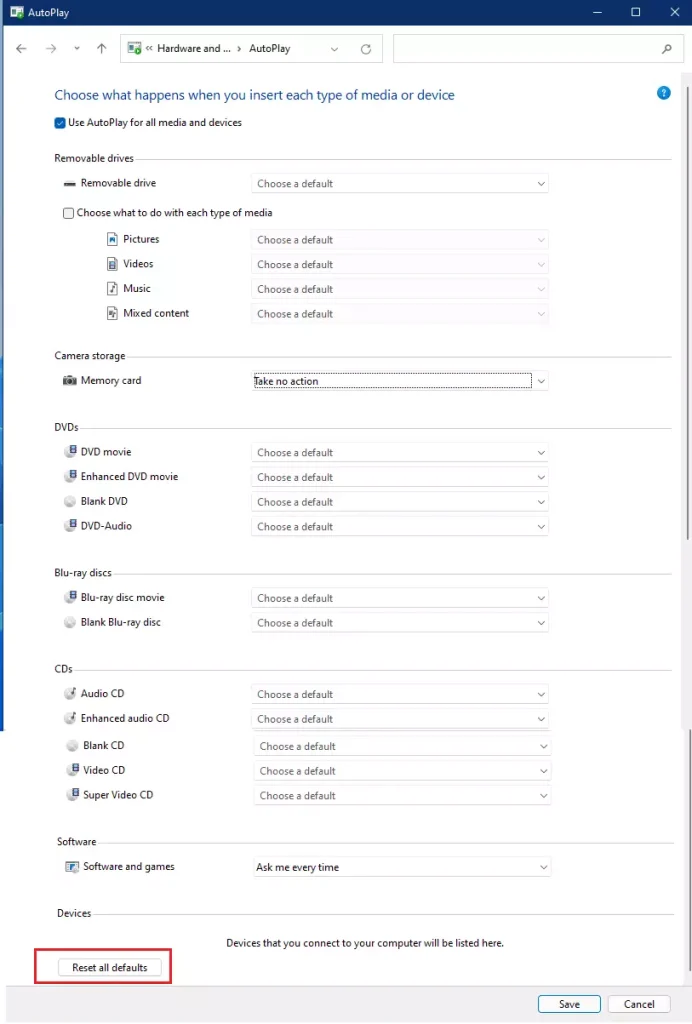
Click the Save button to finish. Your settings are now reset.
Troubleshooting AutoPlay failures
AutoPlay problems with a specific USB drive or device often have simple fixes. Trying a different USB port or updating device drivers, which are small programs that help Windows communicate with hardware, can solve many AutoPlay issues.
Checking Shell Hardware Detection
The Shell Hardware Detection service is crucial for AutoPlay to work in Windows 11, as it tells Windows when a new device connects. If the Shell Hardware Detection service is not running, AutoPlay might not appear. Checking the Shell Hardware Detection service's status is an important troubleshooting step.
- Press ⊞ Win+R, type services.msc, and hit Enter.
- Scroll down to find Shell Hardware Detection.
- Right-click it and select Properties.
- Ensure the Startup type is set to Automatic.
- If the service is stopped, click Start.
Advanced Registry and Policy Fixes
Advanced users can reset AutoPlay settings in Windows 11 using the Registry Editor or Group Policy Editor by directly changing system settings. Be very careful when using these tools, as incorrect changes can affect how Windows works. One command to reset AutoPlay handlers is: reg delete “🗝️HKEY_CURRENT_USER\Software\Microsoft\Windows\CurrentVersion\Explorer\AutoplayHandlers” /f
reg delete "HKEY_CURRENT_USER\Software\Microsoft\Windows\CurrentVersion\Explorer\AutoplayHandlers" /fSummary
You can easily reset AutoPlay settings in Windows 11 by opening the Control Panel and selecting your preferred default actions for connected devices. If AutoPlay isn’t working, check the Shell Hardware Detection service and update device drivers. Click ‘Reset all defaults’ in the Control Panel to clear custom choices.- Access Control Panel: Navigate to the Control Panel to find your AutoPlay settings.
- Reset to Defaults: Click the “Reset all defaults” button to clear your custom choices.
- Check Services: Ensure the Shell Hardware Detection service is running if AutoPlay fails.
- Update Drivers: Reinstall USB drivers via Device Manager to fix connection issues.
- Immediate Effect: Your computer will now prompt you for actions when you connect new devices, just like when it was new.
Why is my AutoPlay option missing in 🪟 Windows 11 settings?
The AutoPlay option may be missing due to a corrupted system file or a disabled Shell Hardware Detection service. You can often restore it by running the System File Checker tool or by ensuring the required background services are enabled in the Windows Services console.
Was this guide helpful?

About the Author
Richard
Tech Writer, IT Professional
Richard, a writer for Geek Rewind, is a tech enthusiast who loves breaking down complex IT topics into simple, easy-to-understand ideas. With years of hands-on experience in system administration and enterprise IT operations, he’s developed a knack for offering practical tips and solutions. Richard aims to make technology more accessible and actionable. He's deeply committed to the Geek Rewind community, always ready to answer questions and engage in discussions.


No comments yet — be the first to share your thoughts!