How to Assign Apps Shortcut Key in Windows 11

| Press this key | Assigned Shortcut Key |
|---|---|
| Numbers 0-9 from top of keyboard | Ctrl + Alt + <number> |
| Numbers 0-9 or characters / * – + . on numpad | Num <number or character> |
| Letters A-Z | Ctrl + Alt + <letter> |
| Character keys ` ~ @ # $ % ^ & ( ) = + [ ] { } | ; : , ‘ “ . < > / ? | Ctrl + Alt + <character key> |
| Up, Down, Left, or Right arrow keys | Ctrl + Alt + <arrow key> |
| Function keys F1-F12 | <function key> |
A custom keyboard shortcut lets you open a desktop app by pressing a key combination instead of hunting for its icon. Windows 11 stores the key in the shortcut’s Properties window, so you can set one up for any desktop program without installing anything.
Right-click the app’s desktop shortcut, select Properties, then click the Shortcut key field and press your desired key combination. Click OK to save.
Three rules apply to every method below:
- Windows automatically adds Ctrl + Alt to most letter and number keys. If you press T in the Shortcut key field, you get Ctrl+Alt+T. This prevents clashes with the shortcuts inside your apps.
- The key combination belongs to the shortcut file. If you move that shortcut to a new folder, the combination stops working.
- If you give the same keys to two different apps, the newest assignment wins. Pick a combination you have not used before.
Assign Shortcut Key to Desktop Apps
Use this method when the app already has a shortcut icon on your desktop. It takes about ten seconds.
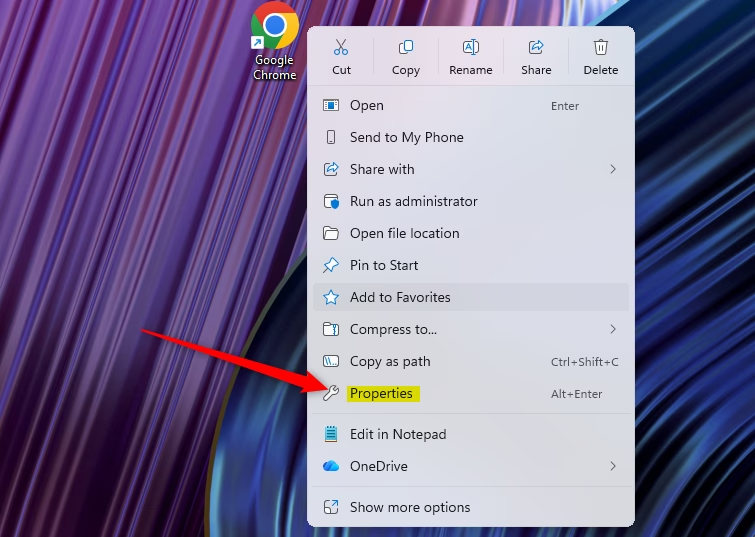
- Right-click the desktop shortcut and select Properties. On Windows 11, the right-click menu is the short one. If you do not see Properties, choose Show more options first. You should now see the Properties window for the shortcut.
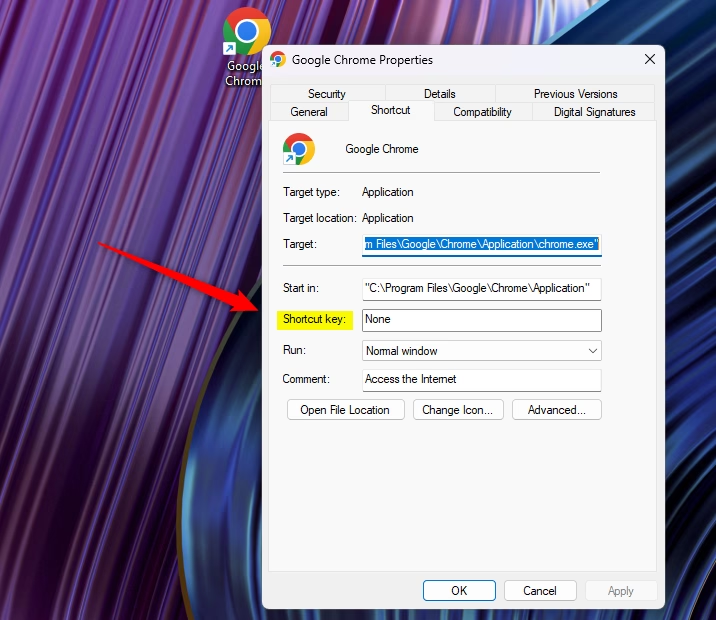
- Open the Shortcut tab and click inside the Shortcut key field. It says None until you set a key.
- Press the key combination you want. Press only the final key, such as T, and Windows fills in Ctrl + Alt for you. The field now shows something like Ctrl+Alt+T.
- Click OK. If Windows asks for administrator permission, approve it.
Press the combination to test it. The app should open. To undo the change, go back to the same field, press Backspace to clear it so it shows None, and click OK. No restart is needed.
Assign Shortcut Key to Taskbar Apps
Store apps do not have an editable shortcut file, so the Shortcut key field is not available for them.
Use this method when the app is pinned to the taskbar and you do not have a desktop icon for it.
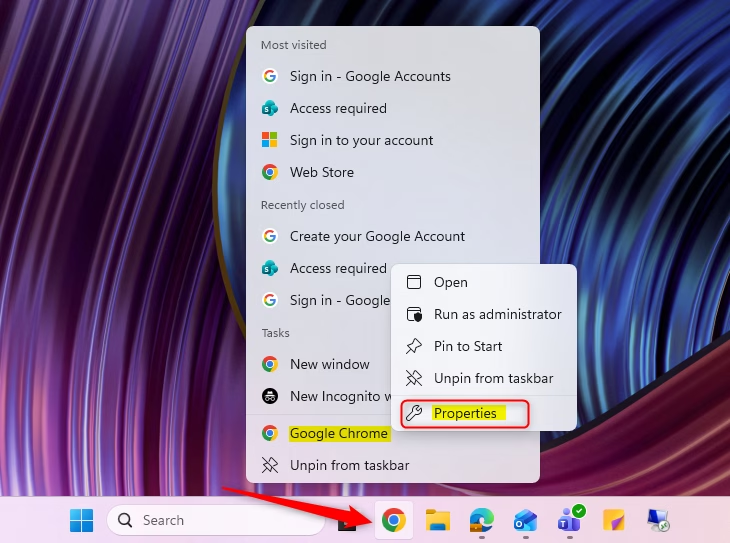
- Hold the Shift key and right-click the app’s taskbar icon. You should see the classic menu for that app. If Properties is not listed, right-click the app name in that menu and select Properties.
- Open the Shortcut tab and click the Shortcut key field.
- Press your keys. The field shows the full combination, including the Ctrl + Alt that Windows adds.
- Click OK.
If the Shortcut tab is missing or the field is greyed out, the app is probably a Store app. Use the Start menu method or PowerToys instead.
Assign Shortcut Key to All Apps List
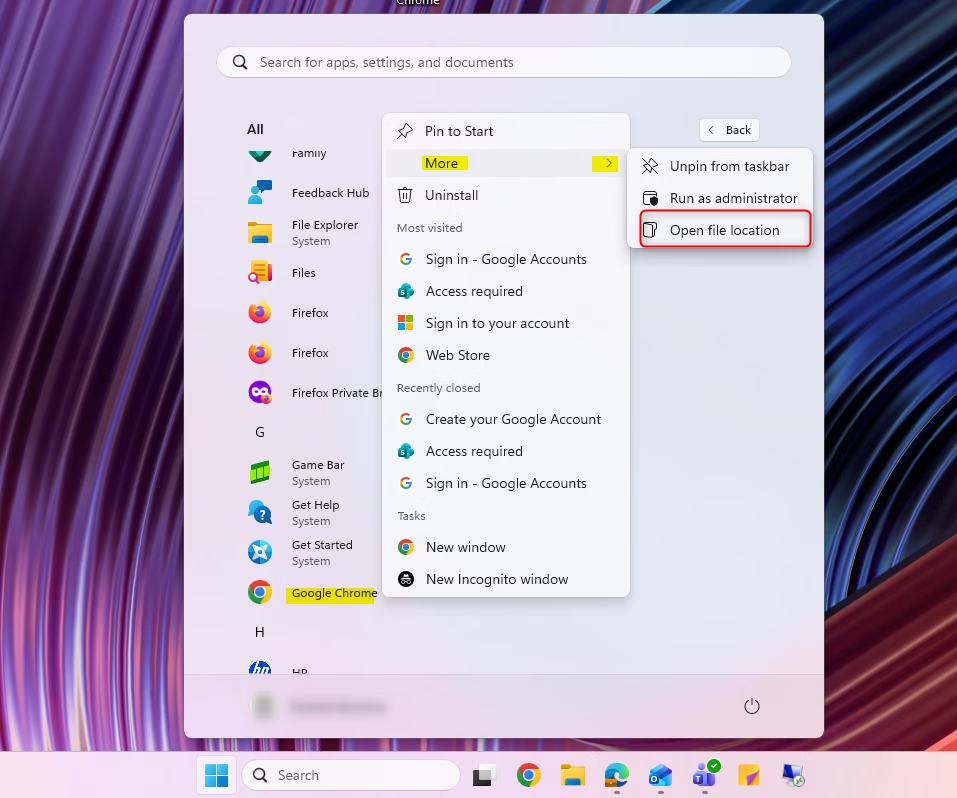
You can also set the key from the Start menu . Windows keeps a real shortcut file for each classic desktop program in a Start menu folder, and you can edit it from there. Open that file location from the All apps list, open its properties, and press your keys in the Shortcut key box.
- Open the Start menu and click the All apps button. You should see the alphabetical list of installed apps.
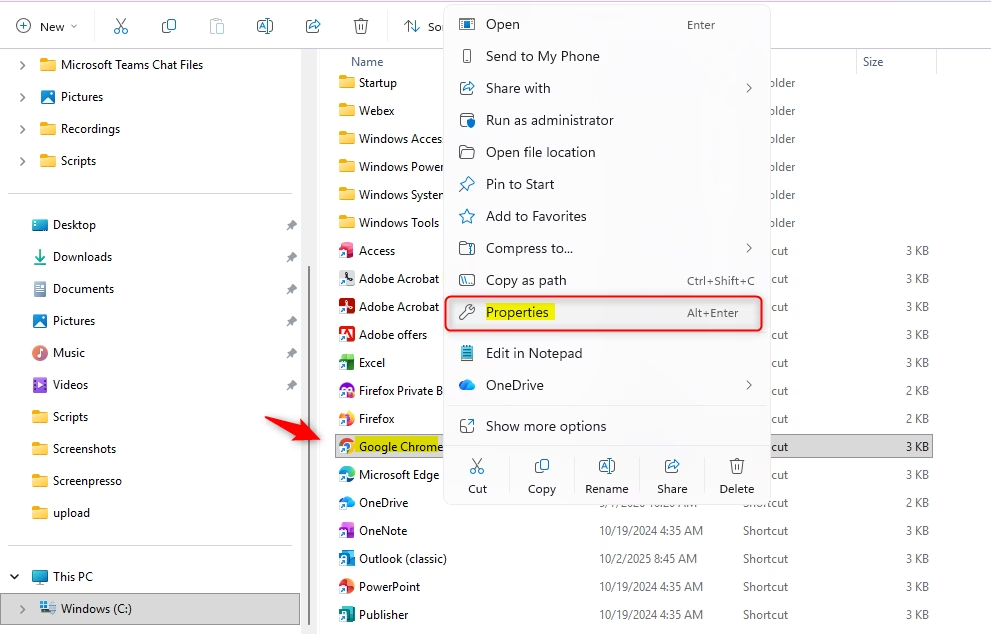
- Right-click your app, hover over More, and select Open file location. A File Explorer window opens with the app’s shortcut selected or listed.
- Right-click the icon in the folder that opens and select Properties.
- Click in the Shortcut key box and press your desired keys.
- Click OK. If Windows asks for administrator permission, approve it, because some Start menu folders are shared by all users.
If Open file location is missing from the More menu, the app is a Microsoft Store app. These have no shortcut file to edit.
Assign Shortcut Key to Start Menu Pinned App
If the app is already pinned to Start, you can skip the All apps list and go straight to its file.
- Open the Start menu . Your pinned apps appear at the top.
- Right-click the pinned app and select Open file location. File Explorer opens on the folder that holds the app’s shortcut.
- Right-click the icon in the folder that opens and select Properties.
- Click in the Shortcut key box and press your desired keys.
- Click OK.
Leave the shortcut in the folder where you edited it. Moving it breaks the key combination.
Using PowerToys Keyboard Manager
Microsoft PowerToys is a free Microsoft tool that you install separately. Its Keyboard Manager can launch an app from a key combination of your choosing, with no desktop icon required. It suits you if you want keys other than Ctrl + Alt, or if you want to launch apps the Properties method cannot handle.
Keyboard Manager must be switched on first. In PowerToys Settings, make sure the Enable Keyboard Manager toggle is on. PowerToys must also be running in the background for the shortcut to work.
- Open PowerToys Settings.
- Select Keyboard Manager in the left pane.
- Click Remap a shortcut. A new window opens.
- Click the + icon to add a new mapping. A blank row appears.
- Choose your trigger keys, then choose the app you want to launch. In current PowerToys versions, you do this by setting the action for the mapping to start an app and entering the program details. The menu labels can differ between PowerToys versions.
- Click OK to save the mapping.
To undo a mapping, open the same window and delete the row. Avoid trigger keys that Windows or your other apps already use.
Taskbar Productivity: Windows + Number Keys
Windows 11 has a built-in way to launch pinned apps, and it needs no setup. Press Win+1 to open the first app on your taskbar , Win+2 for the second, and so on. If the app is already running, the same keys switch to it instead of opening a second copy.
The numbers follow the order of the icons on your taskbar. If you drag icons into a different order, the keys change with them. This is the fastest way to move around your workspace, and it works for Microsoft Store apps as well.
Troubleshooting and Limitations
If a shortcut stops working, check these things in order:
- Make sure the original shortcut file has not been moved, renamed, or deleted. Open its Properties and confirm that the Shortcut key field still shows your combination.
- Check that you did not give the same keys to another app. The newest assignment wins, so the older app loses the combination.
- If the app is a Microsoft Store app, the Properties methods will not work. Use PowerToys or the Windows key + number shortcut.
- If you use PowerToys, confirm that it is running and that Keyboard Manager is enabled.
If you assign a key that Windows already uses, your custom shortcut will usually take priority. Some system keys are reserved, though, so if a combination never works, try a different one.
Reserved Windows Hotkeys to Avoid
| Key Combination | Function |
|---|---|
| Win + D | Show Desktop |
| Win + E | File Explorer |
| Win + L | Lock PC |
Summary
Custom keys for the programs you use most cut down on repetitive clicking. Use the Properties window for standard desktop shortcuts, or PowerToys for advanced remapping and Store apps. Use Windows key + number for anything pinned to the taskbar. Before you rely on a new combination, check that it does not conflict with an existing Windows key or another app.
Have a question about this guide?
Answered by AI from this guide. Good questions may be added to this page — please don't include personal details.
Did this guide fix your problem?

About the Author
Richard
Tech Writer, IT Professional
Richard is a writer at Geek Rewind who turns complex IT tasks into clear, step-by-step guides. He draws on years of hands-on experience in system administration and enterprise IT operations, focusing on Windows, Linux and WordPress: the problems people actually run into, and the fixes that work. His server and WordPress guides come from systems he runs himself. Richard builds and maintains the platform behind Geek Rewind, from its Ubuntu servers and Nginx configuration to its custom WordPress plugins. Many new tutorials start with readers' questions, and he's always glad to answer them in the comments.
No comments yet — be the first to share your thoughts!